Build-Up From the Back: 4-3-3 Press-Resistant Exit
Teach your 4-3-3 to use the goalkeeper, stretch the first press, and break into midfield with clear positional and timing cues.
Equipment Needed
Build-Up From the Back: 4-3-3 Press-Resistant Exit
Overview
This is an 11v11 build-up pattern for a 4-3-3 that gives your team a repeatable way to start attacks from the goalkeeper, draw the first press, and progress through the free player. It is not a call to play short at every opportunity. The objective is to create a first pass, recognise the press, and either play through the next line or use space beyond it. Use it against a high 4-4-2, 4-3-3, or any front line that locks onto the centre-backs.
Use a 100–110 m x 64–75 m regulation pitch for full rehearsal.1 In this 4-3-3, #1 is the extra player; #4/#5 split, #2/#3 provide width, and #6 connects the first and second lines. When the press commits, identify the free player before the ball arrives.
Setup
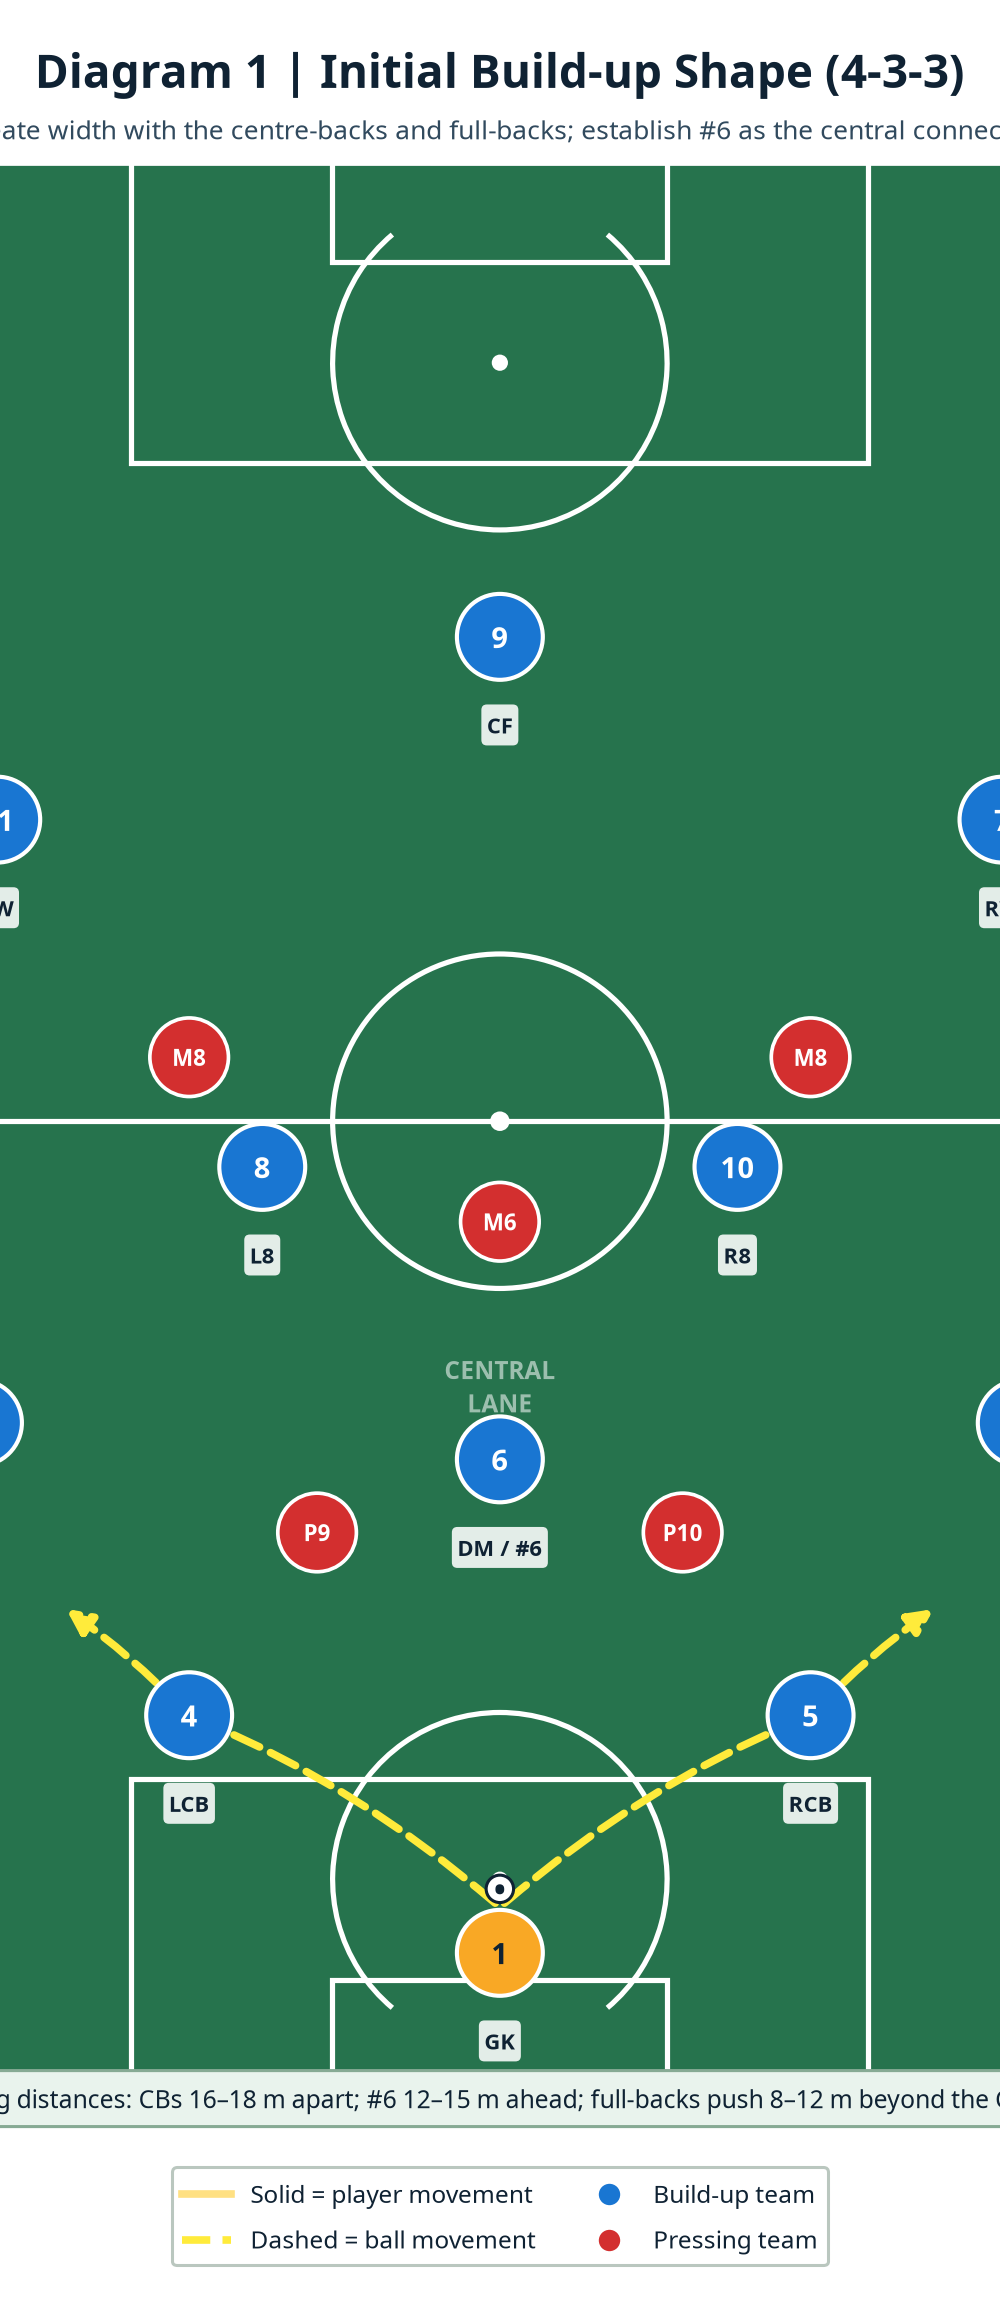
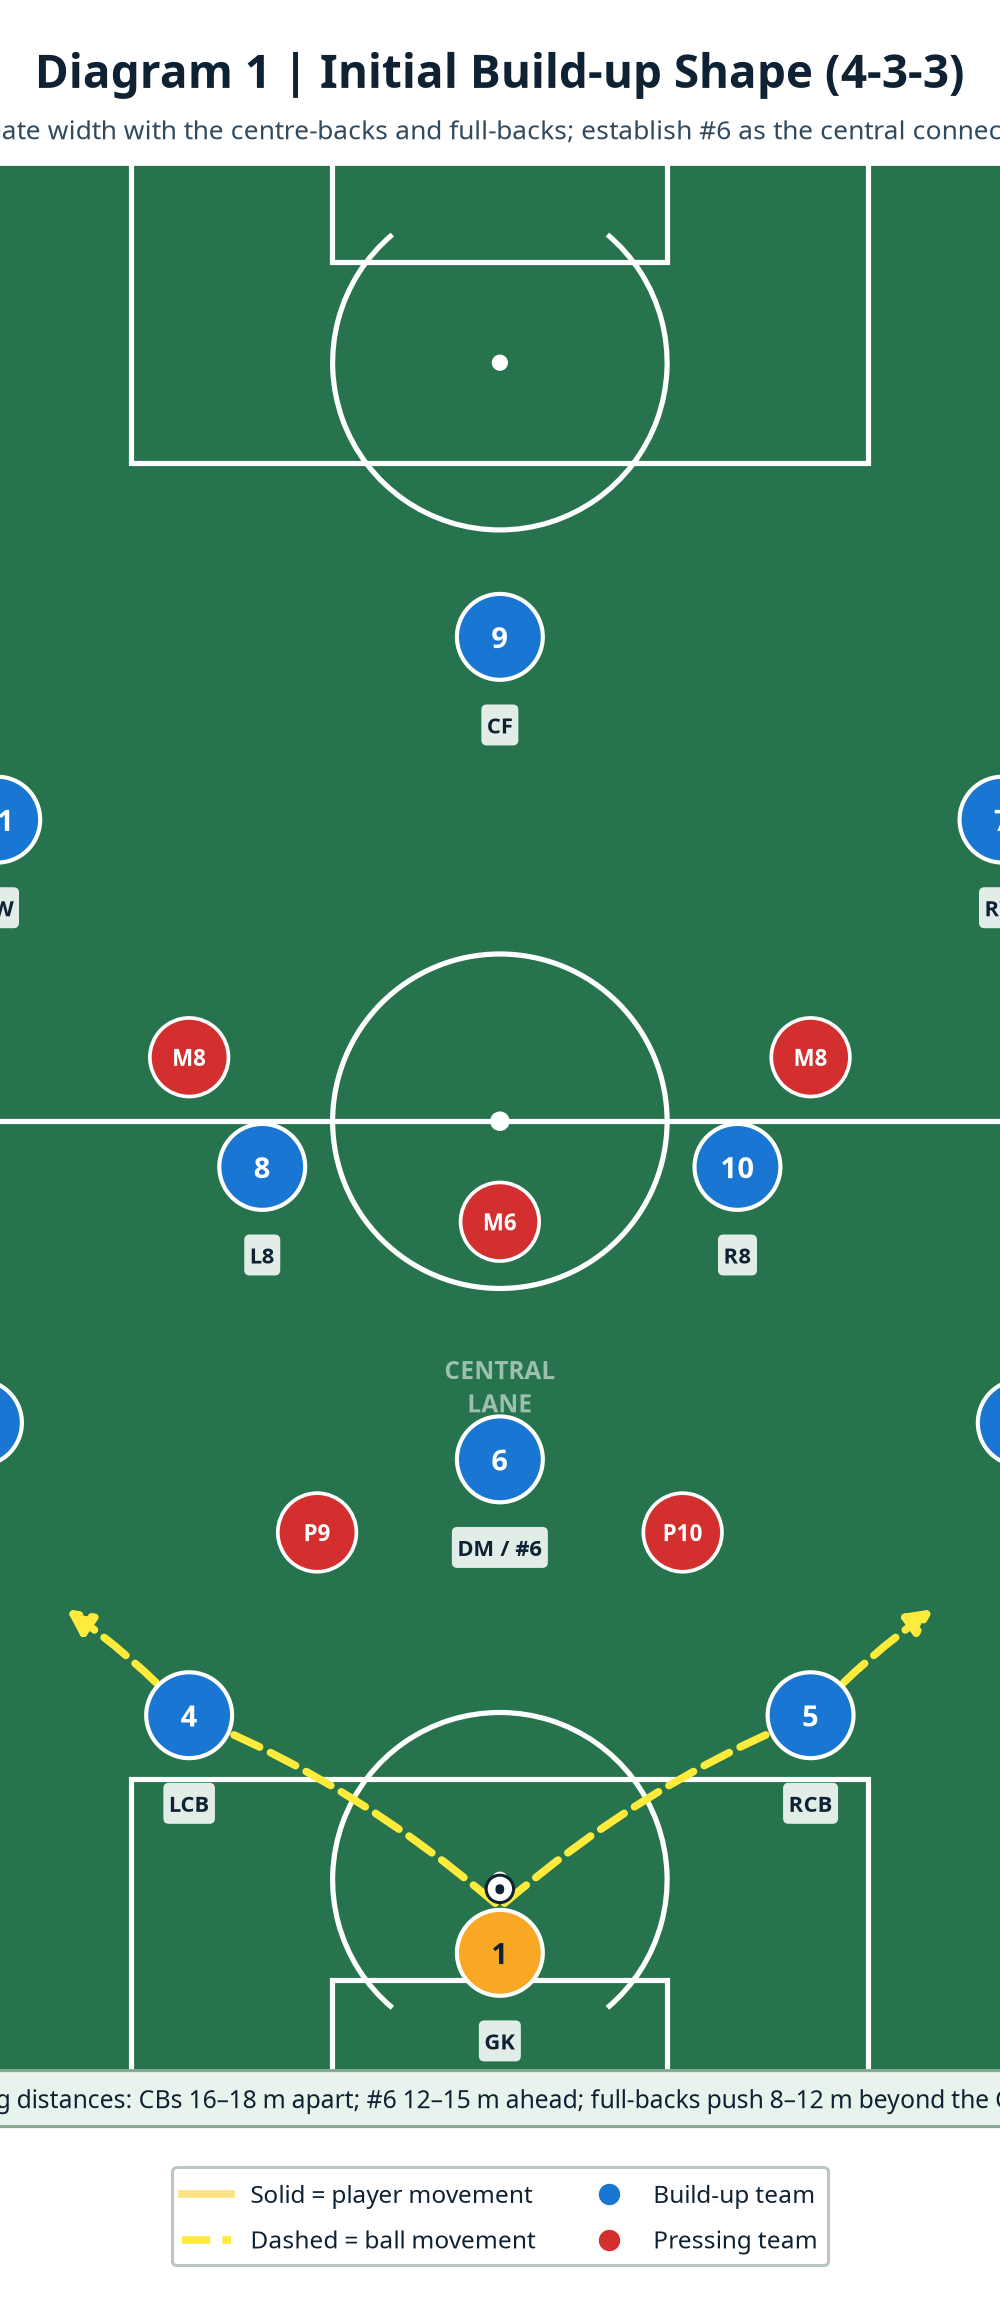
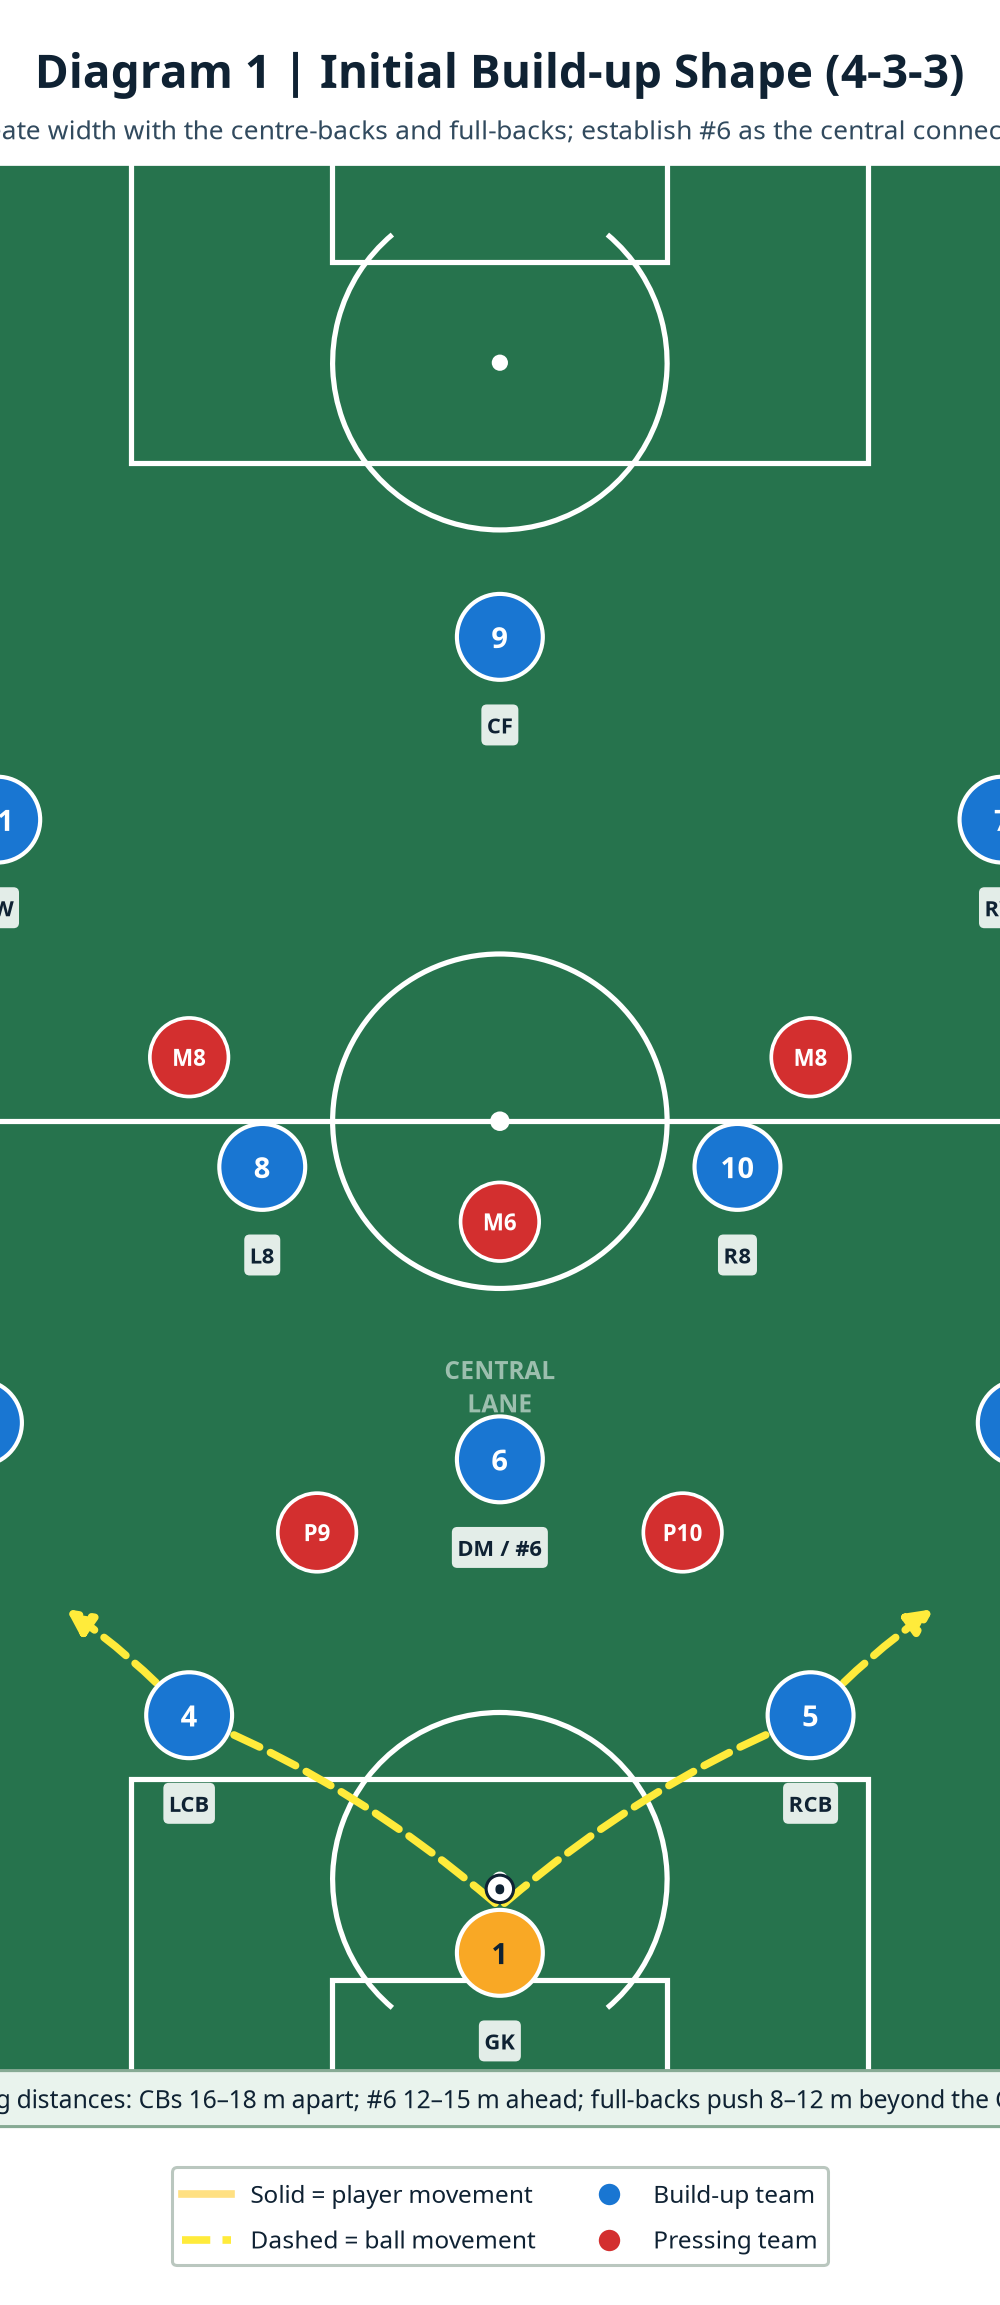
Use 22 players if available: your 11 in blue and an opposition 11 in red. Start every repetition with #1 in the centre of the six-yard box. Position #4 and #5 16–18 m apart and 8–10 m outside the penalty-area line. #2 and #3 begin 8–12 m ahead of the centre-backs and close to the touchlines. #6 starts 12–15 m ahead of the centre-back line; #8 and #10 operate between the opposition midfield and forward lines. #7 and #11 hold the wide channels high, while #9 occupies the two opposition centre-backs.
| Item | Coach setup | Purpose |
|---|---|---|
| Playing area | Full pitch, ideally 105 m x 68 m; score the restart from #1 | Makes the distances and pressing decisions realistic |
| Markers | Flat discs for the three vertical lanes and a cone gate 5 m either side of halfway | Gives players a clear target for the first line break |
| Balls | 10–12 balls with #1 | Keeps the practice moving after an interception or poor restart |
| Teams | 4-3-3 against a 4-4-2 first; change the press later | Lets players see both two-forward and three-forward pictures |
| Work block | 4 x 4 minutes, with 90 seconds for concise coaching | Repeated exposure without slowing the detail |
Step-by-Step Instructions
Set the rest-defence before the restart. #1 checks that #4 and #5 are open on different passing lines. #2 and #3 are not allowed to stand level with their centre-back; they must be high enough to pin the opponent’s wide midfielder. #6 scans both shoulders, then moves only after the opposition striker commits. Demand one clear call from #1: left, right, or switch.
Split and show a receiving angle. On #1’s first touch, #4 and #5 open to a body shape that can receive on the back foot. Their starting distance of 16–18 m must be wide enough to stretch the two pressers but short enough for a firm pass. The non-ball-side centre-back stays connected rather than drifting to the touchline; he is the switch option, not a spectator.
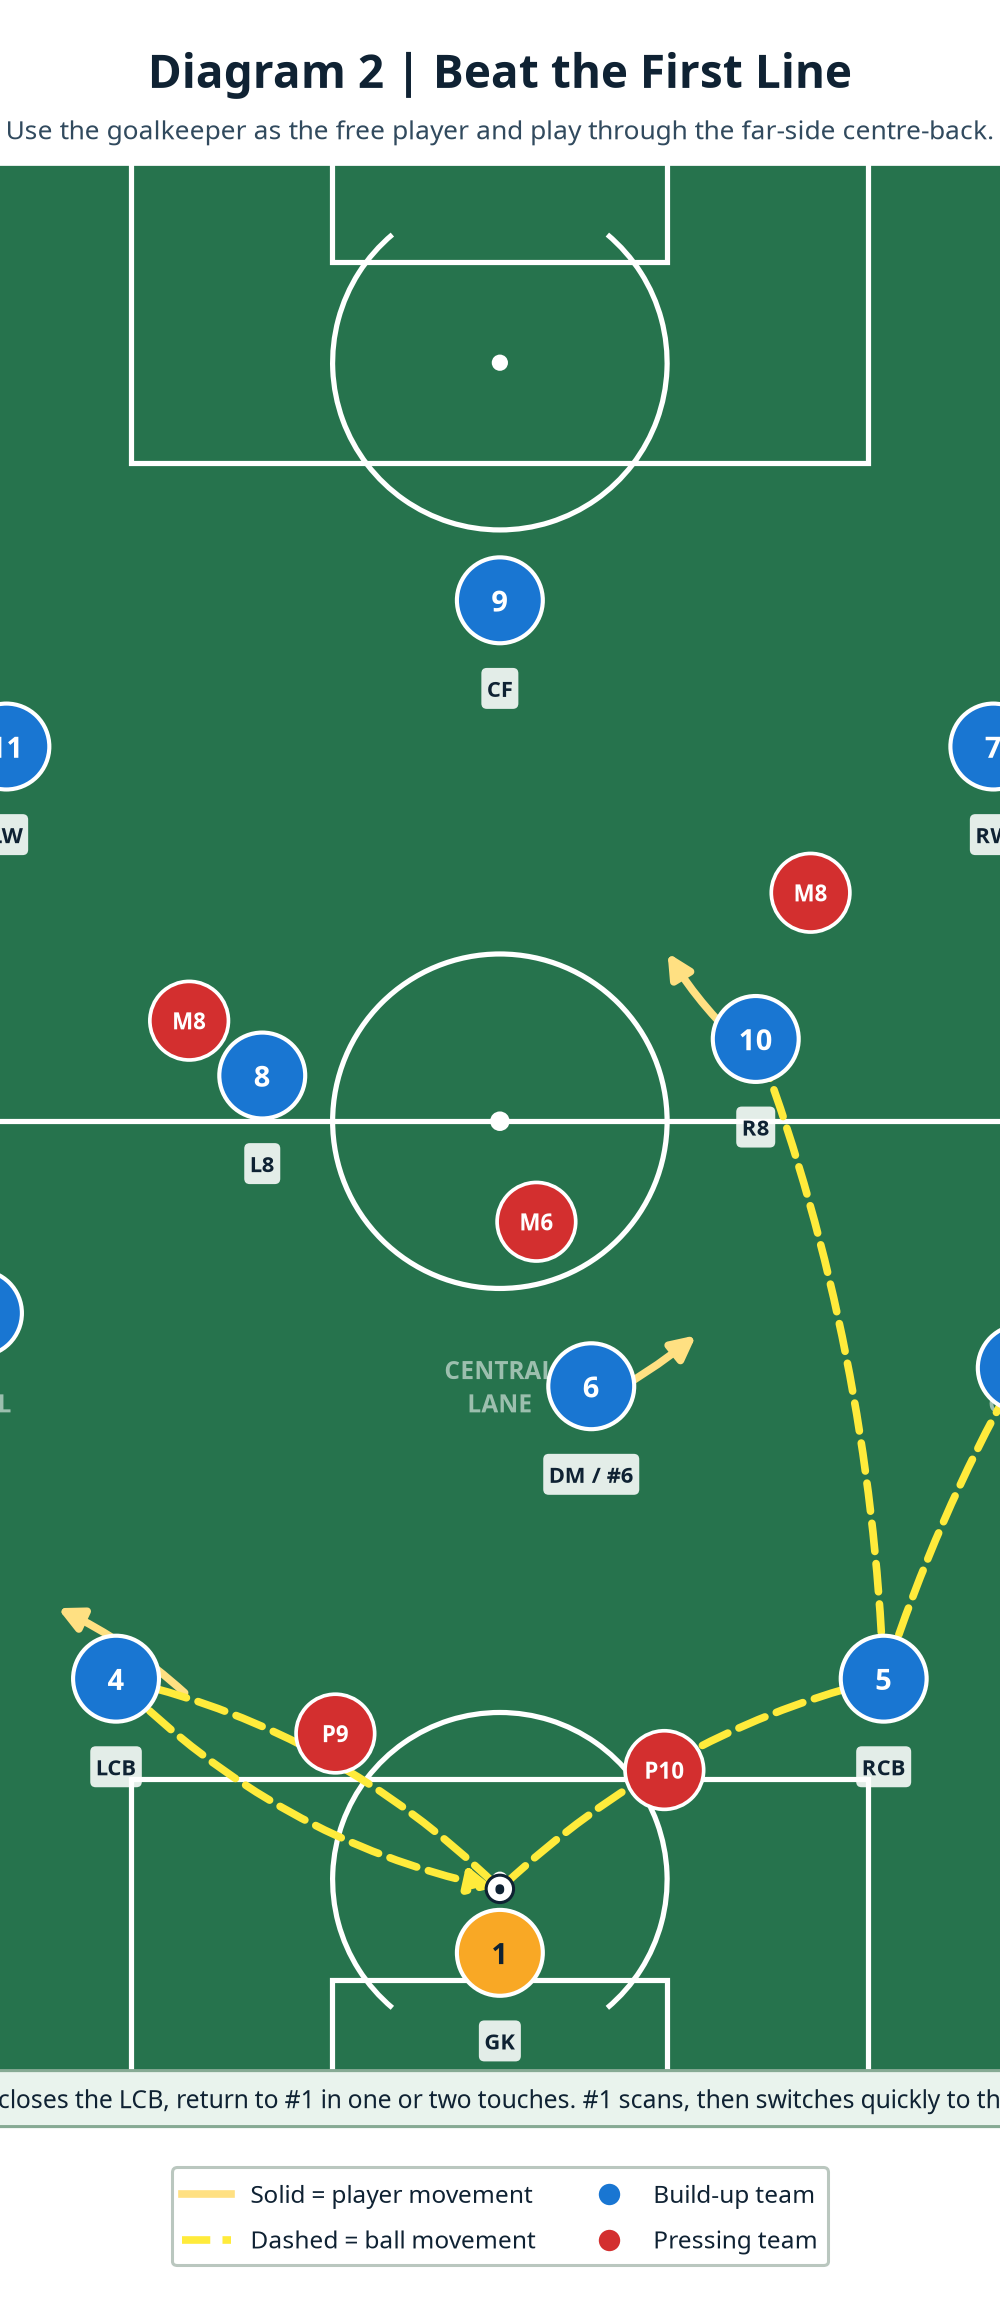
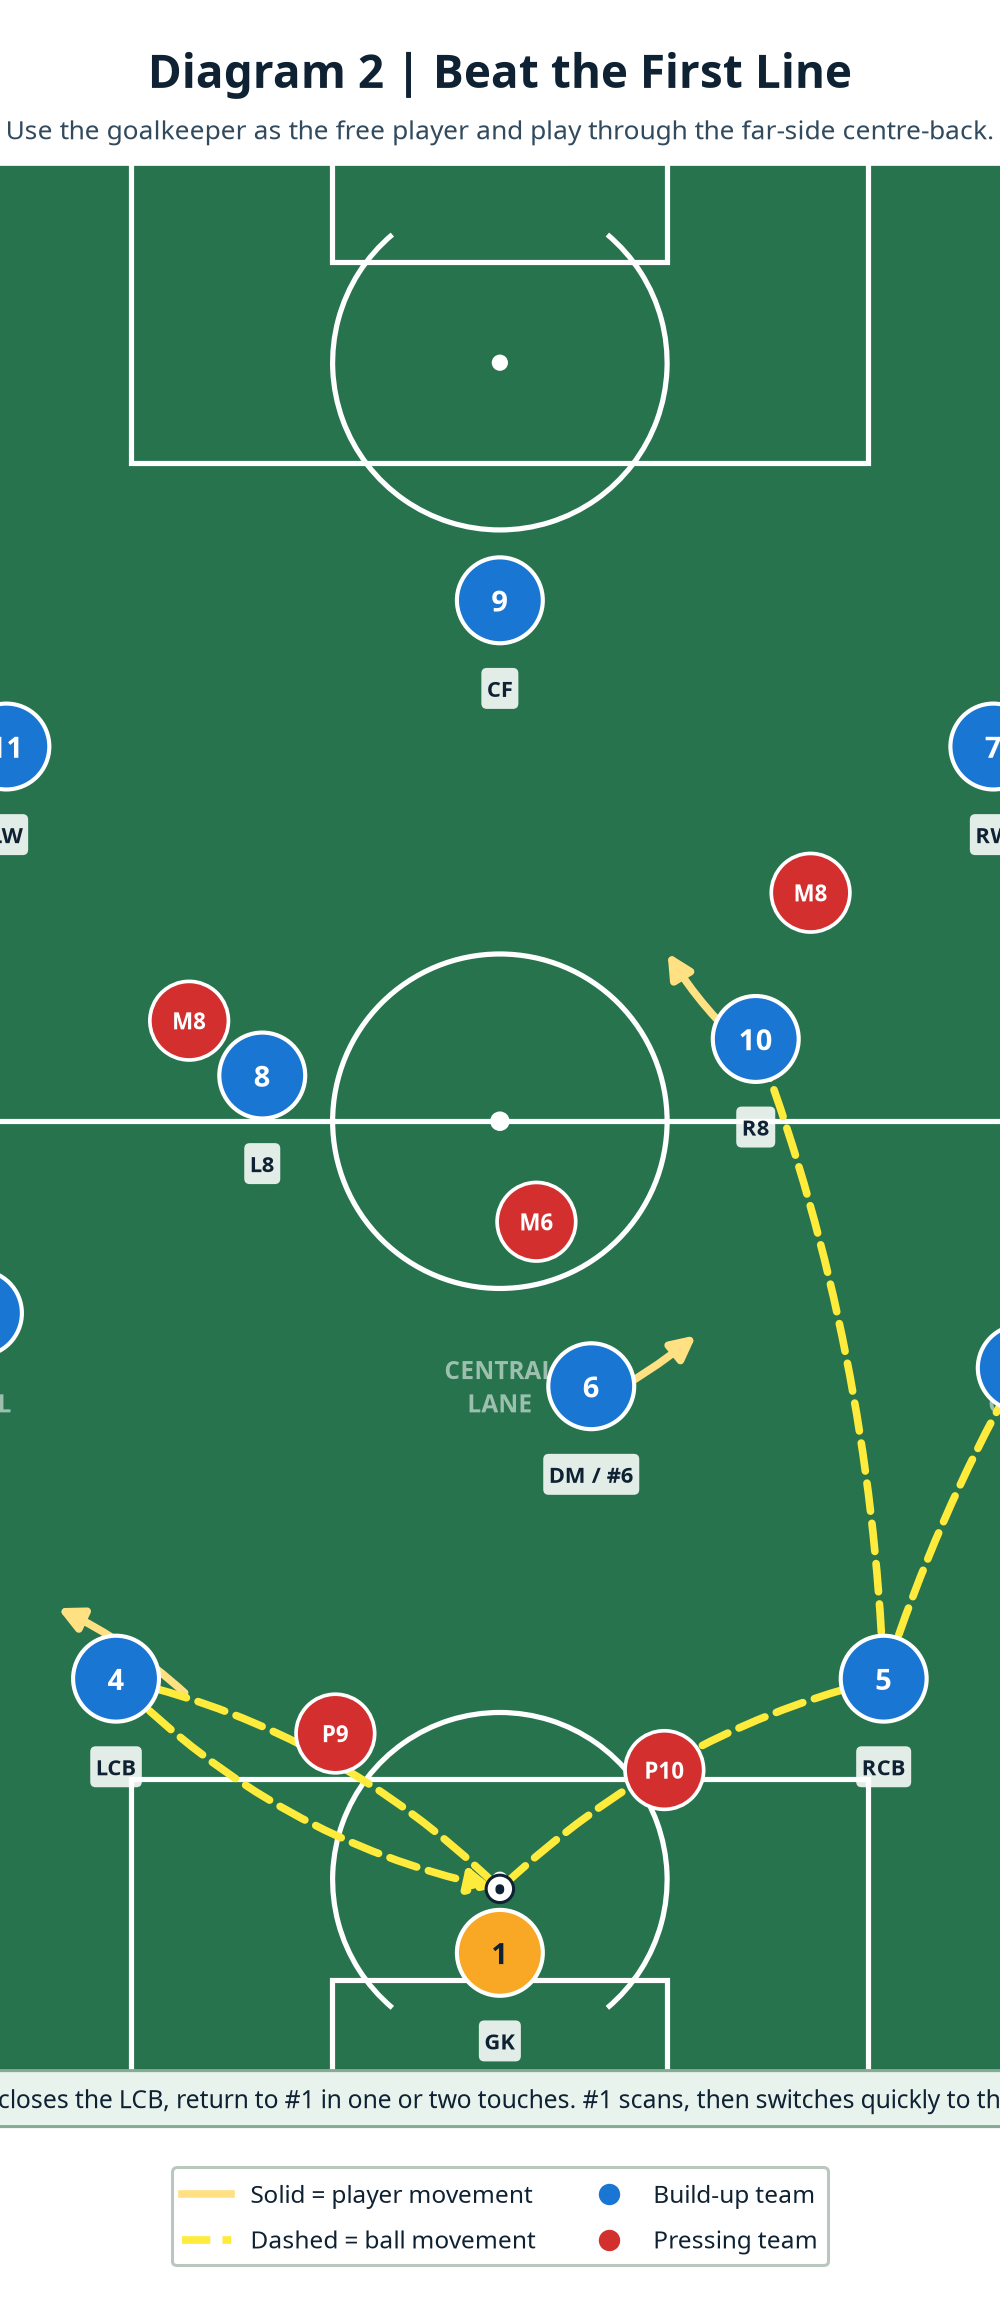
Use the goalkeeper to create 3v2. If the two opposition forwards press #4 and #5, #1 becomes the free player. Play #1 to the near centre-back only if the return pass to #1 remains open. The near centre-back takes the first touch toward the pressing forward, which fixes that opponent, then returns the ball in one or two touches. This should take no more than 4–6 seconds from the initial restart.
Switch through the free centre-back. When the first forward has been attracted, #1 plays a firm, accurate pass to the far-side centre-back. The far-side player must scan before the ball travels and receive half-open, facing the next line. Coach the pass to arrive on the outside foot so the centre-back can either drive forward or find #2/#3 immediately.
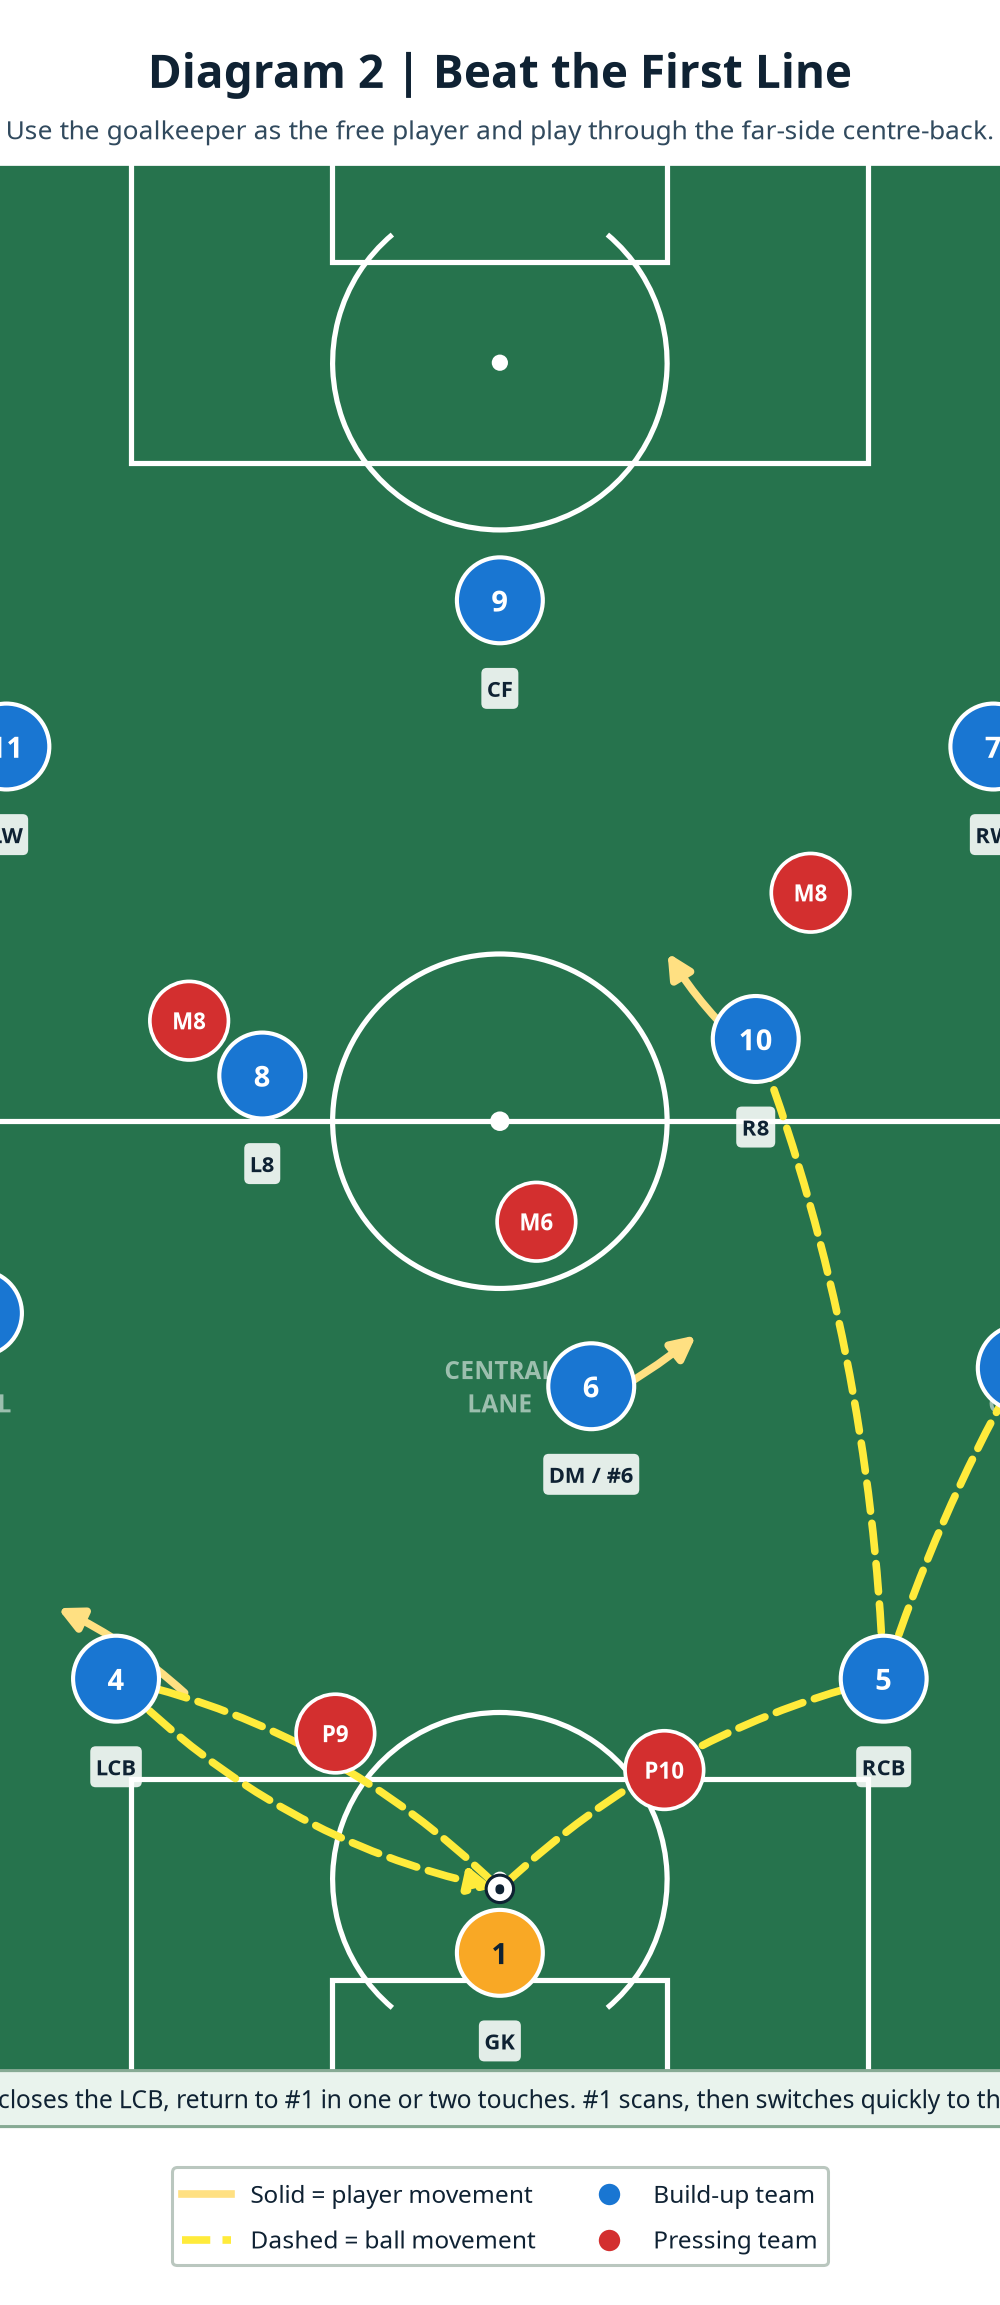
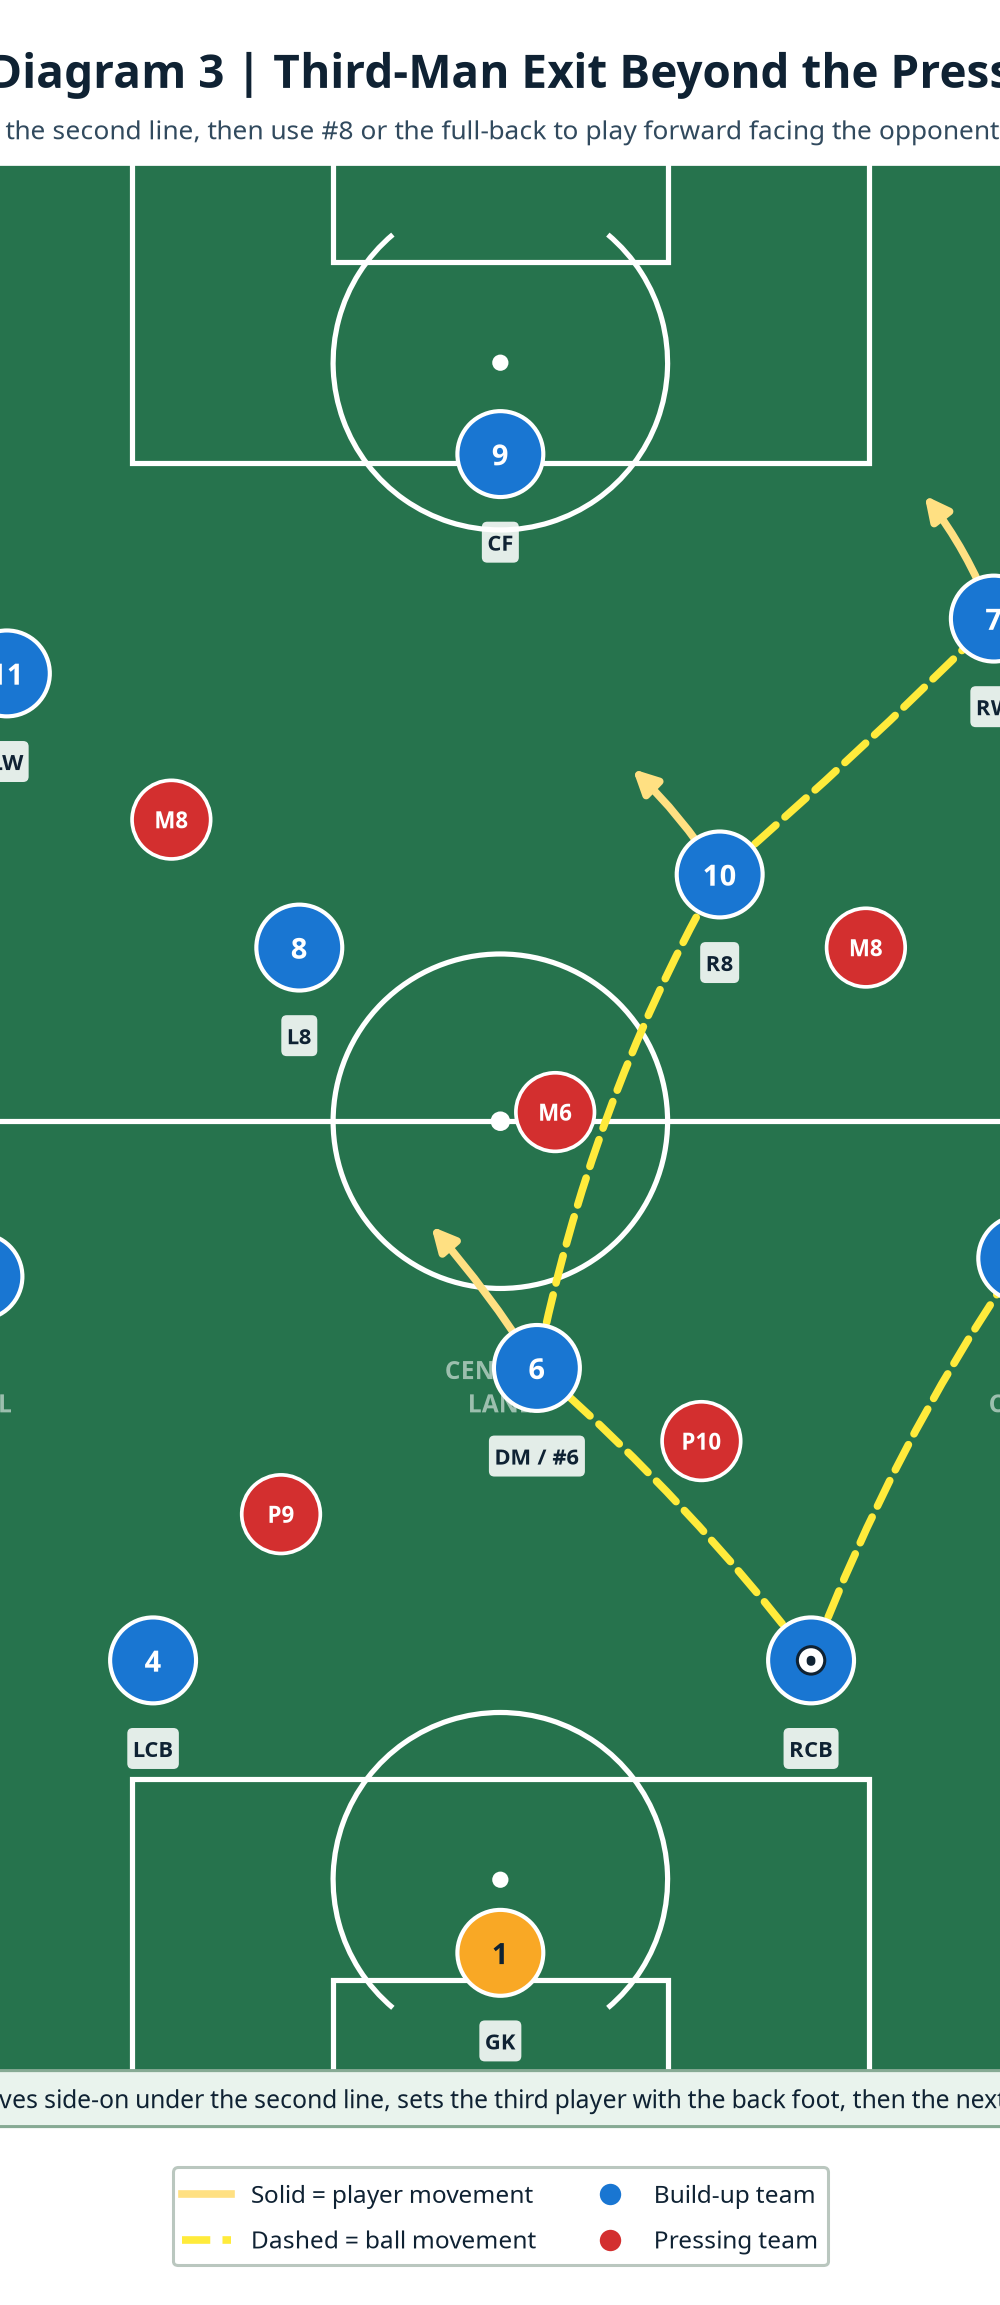
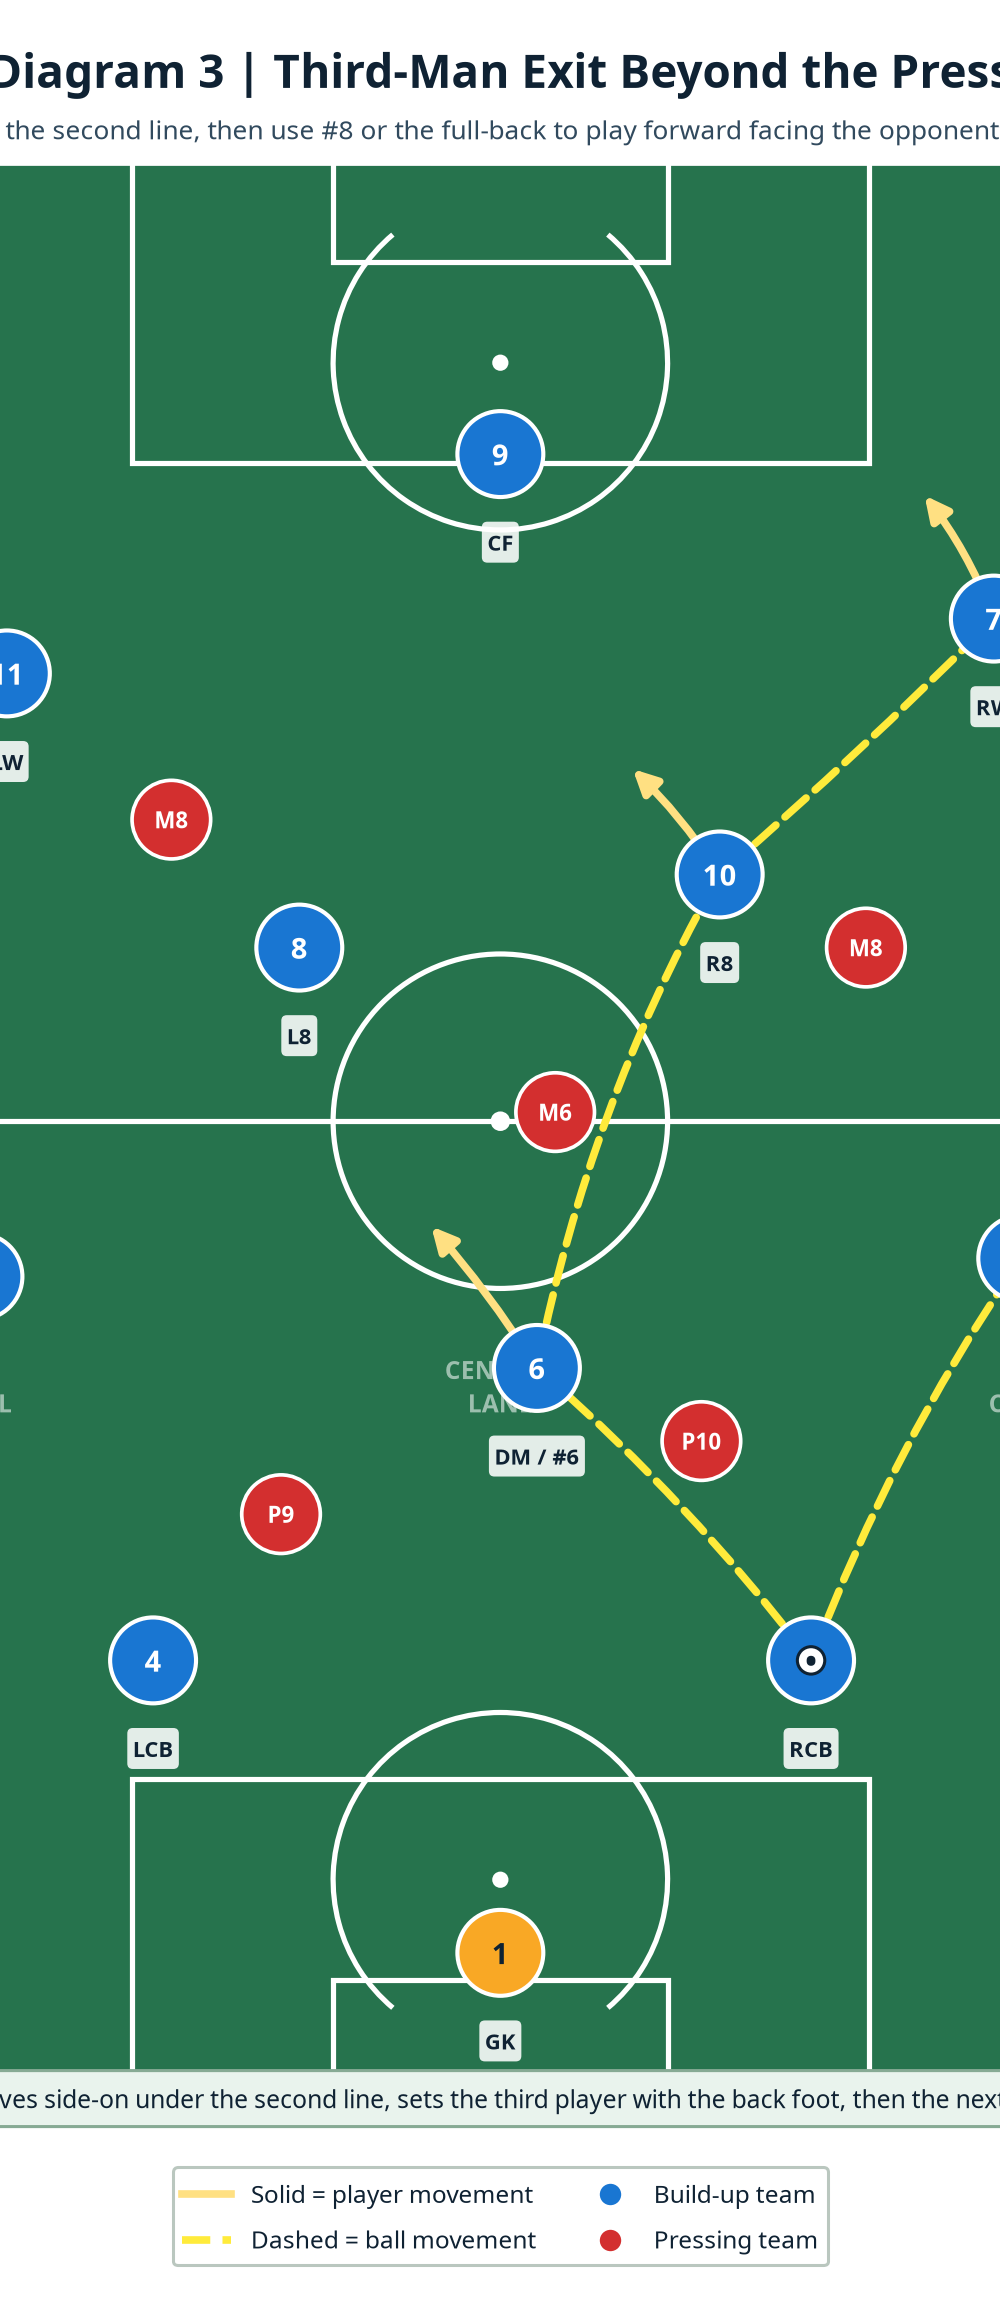
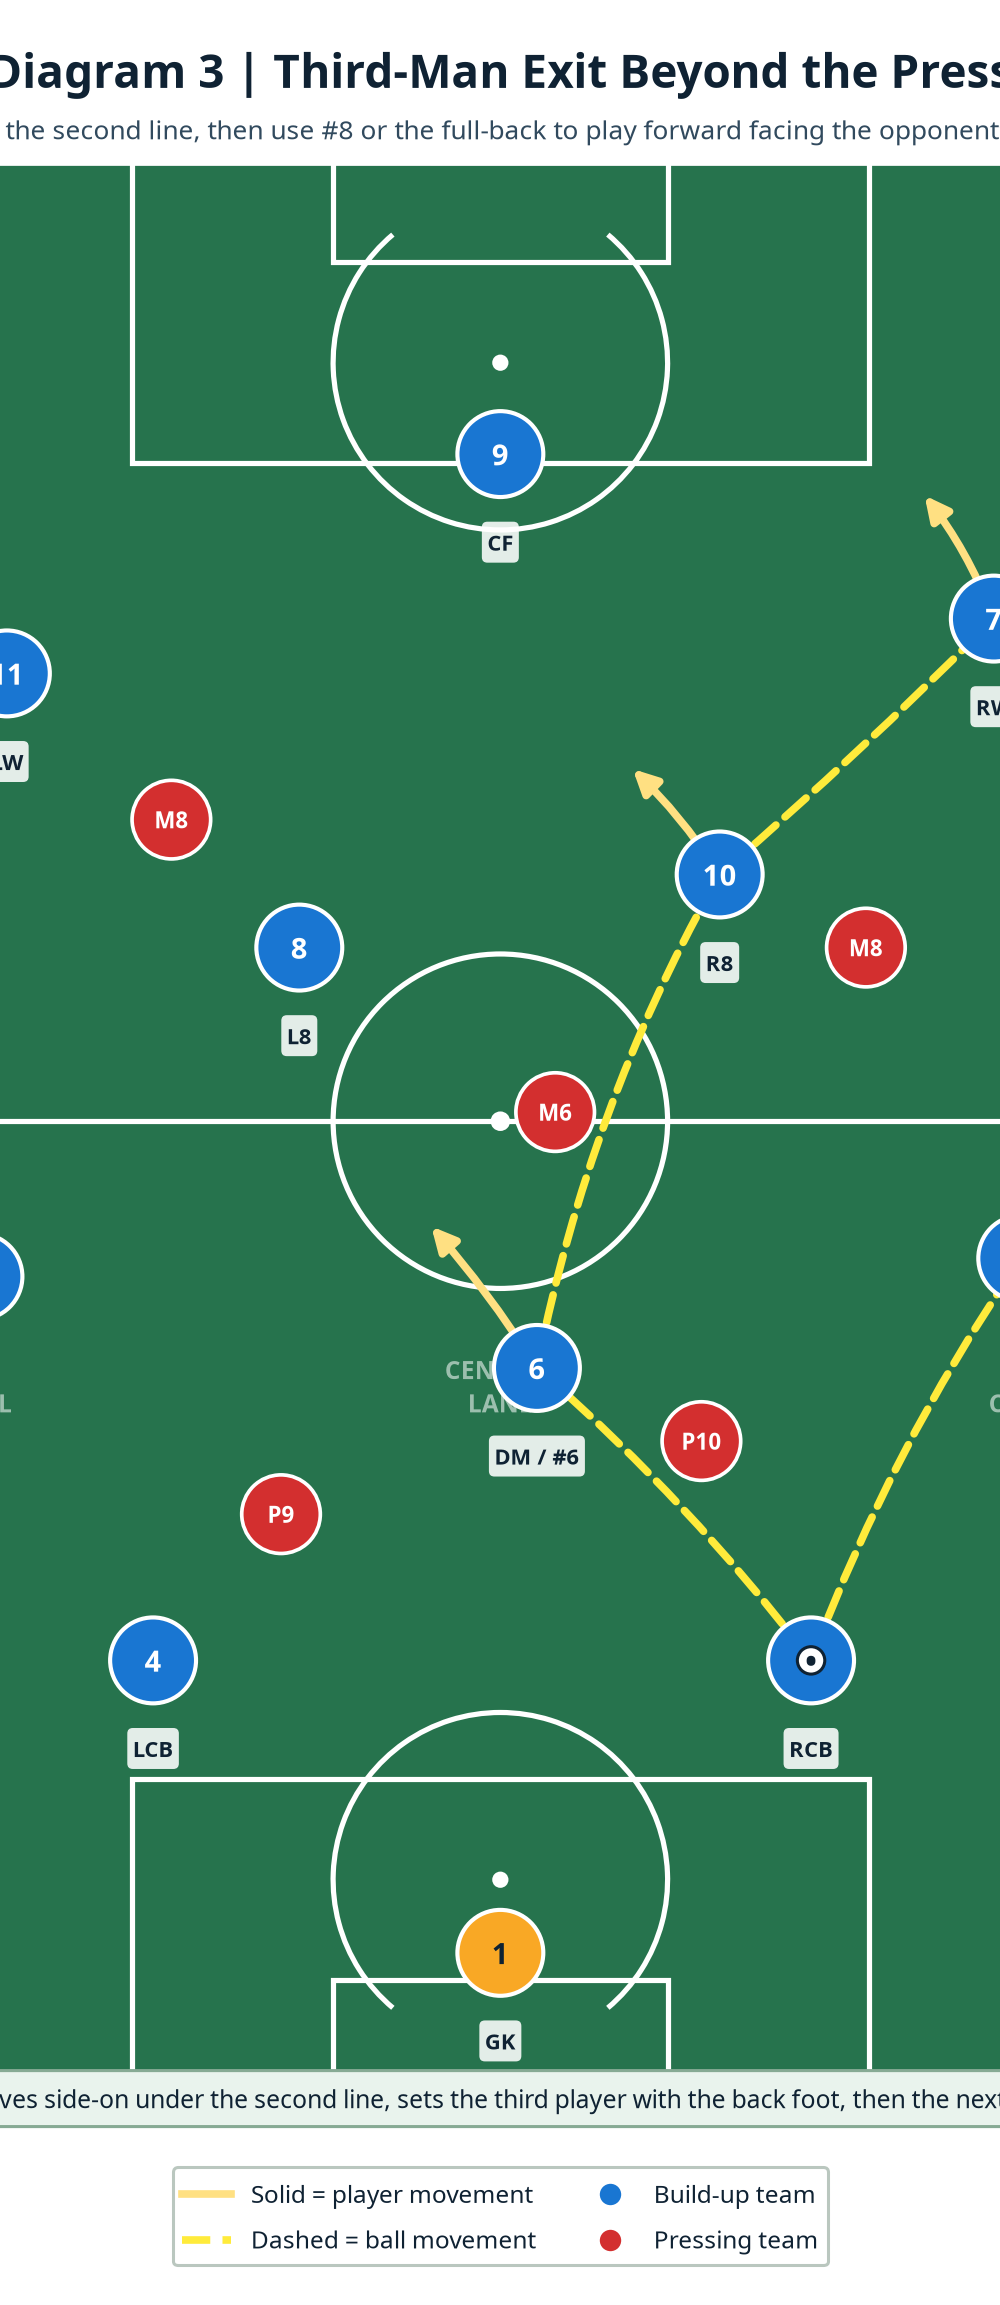
Find #6 only when he can turn or set. #6 should not stand in the opposition holding midfielder’s cover shadow. He moves diagonally 3–5 m away from the shadow and presents side-on. If #6 can receive facing forward, play him directly. If his back is to goal, he sets the ball first time into #8, #10, or the advancing full-back. The key is not the pass into #6; it is the next pass beyond the second line.
Use the third player to exit. When #5 finds #6, #10 moves away from the marker, then curves into the space above the opposition midfield line. #6 sets to #10 with his back foot, and #10 plays forward to #7 or #9. On the opposite side, #2 can be the third player if the opposition central midfielder jumps to #6. Insist that the third player arrives as the ball is travelling, not after it has been received.
Attack the space you have created. Once #7, #11, #9, #8, or #10 receives beyond the press, the nearest three players sprint to support the second action. #9 either secures the ball and sets it or runs across the centre-back to open the far channel. Finish the repetition only when the team has entered the final third with control, lost the ball, or scored within 10 seconds of the line break.
Key Coaching Points
| Coaching point | What to demand on the grass |
|---|---|
| Goalkeeper as an outfield player | #1 must scan before receiving, use a positive first touch, and pass through a clear lane rather than simply clearing pressure. |
| Width with a purpose | #4 and #5 split to stretch the press; #2 and #3 stay high enough to pin wide opponents and open the centre-back’s forward lane. |
| Body shape before the pass | Every receiver shows a half-open stance and checks both shoulders before the ball travels. Correct the player before the pass, not after the turnover. |
| Timing over constant movement | #6 and the #8s move late, on the opponent’s commitment. Early movement lets the opponent pass them on. |
| Play through, around, or over | Give permission to go long to #9 if the press leaves a 1v1 or an exposed far-side winger. Short build-up is a tool, not an ideology. |
| Reaction after the line break | The first forward pass starts the attack; the supporting runs must be immediate, forward, and connected. |
Common Mistakes
| Error you will see | Immediate correction |
|---|---|
| Centre-backs split too wide and receive on the touchline | Bring them 3–4 m inside the channel and rehearse a body shape that can return to #1 or play forward. |
| #6 stands square behind the opponent’s midfielder | Put a flat disc at the edge of the cover shadow and demand a diagonal movement off it as the ball leaves #1. |
| Goalkeeper plays before scanning | Freeze the action, ask who is free and where the next pass is, then replay the same restart. |
| Full-backs come toward the ball too early | Hold them 8–12 m above the centre-backs until the wide midfielder is pinned or the centre-back can drive forward. |
| The team celebrates the pass into #6 and stops | Set a rule that the #8, winger, and #9 must make a forward action within two seconds of #6’s first touch. |
Variations & Progressions
Begin with a shadow press in which six opponents screen but cannot tackle. Rehearse spacing and scanning, then progress to live 6v6+1 in the defensive two-thirds. Award one point for crossing the halfway gate and two for doing so through #6.
Use live 11v11 against a 4-4-2. The pressing team scores within eight seconds of a regain; your team earns three points for finding #7, #11, or #9 beyond midfield from the same restart. The consequence makes body shape and circulation speed non-negotiable.
Against a 4-3-3 press, ask #3 or #2 to invert beside #6 after the first pass, creating a 3+2 base. Pause only when players miss the spare player, then ask: Where is our free player now?
Age Adaptations
| Age group | Adaptation | Non-negotiable message |
|---|---|---|
| Under 8 | Use 5v5 or 7v7 in a 35 m x 25 m area, with a goalkeeper and two defenders; remove the cover-shadow language. | Spread out, look up, and pass to the player facing forward. |
| Under 10 | Use 7v7 or 9v9 in a 55 m x 40 m area, with one #6 and a simple 2v2 first press. | Make a triangle around the ball and use the goalkeeper again when needed. |
| Under 12 | Use 9v9 on a 70 m x 50 m area, introduce #6’s side-on receiving shape and reward the third-player pass. | Scan before the ball arrives and move after the defender commits. |
| Under 14 | Use the full 4-3-3 structure on 85 m x 60 m before moving to a full pitch. | Recognise the cover shadow and decide whether to play through, around, or over. |
| Under 16 and open age | Train live 11v11 on the full pitch with opponent-specific pressing triggers and recovery transitions. | Execute the principles at match speed, but retain the right to play direct when the picture demands it. |
Run this as a 30-minute tactical block, then revisit it with match clips and low-rep restarts. Success is players recognising the free player, receiving with the right picture, and progressing when the press arrives.

