Goalkeeper Reflex & Recovery: The 3-Point Shot-Stopping Circuit
A high-intensity, match-realistic drill designed to develop a goalkeeper's reflexes, footwork, and ability to recover quickly for secondary saves.
Equipment Needed
Goalkeeper Reflex & Recovery: The 3-Point Shot-Stopping Circuit
1. Overview
The 3-Point Shot-Stopping Circuit is a high-intensity, match-realistic drill designed to develop a goalkeeper's reflexes, footwork, and ability to recover quickly for secondary saves. In modern football, goalkeepers are frequently called upon to make multiple saves in quick succession. This drill replicates the chaos of a crowded penalty area, forcing the goalkeeper to maintain focus, quickly reset their feet, and react to shots from different angles and distances.
Use this drill during the main technical phase of a goalkeeper-specific session, or integrate it into team training by using your strikers as the designated shooters.
2. Setup
Pitch Dimensions & Positioning
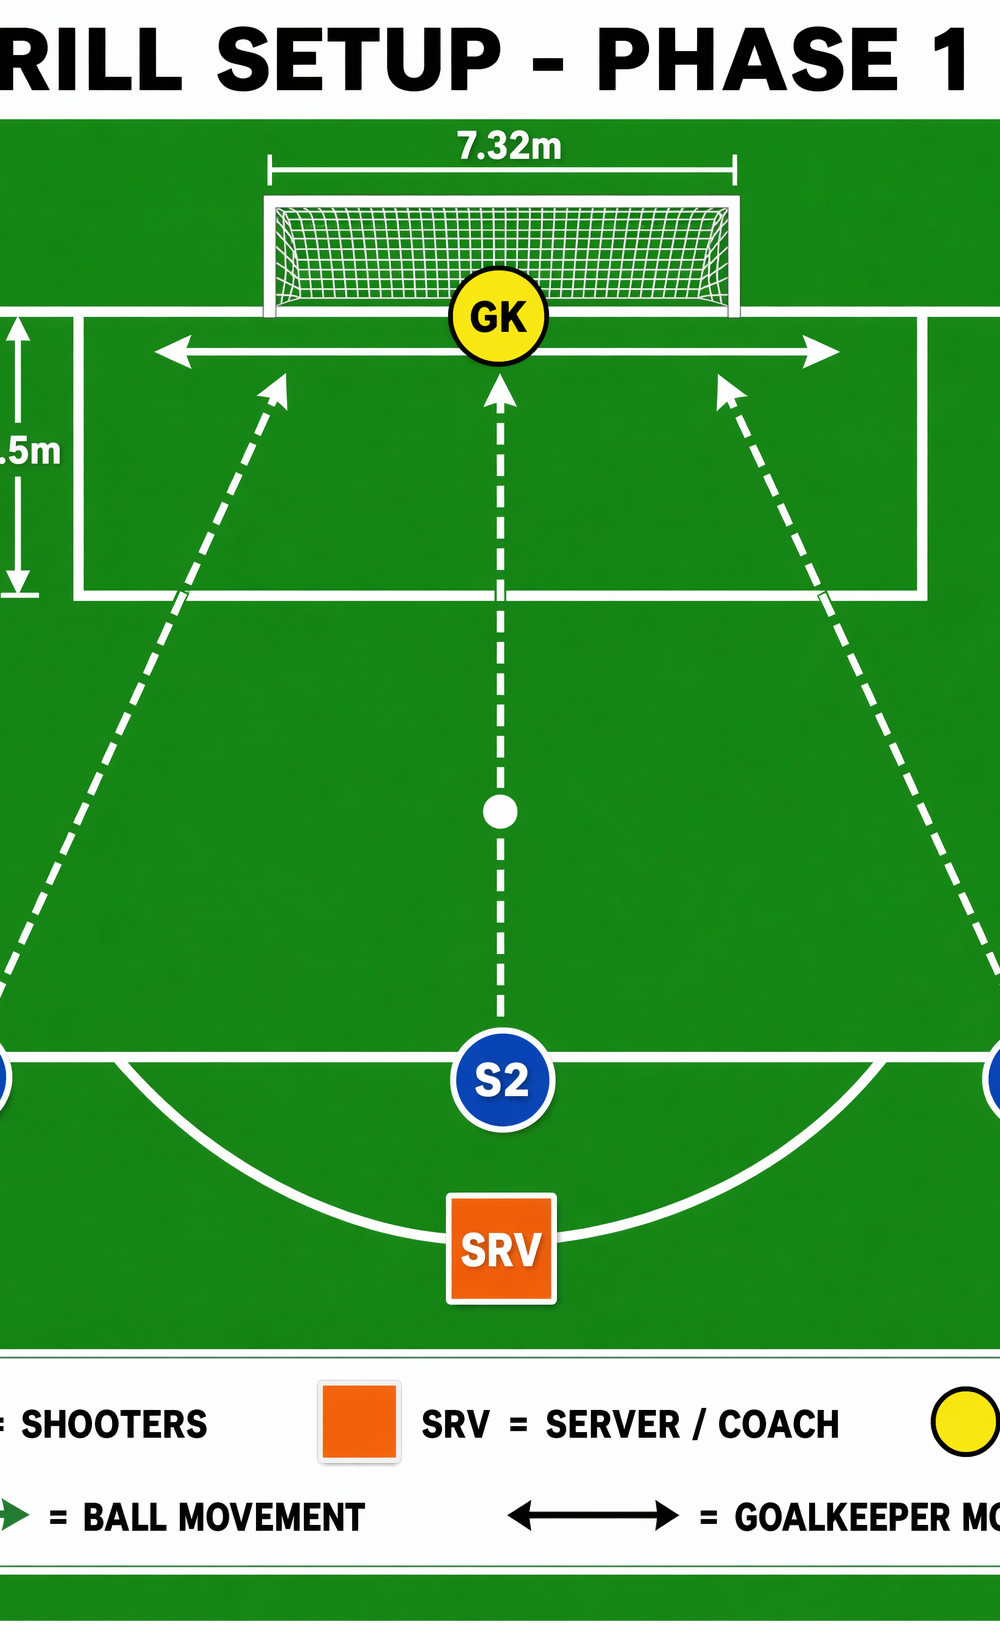
- Area: Full penalty area (16.5m x 40.3m) using a standard 11v11 goal (7.32m x 2.44m).
- Goalkeeper (GK): Starts centrally on the goal line.
- Shooters (S1, S2, S3): Positioned in a semicircle arc approximately 14-16 meters from the goal line.
- S1: Left-center of the penalty area.
- S2: Central, near the penalty spot.
- S3: Right-center of the penalty area.
- Server/Coach (SRV): Positioned at the top of the penalty arc (D) with a large supply of footballs.
Equipment Required
- 1 Full-size goal
- 10-15 Footballs
- 4 Marker cones (to outline the working area)
- 3 Mannequins (optional, to simulate defenders obscuring the GK's vision)
3. Step-by-Step Instructions
Phase 1: The Initial Circuit
- Starting Position: The GK starts in a ready stance, centrally located on the goal line.
- First Shot: The Coach (SRV) passes the ball to S1. S1 takes one touch to control and immediately strikes at goal.
- Recovery: As soon as the shot from S1 is resolved (saved, goal, or wide), the GK must immediately recover, reset their feet, and adjust their angle for the next shooter.
- Second Shot: The Coach immediately passes a new ball to S2, who strikes at goal.
- Final Shot: The GK recovers again, and the Coach passes to S3 for the final shot of the sequence.
- Rest & Rotate: The GK rests for 30-45 seconds while the next goalkeeper steps in, or the shooters rotate positions. Complete 4-5 sets per goalkeeper.
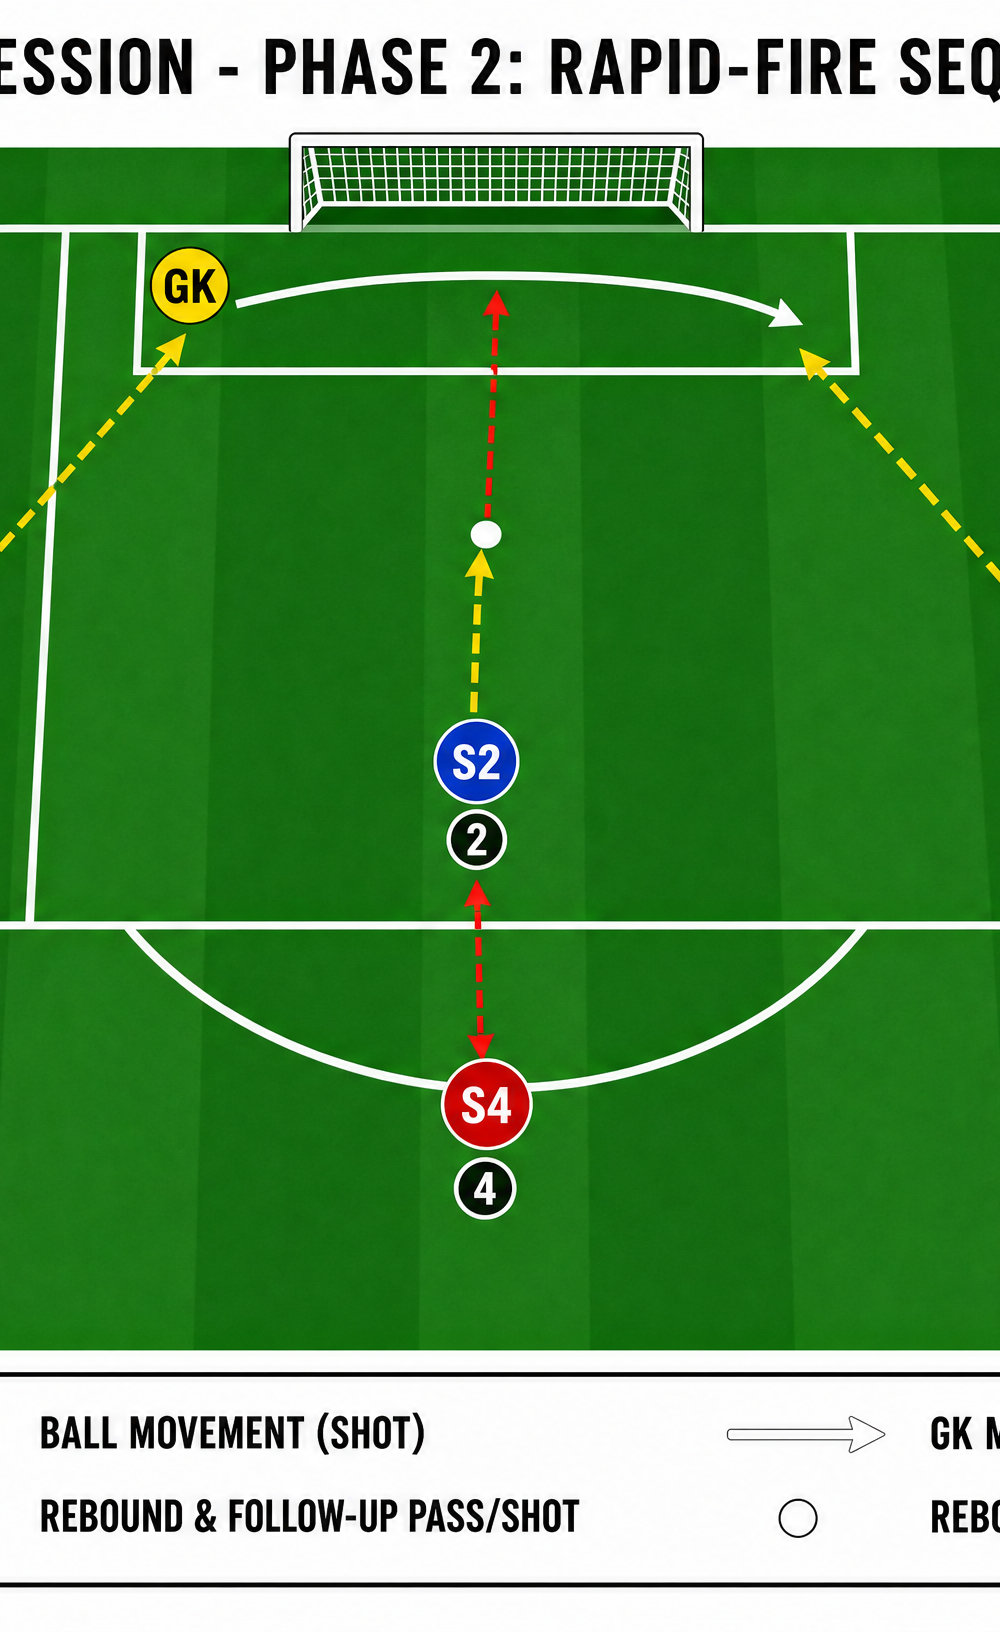
Phase 2: The Rapid-Fire Sequence (Progression)
- In this progression, the shooters do not wait for a pass from the coach. They each have a ball at their feet.
- S1 shoots on the coach's whistle.
- The moment the ball crosses the line or is saved, the coach blows the whistle again, and S2 shoots.
- The sequence repeats for S3, and optionally S4 for a follow-up rebound shot.
- Rule: If the GK parries the ball back into the playing area, the nearest shooter must attempt to score the rebound before the next sequence begins.
4. Key Coaching Points
- Set Position: The GK must be perfectly still and balanced at the exact moment the striker makes contact with the ball. "Feet set, hands ready."
- Footwork Efficiency: Emphasize quick, short lateral steps (side-steps or crossovers) rather than long, bounding leaps when moving between angles.
- Handling & Parrying: Prioritize catching the ball cleanly. If a catch is impossible, the GK must actively parry the ball wide and away from the danger zone, not back into the center of the penalty area.
- Recovery Speed: The drill is about the second save as much as the first. The GK must hit the ground, spring back to their feet using the momentum of the dive, and immediately locate the next ball.
- Angle Play: Ensure the GK is moving along the correct arc, stepping slightly forward to cut down the angle for each respective shooter, rather than staying glued to the goal line.
5. Common Mistakes
- Moving While the Shot is Struck: The GK is still shuffling across the goal when the striker hits the ball, resulting in a loss of balance and inability to dive effectively.
- Parrying into Danger: Pushing the ball straight back out to the penalty spot instead of turning it around the post or wide.
- Slow Recovery: Staying on the ground to watch the result of the save instead of immediately springing up to prepare for the next phase of play.
- Poor Starting Position: Standing too deep in the goal, giving the shooters too much of the net to aim at.
6. Variations & Progressions
- The Blind Screen (Intermediate): Place mannequins or passive defenders between the shooters and the GK to obscure the line of sight, forcing the GK to react later.
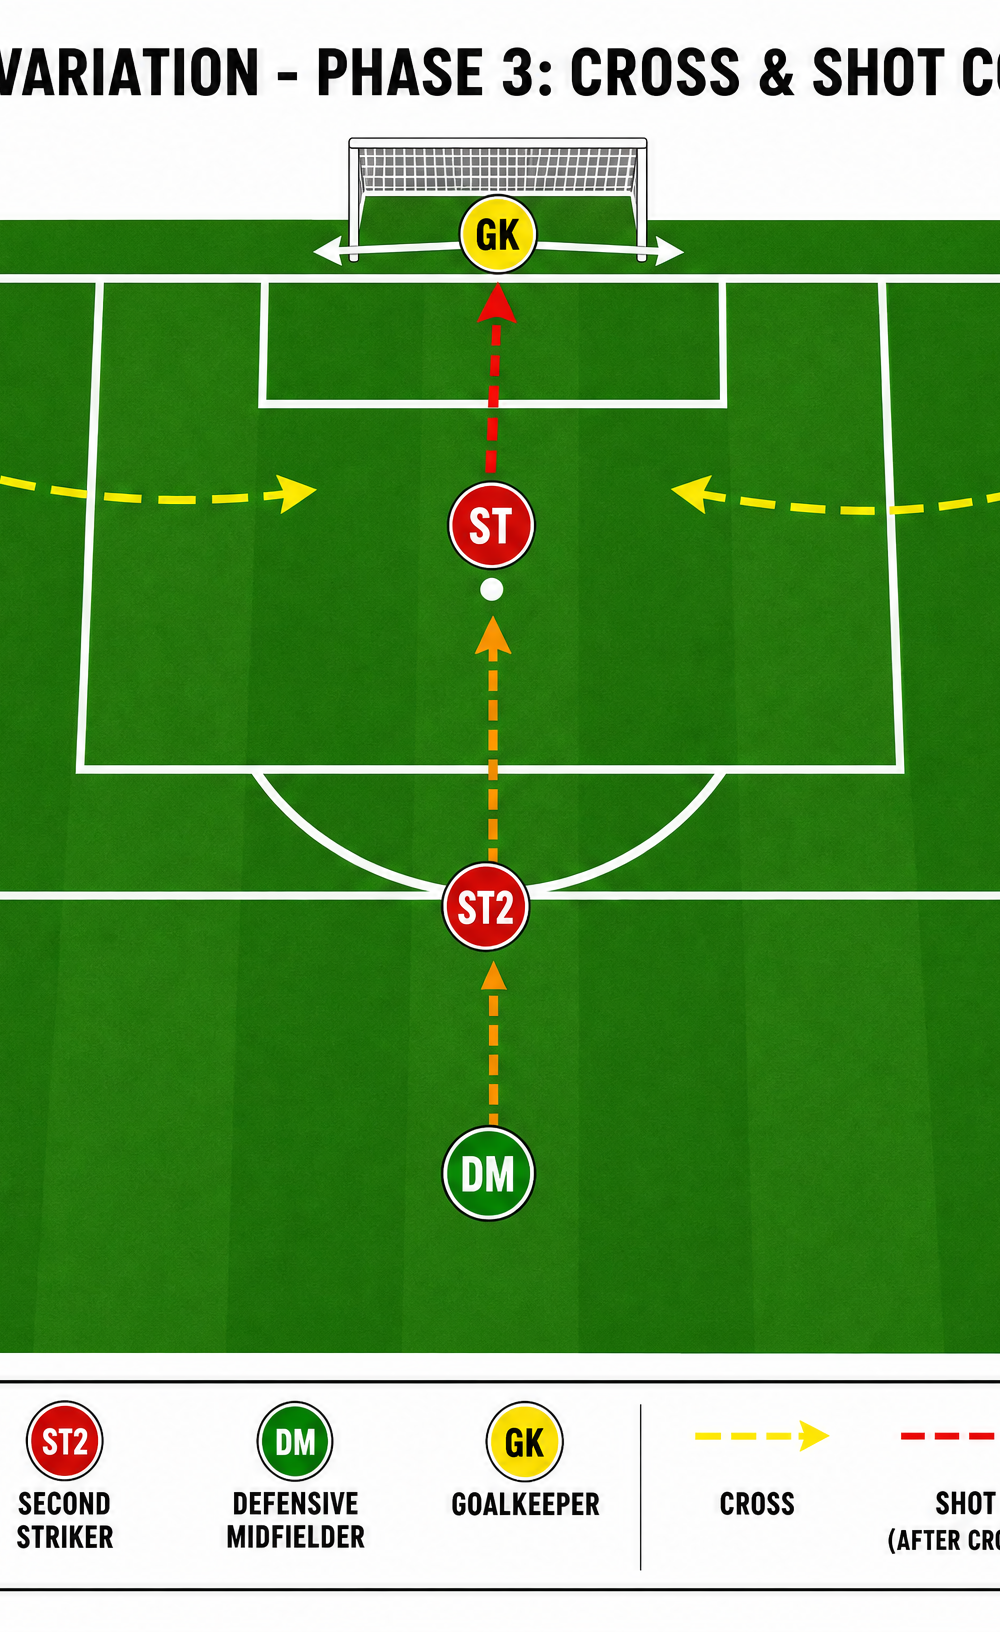
- Cross & Finish (Advanced): Instead of direct shots from the edge of the box, initiate the drill with a wide cross from a winger (W1/W2). The GK must decide whether to claim the cross or drop back to save a header/volley from the central strikers (ST1/ST2).
- Movement Trigger: The shooters must dribble left or right before shooting, forcing the GK to constantly adjust their feet and angle before setting.
7. Age Adaptations
- Under 8 - Under 10: Reduce the distances significantly (shots from 8-10 meters). Focus heavily on basic handling (the 'W' catch or scoop) rather than diving. Use a smaller goal if available.
- Under 12 - Under 14: Introduce the rapid-fire element but keep the pace manageable. Focus on footwork and ensuring they are set before each shot.
- Under 16 - Open/Senior: Run the drill at full match intensity. Demand maximum power from the shooters and perfect parrying technique from the GK. Incorporate the blind screen and rebound rules.