Horns Set Play: The Open Three-Pointer
Learn how to execute the classic Horns set play to create high-percentage three-point shooting opportunities against man-to-man defense.
Equipment Needed
Overview
The Horns Set Play is a staple in modern basketball, renowned for its versatility and effectiveness in creating high-quality scoring opportunities. This specific variation focuses on generating an open three-point shot for one of your perimeter players. By utilizing the unique spacing of the Horns alignment—where the two bigs are positioned at the elbows and the shooters are spaced in the corners—you force the defense into difficult decisions.
This play is highly effective against man-to-man defenses, particularly when you have a strong shooting guard or small forward who can shoot off the catch. The initial action often misdirects the defense, drawing attention to the high post before punishing them with a quick perimeter screen and release.
Setup
To run this play effectively, you need a standard half-court setup (28m x 15m FIBA dimensions) and a team that understands basic screening principles.
Player Positions:
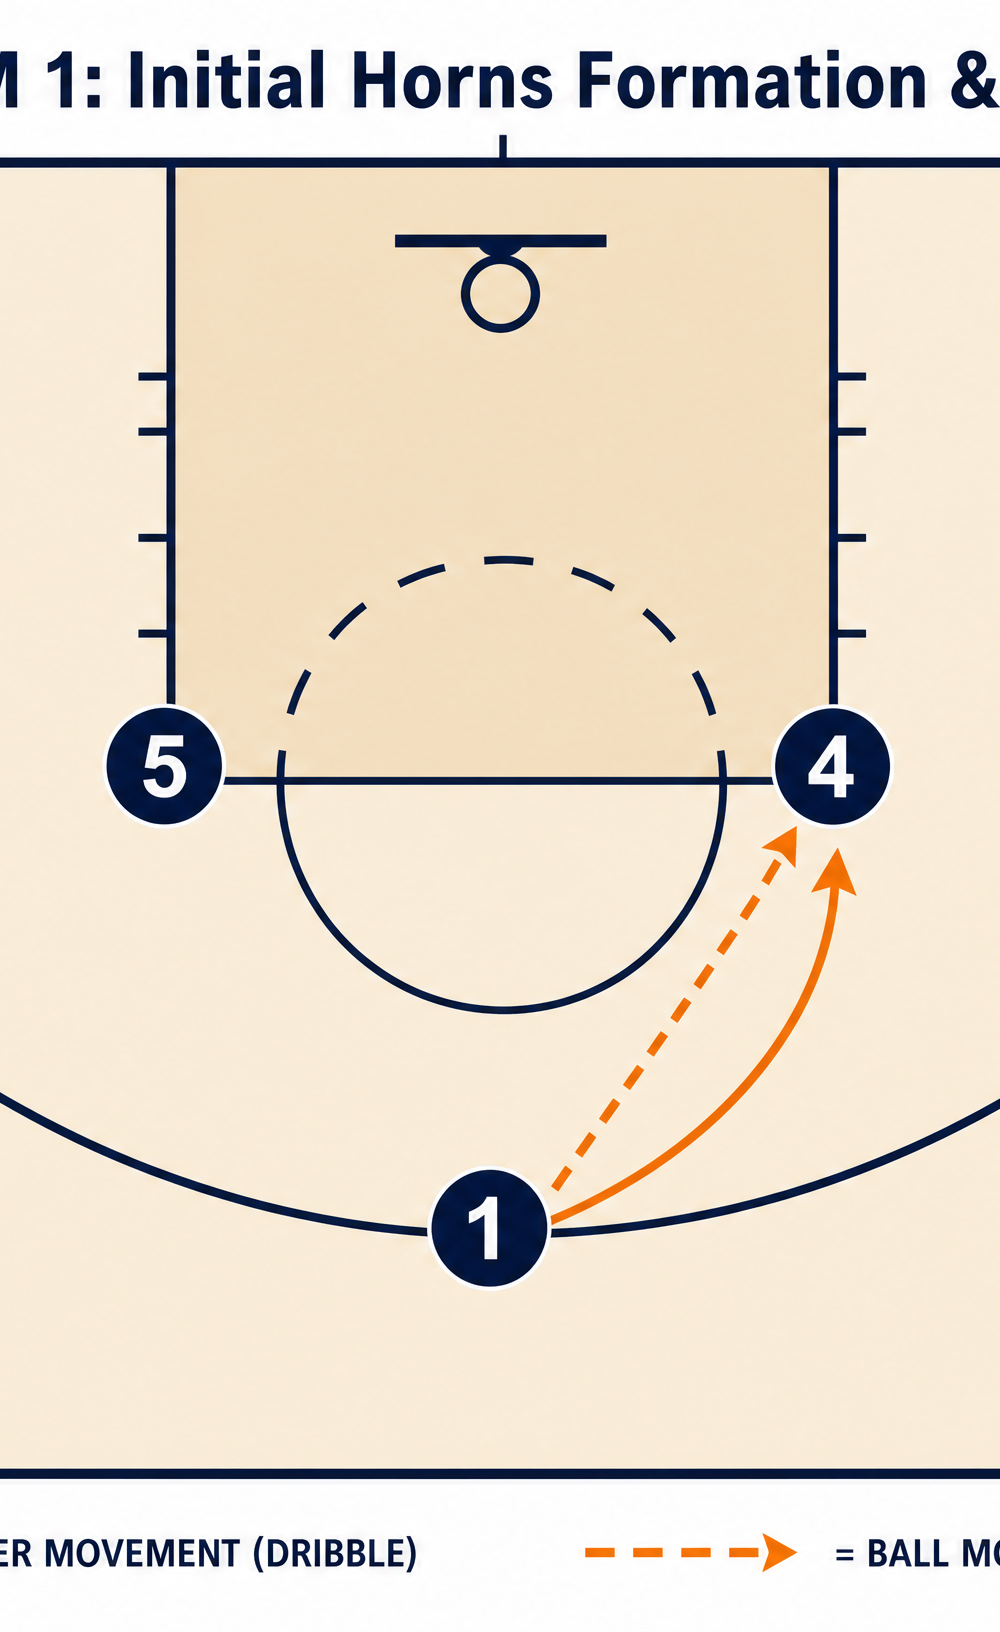
- 1 (Point Guard): Starts at the top of the key with the basketball.
- 2 (Shooting Guard): Positioned in the right corner, ready to spot up or cut.
- 3 (Small Forward): Positioned in the left corner, acting as the primary target for the three-point shot in the initial variation.
- 4 (Power Forward): Positioned at the right elbow (high post).
- 5 (Center): Positioned at the left elbow (high post).
Step-by-Step Instructions
Phase 1: The Entry and Misdirection
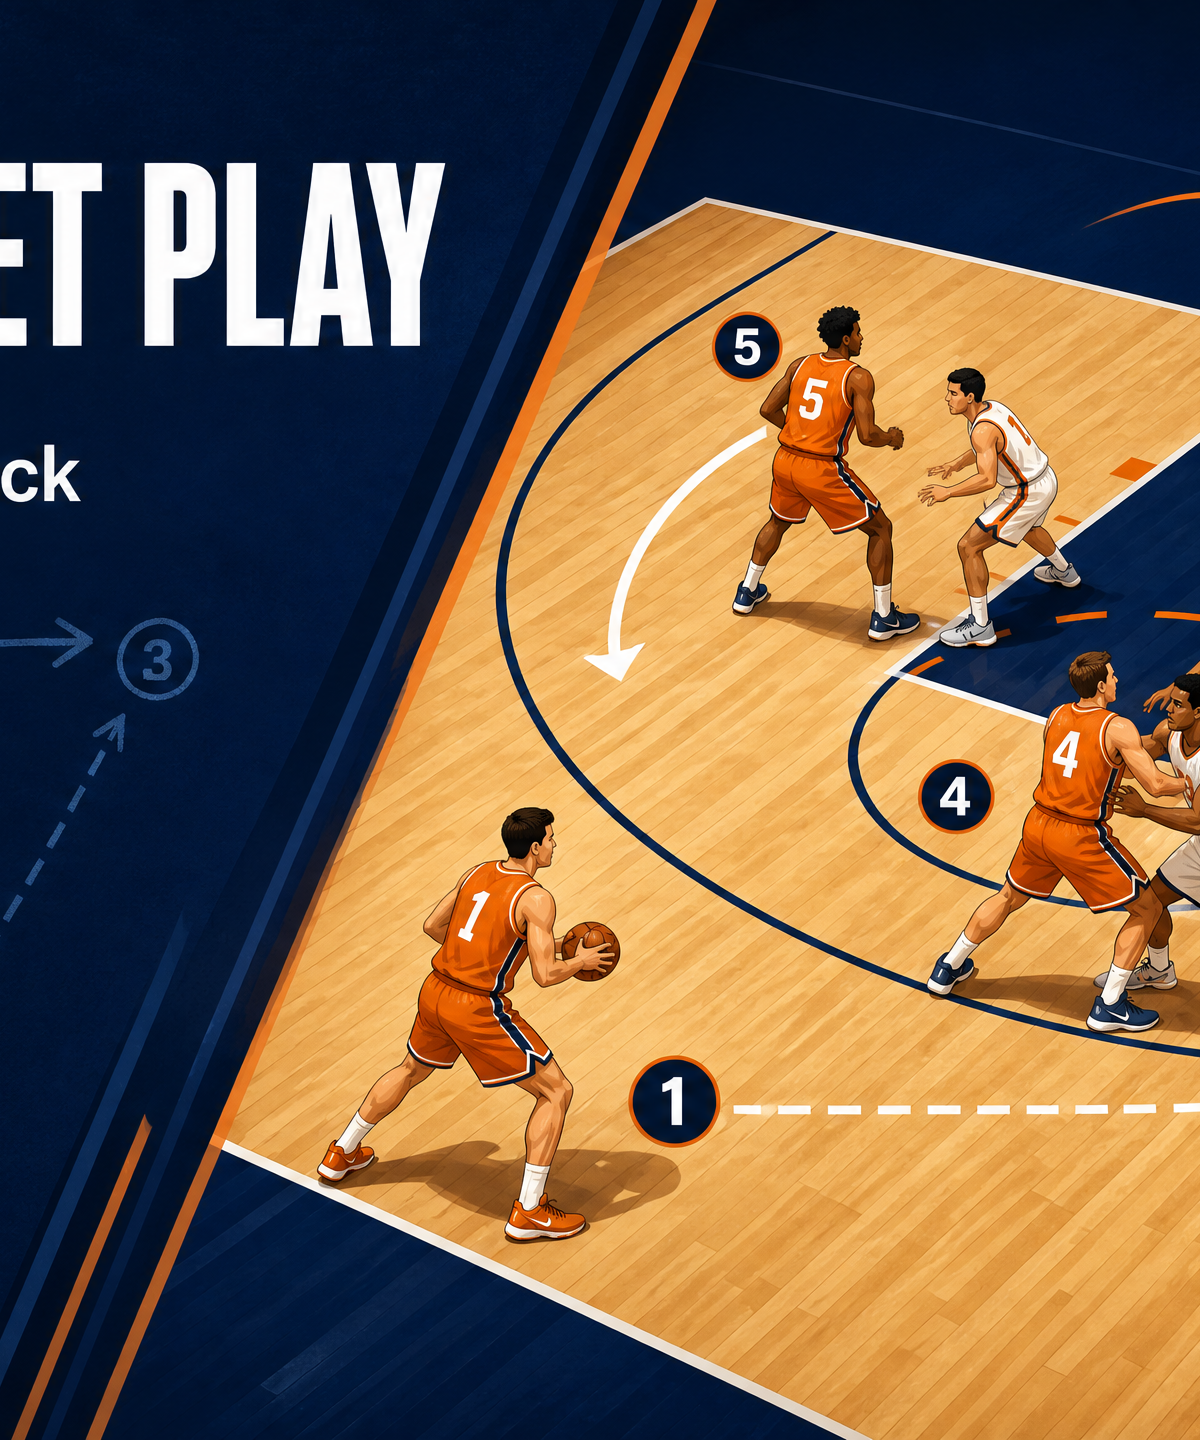
- The Approach: Player 1 brings the ball down the court and calls the "Horns" play. As they cross half-court, players 4 and 5 establish their positions at the elbows, while 2 and 3 space out to the corners.
- The Entry Pass: Player 1 dribbles slightly toward the right side of the court, drawing the defender's attention. Player 1 then makes a crisp, direct pass to Player 4 at the right elbow.
- The Point Guard Cut: Immediately after making the pass, Player 1 cuts hard to the left wing, clearing out the top of the key and taking their defender with them.
Phase 2: The Screen and the Shot
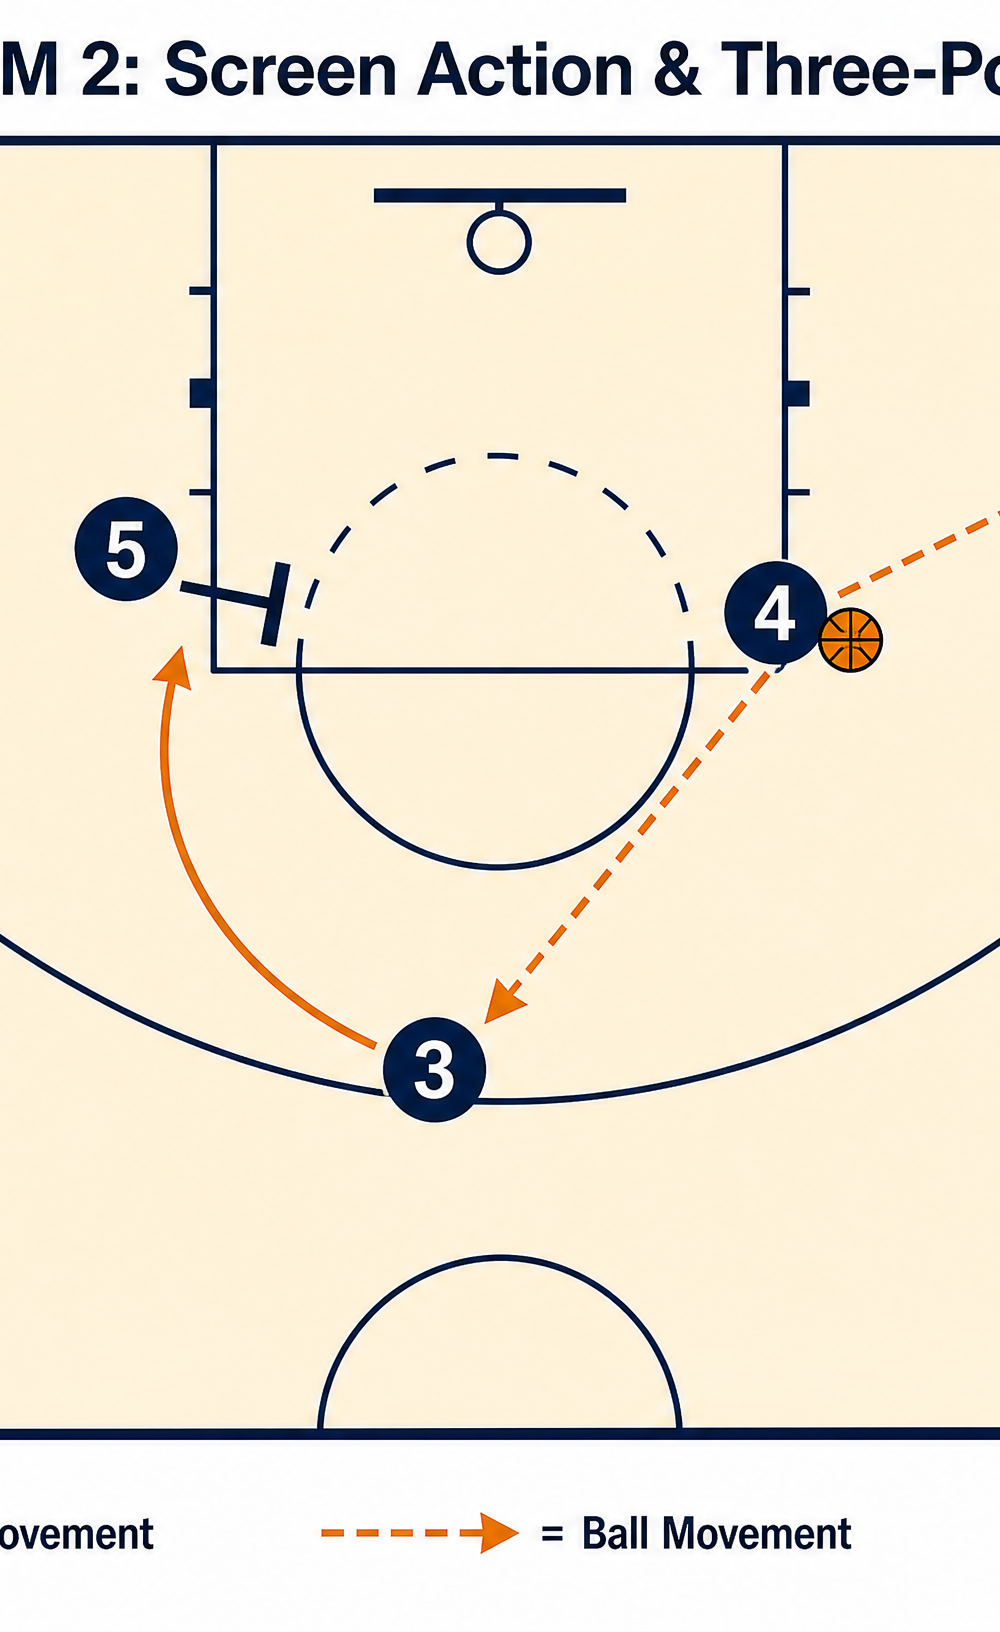
- The Down Screen: As soon as Player 4 catches the ball, Player 5 leaves the left elbow and sets a hard down screen for Player 3, who is positioned in the left corner or low wing.
- The Cut: Player 3 uses the screen set by Player 5, cutting aggressively toward the top of the key (the space just vacated by Player 1).
- The Read and Pass: Player 4, operating from the high post, reads the defense. If Player 3's defender gets caught on the screen, Player 4 delivers a quick, accurate pass to Player 3 at the top of the key.
- The Shot: Player 3 catches the ball in rhythm, squares up to the basket, and takes the open three-point shot.
Phase 3: The Stagger Screen Variation (Corner Three)
If the defense anticipates the action at the top of the key, you can run a stagger screen variation to free up a shooter in the corner.
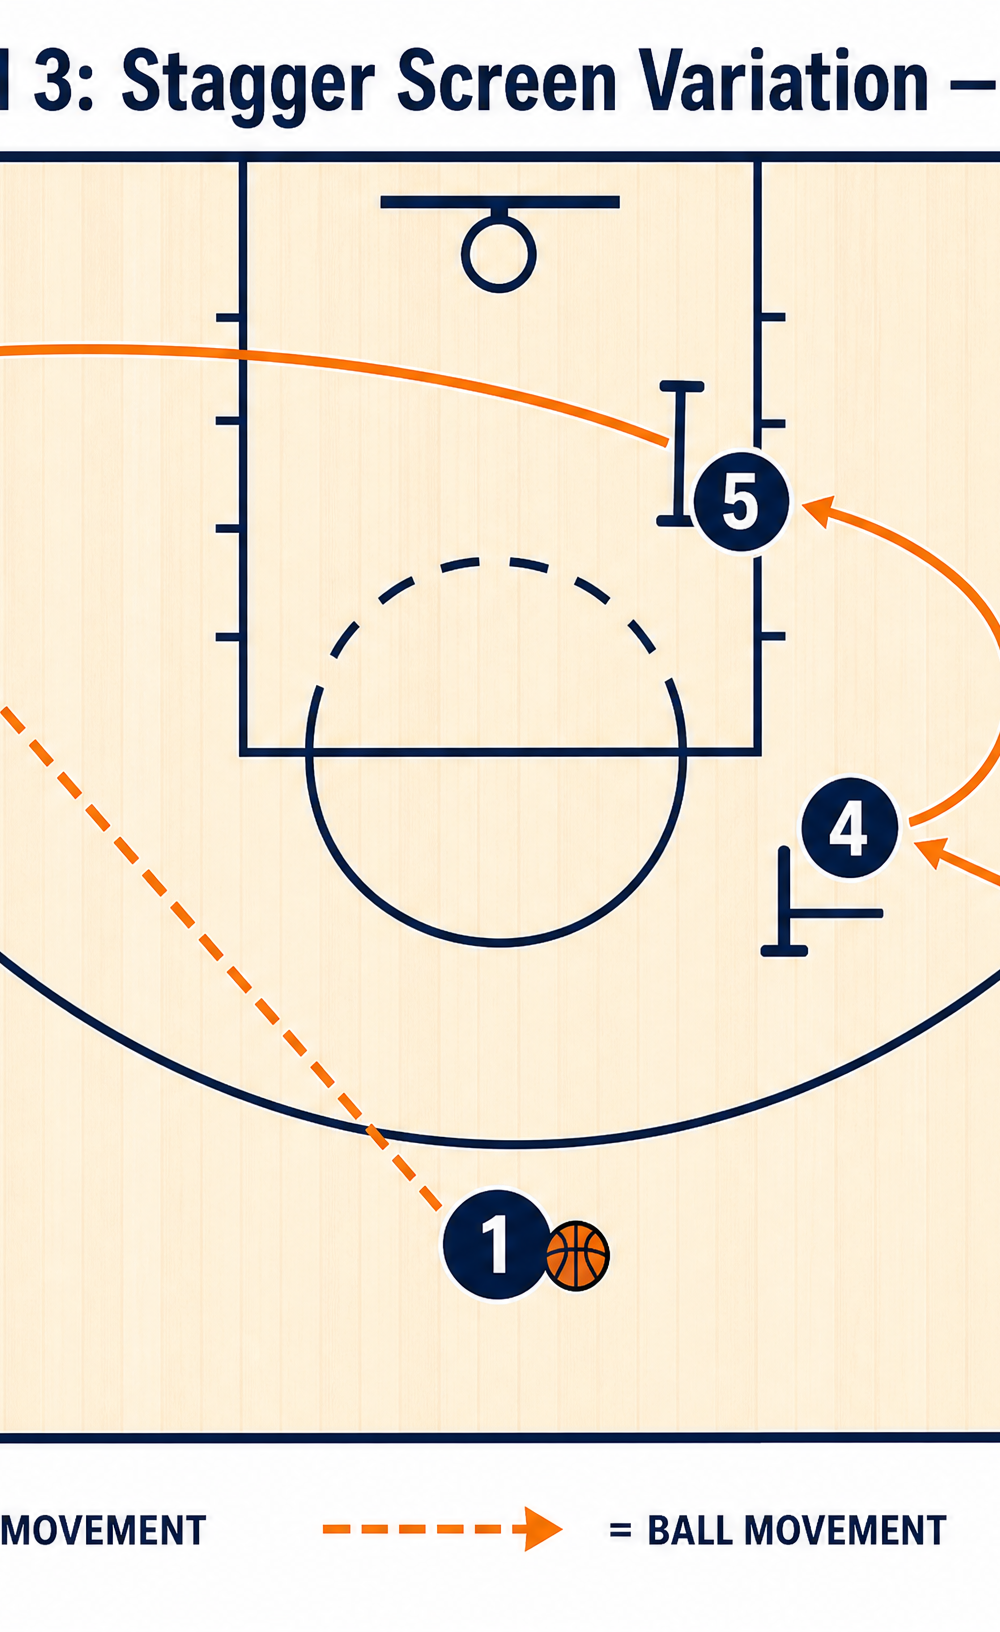
- The Setup: Player 1 keeps the ball at the top of the key.
- The Stagger: Player 4 and Player 5 set staggered screens on the right side of the court (Player 4 near the elbow, Player 5 lower down).
- The Baseline Cut: Player 2 starts in the right corner, uses the staggered screens to run the baseline, and pops out to the left corner.
- The Delivery: Player 1 delivers the pass to Player 2 in the left corner for the open three-point attempt.
Key Coaching Points
- Patience on the Entry: The Point Guard (1) must wait for the bigs to get established at the elbows before initiating the offense. Rushing the entry pass often leads to turnovers.
- Setting the Screen: The Center (5) must set a wide, legal base and hold the screen until the cutter has passed. A weak or moving screen will ruin the timing of the play.
- Using the Screen: The cutter (Player 3) needs to set up their defender by taking a step away from the screen before cutting hard shoulder-to-shoulder off the screener.
- High Post Vision: The Power Forward (4) must catch the ball and immediately face the basket (triple threat position) to survey the floor and make the correct read.
- Shot Readiness: The designated shooter must have their hands and feet ready before catching the ball. The shot must be taken in rhythm.
Common Mistakes
- Poor Spacing: If the shooters in the corners creep up the sidelines, it clogs the driving lanes and makes it easier for the defense to recover.
- Telegraphing the Pass: If Player 4 stares down Player 3 coming off the screen, the defense will anticipate the pass and jump the passing lane.
- Slipping the Screen Too Early: If Player 5 slips the screen before making contact with the defender, Player 3 will not get open.
- Lack of Misdirection: If Player 1 does not cut hard after the entry pass, their defender can sag into the lane and disrupt the play.
Variations & Progressions
- High-Low Action: If the defense switches on the down screen, Player 5 can seal the smaller defender and Player 4 can look for the high-low pass into the post.
- Pick and Roll: Instead of passing to the elbow, Player 1 can use a ball screen from Player 4 or 5 at the top of the key, initiating a standard pick-and-roll out of the Horns alignment.
- Dribble Handoff (DHO): Player 4 can keep the ball and execute a dribble handoff with Player 2 or 3 cutting from the corner.
Age Adaptations
- Under 10 / Under 12: Focus heavily on the basic spacing and the fundamental skill of passing to the high post. You may need to simplify the screening action to a basic give-and-go.
- Under 14 / Under 16: Introduce the screening concepts and emphasize the timing of the cut. Teach the bigs how to read the defense and look for the high-low option.
- Open / Advanced: Incorporate multiple variations and reads based on how the defense reacts. Focus on the speed of execution and the precision of the stagger screens.