Mastering the Lineout Set Piece: Options and Execution
A comprehensive guide to executing flawless lineouts, featuring front, middle, and tail ball options with clear tactical diagrams.

Equipment Needed
Mastering the Lineout Set Piece: Options and Execution
The lineout is one of the most critical set pieces in Rugby, providing a primary platform for launching structured attacks. A well-executed lineout requires precision timing, strong lifting technique, and clear communication between the hooker, jumpers, and scrum-half. This resource breaks down three essential lineout calls—front, middle, and tail—and provides the tactical diagrams and coaching points you need to implement them effectively.
1. Overview
This drill focuses on developing a robust lineout system. It covers the core mechanics of throwing, lifting, and jumping, while introducing tactical variations based on field position and defensive alignment.
When to use it:
- As a foundational set piece session for the forwards.
- To establish reliable first-phase possession.
- When preparing specific attacking plays off lineout platforms.
2. Setup
Equipment Needed:
- 3-5 Rugby balls.
- Cones to mark the 5m and 15m lines (if not clearly marked on the pitch).
- Tackle shields (optional, for defensive pressure).
Pitch Setup:
- Use a standard 100m x 70m pitch, focusing on the touchline and the 5m/15m corridor.
Player Positions:
- Hooker (2): At the touchline, ready to throw.
- Jumpers (4, 5, 7): Positioned in the lineout.
- Lifters (6, 8): Supporting the jumpers.
- Scrum-half (9): Positioned to receive the ball.
- Backline (10, 12, 13, 11, 14, 15): Aligned for attack (optional, depending on the phase of the drill).
3. Step-by-Step Instructions
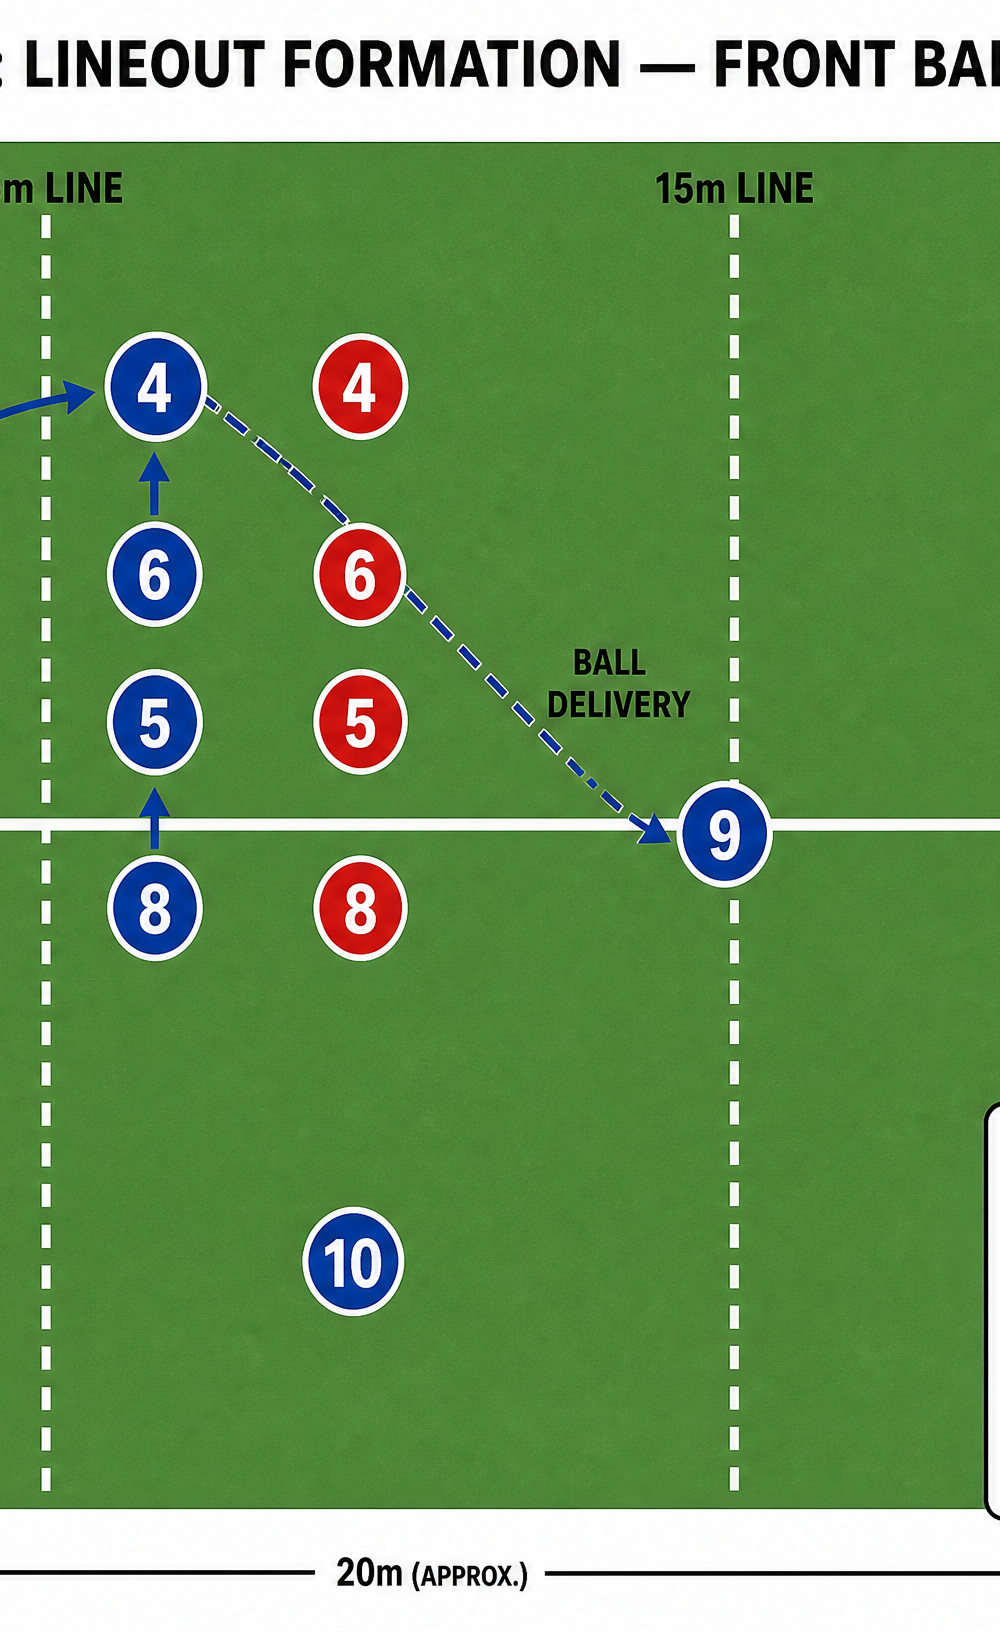
Option 1: The Front Ball (Blue 1)
This is the safest and quickest option, ideal for securing possession when under pressure or near your own try line.

- The Call: The lineout leader calls "Blue 1" (or your team's designated call for a front ball).
- The Movement: The front jumper (4) steps back slightly, then explodes forward and upward.
- The Lift: The front lifter (6) and rear lifter (5 or 8) secure their grips and drive the jumper high.
- The Throw: The hooker (2) delivers a fast, flat throw to the peak of the jumper's reach.
- The Delivery: The jumper secures the ball and immediately delivers it down to the scrum-half (9).
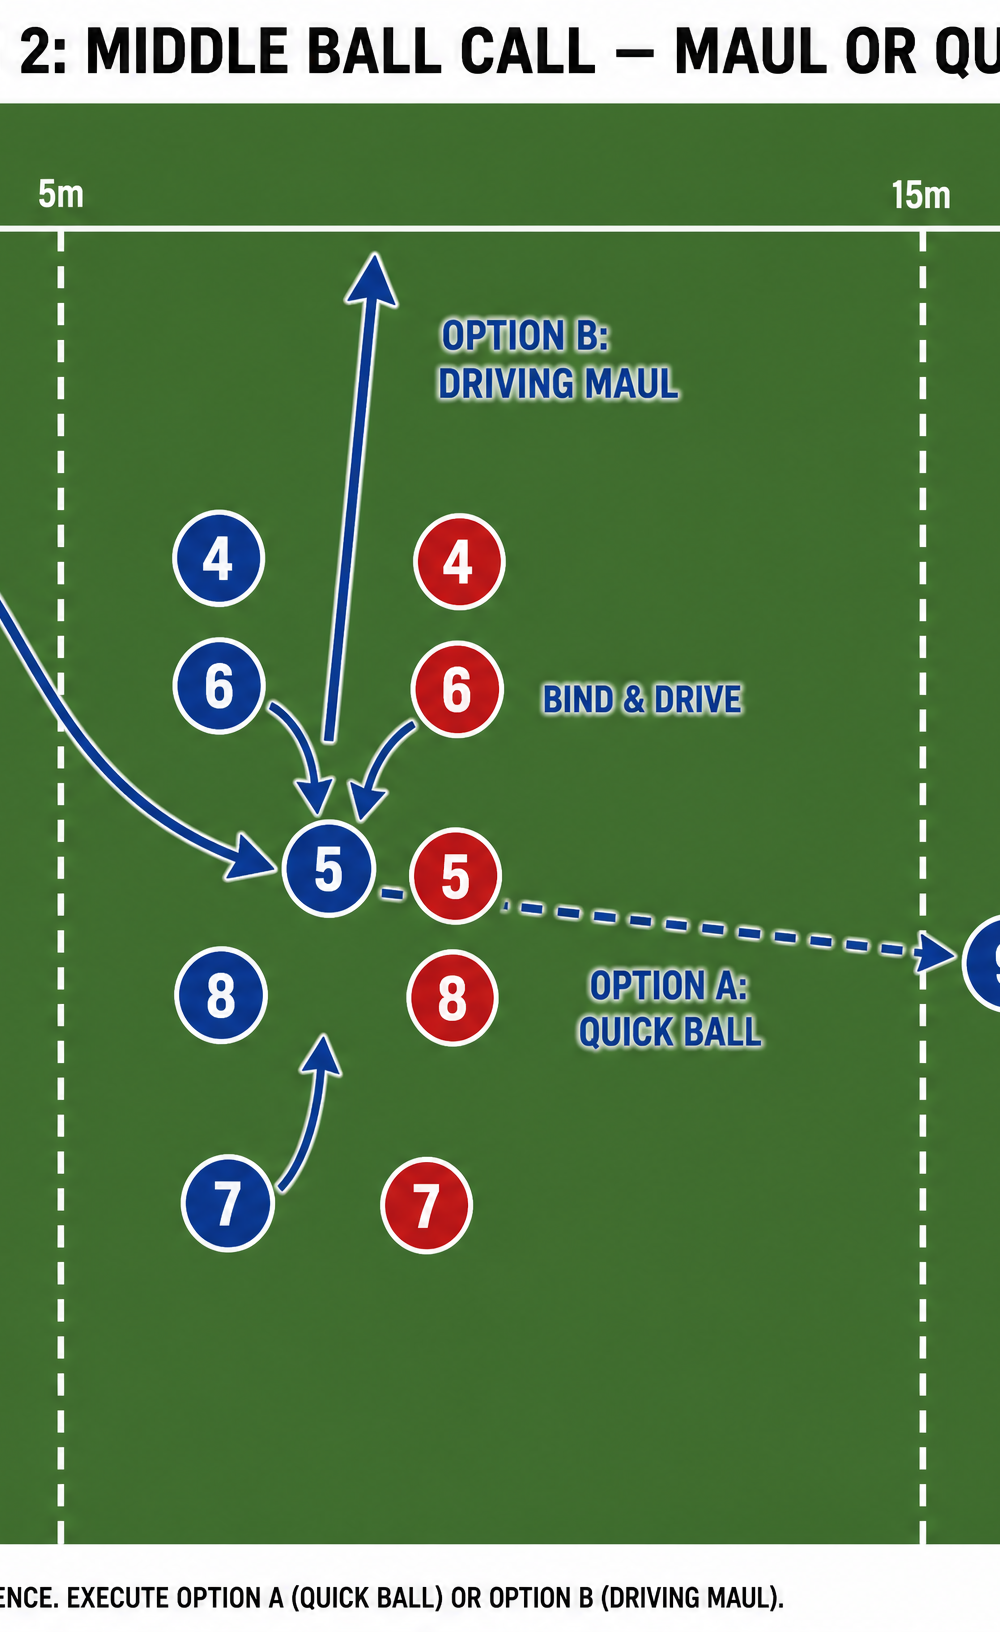
Option 2: The Middle Ball (Maul or Quick Release)
Targeting the middle of the lineout offers options to either set a driving maul or release quick ball to the backs.
- The Call: The lineout leader calls the middle ball.
- The Movement: The middle jumper (5) fakes forward, then drives upward.
- The Lift: The lifters (4 and 6/8) secure the lift.
- The Throw: The hooker delivers a slightly lofted throw to the middle.
- The Decision:
- Option A (Quick Ball): The jumper immediately passes to the scrum-half (9) for a backline attack.
- Option B (Driving Maul): The jumper brings the ball down, turns away from the opposition, and the forwards bind tightly to drive the maul forward.
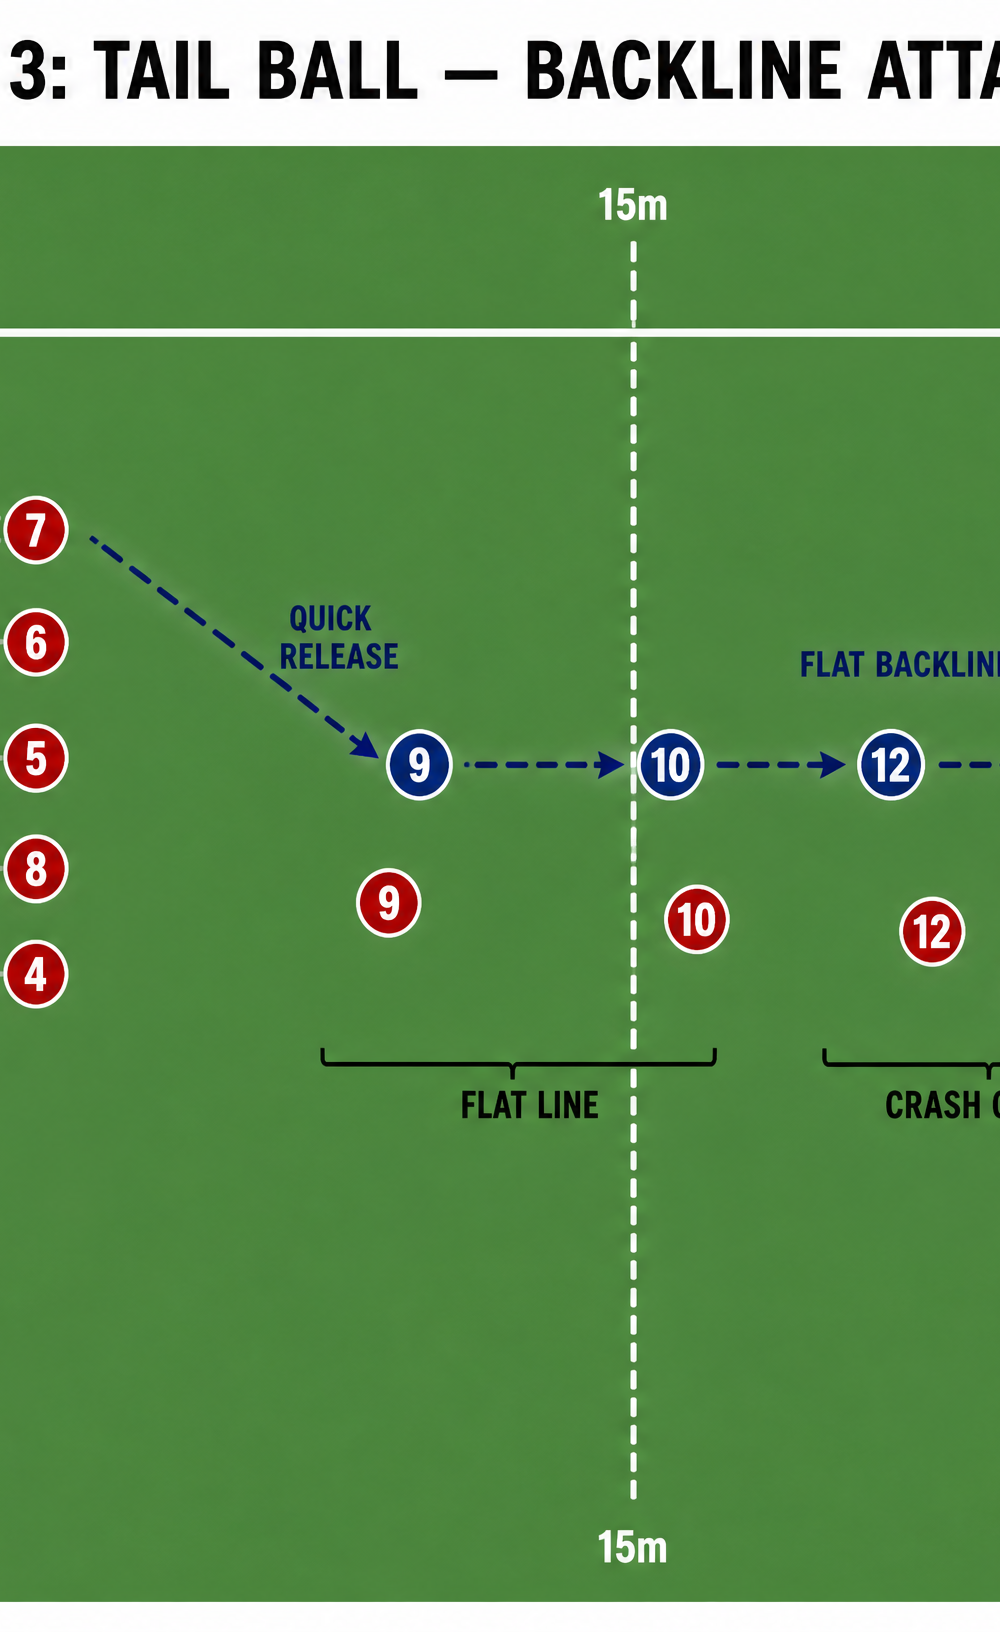
Option 3: The Tail Ball (Backline Attack)
Throwing to the tail stretches the defense and creates space for wide backline moves.
- The Call: The lineout leader calls the tail ball.
- The Movement: The tail jumper (7) coordinates with the lifters (5 and 8) for a rapid ascent.
- The Throw: The hooker must deliver a powerful, accurate throw over the front and middle pods.
- The Delivery: The jumper secures the ball and delivers it quickly to the scrum-half (9).
- The Attack: The scrum-half fires a long pass to the fly-half (10), initiating a flat backline move or a wide attack to the wing (11).
4. Key Coaching Points
- Timing is Everything: The hooker's throw must perfectly match the jumper's ascent. The ball should arrive just as the jumper reaches their peak height.
- Strong Core and Posture: Jumpers must keep their core tight and body straight in the air. Lifters must maintain a strong, wide base and drive through their legs, not just their arms.
- Accurate Throwing: The hooker must hit the target area consistently. Practice throwing at different trajectories (flat for front, lofted for middle/tail).
- Deception: Jumpers should use subtle footwork and dummy jumps to confuse the defense before committing to the actual jump.
- Rapid Delivery: Once secured, the ball must be delivered to the scrum-half immediately to ensure quick phase play.
5. Common Mistakes
- Telegraphing the Jump: Jumpers looking directly at the spot they intend to jump to, giving away the call to the defense.
- Poor Lifting Technique: Lifters lifting with their backs instead of their legs, or failing to lock their arms out at the top of the lift.
- Inaccurate Throws: Hookers throwing not straight or overthrowing the jumper, resulting in a turnover.
- Slow Delivery: The jumper holding onto the ball too long in the air, allowing the defense to set up or contest the breakdown.
6. Variations & Progressions
- Defensive Pressure: Introduce opposition pods to contest the throw. This forces the attacking team to execute under pressure and improves decision-making.
- Movement Before the Throw: Have the forwards start in a tight cluster and rapidly move to their lifting positions just before the throw to disrupt defensive tracking.
- Peel Plays: Instead of delivering to the scrum-half, the jumper hands the ball to a forward peeling around the back of the lineout to attack the seam.
7. Age Adaptations
- Under 12s: Focus purely on the mechanics of the throw and the jump without lifting. Ensure safety is the priority.
- Under 14s/16s: Introduce supported lifting (if permitted by local union regulations) with a strong emphasis on technique and safety. Keep calls simple (front and middle).
- Open/Senior: Implement full lifting, complex calls, dummy jumps, and advanced backline moves off the lineout platform.