Mastering the Short Ball: Comprehensive Batting Drill & Tactics
Equip your batters with the footwork, decision-making, and execution skills required to confidently negotiate and attack short-pitched bowling.

Equipment Needed
1. Overview
Facing short-pitched bowling is one of the most intimidating challenges for any batter. A well-directed bouncer tests not only technique but also courage and decision-making under pressure. This comprehensive drill resource is designed to help coaches systematically develop a batter's ability to negotiate the short ball safely and effectively.
By breaking down the response into clear zones—ducking, swaying, fending, and attacking (pull/hook)—coaches can build confidence in their players. This drill focuses on rapid weight transfer, decisive footwork (back and across), and split-second shot selection, ensuring batters are equipped to handle hostile spells without compromising their wicket or safety.
2. Setup
Proper setup is critical for simulating realistic match conditions while maintaining a safe training environment. This drill is best conducted in a net session but can be adapted for open-field center wicket practice.
Equipment Needed
- 1x Bowling machine (highly recommended for consistency) or a capable throwdown specialist (using a Sidearm/Dog-thrower).
- 6-12x High-quality practice cricket balls (use softer balls or tennis balls for younger/beginner age groups).
- 2x Marker cones (to delineate the batter's safe movement zones).
- 1x Target mat or chalk (to mark the short-pitch landing zone on the pitch).
- Full protective batting gear (Helmet with grille, chest guard, arm guard, gloves, pads, box).
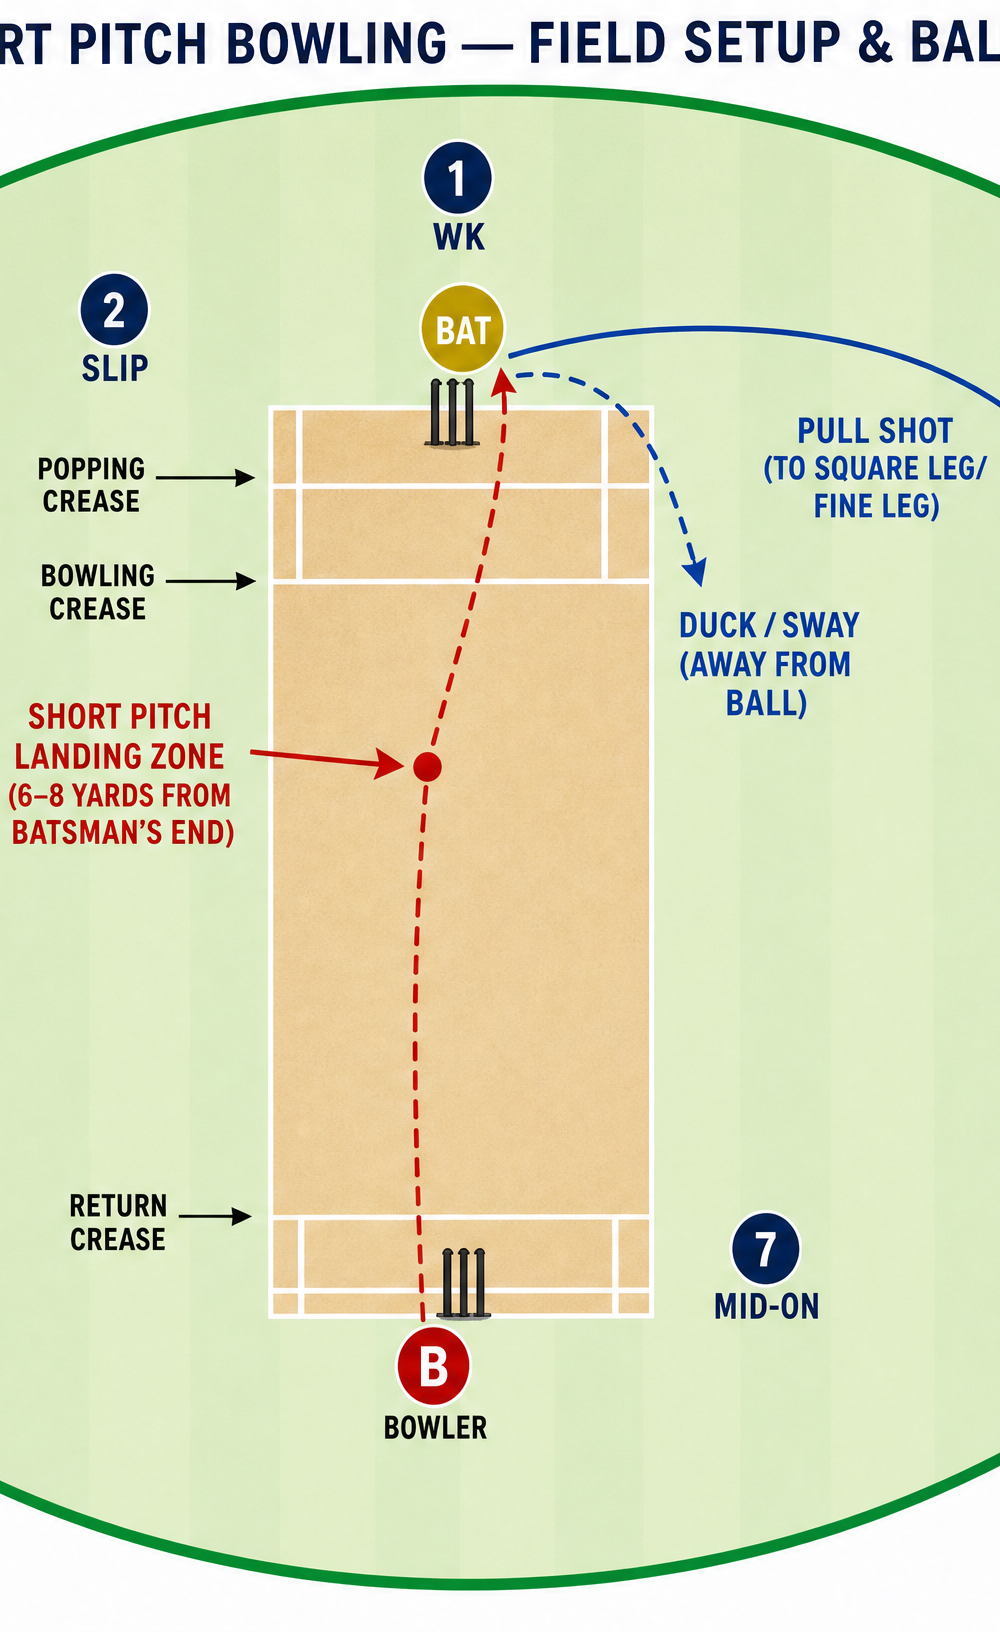
Pitch & Field Setup
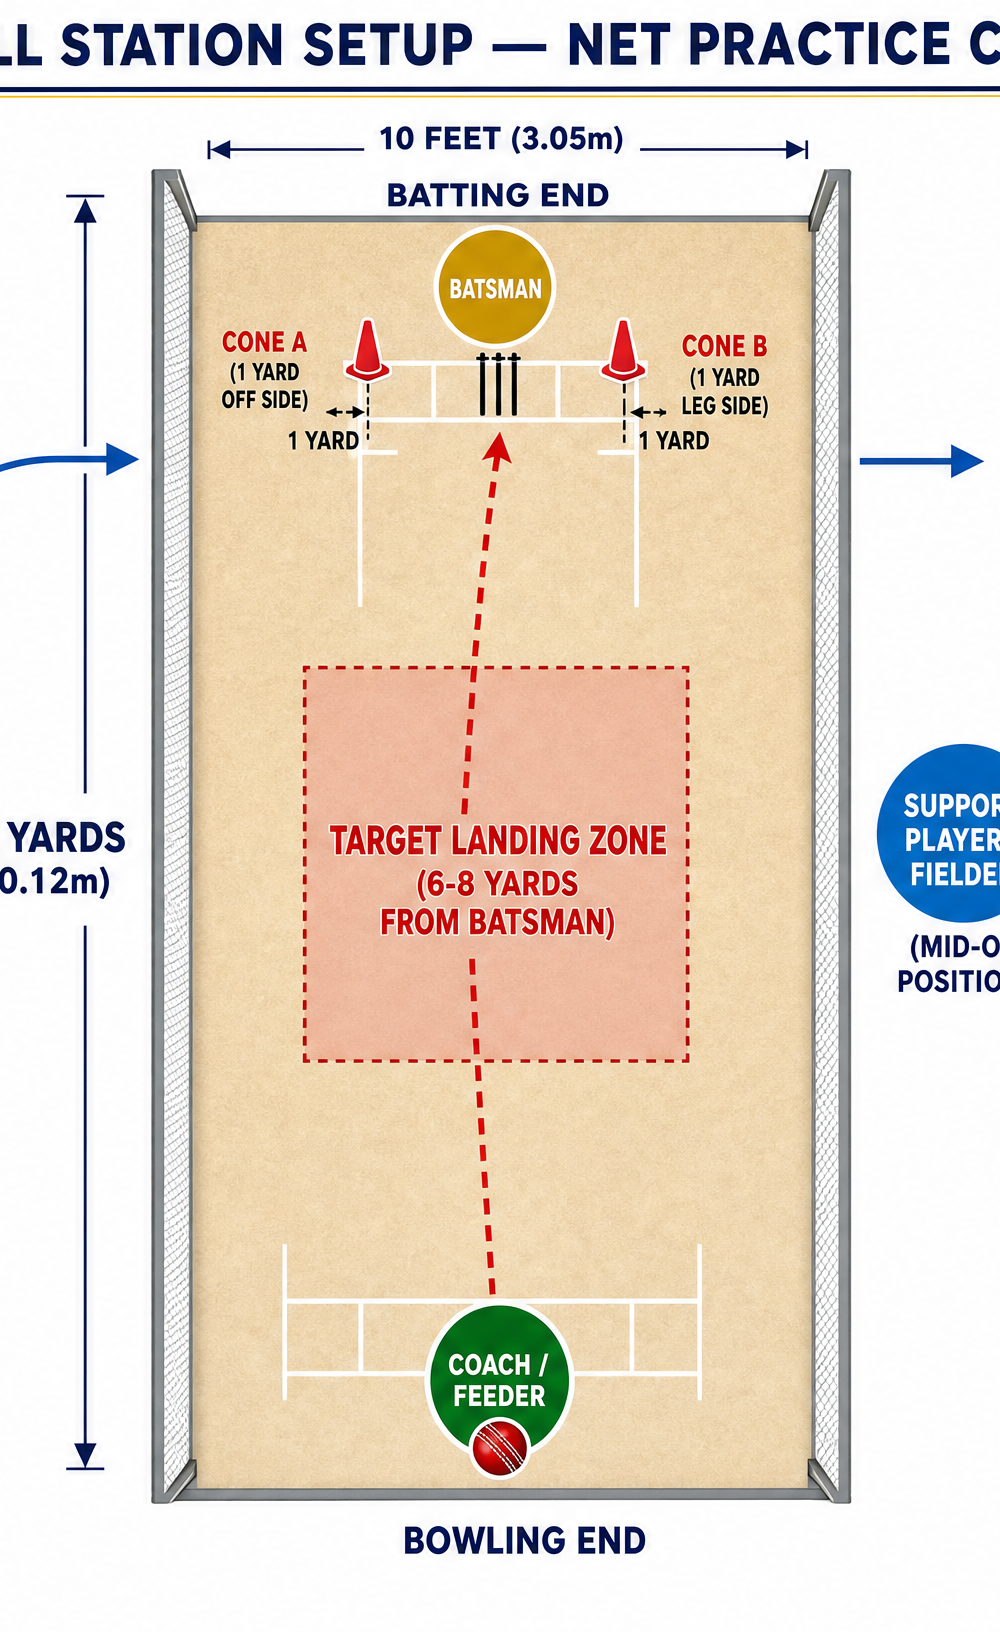
- The Pitch: Standard 22-yard pitch. Mark a "Short Pitch Landing Zone" roughly 6 to 8 yards from the batter's popping crease. This is the target area for the feeder.
- Batter's End: Place Cone A one yard outside the off-stump and Cone B one yard outside the leg-stump. These cones act as visual guides for the batter's initial back-and-across movement.
- Feeder's End: The coach or bowling machine operates from the bowling crease (22 yards away).
3. Step-by-Step Instructions
Run this drill in blocks of 6 deliveries per batter to simulate an over, maintaining high intensity and focus.
Step 1: The Stance and Trigger
The batter adopts their normal stance. As the feeder enters their delivery stride (or loads the machine), the batter executes a clear, balanced trigger movement—typically a small press forward or a slight back-and-across shuffle, keeping the head still and eyes level.
Step 2: The Feed
The coach delivers the ball, aiming strictly for the marked "Short Pitch Landing Zone" (6-8 yards from the batter). The pace should be challenging but appropriate for the batter's skill level.
Step 3: Initial Movement (Back and Across)
As the batter identifies the short length out of the hand, they must immediately push back and across their stumps. The back foot should move towards the off-stump (aiming near Cone A), getting inside the line of the ball. This movement creates space and allows the batter to watch the ball closely.
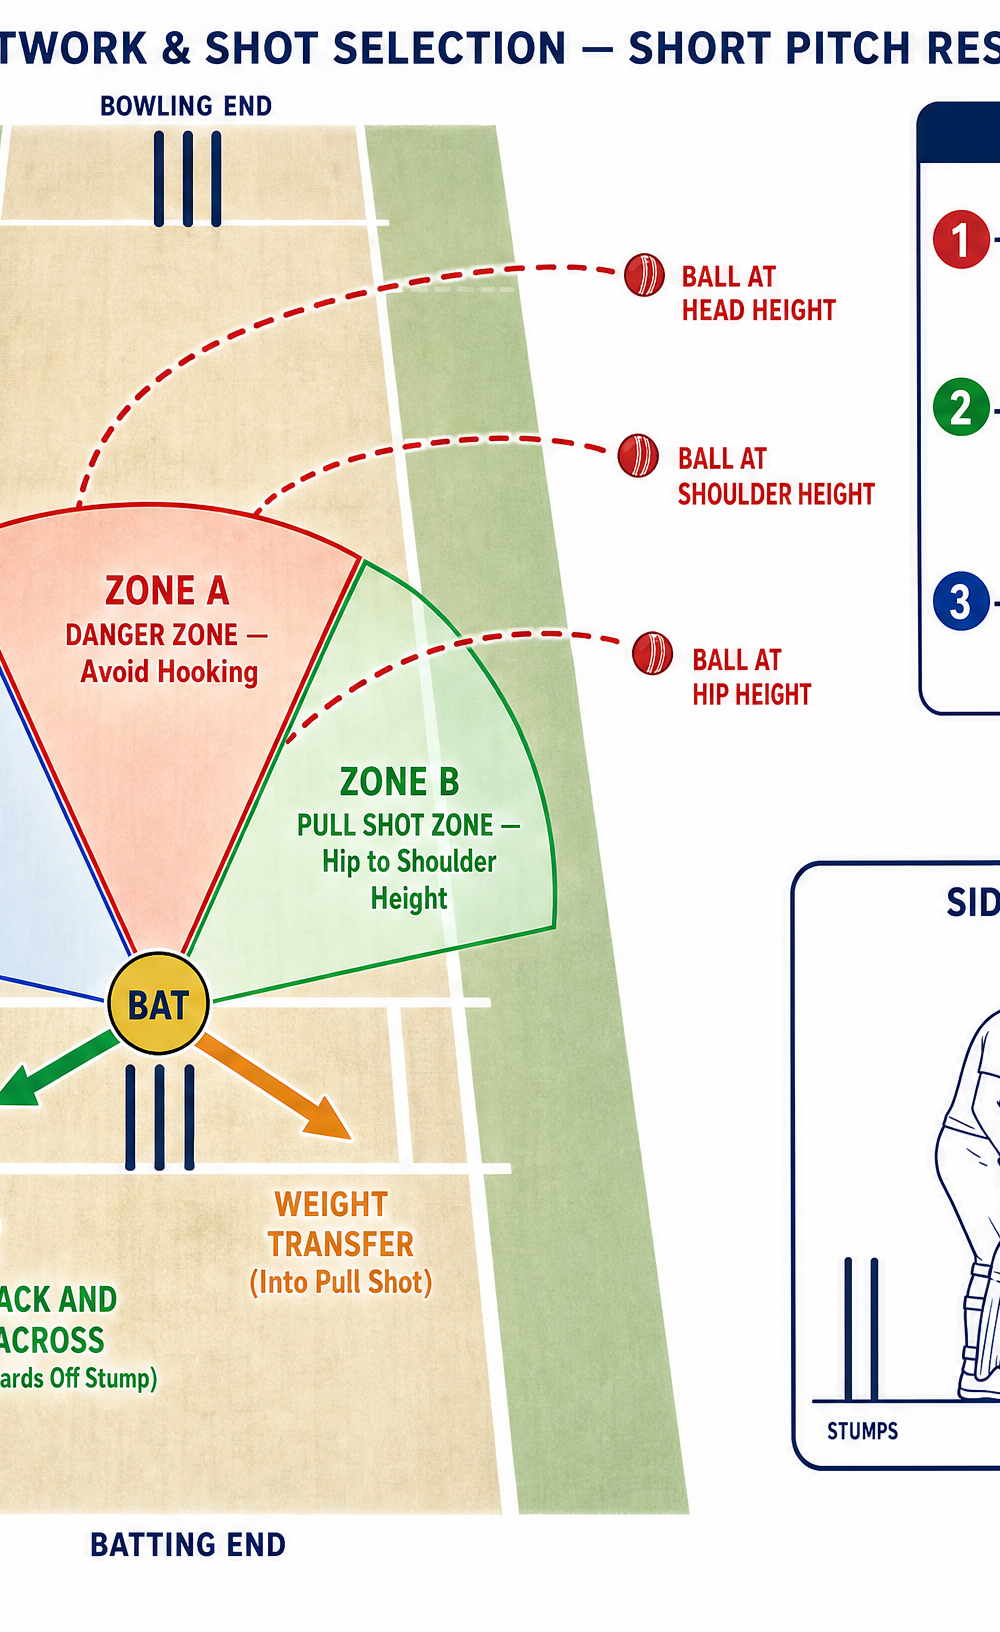
Step 4: Decision Making (The Zones)
The batter must instantly read the height and line of the ball to execute the correct response:
- Zone A (Head Height / Body Line): The primary defensive option. The batter must drop the hands, take the eyes off the ball at the last possible millisecond, and duck or sway out of the line.
- Zone B (Chest to Shoulder Height): The attacking option. If the ball is outside the line of the body and at a manageable height, the batter transfers weight aggressively and executes a pull or hook shot.
- Zone C (Wide of Off-Stump): The leave. The batter drops the wrists and allows the ball to pass harmlessly to the keeper.
Step 5: Execution and Follow-Through
Whether ducking, swaying, or attacking, the batter must maintain a strong, balanced base. On an attacking shot, the rotation of the hips and shoulders should drive the power, finishing with the bat high and weight controlled.
4. Key Coaching Points
To maximize the effectiveness of this drill, coaches should emphasize the following technical aspects:
- Get Inside the Line: The most crucial element of playing the short ball is getting the body inside the line of the delivery. Moving back and across the stumps ensures the batter is not cramped and can either attack or evade safely.
- Watch the Ball Onto the Bat (or Past the Head): Batters must resist the urge to blindly turn their head away. They must track the ball's trajectory for as long as possible, even when ducking.
- Control the Hands: When evading (ducking or swaying), the hands must drop completely. Leaving the bat hanging in the air (a "periscope") is a common way to be caught behind or at short leg.
- Weight Transfer on the Pull: For the pull shot, the initial movement is back, but the execution requires the weight to transfer forward and into the shot. Hitting off the back foot with weight falling backward results in a lack of control and aerial shots.
- Roll the Wrists: When executing the pull shot, batters should actively roll their wrists over the ball at the point of impact to keep the ball along the ground and minimize catching opportunities.
5. Common Mistakes
Watch closely for these frequent errors and correct them immediately:
- Fading Away (Backing Away to Leg Side): Instead of moving back and across to the off-side, the batter steps away towards the square-leg umpire. This exposes the stumps and makes the batter vulnerable to a fuller, straighter delivery.
- Taking the Eye Off the Ball Early: Fear often causes batters to flinch, close their eyes, or turn their head before the ball arrives, completely destroying their ability to react or play the ball.
- Playing from a Static Base: Failing to move the feet and attempting to play the short ball flat-footed. This results in being cramped for room and playing weak, uncontrolled shots.
- Bottom Hand Dominance on Defense: When forced to fend off a rising delivery aimed at the chest/ribs, a tight bottom hand will cause the ball to pop up to short leg or gully. Teach batters to use a relaxed bottom hand when fending.
6. Variations & Progressions
Keep the drill challenging and adaptable with these progressions:
- Progression 1: Mixed Lengths (The Surprise Bouncer): Once the batter is comfortable, the feeder should mix up the lengths. Deliver 4-5 good length or full balls, followed by a surprise short ball. This tests the batter's ability to react naturally rather than pre-meditating the short ball.
- Progression 2: Target Zones for the Pull: Place cones or markers in the deep square leg and mid-wicket regions. Award points for pull shots that are hit along the ground and pass between the designated markers.
- Variation 1: Tennis Ball / Soft Ball Feed: For players struggling with fear, replace the hard cricket ball with a tennis ball or softer practice ball. This allows them to focus purely on footwork and technique without the fear of impact.
7. Age Adaptations
Tailor the drill to suit the developmental stage of your players:
- Under 10s / Beginners: Exclusively use tennis balls or incredibly soft practice balls. The focus should be 100% on evasion (ducking and swaying) and basic footwork. Do not encourage the pull or hook shot until the defensive fundamentals and confidence are established.
- Under 12s - Under 14s: Introduce softer synthetic cricket balls. Begin teaching the pull shot to deliveries that sit up favorably. Emphasize rolling the wrists to keep the ball down.
- Under 16s and Open: Use standard hard cricket balls. Increase the pace of the feeds (using a bowling machine or Sidearm). Focus on split-second decision making, attacking the short ball, and dealing with hostile, body-line bowling.