Mastering the Short Ball: Pull & Hook Shot Progression Drill
Equip your batters with the technique, footwork, and confidence to aggressively take on short-pitched bowling with this structured three-stage drill.

Equipment Needed
1. Overview
Facing short-pitched bowling is one of the most intimidating challenges for a batter at any level of cricket. A well-directed bouncer tests not only a player's technique but their courage and decision-making under pressure. This comprehensive drill progression is designed to build a batter's confidence, improve their weight transfer onto the back foot, and develop the muscle memory required to execute attacking pull and hook shots safely and effectively.
Coaches should use this drill when batters are struggling to score off back-of-a-length deliveries, getting trapped on the crease, or showing apprehension against faster bowlers. By breaking the skill down into manageable stages, batters can master the horizontal bat swing before facing live, match-pace bowling.
2. Setup
Proper setup is crucial for safety and skill acquisition. Ensure all batters are wearing full protective equipment (helmet with grille, pads, gloves, thigh pad, chest guard, and arm guard).
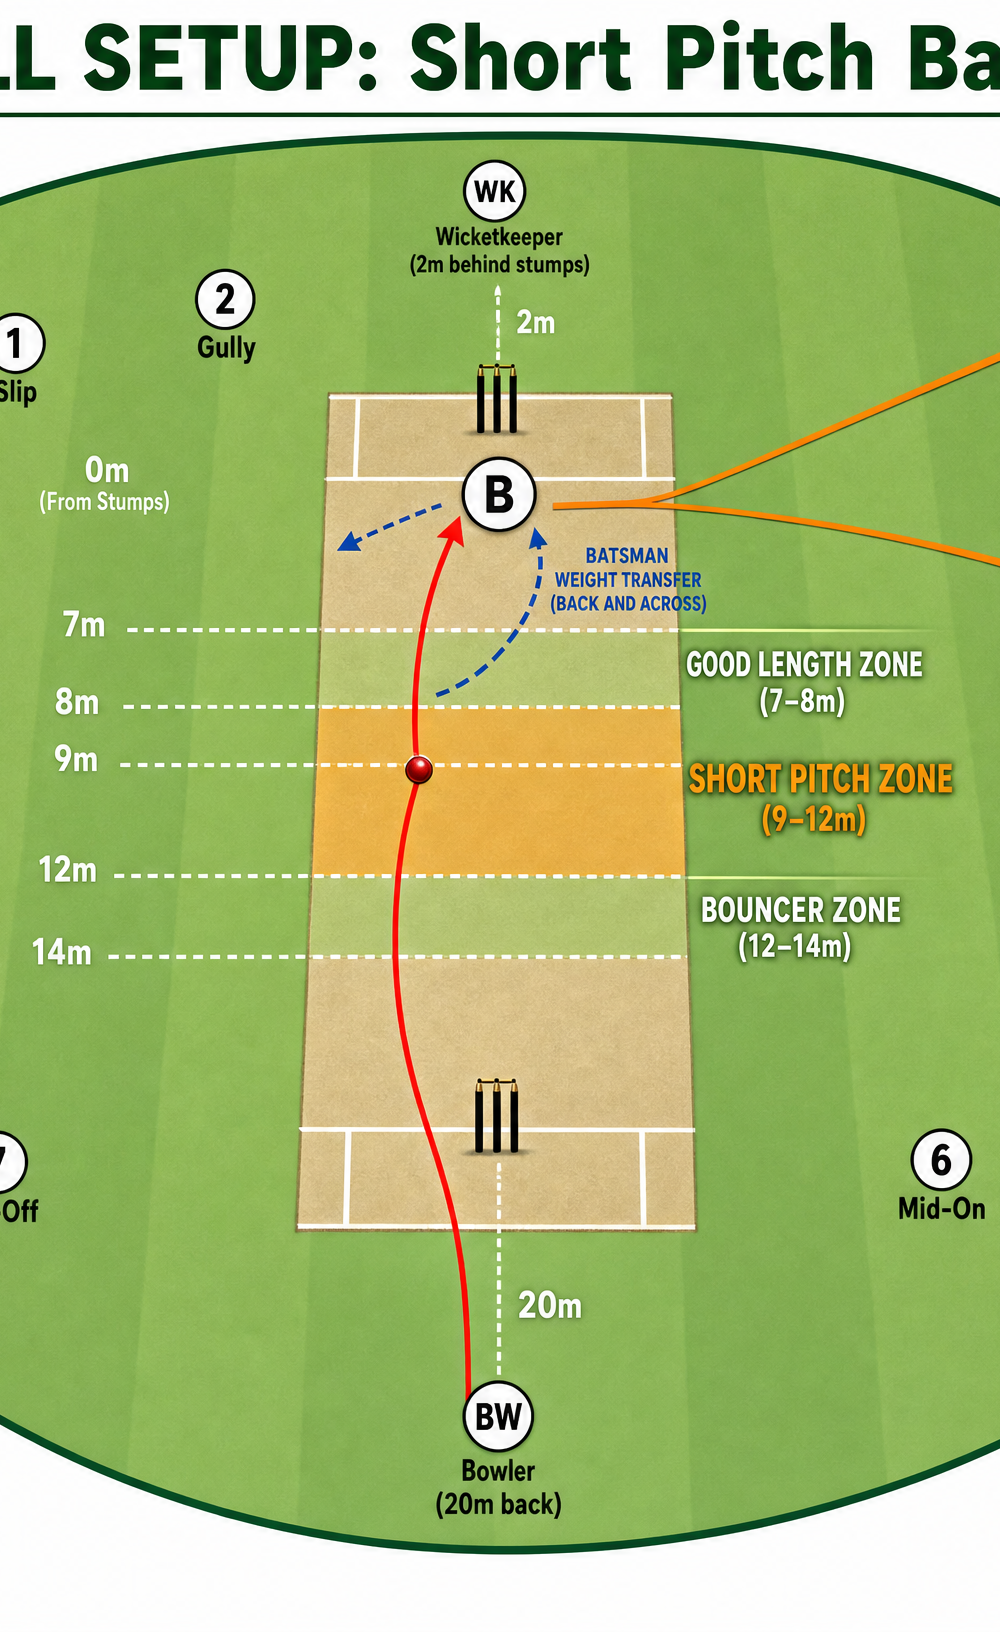
Pitch & Field Setup:
- Location: Standard 22-yard cricket pitch or artificial net surface.
- Markings: Use flat markers or cones to highlight the 'Short Pitch Zone' (approximately 9-12 meters from the batting stumps) and the 'Good Length Zone' (7-8 meters).
- Target Areas: Place cones on the square leg and fine leg boundaries to give the batter clear scoring targets.

Equipment Needed:
- 12-15 cricket balls (use softer training balls or tennis balls for younger/less experienced players before progressing to hard leather balls).
- Sidearm/throw-down stick (optional but recommended for Stage 2).
- Full batting protective gear.
- Stumps (at both ends).
- Flat markers/cones.
3. Step-by-Step Instructions
This drill uses a three-stage progression to gradually increase difficulty and decision-making.
Stage 1: The Feed Drill (Beginner)
This stage isolates the back foot movement and the horizontal bat swing without the fear of pace.
- Position the Feeder: The coach or feeder stands approximately 8 meters from the batter, slightly off the pitch to the off-side to avoid being hit.
- The Feed: Using underarm tosses or gentle overarm throws, the coach feeds the ball so it bounces and sits up around chest to shoulder height.
- The Execution: The batter must rock back, transfer their weight onto the back foot, and execute a controlled pull shot, aiming to hit the ball downwards towards the square leg boundary.
- Reps: Complete 3 sets of 6 deliveries per batter.
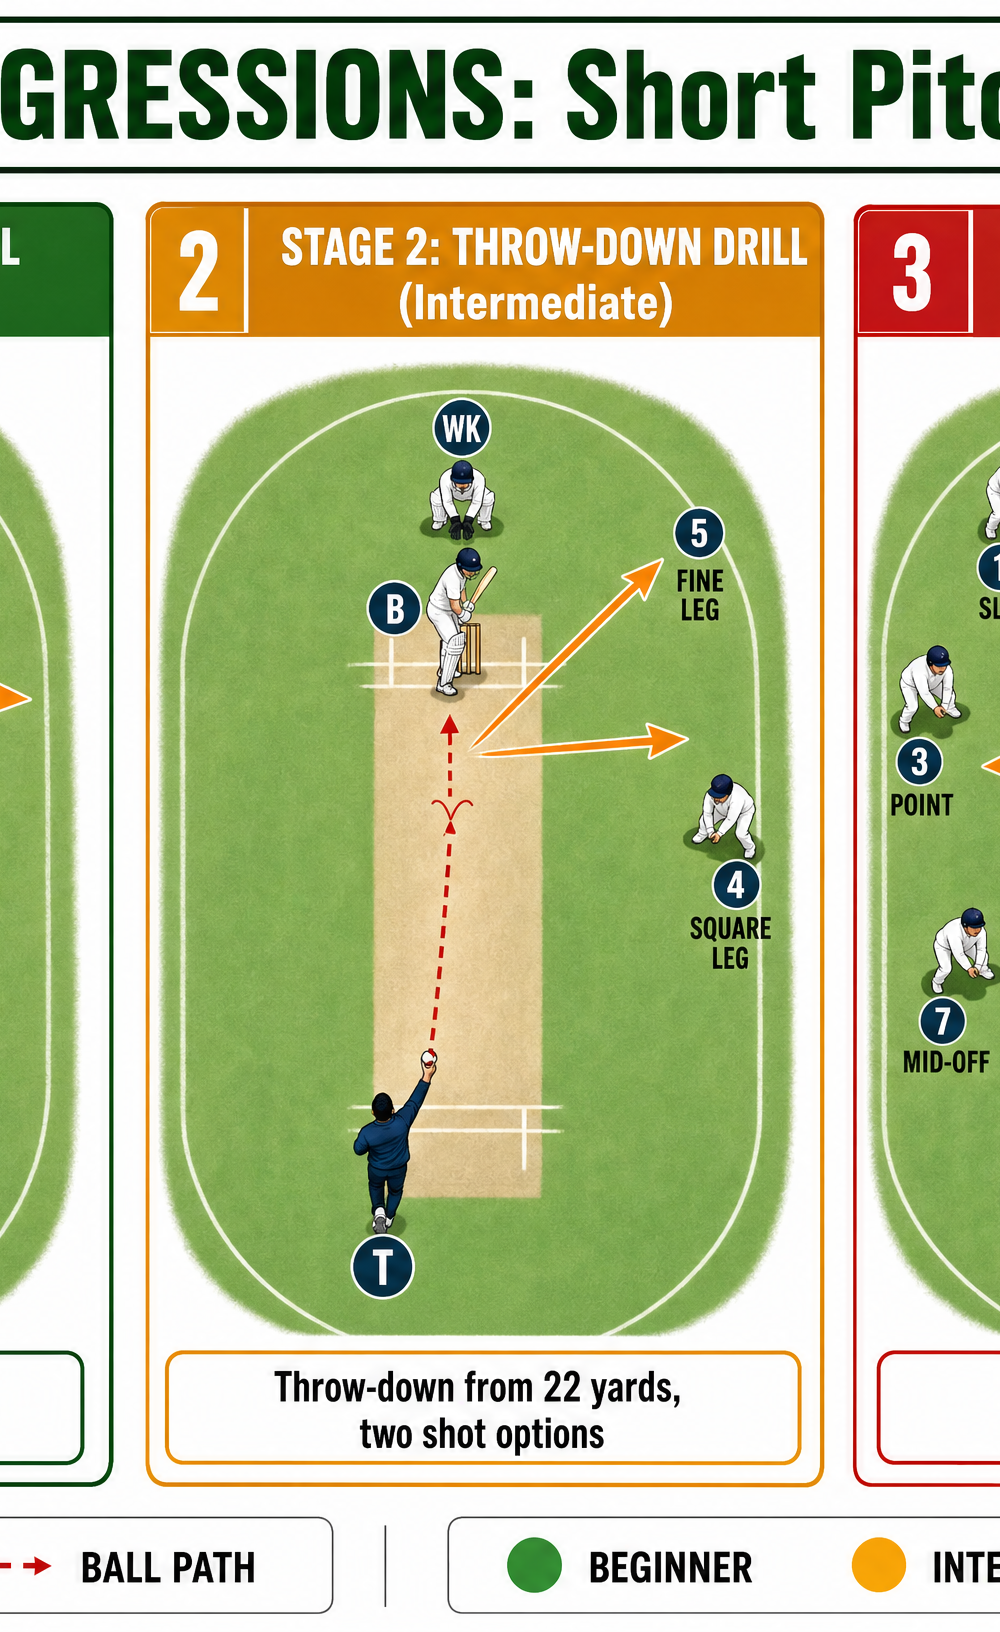
Stage 2: Throw-Downs from 22 Yards (Intermediate)
This stage introduces realistic trajectory and reaction time.
- Position the Thrower: The coach moves back to the bowling crease (22 yards away). A sidearm tool is highly recommended here to generate realistic bounce without exhausting the coach's shoulder.
- Target the Zone: The coach aims to land the ball consistently in the highlighted 'Short Pitch Zone' (9-12 meters from the stumps).
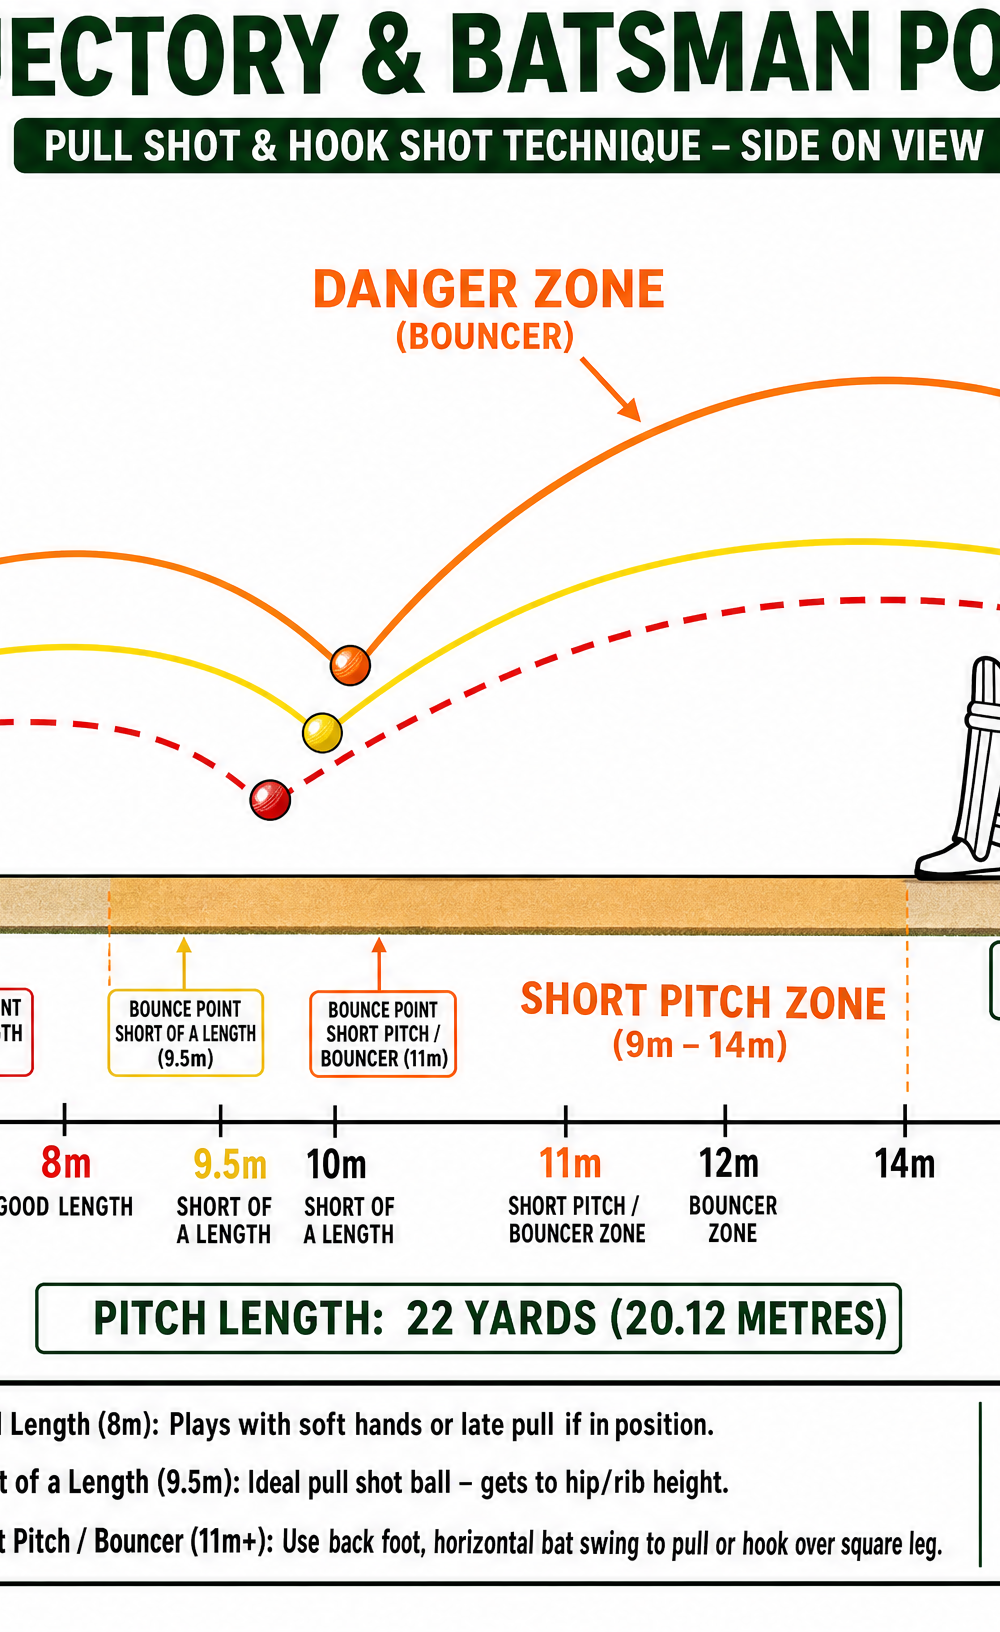
- Shot Selection: The batter must quickly judge the length. If the ball is between waist and chest height, they play the pull shot. If the ball is above shoulder height, they can choose to play the hook shot or duck/sway out of the way.
- Reps: Complete 4 overs (24 balls) per batter.
Stage 3: Live Bowling & Decision Making (Advanced)
This final stage replicates match conditions.
- Involve Bowlers: Bring in fast or medium-pace bowlers to bowl with a full run-up.
- Set a Field: Place fielders in realistic catching positions (e.g., deep square leg, fine leg, and a catching mid-wicket).
- The Challenge: Bowlers are instructed to mix up their lengths—bowling a combination of good length deliveries and short-pitched balls.
- Execution: The batter must now rely on early pick-up to determine whether to play forward or rock back to attack the short ball.
4. Key Coaching Points
When running this drill, coaches should consistently reinforce the following technical fundamentals:
- Early Pick-Up: Watch the ball closely out of the bowler's hand. Early length detection is the foundation of playing the short ball.
- Decisive Weight Transfer: The batter must push hard off the front foot, moving back and across the crease. The back foot should point towards the point/cover region to open up the hips.
- Stay Side-On: Avoid opening the chest to the bowler too early. Maintain a side-on position to keep control and power.
- High Hands and Horizontal Bat: The hands must go up quickly. The bat should swing horizontally, coming from high to low to keep the ball on the ground, or extending fully for a hook shot.
- Eyes Level: Keep the head still and eyes level with the ball at the point of contact.
5. Common Mistakes
Watch out for these frequent errors and correct them immediately:
- Taking the Eye Off the Ball: Batters often flinch or look away just before impact. Correction: Reinforce tracking the ball right onto the bat. Use softer balls to build confidence.
- Weight Stuck on the Front Foot: The batter tries to play a short ball without moving back, resulting in a cramped, uncontrolled shot. Correction: Return to Stage 1 and focus solely on the back-and-across footwork before introducing the swing.
- Dropping the Hands: Starting the swing with low hands causes the bat to come up underneath the ball, resulting in a top edge. Correction: Emphasize 'high hands' in the stance and backlift.
- Opening Up Too Early: Squaring up (chest facing the bowler) restricts the swing arc and reduces power. Correction: Keep the front shoulder pointing down the pitch for as long as possible.
6. Variations & Progressions
Adapt the drill to suit the skill level of your players:
- The Tennis Ball Drill (Easier): For players lacking confidence, use tennis balls or incrediballs. This removes the fear of injury and allows them to focus purely on technique.
- Target Practice (Harder): Place smaller target zones on the leg-side boundary. Award points for hitting specific gaps (e.g., in front of square vs. behind square).
- The 'Two-Bounce' Feed (Easier): In Stage 1, bounce the ball twice before it reaches the batter to slow down the pace and give them more time to get into position.
- Variable Bounce (Harder): Use a rough pitch or place a damp towel on the short-pitch zone to create unpredictable bounce, forcing the batter to watch the ball even closer.
7. Age Adaptations
- Under 10s: Focus entirely on safety and basic footwork. Do not use hard cricket balls for short-pitch practice. Use tennis balls and focus on the 'sway and duck' mechanics before teaching attacking shots.
- Under 12s - Under 14s: Introduce the pull shot using softer training balls. Emphasize rolling the wrists to keep the ball on the ground. Keep the feed slow and predictable.
- Under 16s & Open: Full progression using hard balls. Focus on decision-making (when to pull, hook, duck, or sway) and attacking field placements.