Penalty Pass Advantage Play
Learn how to exploit a 6 vs 5 numerical advantage with this rapid, pre-rehearsed attacking sequence following a penalty pass.

Equipment Needed
1. Overview
The Penalty Pass Advantage Play is a rapid, pre-rehearsed attacking sequence designed to exploit the momentary numerical advantage created when a defending player is penalised and must stand out of play. When a penalty pass is awarded, the penalised defender must stand beside the thrower (0.9 metres away) and cannot take part in the play until the ball is released. This creates a temporary 6 vs 5 attacking advantage on the court.
By executing a structured, fast-paced sequence before the defence can reset, the attacking team can systematically draw defenders out of position, create clear passing channels, and deliver a high-percentage feed into the goal circle. This play is particularly effective when awarded in the attacking centre third or the top of the goal third.
2. Setup
Equipment Needed:
- 1 Netball
- Full netball court (30.5m x 15.25m)
- Training bibs (minimum 7 attacking, 5 defending)
- Throw-down markers or cones (optional, for initial walk-throughs)
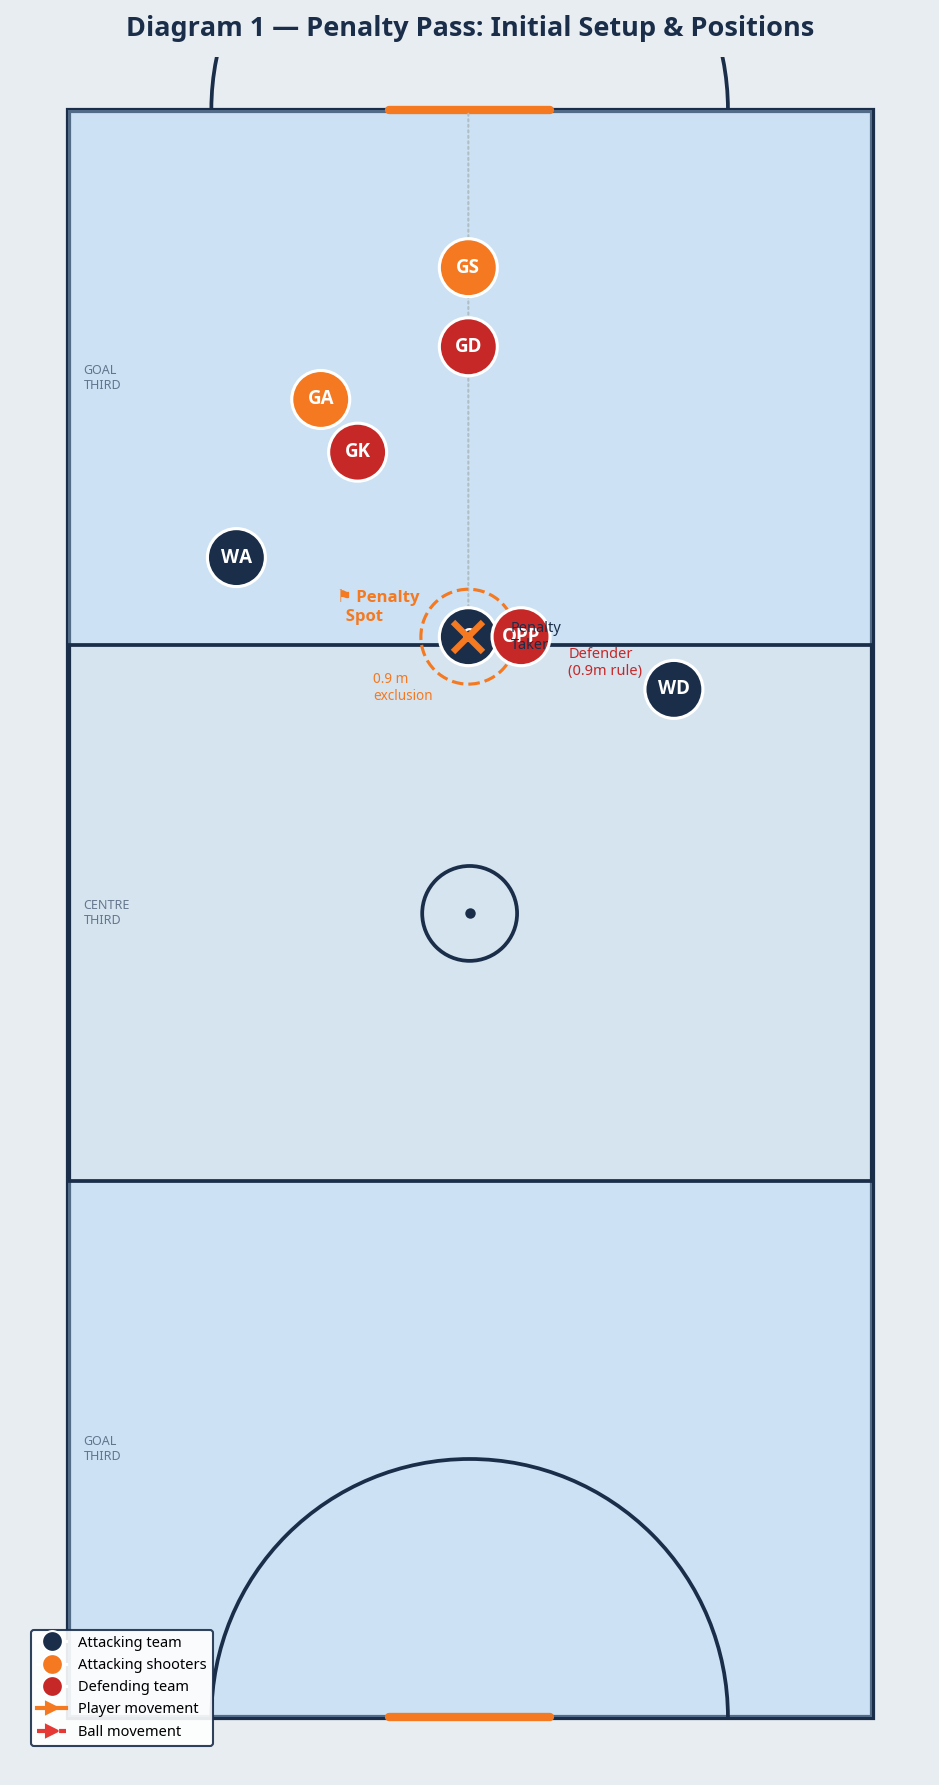
Court Setup & Player Positions:
The play is initiated from a penalty pass awarded near the transverse line separating the centre third and the goal third.
- Centre (C): Takes the penalty pass.
- Wing Attack (WA): Starts wide on the left side, midway through the goal third.
- Goal Attack (GA): Sets up on the edge of the goal circle, left side.
- Goal Shooter (GS): Positions deep in the goal circle near the post.
- Wing Defence (WD): Holds position in the centre third as a safety reset option.
- Opposing Defender (OPP): The penalised player, standing beside the C.
3. Step-by-Step Instructions
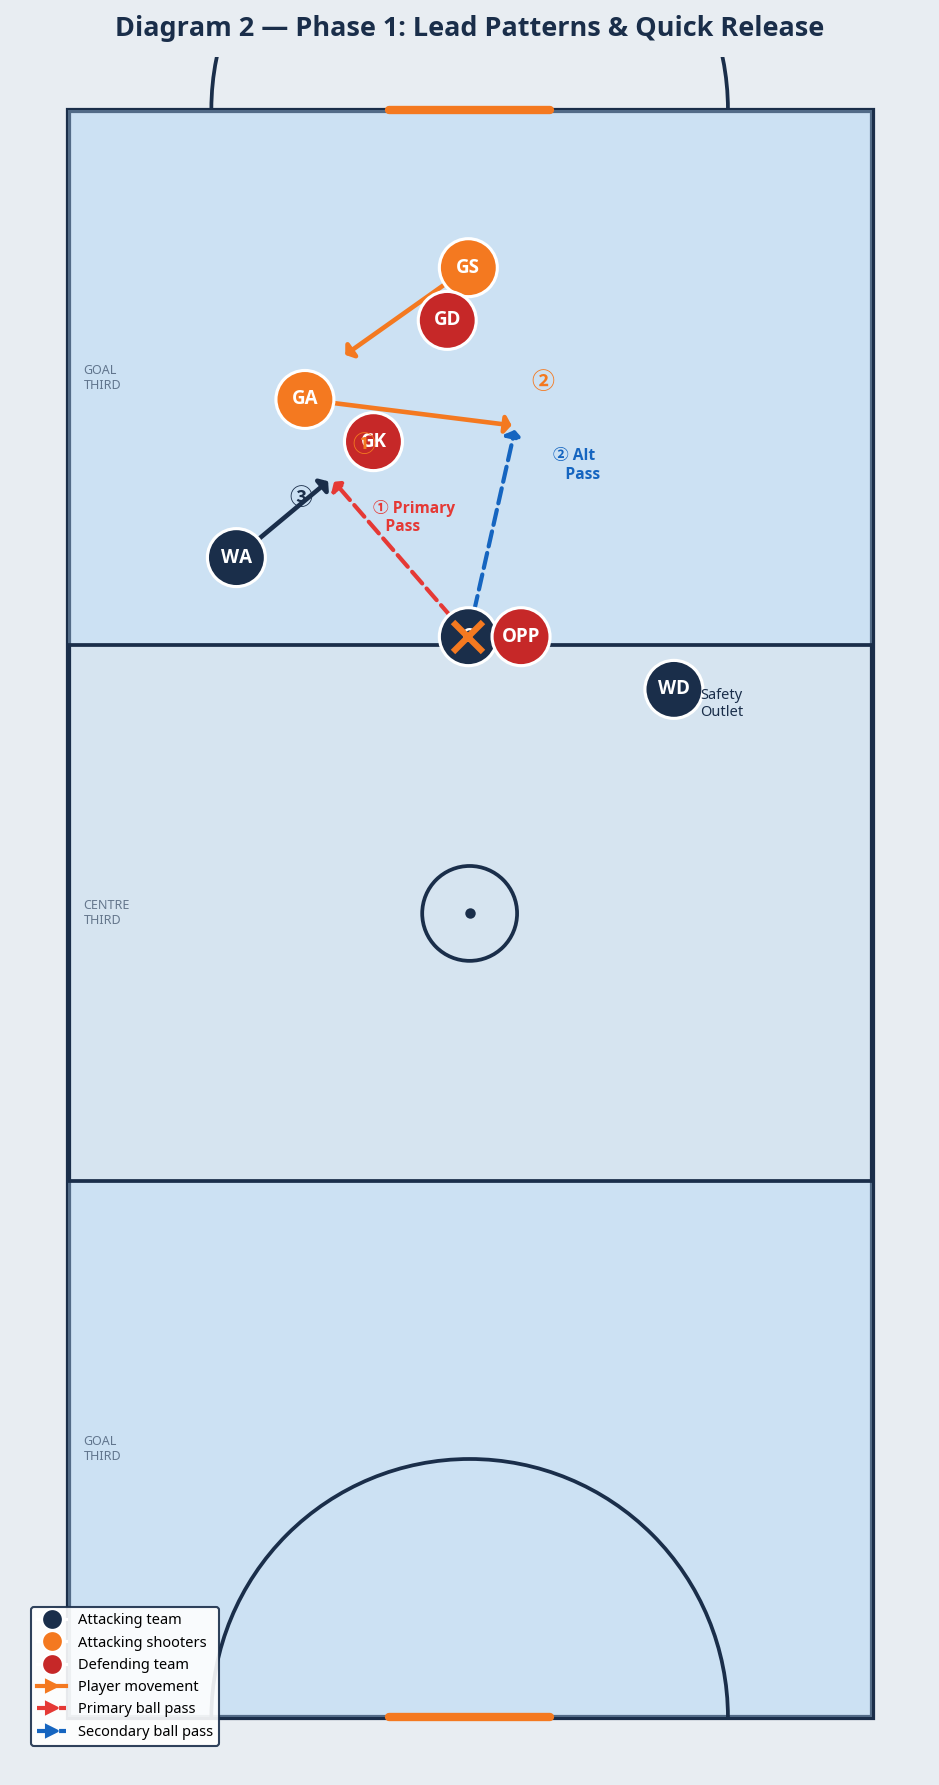
Phase 1: The Lead and Quick Release
- The Setup: The Centre (C) steps up to the penalty mark immediately. Do not wait. The penalised defender stands beside them.
- The Clear: The Goal Shooter (GS) drives hard from deep in the circle towards the near post on the left side, drawing the Goal Keeper (GK) with them.
- The Cut: Simultaneously, the Goal Attack (GA) cuts aggressively across the top of the goal circle from left to right. This movement is designed to drag the Goal Defence (GD) away from the primary passing channel.
- The Drive: The Wing Attack (WA) drives powerfully into the central space just vacated by the GA's cut.
- The Release: The Centre (C) delivers a fast, flat, and direct pass (Primary Pass) to the driving WA. If the WA is covered, the C looks to the GA cutting across the circle (Secondary Pass).
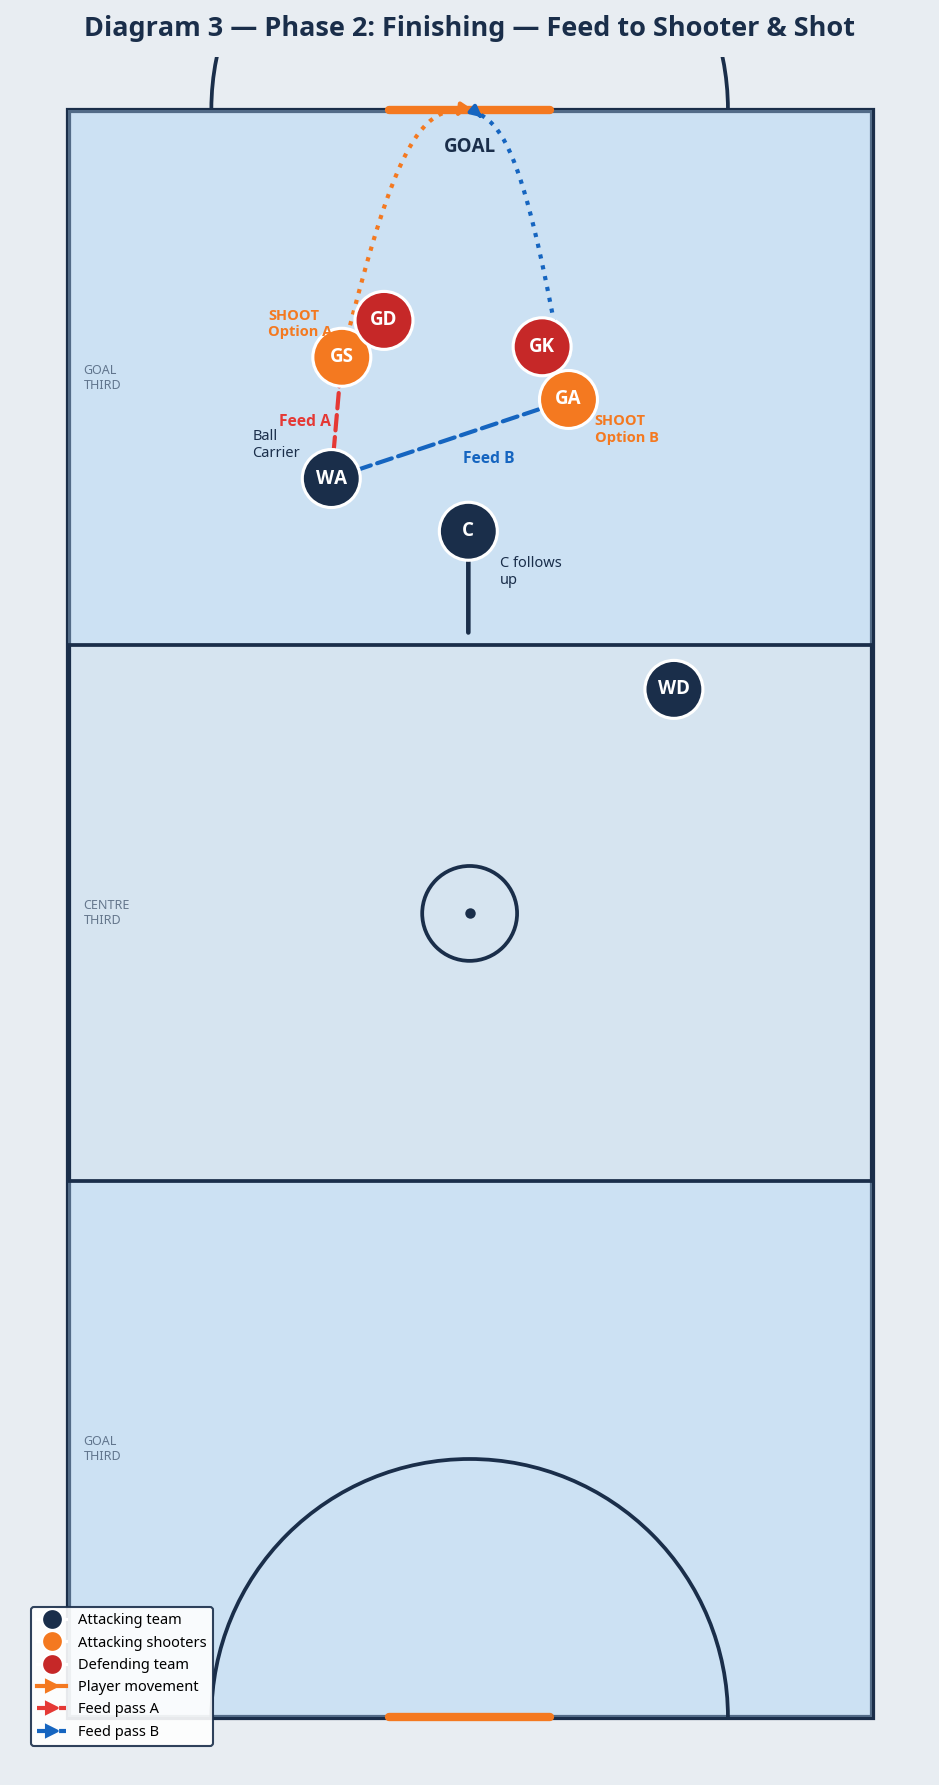
Phase 2: The Feed and Finish
- The Catch: The WA receives the ball at the top of the goal circle, perfectly balanced and facing the post.
- The Feed: The WA now has dual feeding options:
- Option A: A quick drop pass to the GS holding position at the near post.
- Option B: A lofted pass to the GA who has completed their cut and established front position on the right side of the circle.
- The Support: The C follows their pass to the top of the circle to offer a reset option or position for a potential rebound.
- The Finish: The receiving shooter (GS or GA) balances and takes the high-percentage shot.
4. Key Coaching Points
- Speed of Execution: The entire play hinges on the C taking the penalty quickly before the un-penalised defenders can adjust to cover the missing player's zone.
- Timing of the Leads: The GA must initiate their cut just before the WA drives. If they move at the exact same time, they risk bringing their defenders into the same space, cluttering the passing channel.
- Eye Contact: The C must make early eye contact with the WA to signal the play is on.
- Strong Takes: The WA must attack the ball strongly. Because the play is fast, defenders will look to intercept; the receiver must meet the ball, not wait for it.
- Court Balance: The WD must remain disciplined, staying back in the centre third to provide a safety pass if the primary options are shut down.
5. Common Mistakes
- Hesitation on the Whistle: The C waits for players to set up perfectly, allowing the defence time to organize and negating the numerical advantage.
- Cluttered Top of Circle: The GA fails to clear out far enough to the right, leaving the GD in a position to contest the pass intended for the WA.
- Floating Passes: The C throws a loopy, high pass to the WA instead of a hard, flat chest pass, giving the defence time to recover and intercept.
- Shooter Movement: The GS drifts out of the circle instead of holding a strong, deep position, removing the most direct scoring threat.
6. Variations & Progressions
- Progression 1 (The Fake Cut): The GA fakes the drive across the circle, plants their foot, and cuts back to the left side to receive the primary pass direct from the C.
- Progression 2 (The Give and Go): The C passes to the WA, who immediately pops a short pass back to the C driving to the circle edge, who then delivers the final feed to the shooters.
- Variation 1 (Right Side Setup): Mirror the entire play, initiating the WA drive from the right side and having the GA cut left.
7. Age Adaptations
- Under 10s: Focus purely on the speed of taking the penalty pass. Teach players to look for the first available teammate driving toward them, rather than running the full structured pattern.
- Under 12s / Under 14s: Introduce the concept of "clearing space." Teach the GA to run away to create a hole for the WA to run into. Emphasize strong, flat passing.
- Under 16s / Open: Run the full play at match speed. Focus on the precision of the timing, the quality of the WA's feed into the circle, and introducing the variations to keep the defence guessing.