Football
Drill
advanced
Rapid-Fire Reflex: Advanced Goalkeeper Shot-Stopping & Recovery Drill
Develop your goalkeeper's reaction time, footwork, and recovery speed under high-pressure, multi-shot scenarios.
Jul 2, 20265 min read20 min drill5 players

Equipment Needed
1 full-size goal
10-15 footballs
4 marker cones
1. Overview
The Rapid-Fire Reflex drill is designed to push goalkeepers to their limits by simulating chaotic, high-pressure match scenarios. Rather than focusing on a single, isolated save, this drill forces the goalkeeper to make a save, recover immediately, and reposition for a subsequent shot. It builds explosive power, lateral agility, and the mental resilience required to stay focused when the penalty area is under siege.
This drill is ideal for the middle or end of a training session when you want to test the goalkeeper's fitness and concentration under fatigue.
2. Setup
- Pitch Area: Penalty area (18-yard box) of a standard football pitch (100-110m x 64-75m).
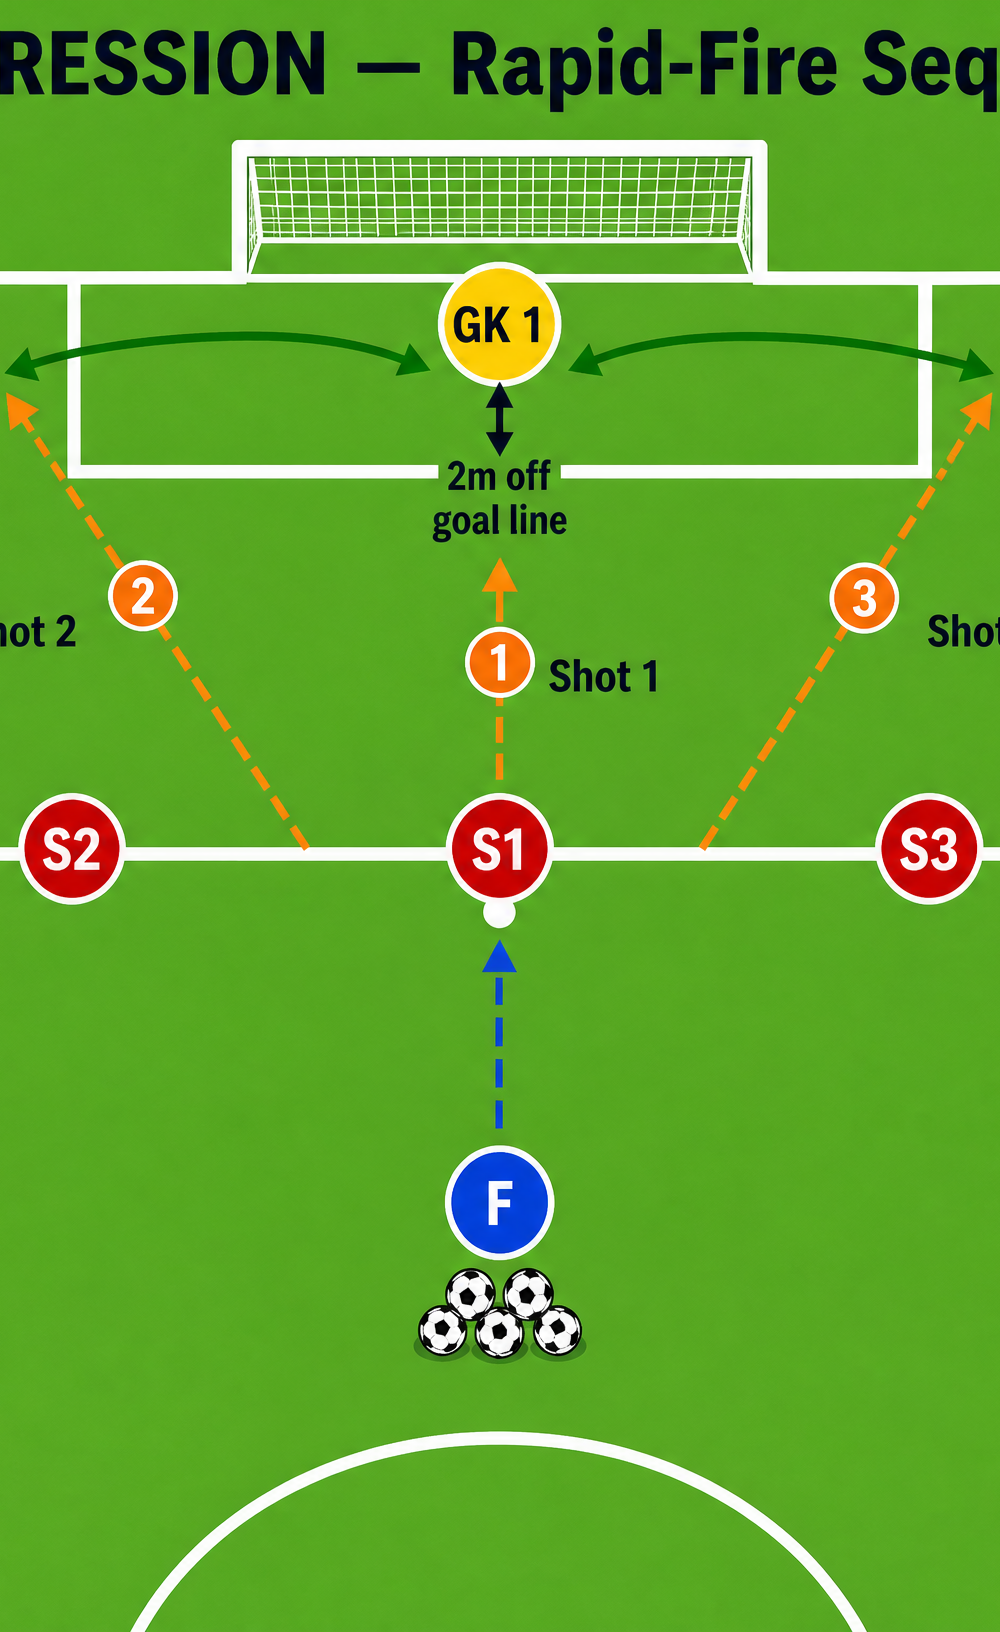
- Players Required: 1 Goalkeeper (GK 1), 1 Feeder/Server (F), and 3 Strikers/Shooters (S1, S2, S3).
- Equipment: 1 full-size goal, 10-15 footballs, 4 marker cones (optional, to mark striker positions).
Positioning:
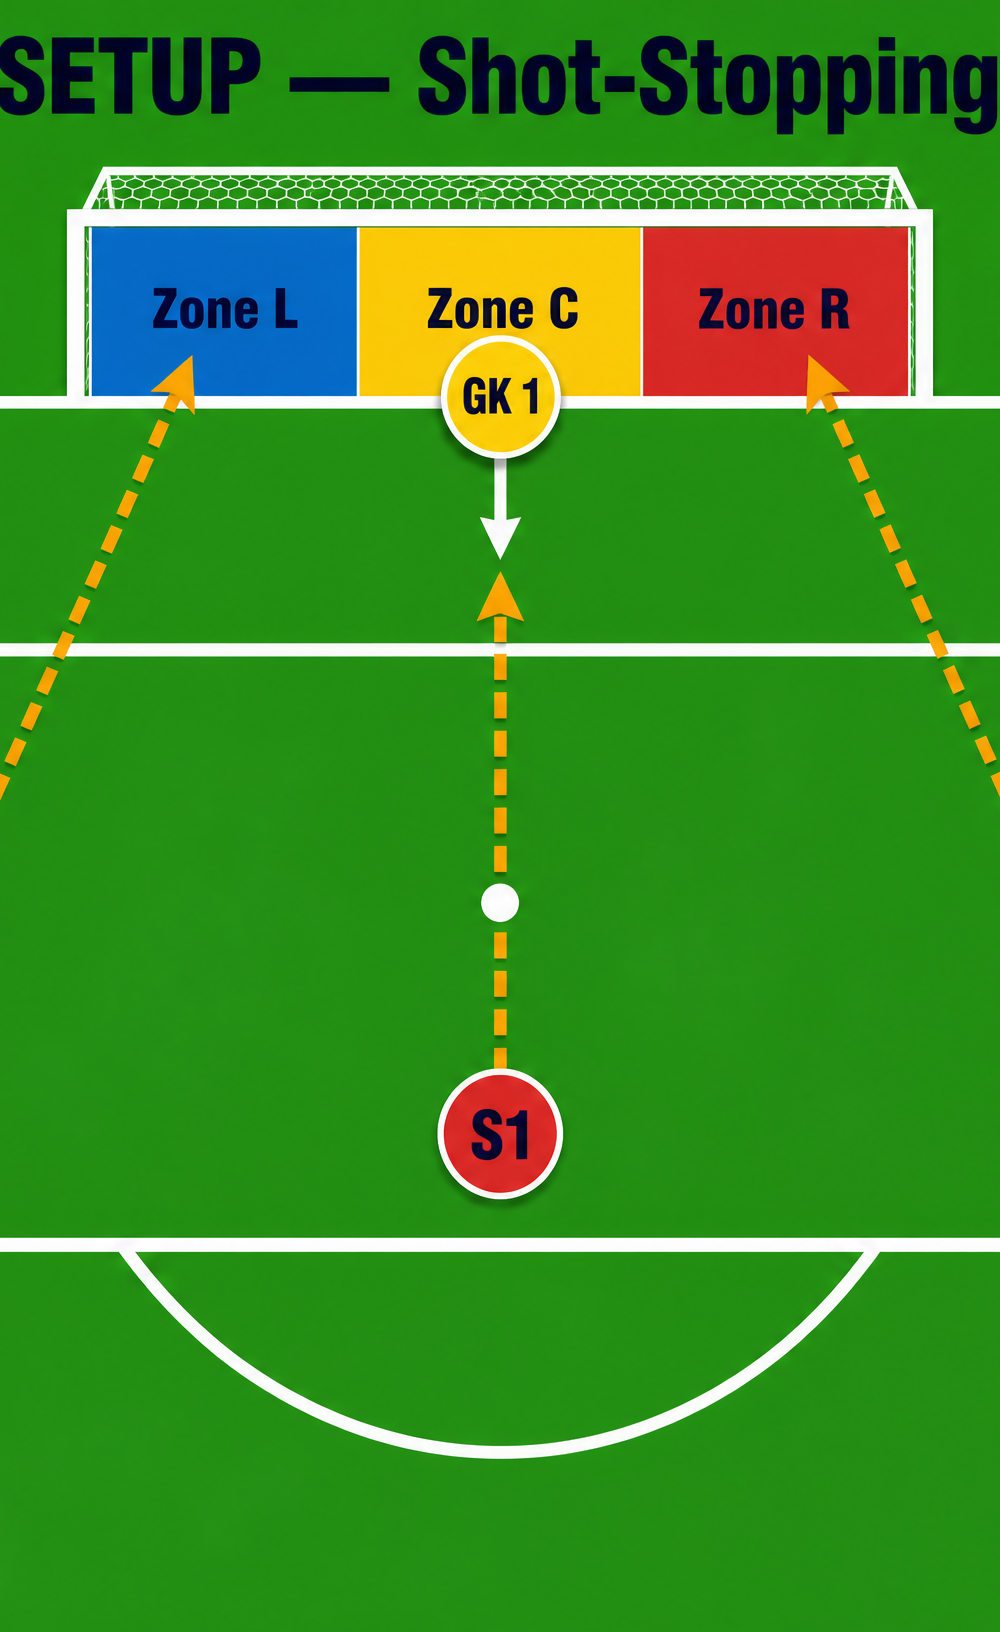
- GK 1 starts centrally on the goal line.
- S1 is positioned centrally on or just behind the penalty spot (12 yards out).
- S2 is positioned wide left, roughly at the corner of the 6-yard box or slightly wider.
- S3 is positioned wide right, mirroring S2.
- Feeder (F) stands 5-10 metres behind S1 with the supply of footballs.

3. Step-by-Step Instructions
- The Trigger: The Feeder (F) shouts "Play!" and plays a firm pass along the ground to the central striker (S1).
- Shot 1 (Central): As the ball travels to S1, the Goalkeeper (GK 1) must take a short, explosive step off the line to narrow the angle. S1 takes a touch (or hits first-time) and strikes firmly at goal. GK 1 attempts the save.
- Recovery & Reposition: Immediately after the save (or goal), GK 1 must recover to their feet quickly and shuffle laterally towards the left post.
- Shot 2 (Wide Left): The Feeder immediately plays a second ball to S2. S2 shoots aiming for the near or far post. GK 1 must set their feet just before S2 strikes the ball and attempt the save.
- Final Recovery: GK 1 recovers again, this time shuffling rapidly across the goalmouth towards the right post.
- Shot 3 (Wide Right): The Feeder plays a third ball to S3, who shoots. GK 1 makes the final save of the sequence.
- Reset: The goalkeeper rests for 30-45 seconds while the balls are retrieved, then the sequence repeats. Complete 4-6 sets.
4. Key Coaching Points
- Set Position: The goalkeeper MUST be stationary and balanced ("set") at the exact moment the striker makes contact with the ball. Moving while the shot is struck drastically reduces reaction time.
- Explosive Recovery: Emphasize getting back to the feet quickly using the correct technique (not rolling over onto the stomach). The core must be engaged to spring back up.
- Efficient Footwork: Use quick, sharp side-steps (shuffling) to move laterally across the goal. Do not cross the feet, as this compromises balance.
- Angle Play: Ensure the goalkeeper is stepping out slightly for each shot to narrow the angle, rather than staying glued to the goal line.
- Handling vs. Parrying: Encourage the goalkeeper to catch and hold the ball if possible to kill the play. If parrying is necessary, push the ball wide and away from the danger zone, not back into the centre.
5. Common Mistakes
- Cheating the Drill: The goalkeeper anticipates the next shot and starts moving towards the next striker before the current shot is taken. Correction: Ensure the goalkeeper fully commits to the first shot before recovering.
- Diving Backwards: The goalkeeper's momentum takes them backwards into the goal when making the save. Correction: Encourage the goalkeeper to attack the ball and step forward into the save.
- Slow Recovery: The goalkeeper stays on the ground too long admiring the save or reacting to a goal. Correction: Demand immediate reaction. The drill doesn't stop until all three shots are taken.
- Poor Parrying Technique: Parrying the ball straight back out to the penalty spot. Correction: Work on strong wrists and directing the ball wide.
6. Variations & Progressions
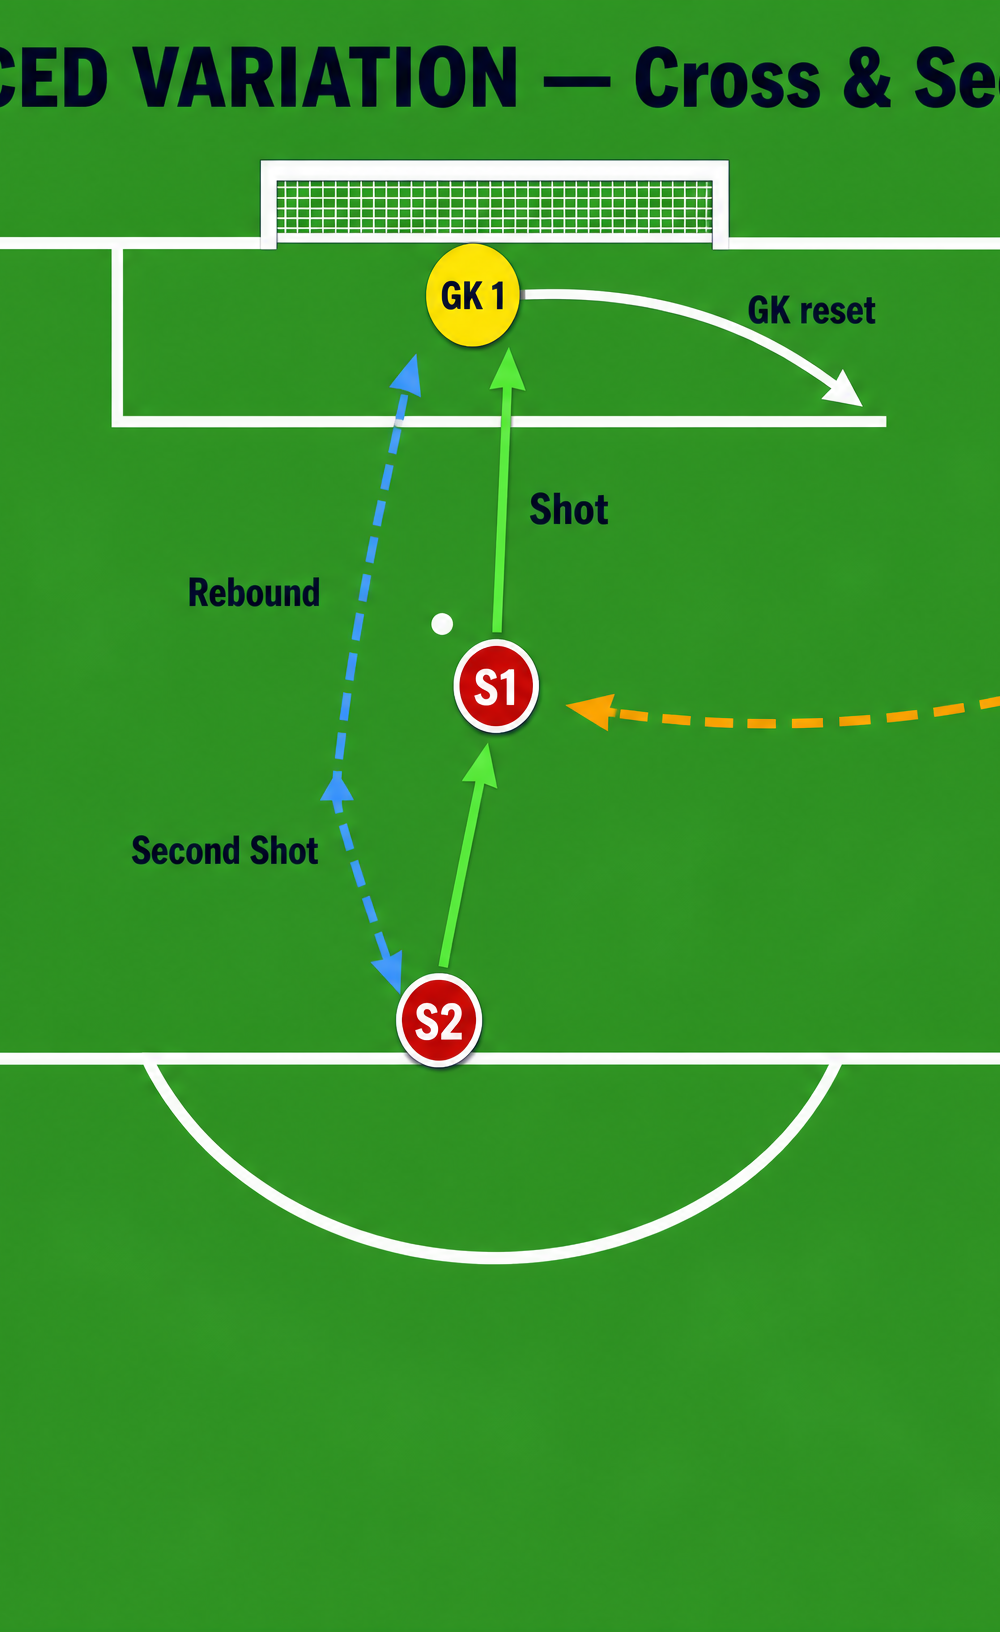
- Progression 1: The Rebounder. Instead of the Feeder playing the ball to S2 and S3, S2 and S3 act as rebounders. If GK 1 parries S1's shot, S2 or S3 can immediately attack the loose ball for a second shot.
- Progression 2: Cross & Finish. Add a winger (W). Instead of a shot from S3, the Feeder plays the ball wide to W, who delivers a cross into the box for S1 and S2 to attack. The goalkeeper must deal with the cross or the ensuing shot.
- Variation 1: Unpredictable Order. The Feeder can play the ball to S1, S2, or S3 in any order. The goalkeeper must constantly scan and adjust their position based on where the ball goes.
7. Age Adaptations
- Under 8 - Under 10: Focus only on Shot 1 and Shot 2. Reduce the power of the shots and ensure the distances are shorter (e.g., edge of the 6-yard box). Emphasize the fun of making diving saves rather than high-pressure recovery.
- Under 12 - Under 14: Introduce the full three-shot sequence but allow a slightly longer pause between shots to ensure correct footwork and set position.
- Under 16 - Open: Run the drill at full match speed. Shots should be struck with power, and the time between shots should be minimal to test fitness and reaction speed.