First Phase Backs Attack: The 12 Hard-Line with Fullback Loop
Master the most reliable first-phase attacking backs move in rugby — the 12 Hard-Line with Fullback Loop — to consistently create overlaps and put your outside backs into space off the scrum.

Equipment Needed
Overview
The 12 Hard-Line with Fullback Loop is one of the most effective and repeatable first-phase attacking moves available to a backs unit. Executed off a scrum or dominant lineout, this set play exploits the natural tendency of flat defensive lines to drift by committing two defenders to the inside channel before releasing the ball wide through a looping fullback (15) who arrives at pace as an extra man.
This move is best deployed when your team has won a scrum in the opposition half — ideally between the 22-metre line and halfway — with enough width on the open side to allow the outside backs (13, 14, 15) room to operate. It is equally effective from a lineout on the 15-metre channel. The play works because it forces the defence to make a decision: if they hold their shape to stop the wide ball, the 12's hard inside angle breaks the gain line; if they rush up to stop 12, the loop creates a 2v1 out wide.
Setup

Equipment Required
- 1 full-size rugby ball (or 1 per player pair for warm-up)
- Cones to mark the scrum position, 5-metre and 15-metre channels, and the defensive line (minimum 20 cones)
- Tackle shields or pads (optional, for defenders in live contact progressions)
- Scrimmage vests in two colours to differentiate attack and defence
Pitch Setup
Use a 40-metre wide by 30-metre deep grid on a standard 100m x 70m pitch. Mark the scrum position at the centre of the grid's baseline. The defending line should be set 10 metres from the scrum, flat across the pitch. Cones mark the 5-metre and 15-metre channels as reference points for player alignment.
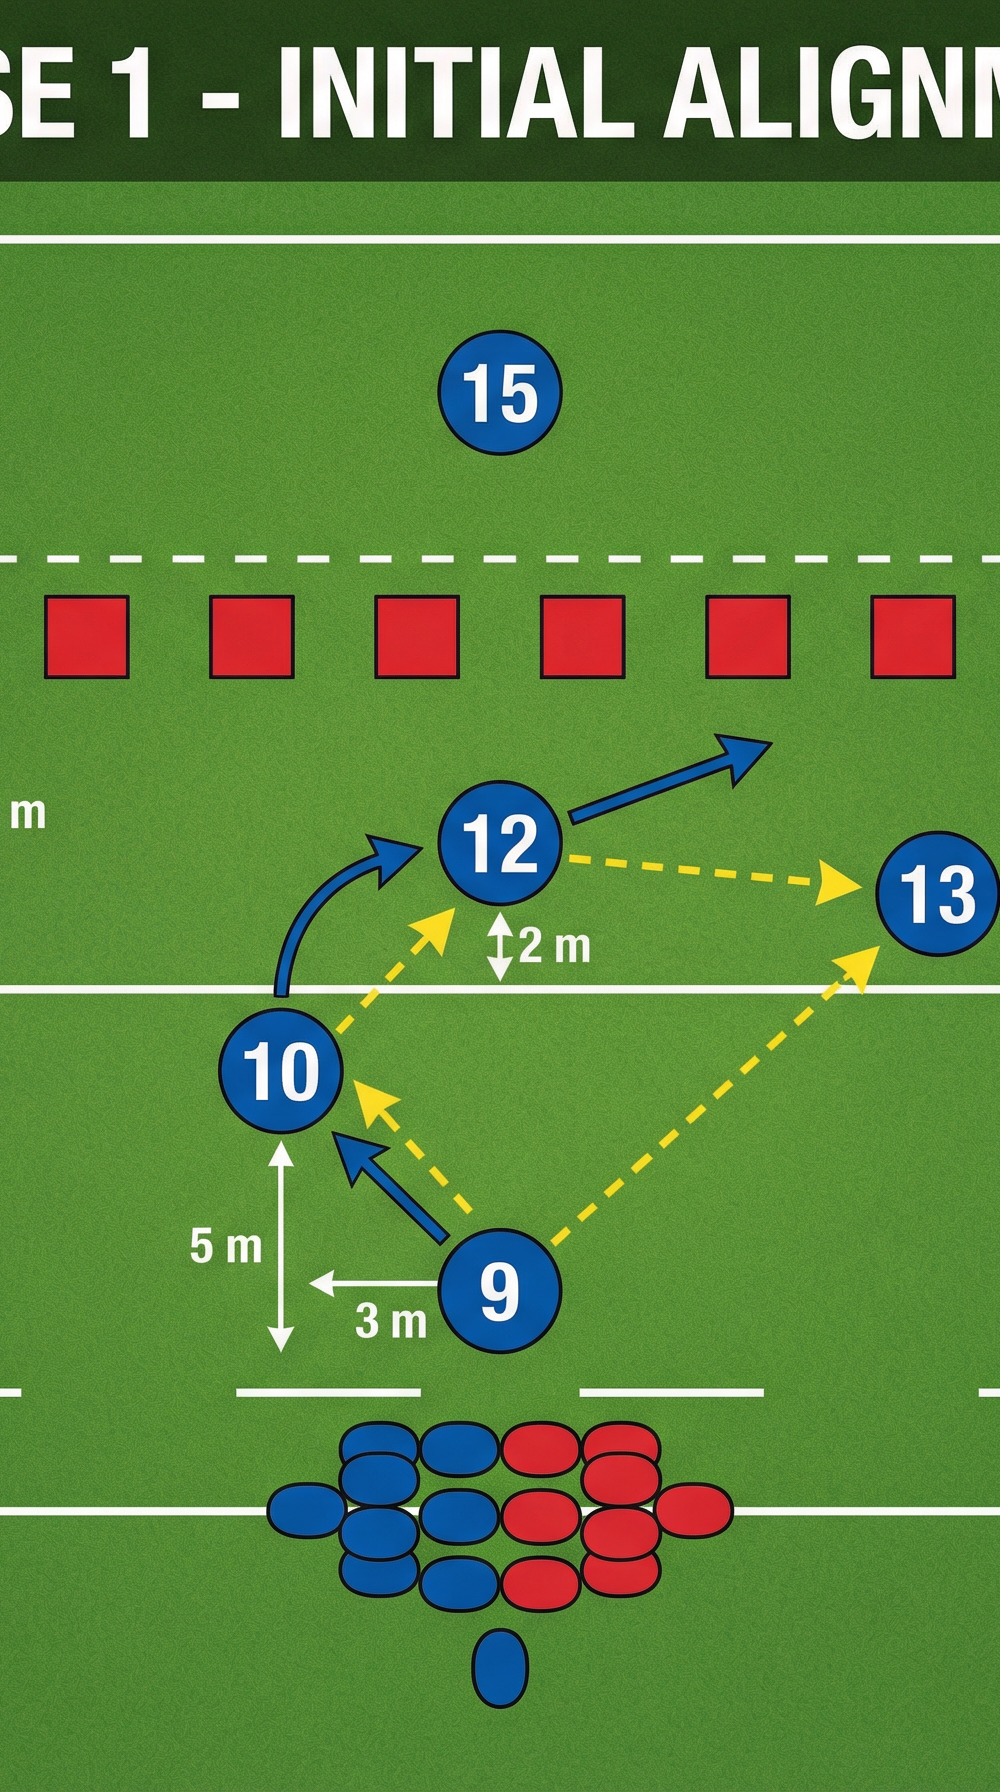
Player Positions — Initial Alignment

| Position | Number | Starting Location |
|---|---|---|
| Scrum-Half | 9 | Base of scrum, right-hand side |
| Fly-Half | 10 | 5m back from scrum, 3m to open side |
| Inside Centre | 12 | 2m behind 10, slightly wider |
| Outside Centre | 13 | 5m outside 12, on the 15m channel |
| Left Wing | 11 | Wide left, near touchline |
| Right Wing | 14 | Wide right, near touchline |
| Fullback | 15 | 10–12m deep behind 10/12 channel |
The key alignment principle is that 10, 12, and 13 must be flat and close together — no more than 2 metres of depth between each player. This compresses the defensive line and makes the hard-angle run by 12 genuinely threatening.
Step-by-Step Instructions
Step 1 — Scrum Call and Signal.
The fly-half (10) calls the play in the huddle before the scrum using a pre-agreed code word (e.g., "BLUE HARD"). All backs acknowledge. The fullback (15) immediately begins walking into their deep starting position, 10–12 metres behind the 10/12 channel.
Step 2 — Scrum Engagement and Ball Delivery.
The scrum-half (9) waits for a clean, stable scrum before putting the ball in. The number 8 controls the ball at the base. On a clean channel-one ball, 9 picks and passes immediately — no delay. The pass to 10 should be flat and fast, arriving at 10's hands as they are already moving forward.
Step 3 — Fly-Half Receives and Fixes.
The fly-half (10) catches the ball running at pace and holds the ball for one full stride after receiving it. This is critical: 10 must genuinely threaten the defensive inside shoulder of the first defender. If 10 passes too early, the defence can simply slide and the hard angle by 12 is nullified. 10 passes to 12 only when the nearest defender has committed.
Step 4 — Inside Centre Runs the Hard Angle.
The inside centre (12) takes a sharp inside running line — approximately 45 degrees infield — aiming to hit the gap between the 2nd and 3rd defenders. This is not a decoy run. 12 must run hard enough to be a genuine first-receiver threat. If a gap presents itself, 12 takes the contact and drives for the gain line. If the defence closes, 12 passes immediately to the arriving fullback (15).
Step 5 — Fullback Loops and Arrives at Pace.
The fullback (15) begins their loop run the moment 9 passes to 10. Running from depth, 15 arcs around the outside of 12, arriving at the 12/13 channel at full pace as 12 receives the ball. The timing must be precise: 15 should be arriving at 12's shoulder — not waiting — when the pass is made. This is the most technically demanding element of the play and requires dedicated repetition.
Step 6 — Outside Centre and Wing Hold Width.
The outside centre (13) and wing (14) must hold their width and not drift infield during the play. Their job is to stretch the defence and be available as outlets if 15 draws a defender. 13 should be calling loudly to 15 as the ball arrives, confirming the overlap.
Step 7 — Ball to the Overlap.
With 15 running at pace and 13 and 14 holding width, the attacking team has a numerical advantage on the outside. 15 either takes the ball to the line and passes to 13, or draws the last defender and puts 11 or 14 away for the try.

Key Coaching Points

1. Flat and Fast Alignment.
The backs line must be flat — no player should be more than 2 metres deeper than the player inside them. A deep line gives defenders time to read the play and slide. Flat alignment means every player is a genuine first-receiver threat, which is what forces defensive decision-making.
2. The Fly-Half Must Fix a Defender.
This is the single most important coaching point in the entire play. If 10 passes too quickly, the play breaks down. 10 must run hard at the first defender's inside shoulder and hold the ball for at least one stride after receiving it. Use the cue: "Catch, step, pass" — not "Catch, pass".
3. The 12 Hard Angle Must Be Genuine.
Coaches often see 12 run a half-hearted inside line that defenders simply ignore. 12 must aim to score every single time they run this line. Only when 12 is a genuine threat does the defence have to make a choice, and only then does the loop create a true overlap.
4. Fullback Timing — Arrive, Don't Wait.
The most common error in this play is 15 arriving too early and standing still, or too late and being out of the play entirely. The cue for 15 is: "Start moving when 9 passes." By the time the ball reaches 12, 15 should be at full pace and arriving at 12's outside shoulder.
5. Width Discipline from 13 and 14.
Outside backs must resist the temptation to drift infield to "help." Their job is to stretch the defensive line and be available. Coaches should use a cone on the touchline as a reference point and insist 13 and 14 do not drift inside it during the play.
6. Communication is Non-Negotiable.
Every player should be calling throughout the play. 15 calls "LOOP" as they begin their run. 13 calls "OUTSIDE" when the overlap is on. 12 calls "BALL" when they want the pass from 10. Loud, clear communication removes hesitation and speeds up decision-making.
Common Mistakes

Mistake 1 — 10 Passes Too Early.
Symptom: The defence slides easily and 12's hard angle is covered. Correction: Isolate 10 in a 1v1 drill against a single defender. 10 must run at the defender and only pass when the defender commits. Reinforce the "Catch, step, pass" cue.
Mistake 2 — 15 Arrives Too Late or Too Early.
Symptom: If too early, 15 is standing still and easily marked. If too late, the play has already broken down. Correction: Run the play without defenders at walking pace, focusing solely on 15's timing relative to the ball. Use the verbal cue: "9 passes, 15 moves." Repeat 10–15 times until the timing is automatic.
Mistake 3 — 12 Runs a Soft Inside Line.
Symptom: Defenders ignore 12 and slide to cover 15. Correction: In training, reward 12 for breaking the gain line. If 12 genuinely gets through, stop the drill and acknowledge it. 12 must believe they can score off this line.
Mistake 4 — 13 Drifts Infield.
Symptom: The overlap disappears because 13 has drifted inside, leaving no wide outlet for 15. Correction: Place a cone 2 metres inside 13's starting position. If 13 drifts inside the cone during the play, stop and reset. Use the cue: "Hold your width until the ball reaches 15."
Mistake 5 — Slow or Untidy Scrum Ball.
Symptom: The play loses its timing advantage because 9 is waiting for the ball. Correction: This play only works with quick, clean ball. If the scrum is struggling, use a lineout variation instead. Reinforce with the forwards that the backs play is dependent on ball speed.
Variations and Progressions

Variation 1 — The "Dummy Loop" (Same Play, 15 Decoys).
Run the exact same play, but 15 loops without receiving the ball. Instead, 12 takes the ball to the line themselves and 15's run creates the space for 12 to break through. This variation is called using the code word "BLUE DUMMY" and keeps the defence honest — they cannot simply ignore the loop.
Variation 2 — Lineout Version.
Run the same play off a lineout on the 15-metre channel. The lineout provides a more controlled platform than a scrum and allows the backs to pre-set their alignment more precisely. The play is identical in execution from the moment 9 receives the ball from the lineout.
Progression 1 — Add Live Defenders.
Begin the drill with passive defenders (walking pace only), then progress to defenders who can intercept but not tackle, then to full contact with tackle shields, and finally to a full live 7v7 scenario. Each stage should only be introduced once the previous stage is consistently clean.
Progression 2 — Decision-Making Layer.
Add a defensive signal: if the coach raises a red flag, the defence blitzes (rushes up fast), and 12 must take the ball to contact and recycle. If the coach raises a green flag, the defence holds, and the play runs as normal. This forces 12 and 10 to read the defence in real time rather than executing a pre-programmed sequence.
Age Adaptations

Under 12 and Under 14.
Simplify the play to a three-player sequence: 9 passes to 10, 10 passes to 12, 12 runs the hard angle. Remove the fullback loop initially. Focus entirely on flat alignment and the "Catch, step, pass" principle for 10. Introduce the fullback loop only once the three-player sequence is clean and consistent. Use a 30m x 20m grid and reduce the number of defenders to two.
Under 16.
Run the full play but begin with passive defenders. Introduce the decision-making progression (Progression 2 above) early, as players at this age can begin to read defensive systems. Introduce the "Dummy Loop" variation once the base play is established. Emphasise communication loudly — this age group often goes quiet under pressure.
Open Age (Senior).
Run all variations and progressions. Add a secondary option: if the scrum goes against the head, 9 can execute a box kick to the wide channel as an alternative to running the play. Introduce defensive analysis — show players video of the opposition's defensive line speed and adjust the timing of the play accordingly. At senior level, the play should be embedded in a wider attacking system with complementary plays that set it up (e.g., a crash ball by 8 in the previous phase to draw defenders infield before running the loop).