

Rugby
Kick Chase and High-Ball Catch: Win the Aerial Battle
A progressive, coach-ready drill that develops the kick quality, chase-line discipline and high-ball catching skills needed to turn a contestable kick into pressure or possession.
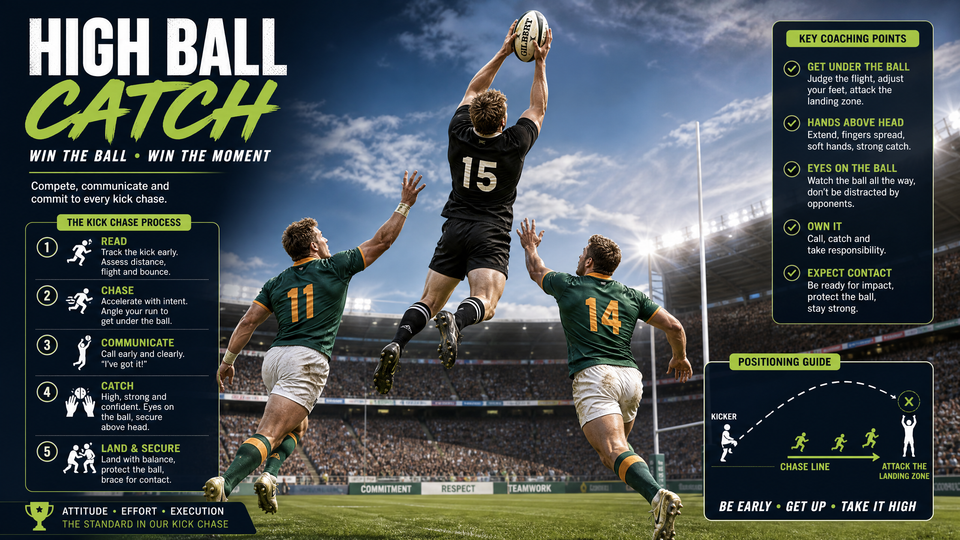
What you need
6 Rugby balls, 24 cones, 2 hit shields, Bibs for chaser and catcher units, Whistle and stopwatch
Overview
This Kick Chase and High-Ball Catch drill trains the whole contestable-kick picture: No. 10 produces a kick that can be challenged, No. 11 and No. 14 chase as one line, and No. 15 owns the landing zone before making a positive next action. The objective is not simply to kick long. It is to create a kick that lets your side either regain possession in the air or win the tackle-and-ruck battle immediately afterwards.
Use the drill in the transition section of a session, after kicking technique and before full-unit exit or kick-return work. It is ideal for Under 14 through open-age squads and should run at high quality for 18-22 minutes. Begin with no aerial contest or contact, then only add pressure when players demonstrate secure tracking, catching and safe braking.
Setup
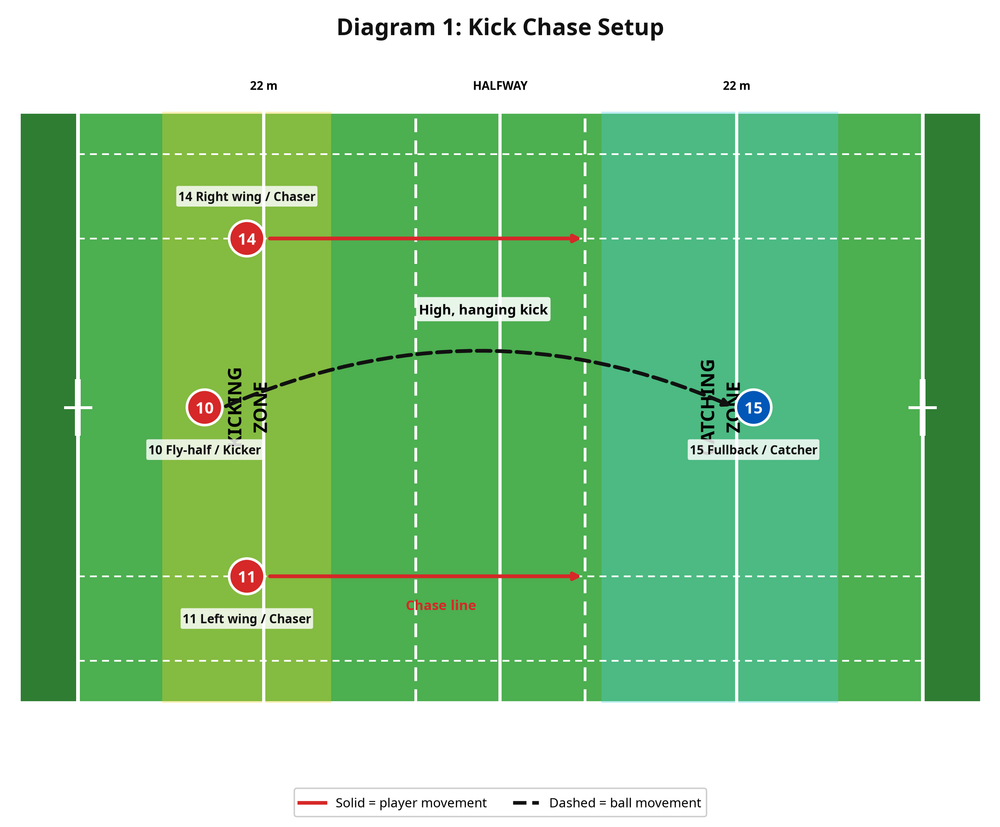
Use a 100m x 70m Rugby pitch as the reference, but run the drill in a 60m-long x 45m-wide central channel for repeatable reps. Mark an 8m-deep kicking zone 5m inside the 22m line. Place a 10m-wide x 12m-deep catching zone 28-35m in front of it. Set two cone lanes 8m either side of the ball line, giving No. 11 and No. 14 a clear launch picture without locking them into a rigid run.
You need 8 players: No. 9 as distributor, No. 10 as fly-half/kicker, No. 11 and No. 14 as chasers, No. 15 as fullback/catcher, No. 6 and No. 7 as the second wave, and a coach or spare player to serve the next ball. Prepare 6 Rugby balls, 24 cones and 2 hit shields. Rotate roles after every four repetitions so each player experiences kick, chase and catch responsibilities.
| Element | Standard to demand | Coach's check |
|---|---|---|
| Kick | High and contestable | 3-4 seconds of hang time, landing inside the marked zone |
| Chase | Flat and connected | Both chasers arrive within 1m of one another |
| Catch | Aggressive aerial take | Ball is taken above head height, then secured to chest |
| Transition | Decisive next action | Carry, pass, tackle or ruck action inside 2 seconds |
Step-by-Step Instructions
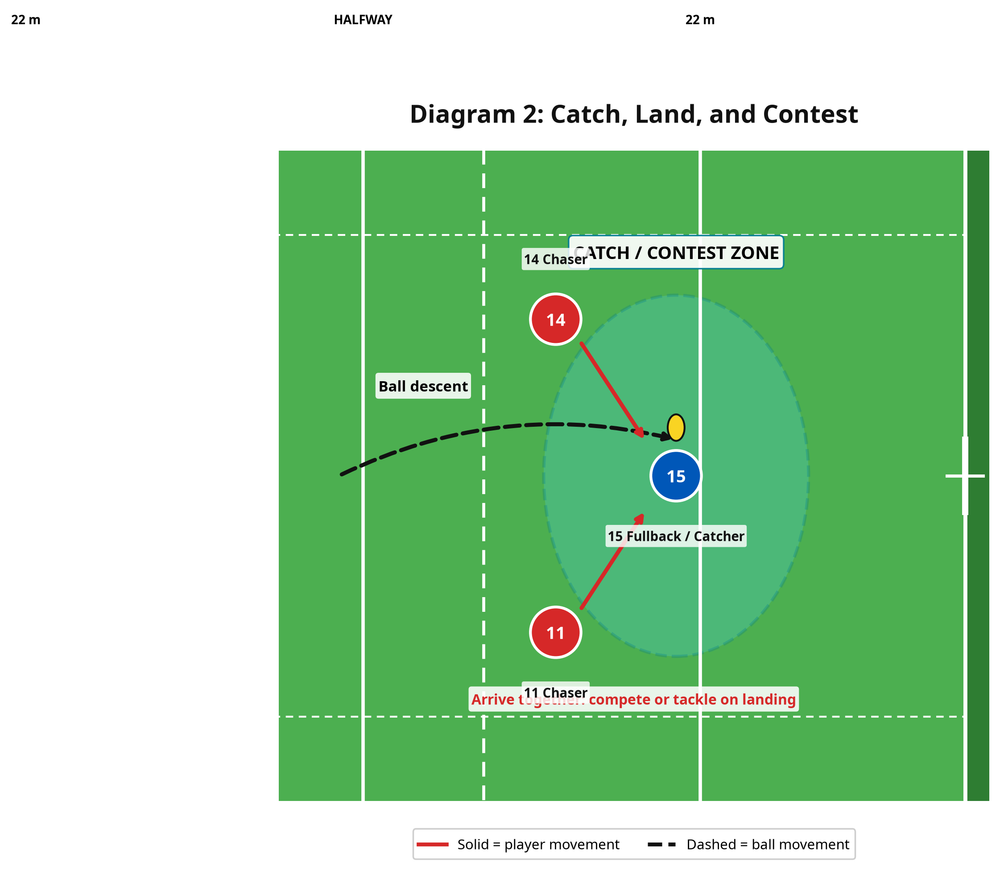
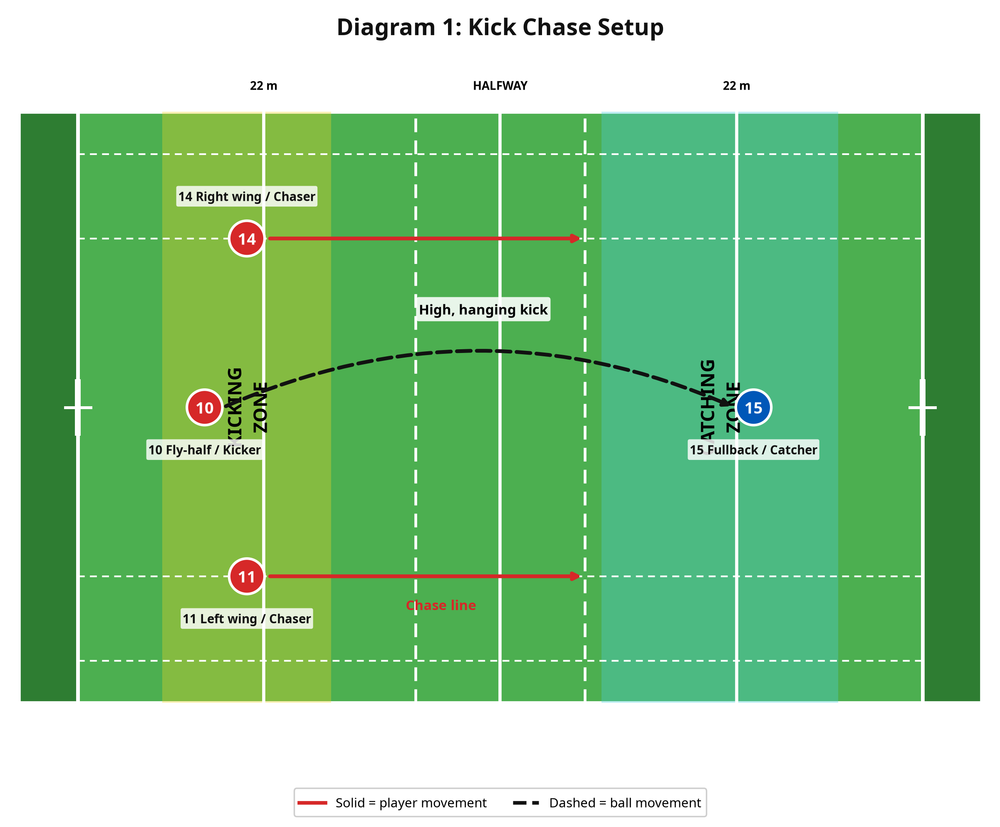
Build the starting picture. Put No. 10 in the kicking zone, No. 11 and No. 14 3m behind the kick line and 12-16m apart, and No. 15 centrally in the catch zone. No. 9 stands 4m inside No. 10. No. 6 and No. 7 wait 8m behind the chasers as recovery support.
Give a clean trigger. On “live,” No. 9 passes to No. 10. The wings stay still until the ball leaves the boot. This removes early starts and forces the chase to relate to the kick rather than anticipate it.
Kick for pressure. No. 10 aims for the centre or outside shoulder of No. 15, not their chest. The ideal ball drops 3-5m in front of the catcher and hangs for 3-4 seconds. If it travels beyond the catch zone, stop the rep, adjust the target and repeat.
Launch a connected chase. At the kick, No. 11 and No. 14 sprint on the same visual line. Their first 10m are maximum acceleration; their final 5m are controlled so they can compete legally. The lead chaser calls “mine to tackle”; the other calls “inside cover.” No. 6 and No. 7 follow 5-8m behind, ready for the next phase.
Track and claim. No. 15 calls “mine” early, moves under the projected drop point and settles with feet wider than hips, chest tall and hands raised. Coach the catcher to finish their footwork before the ball reaches their hands.
Catch, land and act. No. 15 attacks the ball at full extension, softens the catch and locks it to the sternum. In the no-contact version, chasers brake 2m away. In the contact version, they may only compete or tackle after a safe, legal landing. On landing, No. 15 carries through a cone gate, passes to support or presents a long body at the ruck.
Reset with intent. Run four reps kicking right and four left, resetting every 35-45 seconds. Use one short coaching cue between reps—“more height,” “connect,” or “attack it high”—rather than turning the drill into a lecture.
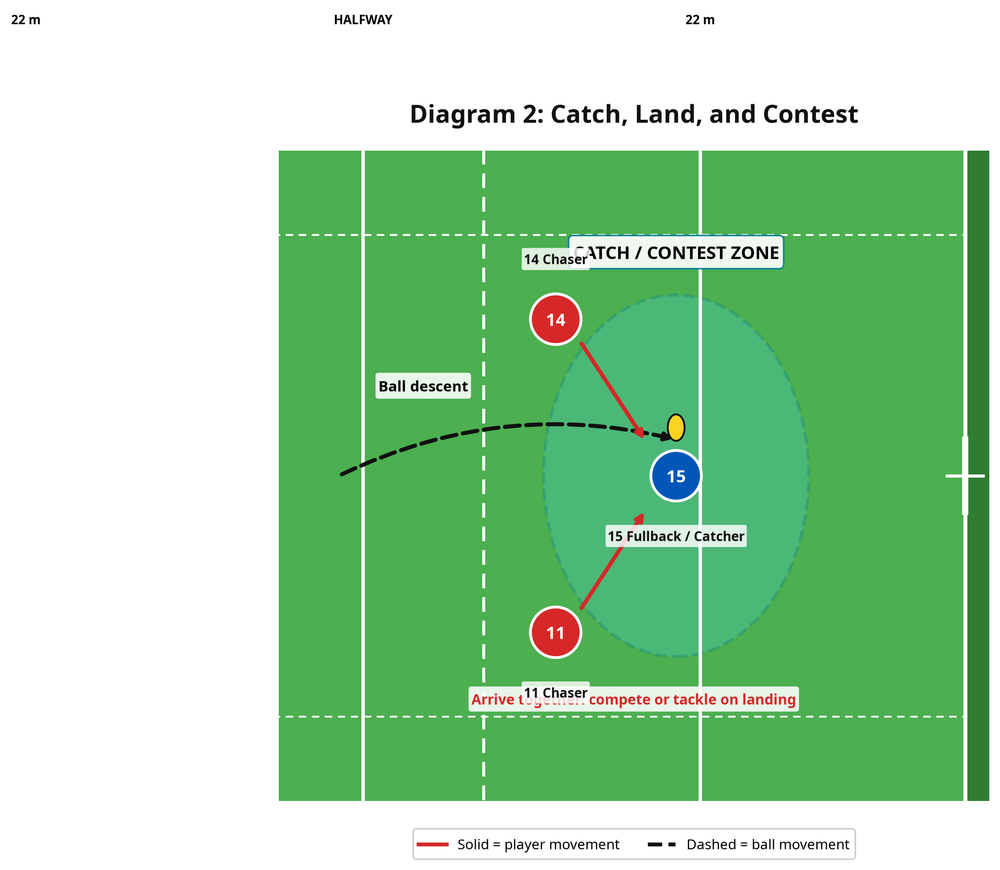
Key Coaching Points
- Kick for a contest, not distance. No. 10 identifies the landing window before receiving and produces height first, then distance.
- Connect the chase line. Chasers should see one another in peripheral vision. A dog-leg gives the catcher an escape route; a flat line creates pressure.
- Attack the ball at full reach. The fullback calls early, moves early and receives in front of the forehead: “high hands, soft fingers, strong finish.”
- Win the landing. Land slightly side-on, knees flexed and the ball locked to the chest. The catcher must know the next action before feet return to the grass.
- Compete safely and support quickly. Nobody contacts the receiver in the air. No. 6 and No. 7 work beyond the chase, ready to secure a clean-out, jackal or support line.
Common Mistakes and Corrections
| Common error | What you will see | Immediate correction |
|---|---|---|
| Flat or over-hit kick | Chasers run beyond the landing point or arrive too early | Bring the target 5m closer and demand more height |
| Dog-leg chase | One wing arrives 4-5m ahead of the other | Re-mark the launch lanes and make the trailing player call the line |
| Catcher waits under the ball | No. 15 backpedals late or catches at chest height | Freeze the rep, walk to the drop point and repeat the early call |
| Unsafe pressure | A chaser contacts the catcher before landing | Return to the 2m-brake version and rehearse legal arrival |
| Slow post-catch action | The catcher stands still after the catch | Add a 2-second carry, pass or presentation countdown |
Variations and Progressions
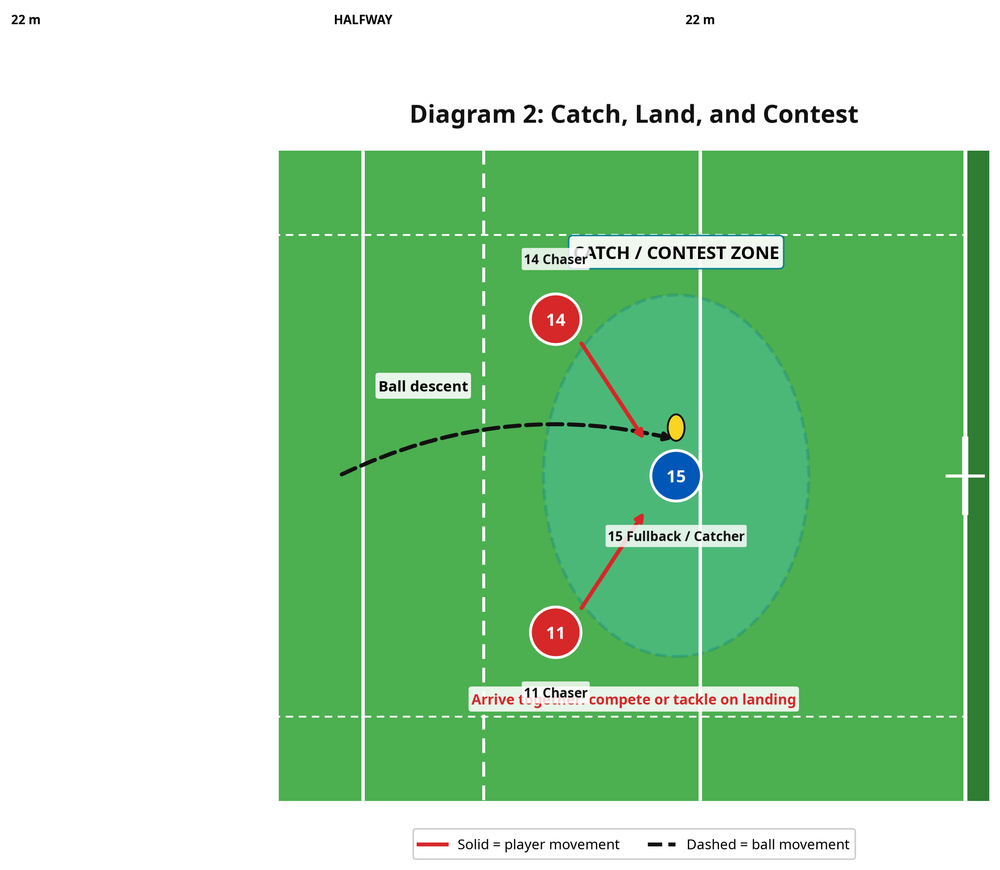
Begin with a guided catch. No. 10 delivers a short, gentle kick; No. 15 calls and catches; and the chasers stop 2m away. This is the entry version for a group still building confidence in the air.
Progress to the full contestable kick in Diagram 1. Add No. 6 and No. 7 as second-wave support, then score one point for a kick inside the target zone, one for a connected chase, and one for a clean catch or dominant tackle. The scoreboard gives every role a match-relevant consequence.
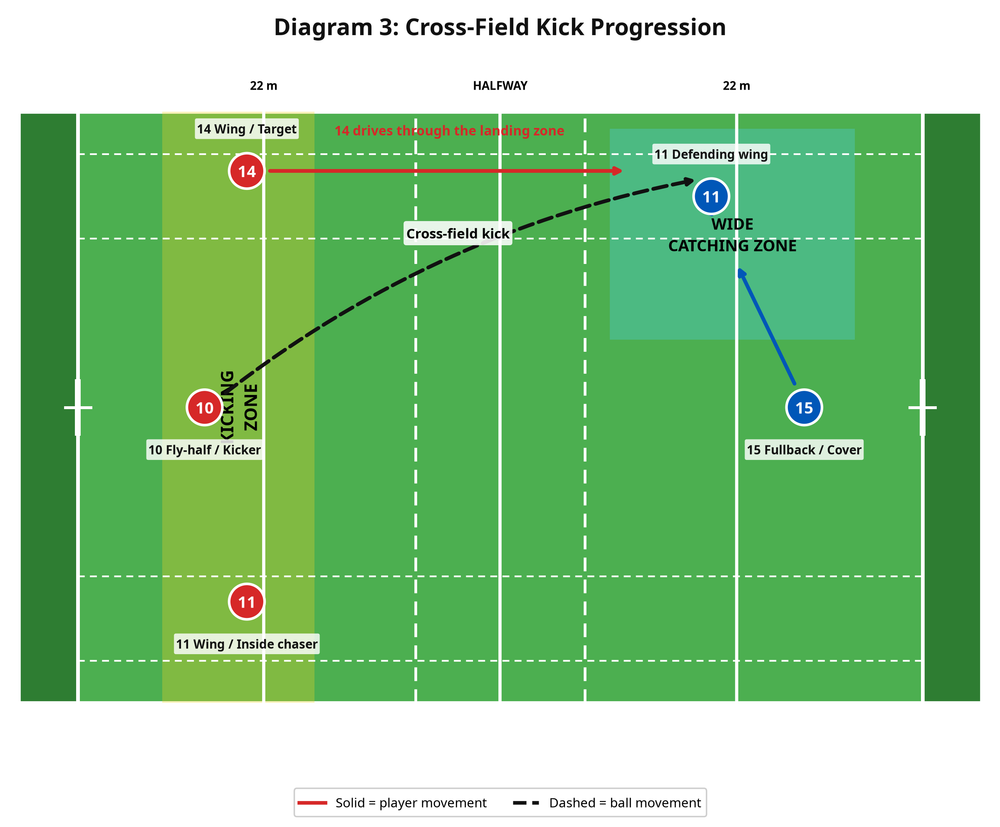
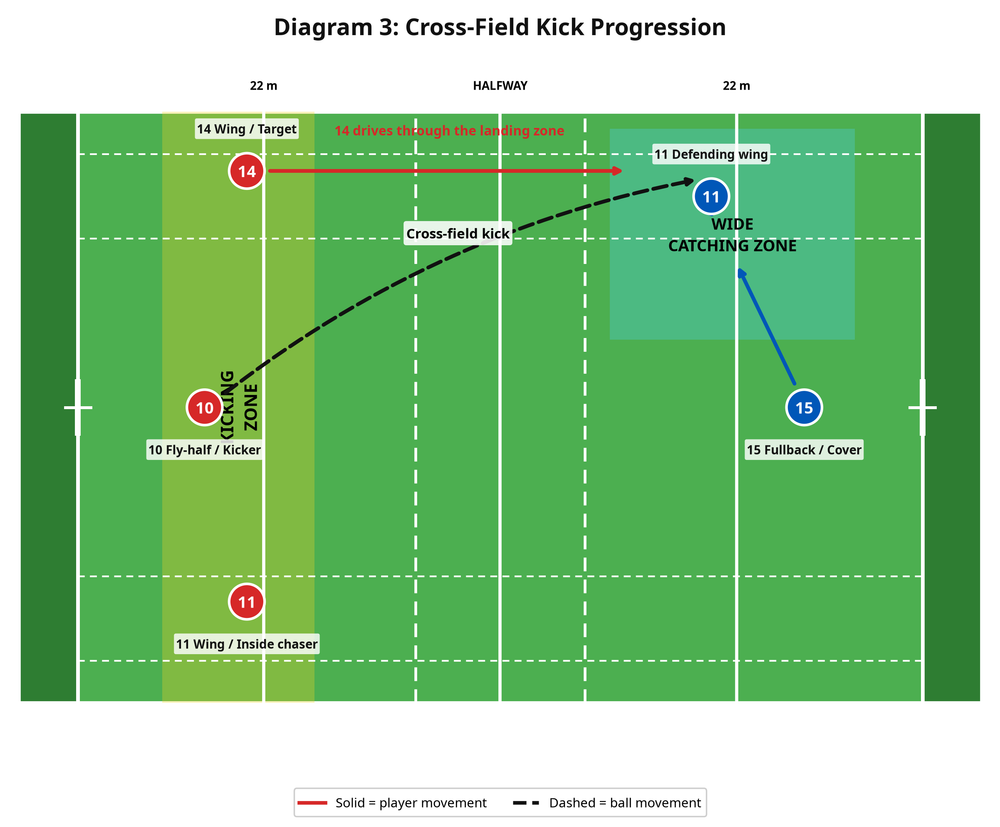
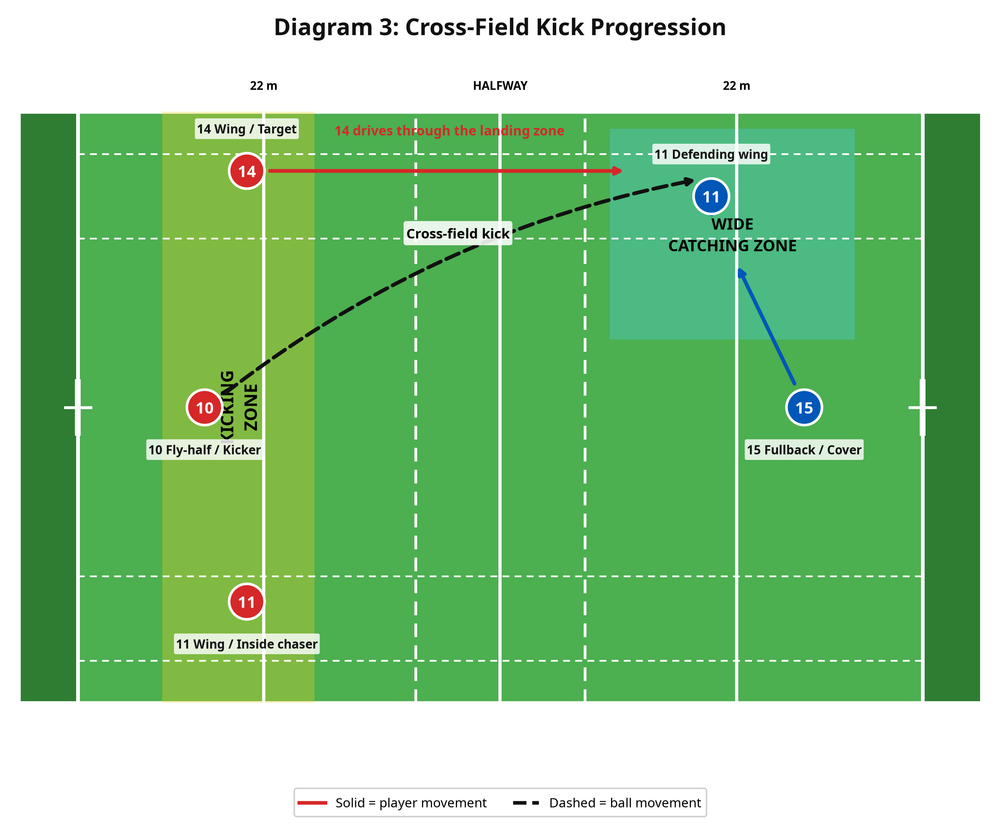
For the advanced option, use the cross-field kick below. No. 10 kicks to No. 14 near the far touchline while the defending No. 11 and No. 15 cover across. This requires a wider chase angle, a sideline aerial decision and clear support communication. Switch the direction every two reps so both wings act as target and chaser.
Age Adaptations
| Age group | Adaptation | Contact standard |
|---|---|---|
| Under 8-Under 10 | Use a 25m x 20m box, hand-fed or gentle kicks and a 5m catch zone. Focus on calling, tracking and two-handed catching. | No contest; chasers stop 2m away. |
| Under 12-Under 14 | Use 30-35m kicks and a marked target zone. Introduce the two-player chase and a shield on landing. | Controlled, ground-only tackle after the catch. |
| Under 16-Open | Use the full 60m x 45m channel with variable kick lengths and live decisions. | Full legal contest only after players show safe landing mechanics. |
Finish with two competitive sets: the kick-chase unit scores for a regain or dominant tackle, while the catch unit scores for a clean take plus a positive next action. Keep the coaching priority clear—safe, connected aerial Rugby first; competitive outcome second.
