Rugby
Rugby Lineout Steal: Middle-Pod Mirror on Opposition Throw
A coach-ready defensive lineout steal that teaches a legal, timed middle-pod mirror, safe aerial contest, and immediate scrum-half exit.

What you need
2 rugby balls, 10 cones, 8 bibs, stopwatch, clearly marked 5m and 15m lineout channel
Lineout Steal: Middle-Pod Mirror on Opposition Throw
1. Overview
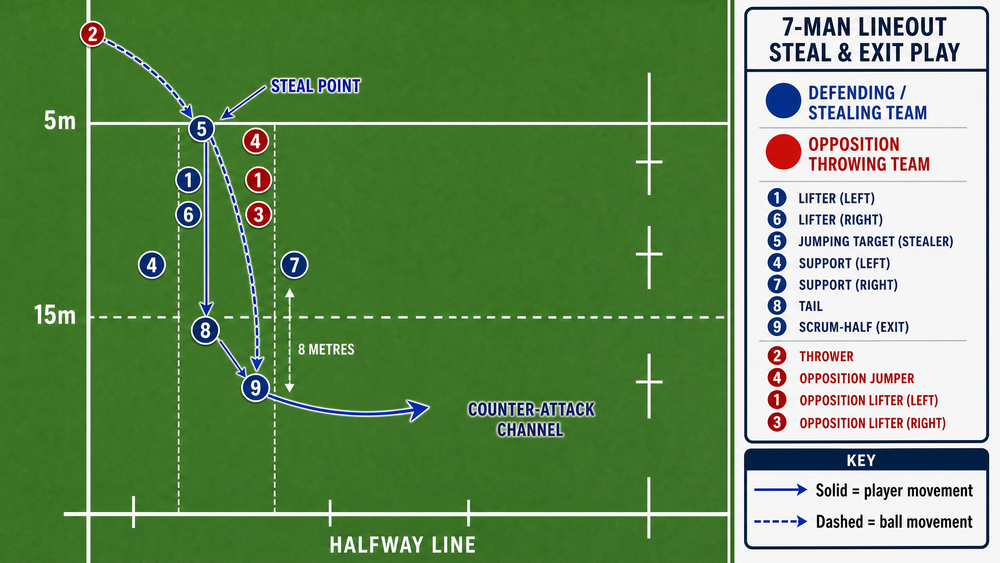
This defensive lineout steal is for the moment an opposition hooker shows a repeatable middle throw. Your best aerial forward—normally No. 5 (lock)—mirrors the opposition target while No. 1 and No. 6 lift. The aim is a clean catch or a deliberate tap into blue space, followed immediately by a No. 9 exit. It is a disruption play, not a licence to collide with the opposition jumper.
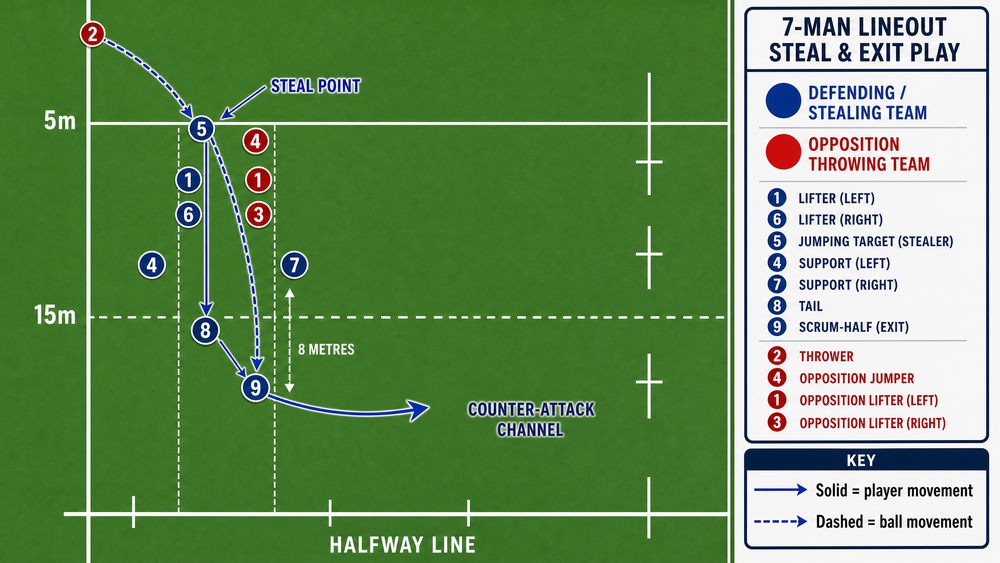
Use it when the opposition is between your 22m line and halfway, their caller is predictable, and your lifting unit is technically safe. This resource uses a 7-player defensive unit: 2 controls the touch-side space; 1–5–6 form the primary lift; 4 and 7 secure the landing; 8 protects tail; 9 is the first outlet. Law 18 requires the lineout to form between the 5m and 15m lines, with each line 0.5m from the mark of touch. Pre-gripping is permitted, but lifting before the ball leaves the thrower's hands is not. 1
2. Setup
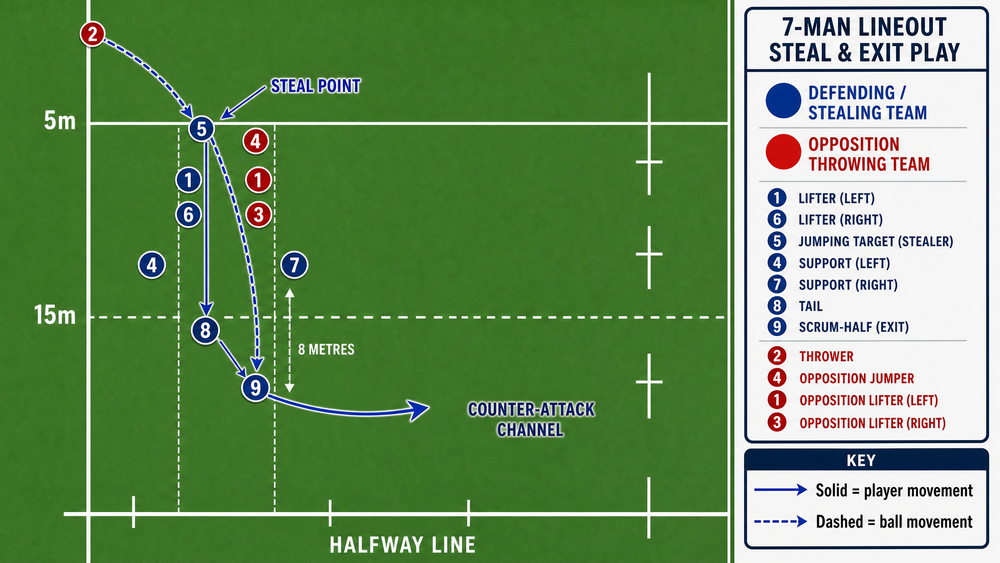
Use a 100m x 70m pitch and mark a 20m x 25m working channel using the touchline, 5m line, 15m line and a cone 10m infield. Start 5m outside your 22m line, so the exit is realistic. You need 14–16 players, two balls, 10 cones, eight bibs and a stopwatch. Begin with a 60% walk-through, then add a live lift and finally an unpredictable opposition target.
| Area | Coach setup |
|---|---|
| Stealing pod | 1 front-lifts, 5 jumps, 6 rear-lifts; 4 and 7 close the landing picture. |
| Opposition picture | Opposition 2 throws to 4 in the middle, lifted by their 1 and 3. |
| Legal geometry | Keep both lines parallel, 0.5m from the mark. No. 2 uses the required touch-side space. 1 |
| Exit position | 9 begins 8m behind the lineout and 3–5m infield, ready for a tap or clean transfer. |

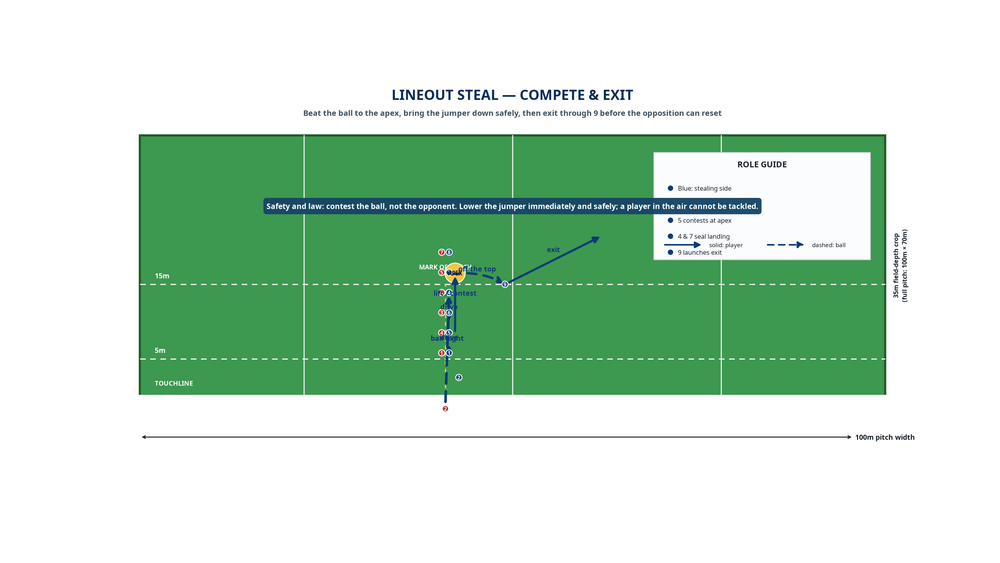
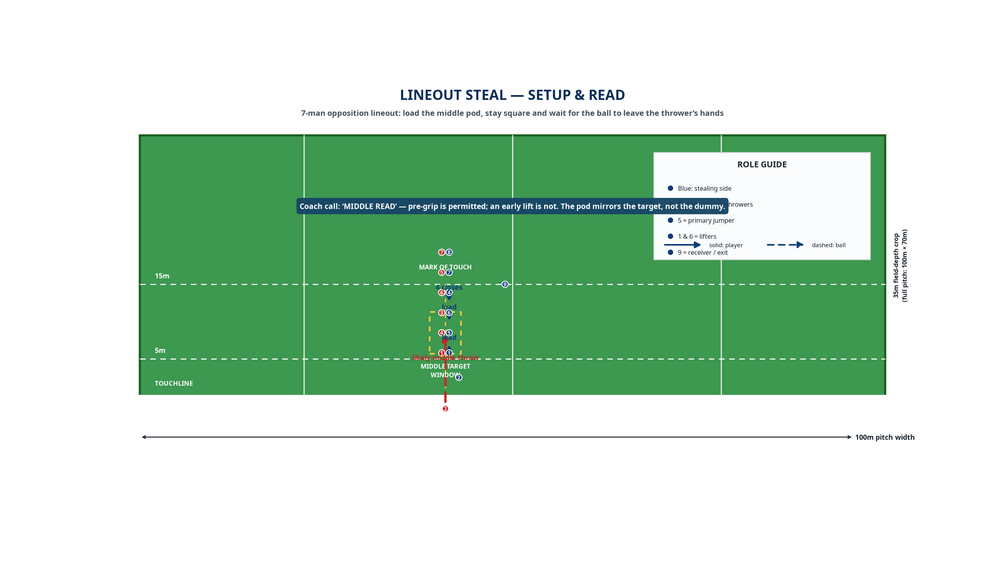
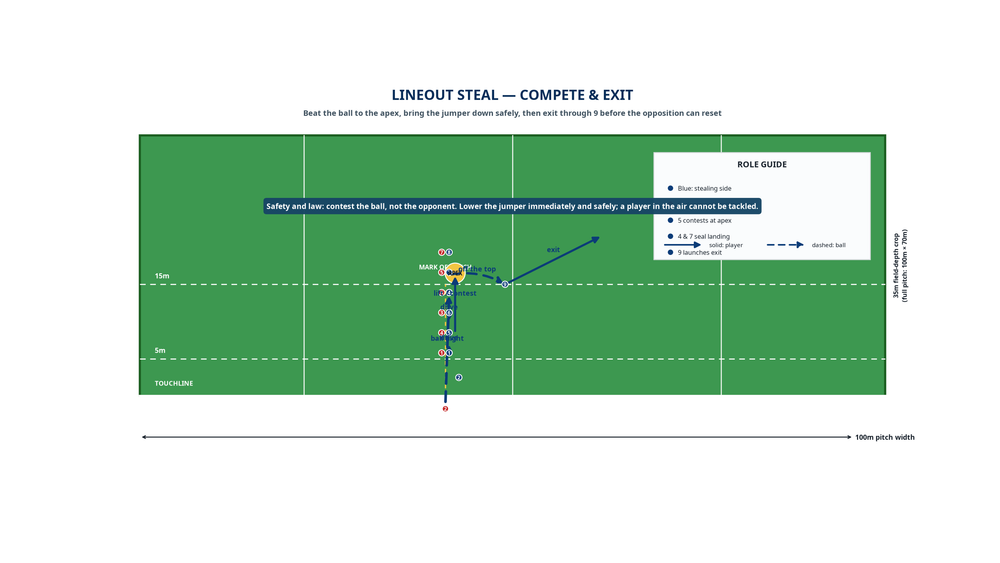
Blue is the stealing side; red is the throwing side. Solid arrows show player movement; dashed arrows show ball movement. The caller’s single command is “Middle read.” That means load the middle pod and react to release; it never means jump early.
3. Step-by-Step Instructions
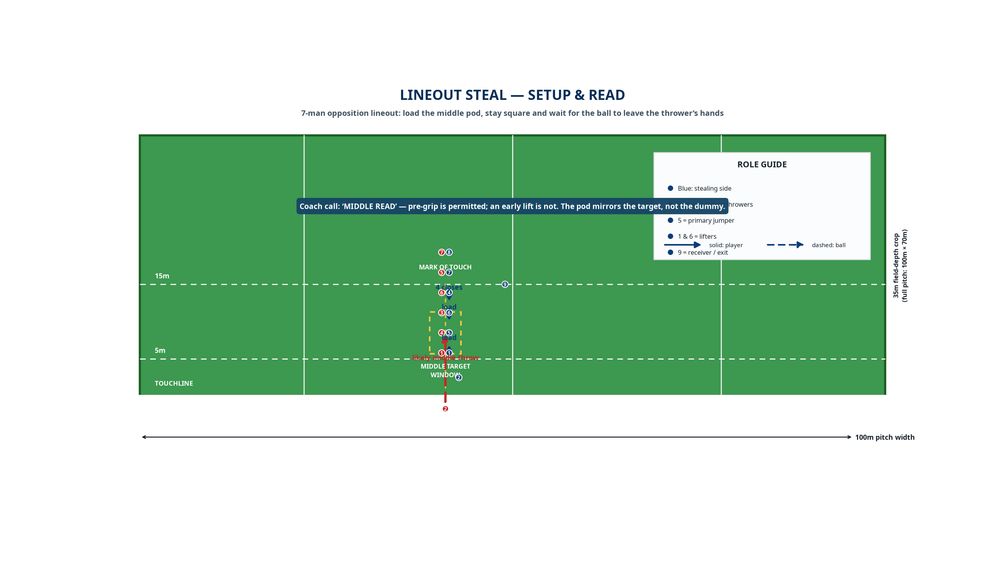
Build the legal picture. Form your six-player line between the 5m and 15m lines. Place No. 5 opposite the opposition’s likely middle target. Check that neither pod has crossed the mark of touch and that No. 2 is set in the touch-side position. The lines must maintain their gap until the throw. 1
Load the lifting unit. No. 1 and No. 6 establish legal lifting grips; No. 5 sits through the hips with eyes on the opposition lifters. No. 4 closes by no more than a player-width. No. 7 holds the far-side seal and No. 8 guards the tail. Rehearse the setup from the caller’s cue in under three seconds.
Read the genuine trigger. Teach No. 5 to watch the opposition front lifter’s hip drop, the target’s first step, and the hooker’s release position. Ignore a head fake or dummy call. No. 2 calls “ball” only as the ball visibly leaves the opposition hooker’s hands.
Lift, mirror, compete. On release, No. 1 and No. 6 drive together so No. 5 reaches maximum extension as the ball arrives 8–12m from touch. No. 5 stays vertical with both hands high. Catch cleanly where possible; otherwise tap backward into blue space. Do not slap the ball forward into the opposition half of the channel.
Land and secure. Lower No. 5 immediately and under control. No. 4 and No. 7 bind close enough to secure possession. A player in the air cannot be grasped and brought down; any tackle occurs only after a safe landing and only when a maul has not formed. 1
Convert the turnover. No. 5 transfers to No. 9 off the top within one second, or No. 9 hunts the backward tap inside the 15m line. No. 8 folds behind the breakdown. The exit call is “clean, then width”: protect the turnover before attempting a wide pass.
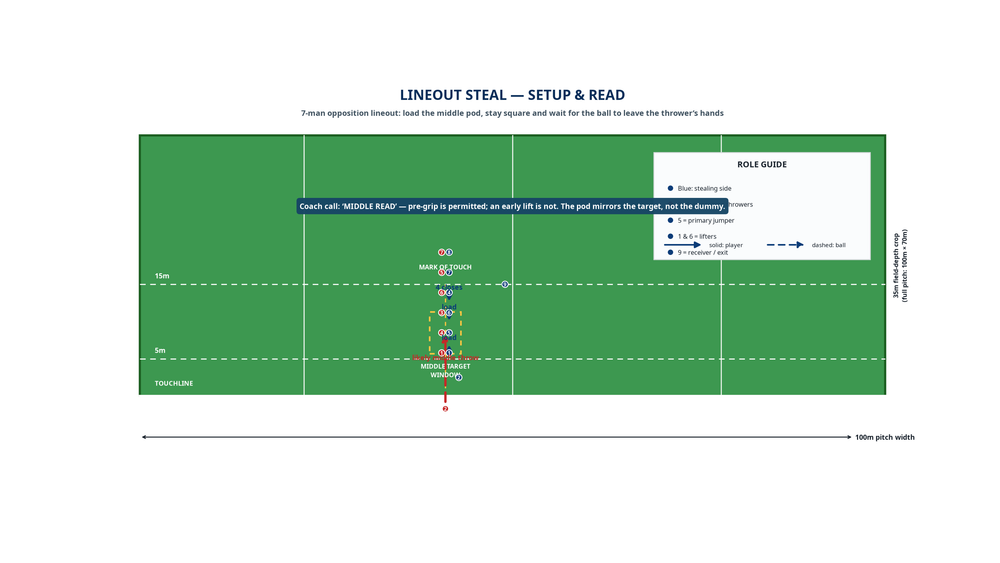
Coach the entire sequence with one rhythm: “Load—release—up—secure—nine.” The lift is driven by release, not by anticipation, and the exit matters as much as the steal.
4. Key Coaching Points
- Time the lift from release. Early lifting concedes a free-kick; late lifting loses the height contest. 1
- Make No. 5 tall, not travelling. Chest up, core braced, both hands high and a vertical take.
- Lift through synchronized legs. No. 1 and No. 6 rise together; an unsynchronised lift twists the jumper.
- Win to blue space. Catch or tap backwards, then let No. 4 and No. 7 protect the landing.
- Keep No. 9 live. Eight metres back, on the ball line, calling “mine,” and ready to exit immediately.
- Coach legality every rep. No pre-throw contact, no early lift, and a controlled descent every time. 1
5. Common Mistakes
| What you will see | Immediate correction |
|---|---|
| No. 5 jumps on the hooker’s wind-up. | Freeze the picture and ask: “Show me the release.” Restart from the thrower’s hand. |
| Lifters rise at different times. | Do three bodyweight lifts before adding a ball; cue “legs together, hands together.” |
| The jumper drifts across the mark. | Use a flat cone line. Demand a vertical contest; arms chase the ball, not the body. |
| The tap goes forward or toward red. | Mark a 2m square behind the pod and reward only backward taps into it. |
| The steal becomes a loose-ball scrap. | Make every winning rep finish with a pass to 9 and a two-pass exit. |
6. Variations & Progressions
1. Scripted middle ball. Opposition throws middle only. Use three sets of four repetitions to coach grips, leg drive and the transfer to No. 9 without decision overload.
2. Two-pod read. Add a front and middle opposition option. Your defensive caller identifies the target from lifter shape, not from an agreed call. Allow one dummy and require a throw within five seconds.
3. Live exit under pressure. Add opposition No. 9 and one back-row defender 10m infield. Award two points for a clean catch that exits beyond the 15m line and one for a legal tap recovered by blue.
Tail-deny variation. When the opposition moves long, keep No. 8 as a late second jumper and let No. 5 hold middle as a decoy. Protect the long throw’s landing zone rather than chasing it blindly.
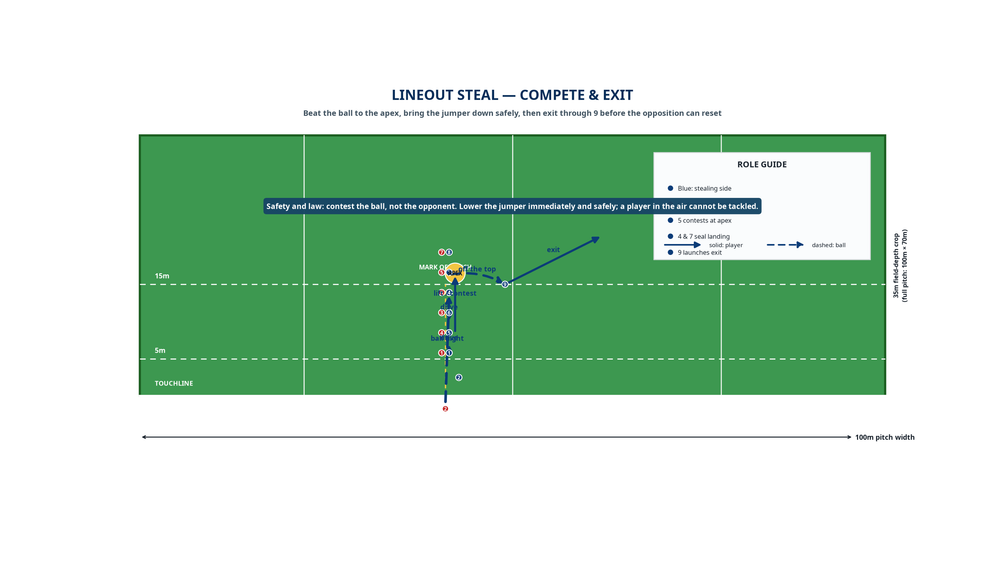
The final picture shows the steal-and-exit: No. 5 wins the middle ball, No. 4 and No. 7 secure the landing, and No. 9 carries the first usable ball into the counter-attack channel.
7. Age Adaptations
| Group | Adaptation | Non-negotiable |
|---|---|---|
| Under 8–10 | No lifting or aerial steal. Use a soft-ball read, middle-cone movement, catch and pass. | Safe catch, tracking and communication. |
| Under 12 | Use ground-based lineout pictures where local variations require it. Teach caller, lifter and receiver responsibilities without elevated competition. | Check local regulations first. |
| Under 14 | Introduce controlled lifting only when locally permitted and players demonstrate safe grips and landing mechanics. | No live contest before a competent controlled lift. |
| Under 16 | Add the two-pod read and supervised live contest in short repetition blocks. | Stop at the first unsafe descent or early lift. |
| Open / senior | Add opponent video tendencies, false targets, late tail cover and live exits. | Every steal includes a possession-security call. |
Age-grade law variations differ by union and competition. For example, England Rugby specifies uncontested U15 lineouts while allowing lifting and supporting; verify your local competition version before teaching a contested steal. 2
References
- [1] World Rugby Passport — Law 18: Touch, Quick Throw and Lineout
- [2] England Rugby — Regulation 15, Appendix 9: U15–U18 Variations