Own 22 Exit: Screen to 15, Contestable Clearance and Counter-Punch
Build a calm, repeatable exit from your own 22 that gives the fly-half three clear answers: clearance, contestable kick, or an edge counter-punch.

Equipment Needed
Overview
This is a three-answer exit system for a ruck inside your own 22. From a ruck 12–16m from the try line, 9 clears quickly, 10 makes the first decision and 15 sweeps to launch. The outcome is touch, a contest or field-position pressure. Rehearse it on a full 100m x 70m field so players recognise the try line, 22, halfway and touch landmarks.[1]
Use it after a settled ruck when the opposition has committed numbers to the line. It is strongest when wings are high, the full-back is isolated or the near-side edge races up. Keep the exit legal, fast and connected: the chase stays onside and no one forces a pass in front of the posts.[2]
Setup
Mark a 100m x 70m pitch where possible. For teaching, use the left-hand 30m: try line, 22 and both touchlines. Set a breakdown pad at x=14m, y=45m and a 15–20m target corridor, 5m in from the far touchline, beginning around the opposition 22. Use two bib colours, one live ball and one reset ball.
| Role | Starting location and task | Non-negotiable detail |
|---|---|---|
| 9 Scrum-half | At the back of the ruck, 1m from the ball. | Clear in under 3 seconds; call the exit side before lifting the ball. |
| 10 Fly-half | 8–10m behind and 8–12m wide of 9. | Scan the near-side line, far wing and full-back before receiving. |
| 15 Full-back | 18–22m deep, sweeping to the exit side. | Arrive early enough to kick on a stable base, not while drifting. |
| 12 and 13 Centres | Staggered across the middle, 8–12m apart. | Hold defenders square and fold instantly onto the chase. |
| 11 and 14 Wings | Both hold maximum legal width. | The exit-side wing owns the first chase and the contest call. |
| 6, 7 and 8 Back row | Secure the ruck, then form the first inside chase line. | Do not leave before the kick; reload through the middle. |

Set five or six defenders 8m behind the offside line. Start with a far backfield defender, then remove that player to reveal the counter-punch. Call clean, exit side, then blue for clearance, gold for contestable or go for counter.
Step-by-Step Instructions
Win the ruck and give 9 a clean picture. The arriving forward must create a ball presentation behind the hindmost foot. The first two cleaners stay connected and drive past the ball; 8 or the nearest forward provides a short guard. Coach this as a three-second standard: if the ball is not available, 10 cannot organise a quality exit.
9 identifies the exit side before the pass. As the ruck forms, 9 turns his head twice: first to check line speed, then to locate 10. He calls the exit side and delivers a flat, chest-height pass from 1–2m behind the ruck. The pass travels to 10, not behind him. Do not allow 9 to drift across the goal-line picture; a square pass buys 10 time.
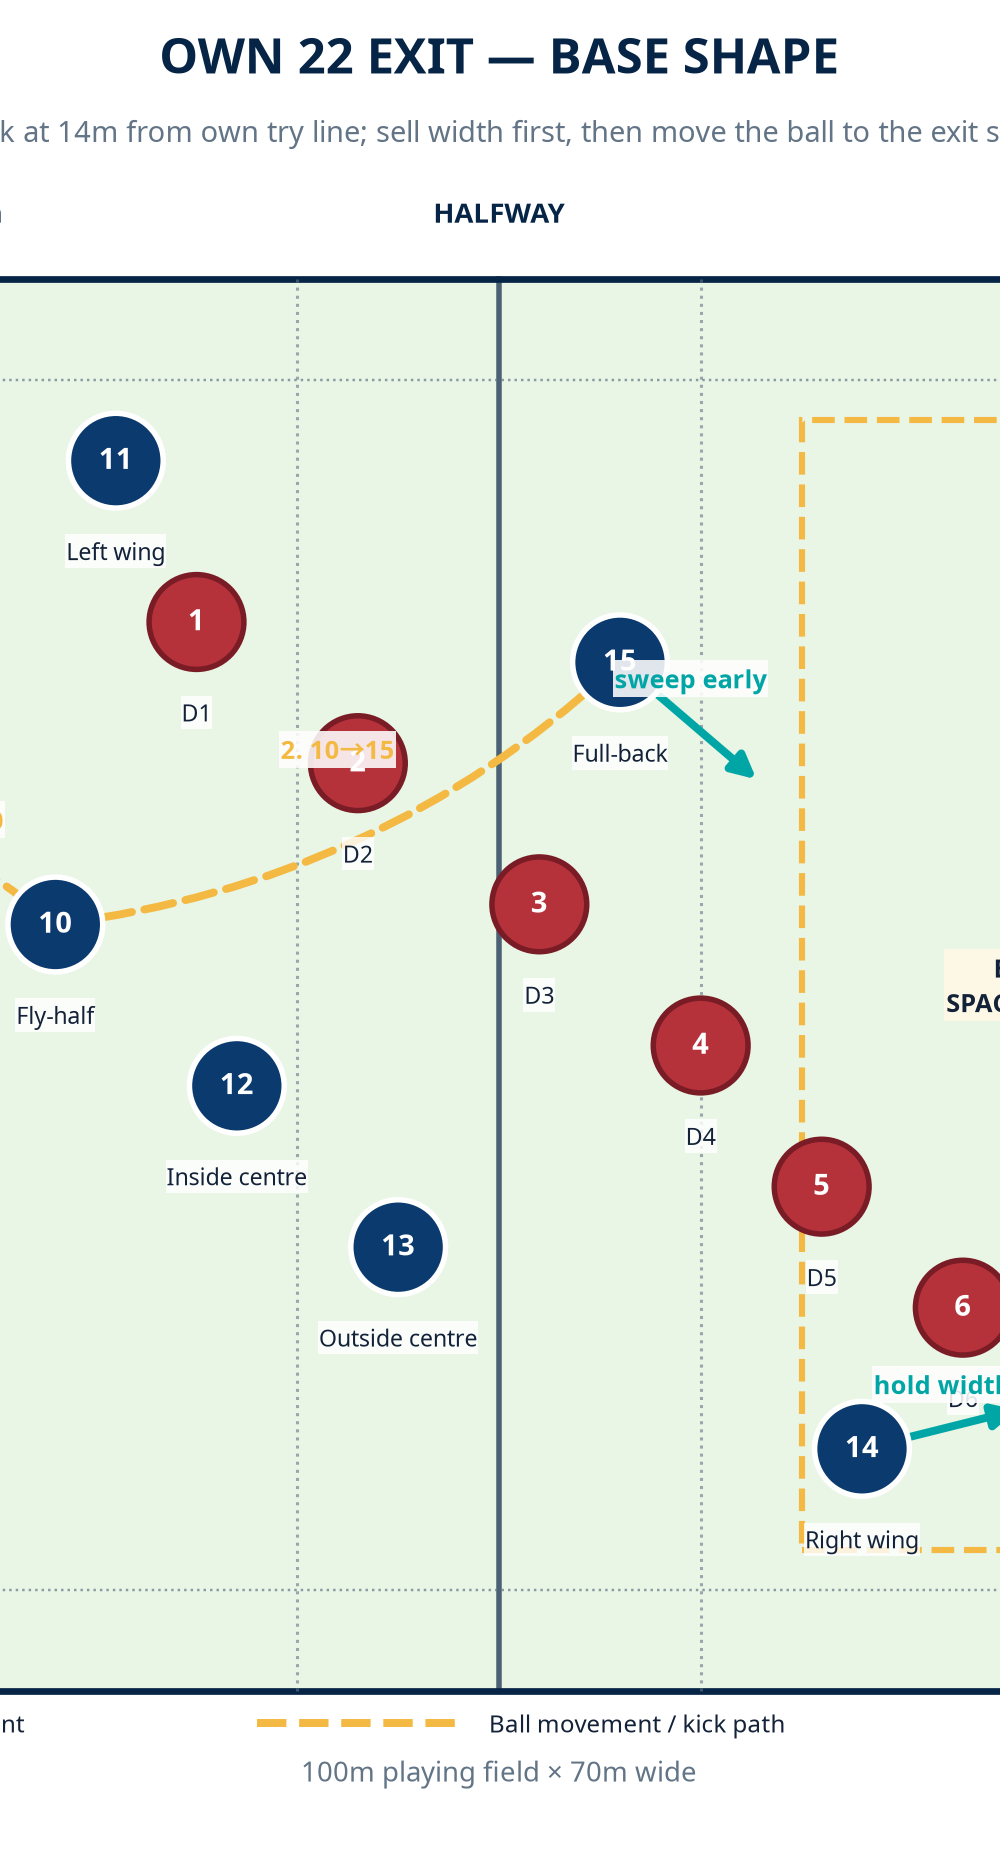
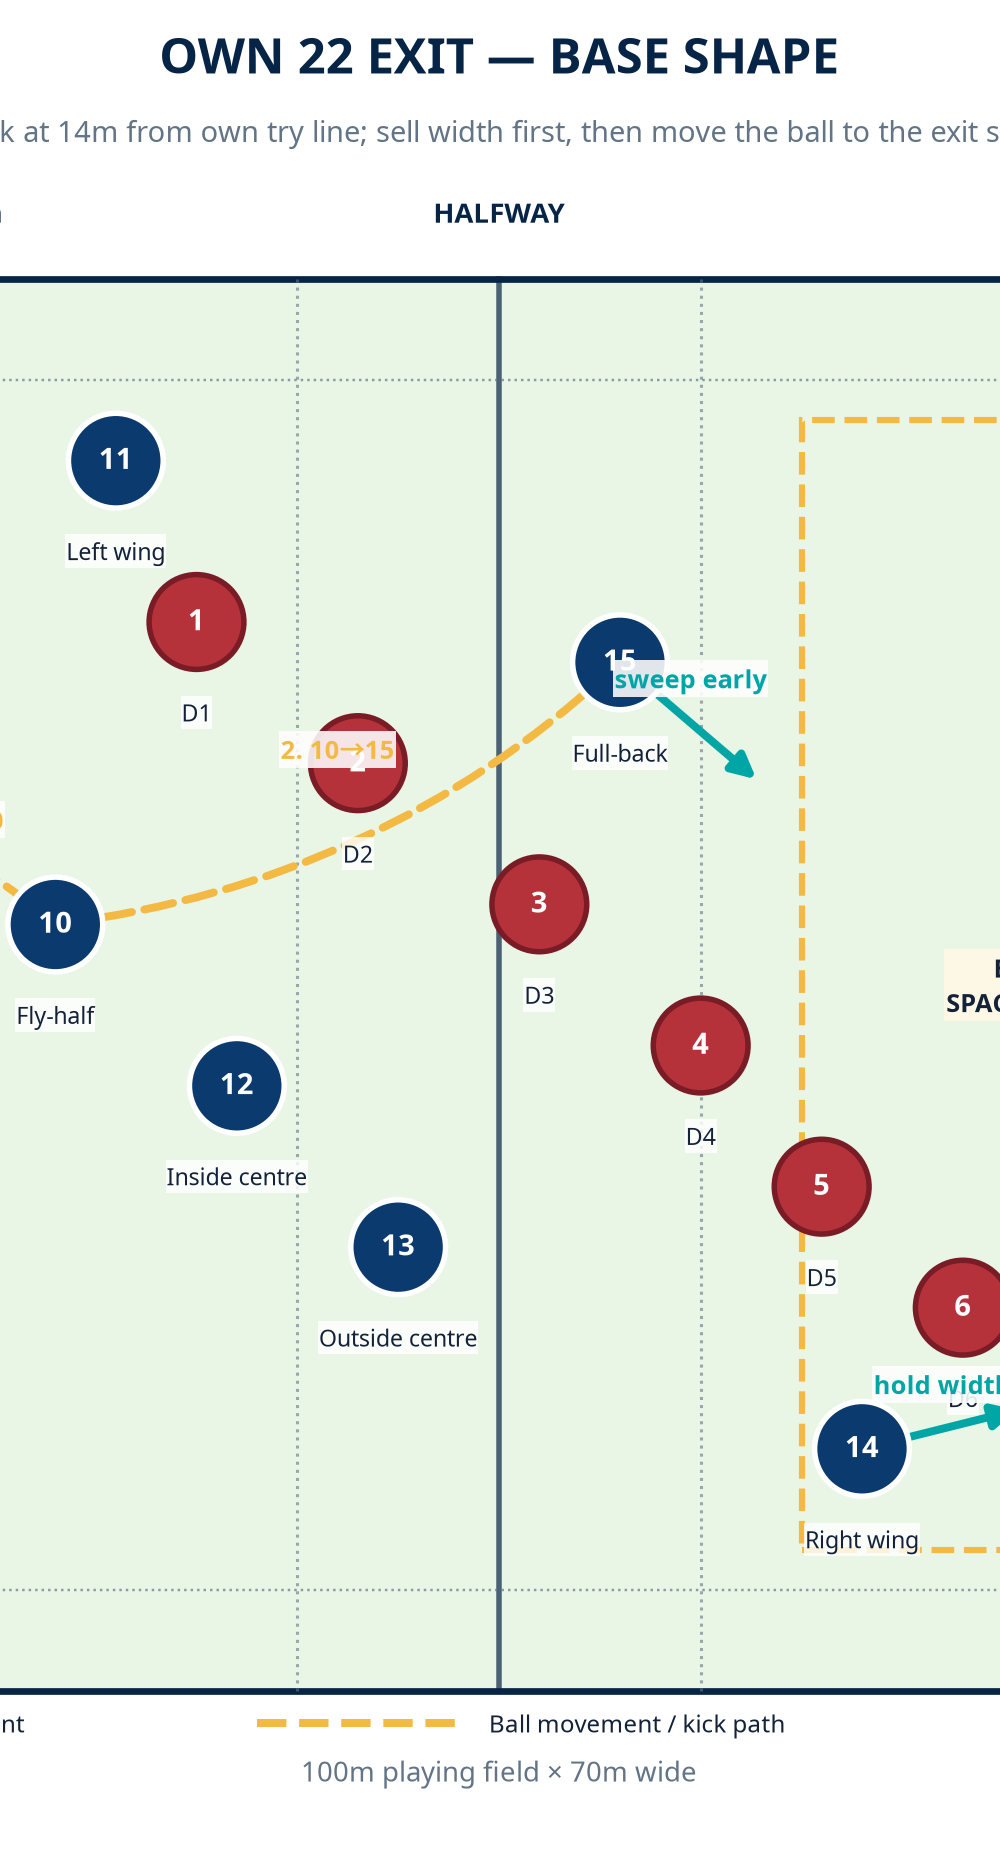
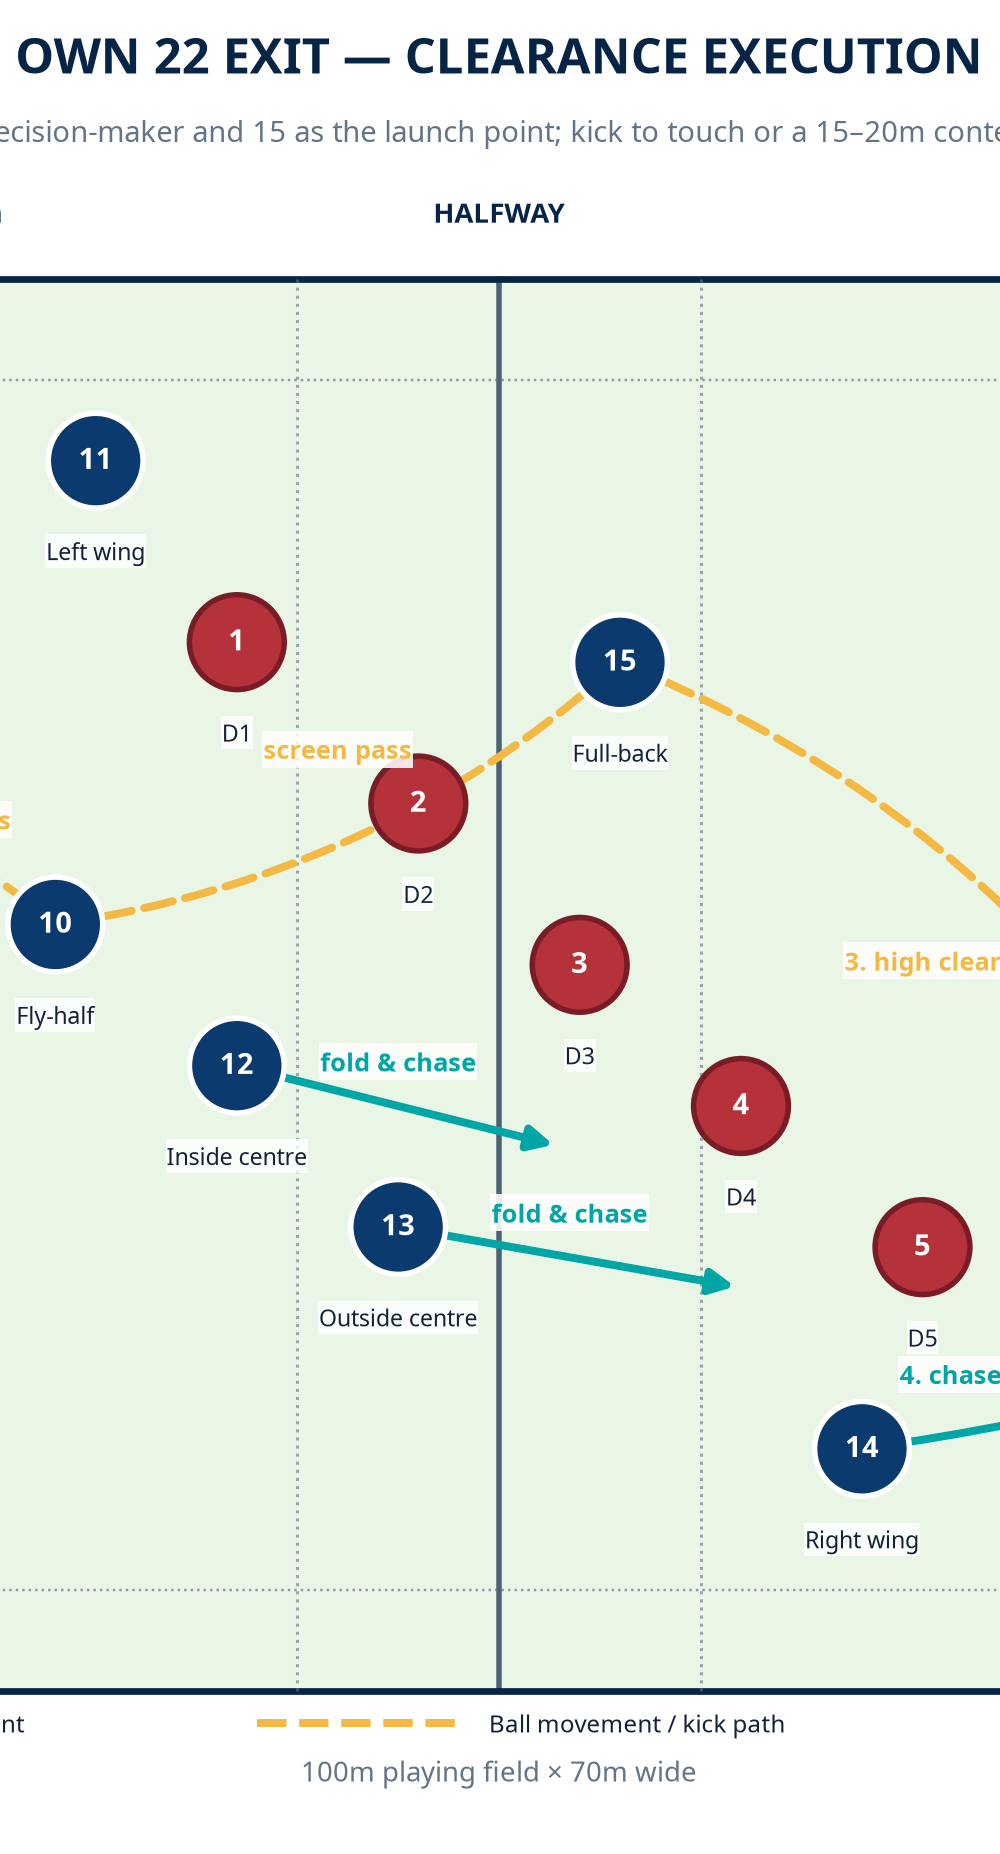
10 scans, catches square and commits the first defender. 10 receives at roughly 24m from the try line and takes one positive step at the line. His eyes move far wing, full-back, then near-side edge. If the full-back is deep and the far touchline is available, 10 gives the screen pass to 15 for a clearance. If the full-back is shallow or isolated, 10 still uses 15 but asks for a contestable ball into the corridor.
15 sweeps behind 10 and chooses kick shape. 15 must arrive 3–5m behind 10, hands up and shoulders square. For a pressure-relief clearance, he kicks 5m inside touch and prioritises distance. For the contestable exit, he kicks high enough for 14 to arrive at or just after the ball, normally targeting a landing point 15–20m infield from the far touchline. The aim is not a miracle 50:22; it is a connected aerial contest with a chase line.
Chase in lanes, not in a flock. 14 is the first hunter and calls ball or bounce. 13 folds to the inside of 14, 12 folds inside 13, and the back row chases through the central lane. 11 holds the far-side cover picture until the kick is secure. Every player stays behind the kicker until put onside; coach the first three chasers to arrive with space between them, so one missed contest does not open a single seam through the middle.[2]
Reload from the outcome. If the ball goes to touch, get your lineout caller and lifters organised immediately. If you win the contest, play the next phase toward the same edge before the opposition resets. If the opposition catches cleanly, the outside backs fold into a connected defensive line and the back row stops the return down the middle. Every repetition finishes only when the next ruck or lineout picture is established.
Key Coaching Points
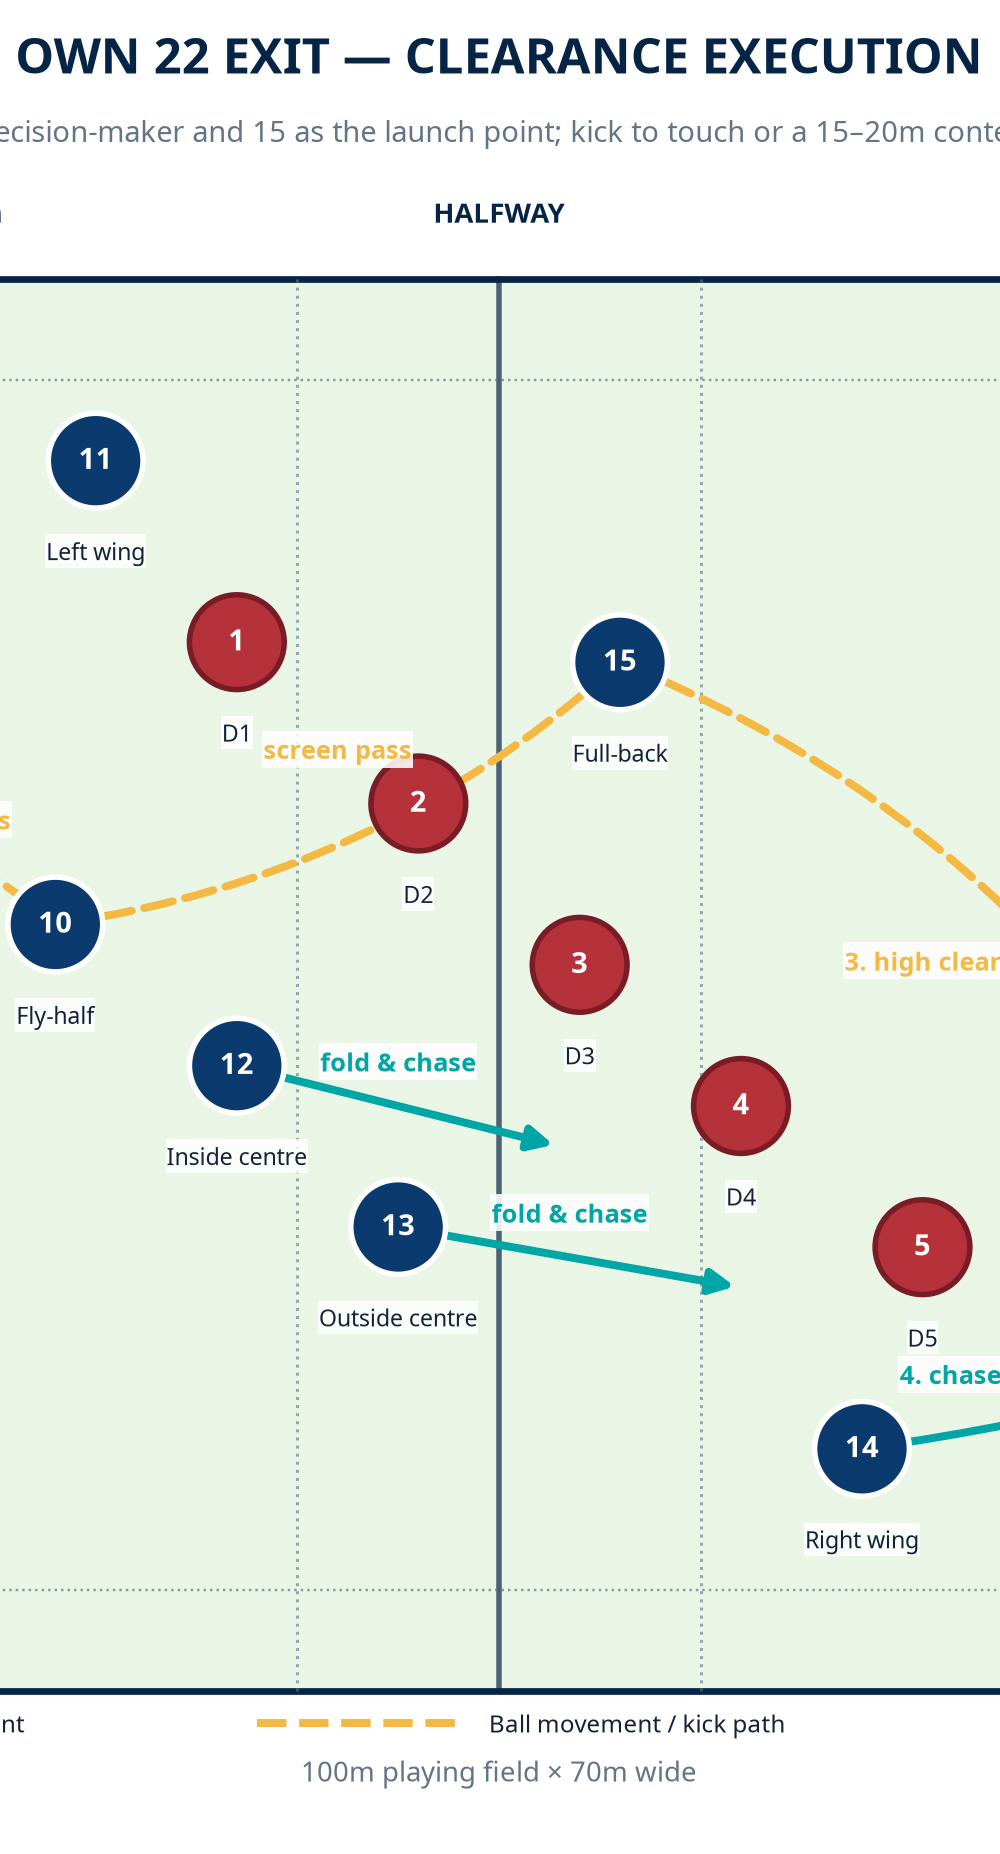
The biggest coaching priority is speed without panic. Insist on clean ball first, then decisive footwork. 10 and 15 should be talking before the ball is lifted, but 10 owns the final decision because he sees line speed earliest. Make 15 sweep from depth with his hips square to touch; a drifting full-back often slices the ball infield.
Second, coach the pass as a screen, not a bailout. 10 must threaten the line for one stride so D1 and D2 cannot simply drift to 15. Third, measure your chase rather than praising effort alone. The exit-side wing should be within 2–3m of the catch point, while the next two chasers stay 3–5m apart. Finally, build a shared picture: when the backfield is short, the best exit may be a pass through 12 and 13, not a kick.
| Coach cue | What good execution looks like |
|---|---|
| Clean and clear | The ball leaves the ruck inside 3 seconds with 9 balanced behind it. |
| Square then sweep | 10 fixes a defender; 15 arrives 3–5m behind, not beside, 10. |
| Kick with a chase | 14 contests while 13, 12 and the back row fill inside lanes. |
| Leave safely, then play | The team values touch, contest or reload ahead of forcing a long pass. |
Common Mistakes
Watch 10 receiving too deep or drifting; place a cone at his catch point and require one square step. If 15 arrives late, start him 2m earlier before gradually increasing his depth. Stop early chases with a whistle rule: chasers may not pass the marked line before foot-to-ball contact. Train both sides, and never accept an infield clearance without a contest or reload plan.
Variations and Progressions
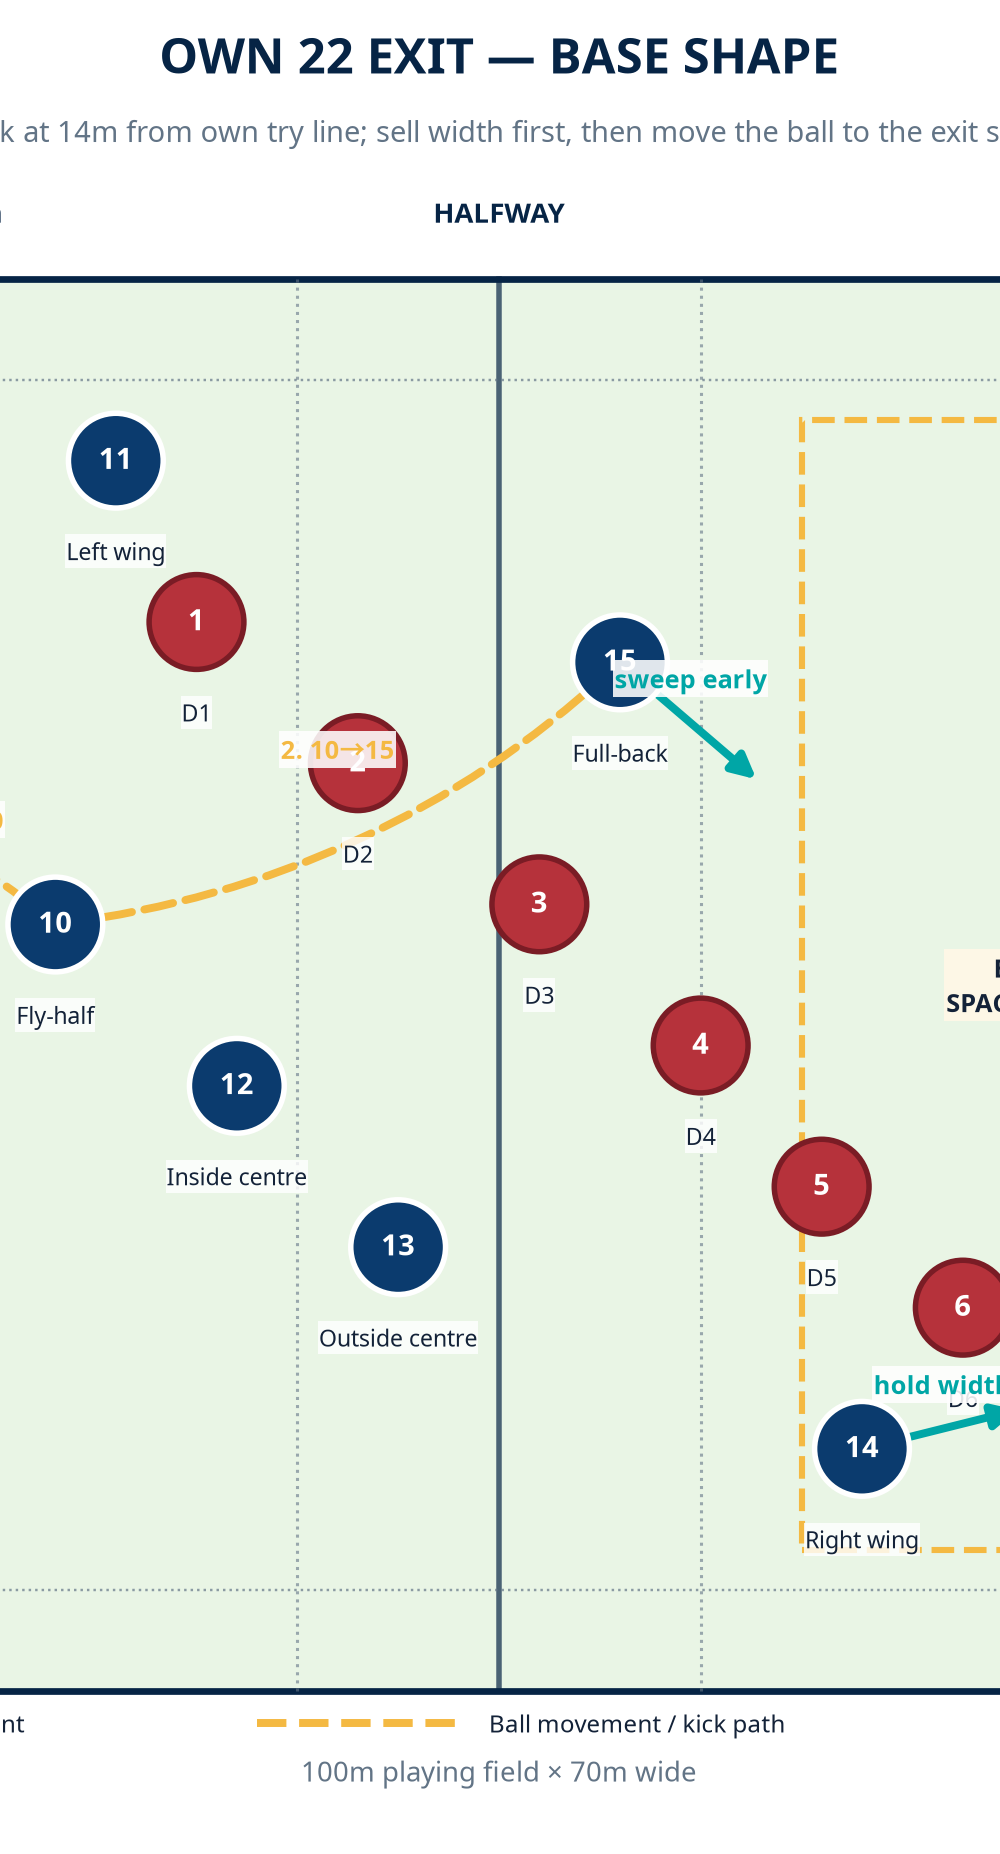
Variation one: direct 10 clearance. Under heavy rush or in wet conditions, 9 passes straight to 10 for touch; 15 covers and 14 leads the chase.
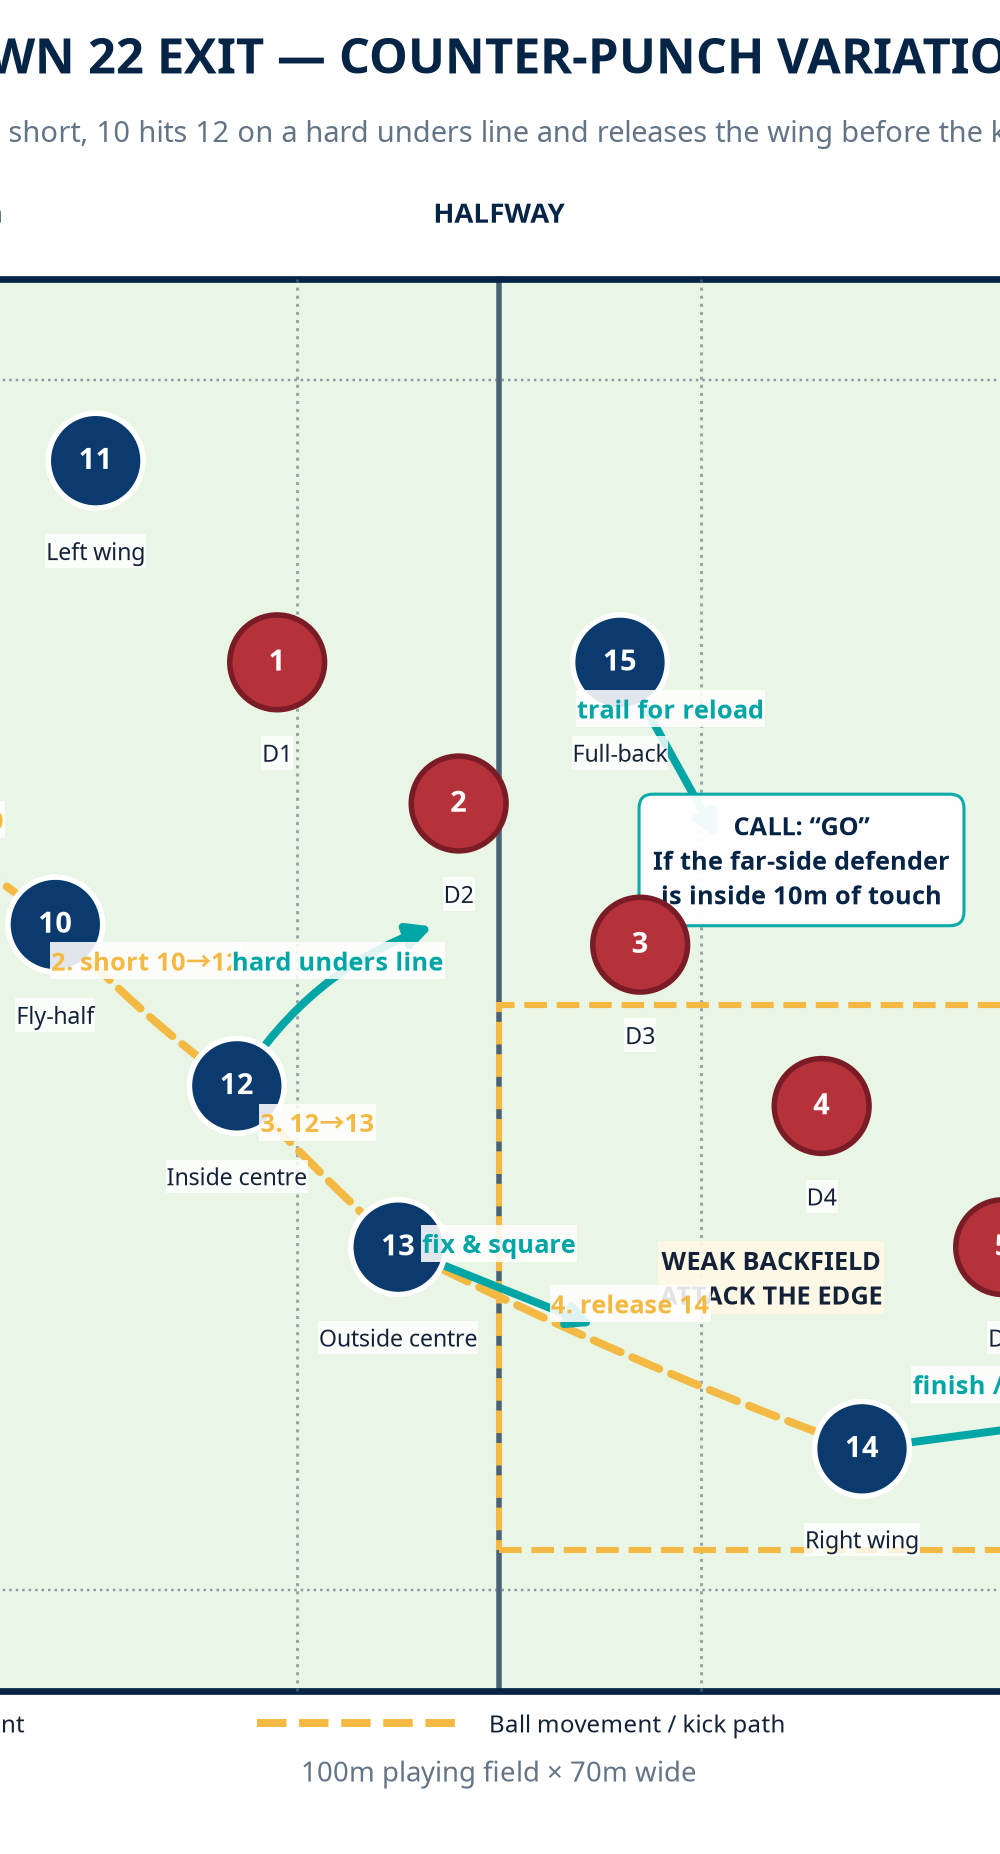
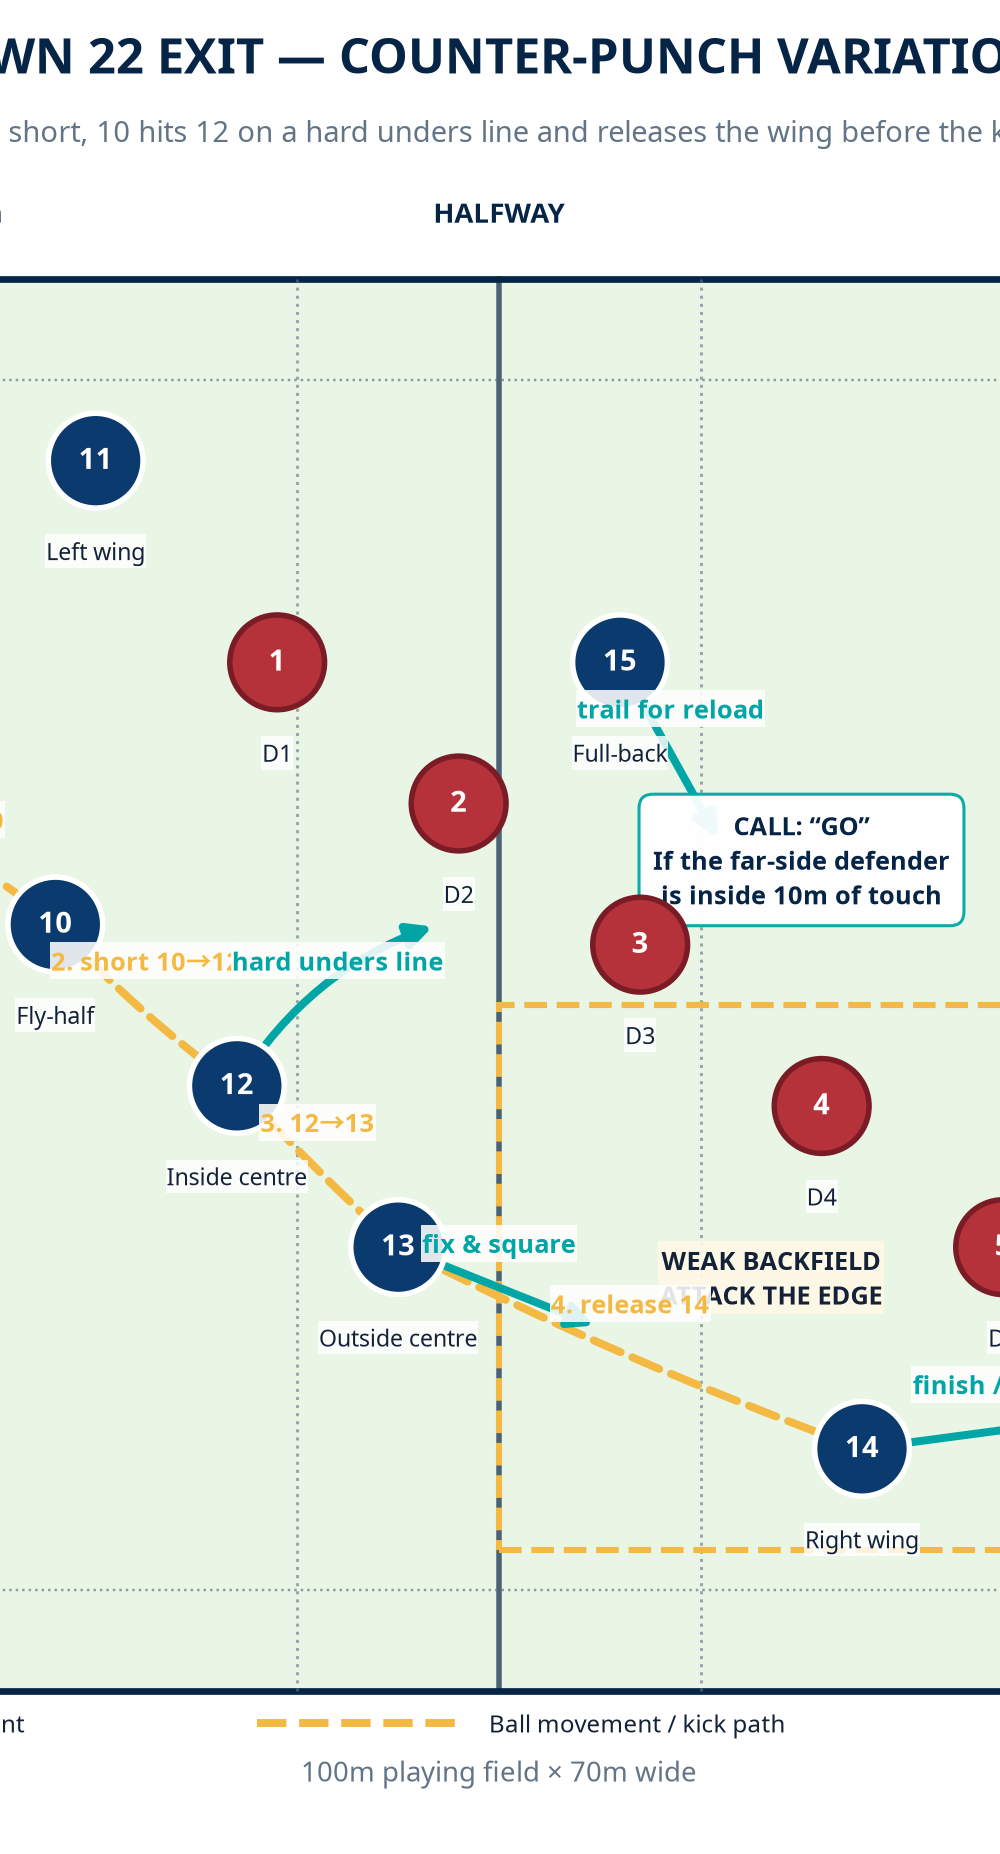
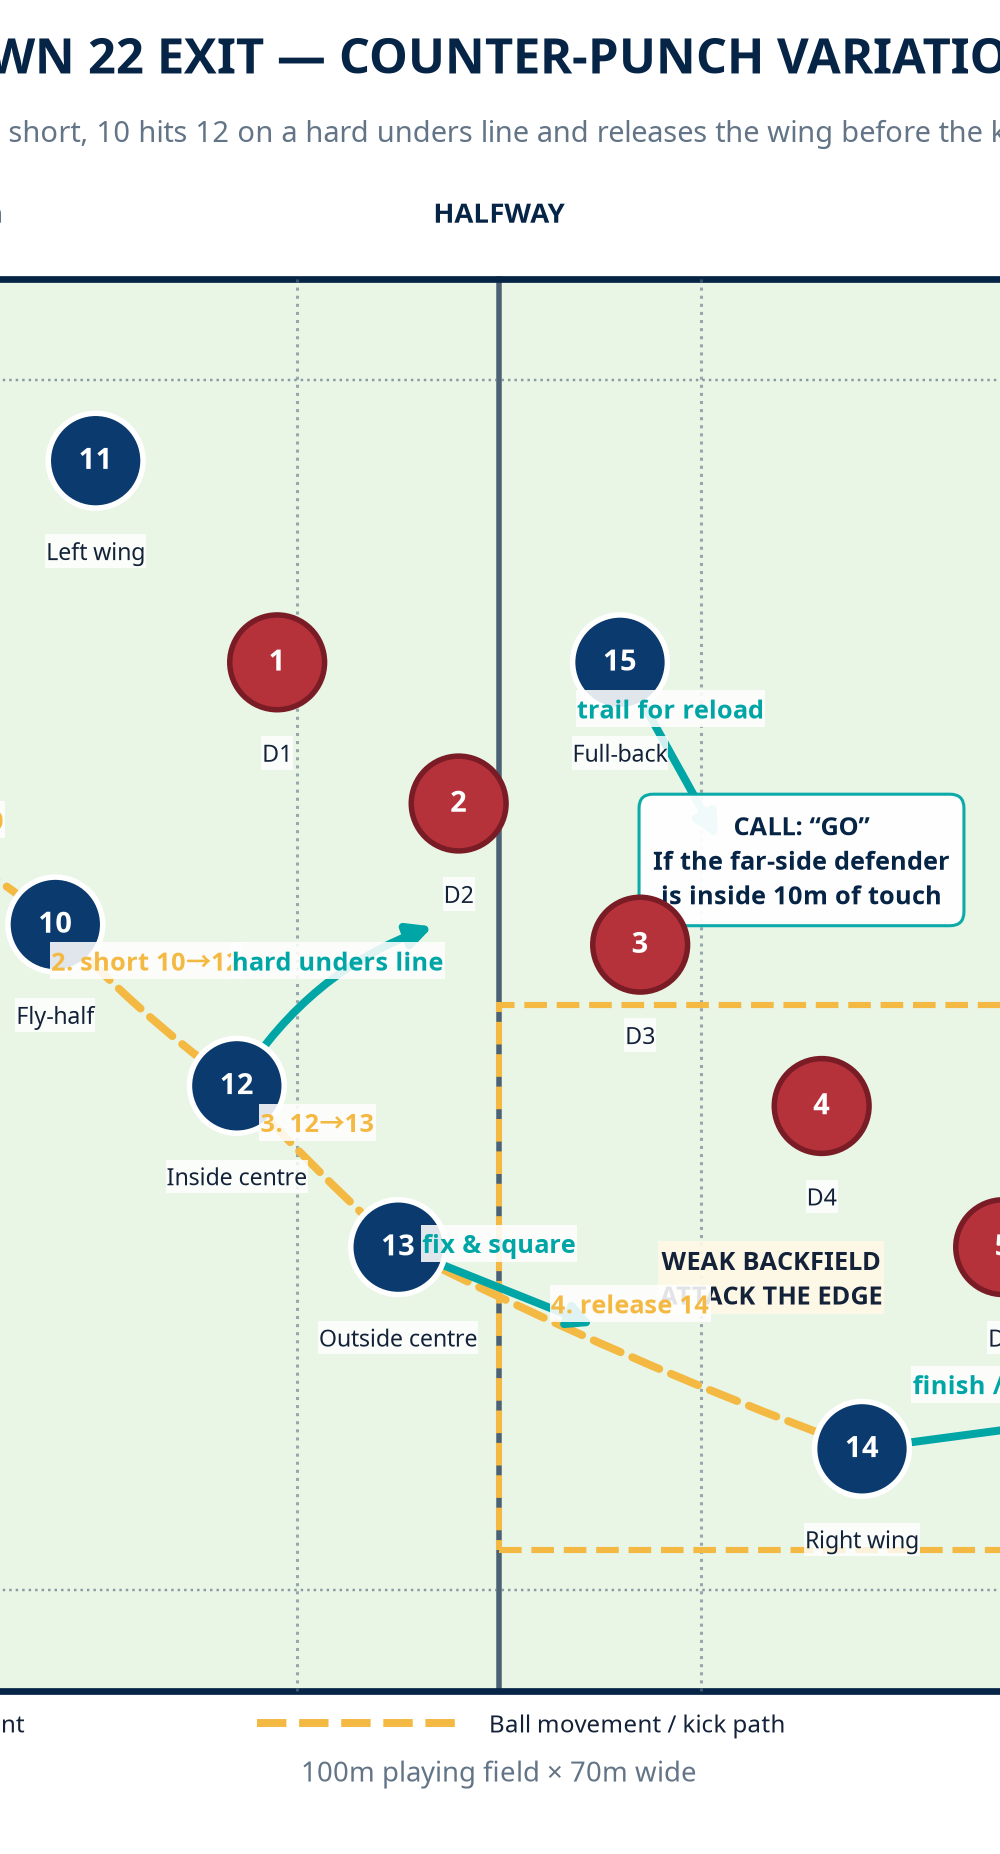
Variation two: counter-punch on go. If the far-side defender is within 10m of touch and the backfield is short, 10 hits 12 on an unders line, then 12–13–14 attack the edge. 15 trails to reload or grubber. Seek 15–25m before the next kick, not a score on every exit.
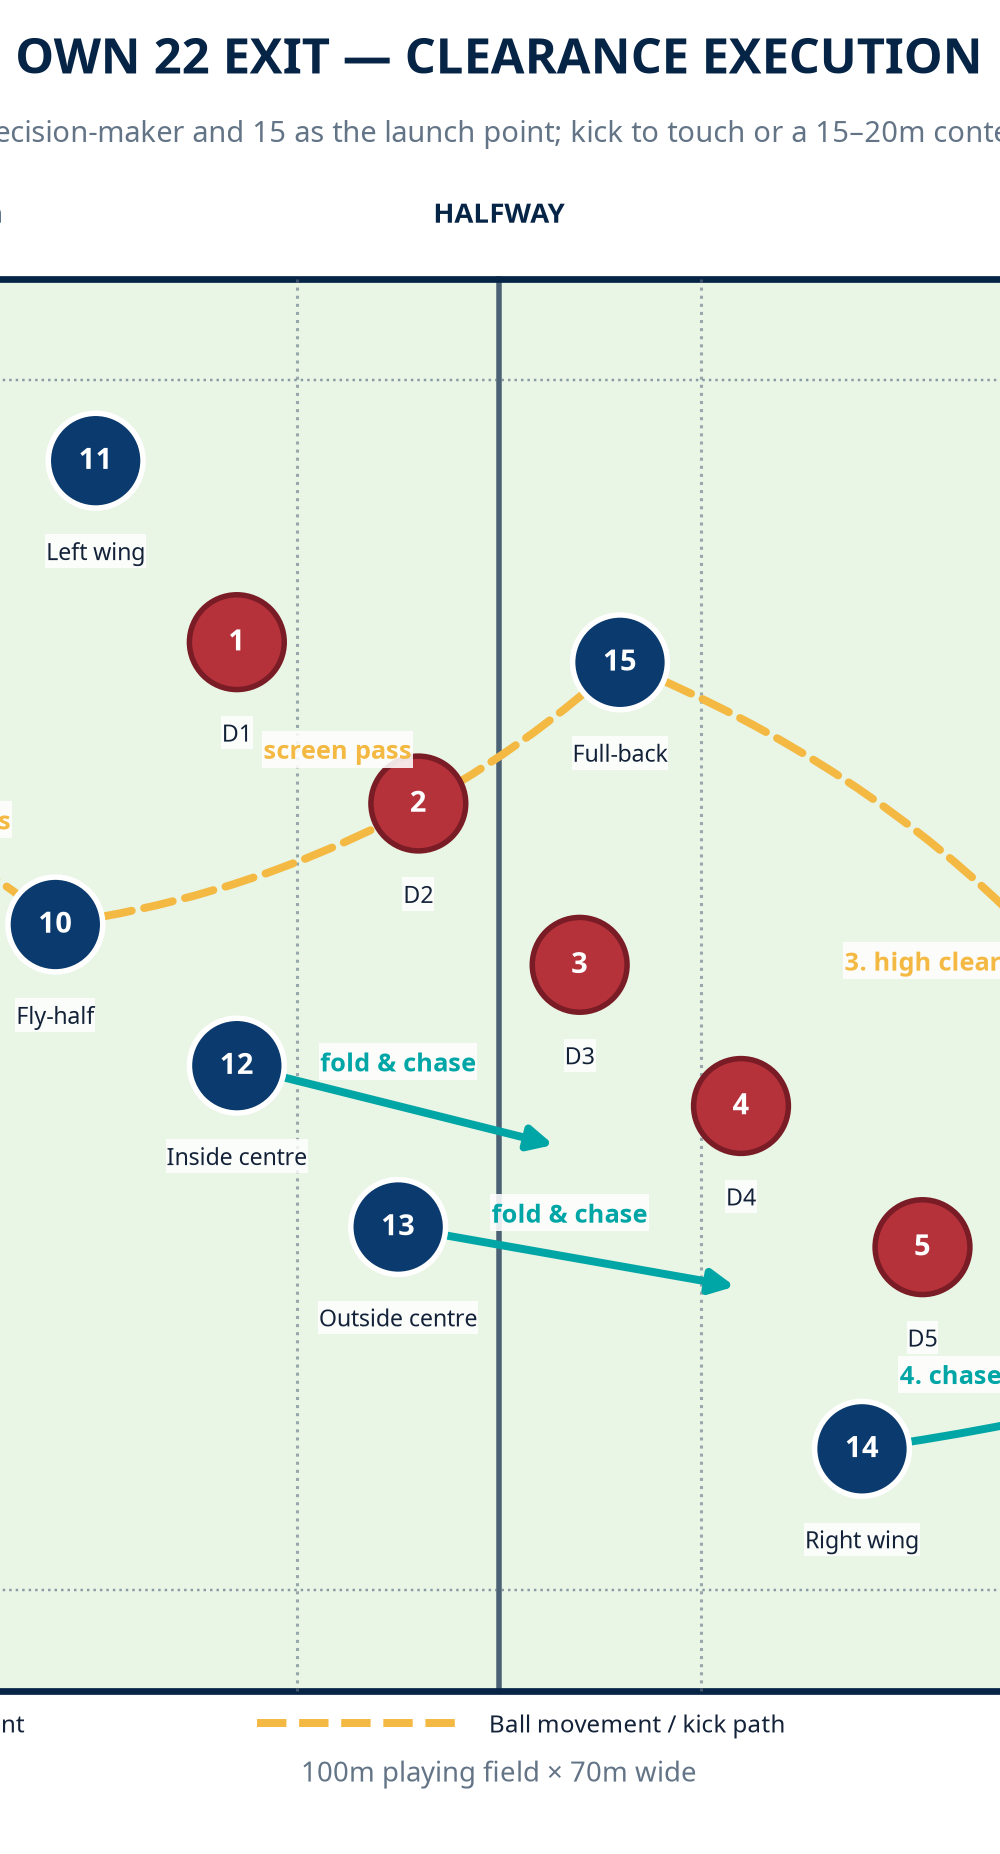
Progression: add live pressure and consequence. Progress from walk-through defenders to a live six-player line with full-back and winger. Score one point for touch beyond 40m, two for a recovered contest and three for a go-call line break; deduct for offside, a pass behind 10 or a return beyond the 22.
Age Adaptations
For Under 8 and Under 10, use a 35m x 25m zone and a two-pass exit to space. Replace aerial contests with a touch or carry target; coach support, communication and safe presentation.
For Under 12 and Under 14, use full width but 60–70m length. Introduce 9–10–15 and a controlled kick to a marked receiving zone only where local policies permit it. Hold defenders at 50% pace until spacing and catch-pass are reliable.
For Under 16 and open-age groups, use a full 100m x 70m pitch, real backfield and live six-player line. Demand all three calls, both exit sides and a return-kick phase. Experienced teams can attach this pattern to lineout and counter-attack systems.
References