

Rugby
Blindside Alley: 8–9–10–12–11 Scrum Strike
A timed blindside scrum strike that teaches your backs to create, fix and exploit the short-side edge.

What you need
balls, cones
Overview
Blindside Alley is a fast, layered scrum strike designed to beat a defence that over-folds towards the open side. It uses the threat of the No. 8 pick and the scrum-half’s delayed arc to create a short-side passing lane: 8 → 9 → 10 → 12 → 11. The objective is not to force a miracle pass to the wing; it is to make the edge defender square up, put the 12 on an inside-shoulder line and give the winger the ball before the cover can drift. On a 100 m × 70 m pitch, use a scrum 15 m from the blind touchline. In the diagrams, the blind touchline is at the top and attack travels right.
Setup
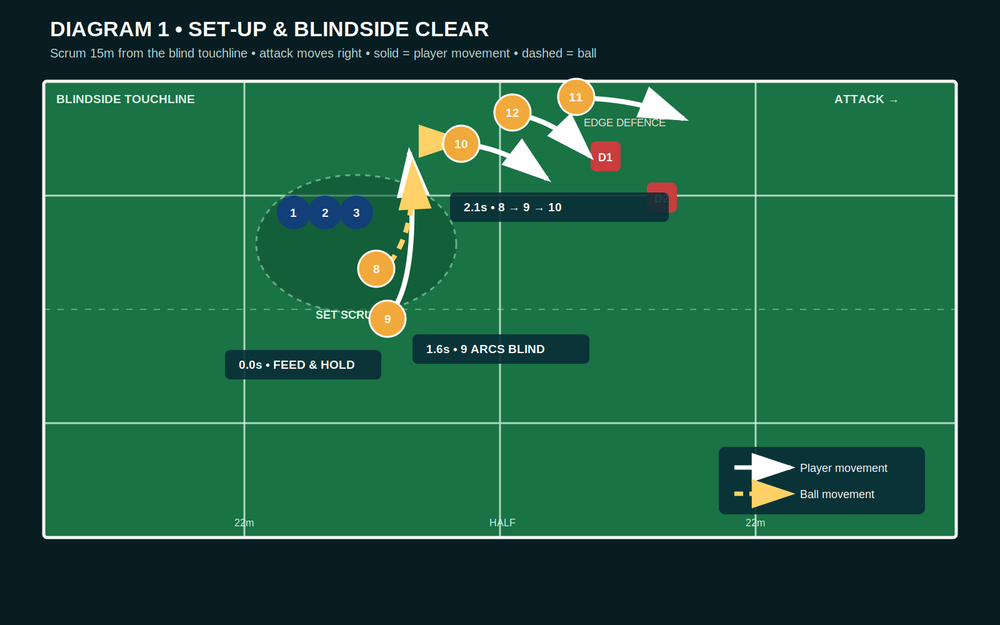
Set the scrum 15 m in from the blind touchline and ideally between the 22 m and halfway lines, where there is enough space for the winger to finish but a credible short side remains. Number 8 controls the ball at the tail. Number 9 starts on the open-side shoulder of the scrum, deliberately showing the defence an open-side picture. Number 10 is 5 m behind the tail and 5 m towards the blindside lane, hips and shoulders facing upfield. Number 12 starts 3 m outside and 2 m flatter than 10. Number 11 begins 6–8 m outside 12, no closer than 3 m to touch, with room to accelerate.
Use the call “Alley” before the feed. The 9 confirms it with a quiet “blind” as the ball is at the No. 8’s feet. The opposition picture for the drill is a first edge defender (D1) aligned on 10, a second defender (D2) aligned on 12, and a wide defender tracking 11.

Step-by-Step Instructions
0.0–0.8 seconds: feed and settle. The hooker feeds on 9’s cue. Number 8 keeps the ball secure at the base and stays square; the scrum is held for one beat so the defence can commit to the expected open-side exit. Number 9 takes one open-side step with eyes and shoulders looking that way, then turns behind the tail.
0.8–1.6 seconds: 9 arcs blind. Number 9 runs a tight U-shaped arc behind the No. 8, arriving 1–1.5 m off the tail on the blindside. The route must be tight enough that D1 cannot shoot through the gate. Number 8 keeps two hands near the ball and communicates with a single cue: “now.”
1.6–2.1 seconds: 8 clears to 9. Number 8 takes one strong blindside step, fixes the nearest guard, then gives a soft two-hand pop to 9. Do not throw a long pass from the base. The transfer is chest height and slightly in front of 9’s line so that 9 can play immediately.
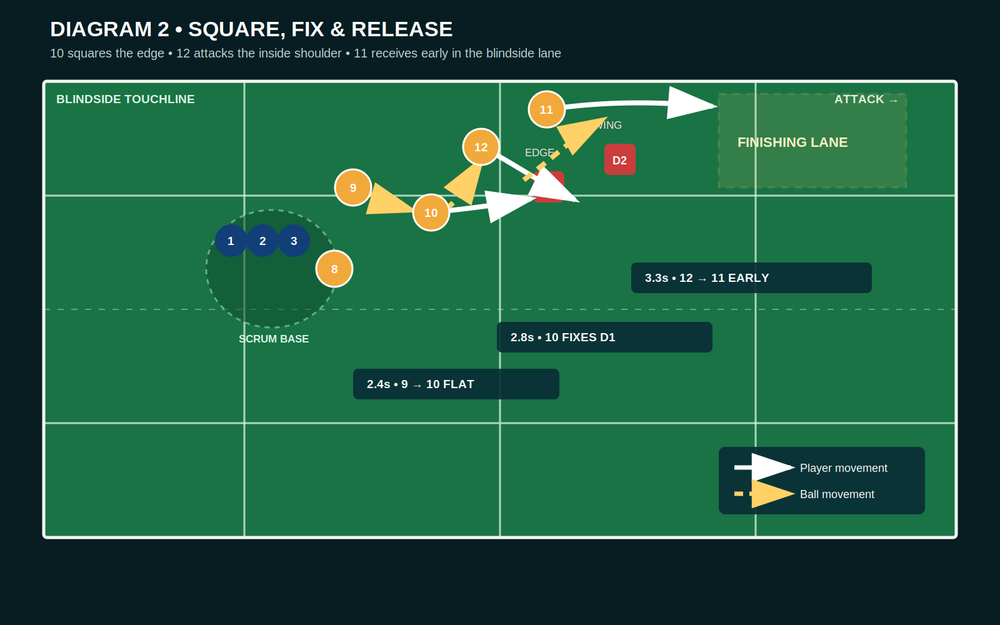
2.1–2.5 seconds: 9 hits 10 flat. Number 10 accelerates late and receives from 9 before reaching the defensive line. His catch height is sternum level, hands up early, with feet underneath him. 10’s first two steps are directly at D1’s inside shoulder; this is the square-and-fix moment. Number 12 holds his depth until 10 has caught, then starts a hard line at D2’s inside shoulder.
2.5–3.0 seconds: 10 makes the decision. If D1 stays square or drifts out, 10 gives the short, firm pass to 12. If D1 shoots hard at 10, 10 carries through D1’s inside shoulder and 12 becomes the cleanout option. Never pass simply because the call was made; the decision is based on D1’s hips and shoulders.
3.0–3.4 seconds: 12 fixes and releases. Number 12 catches while moving, takes no more than two steps, and aims to put D2 on his inside shoulder. Once D2’s feet stop or turn in, 12 releases a 4–6 m pass to 11. The pass should travel in front of the winger’s outside hip, allowing 11 to stay in stride.
3.4 seconds onward: 11 finishes or reloads. Number 11 attacks the outside edge first, then uses the touchline as an extra defender. If the wide defender has held width, 11 steps in and wins the collision; if the defender has tucked in, 11 accelerates around the edge. The nearest three attackers chase inside-out for the first cleanout and immediate reload.
Key Coaching Points
Coach the picture before the pass. 9’s open-side false picture and delayed blind arc are what buy the first half-second; without that deception, the short side is simply a narrow channel. Insist that 8 stays connected to the scrum until 9 has cleared the tail, then delivers a short, quiet ball. A drifting 8 makes 9’s pass longer and gives the guard a free shot.
The backline must preserve depth without becoming passive. 10 needs a flat, late acceleration, not a deep catch-and-shuffle. 12’s line is an inside-shoulder line, not a wide drift: he is there to hold D2, not to run around him. 11 should communicate “early” only when he has clear grass and a genuine passing window. Finally, finish every rep with a support picture; a blindside break that ends with an isolated winger is not a successful team attack.
Common Mistakes
The common failure is 9 declaring the blindside too early and allowing D1 to number up. Correct it by making 9 show open-side shoulders for one step before the arc. A second mistake is 10 catching too deep or drifting across field; use a cone gate 2 m in front of 10 and demand that he crosses it square. Third, 12 often runs too wide and asks 11 to beat two defenders. Put a target cone on D2’s inside shoulder and reward 12 for fixing before releasing.
Variations & Progressions
Variation 1: 8 carry. If the blind guard flies beyond the tail to chase 9, 8 keeps the ball and attacks the gap just off the scrum. 9 becomes the immediate support and 10 wraps underneath for the next phase.
Variation 2: 10 pull-back. When D1 jams hard on 10 and D2 over-chases 12, 10 throws a pull-back pass behind 12 to 11, who has stayed 2 m deeper. Only add this once the base pattern is accurate; it demands strong pass quality and a disciplined winger.
Progress the drill from unopposed walk-through, to three live edge defenders with a passive scrum, then to a conditioned phase game. Award two points for a line break outside D2 and one point for a clean 11 carry with two supporting attackers.
Age Adaptations
For younger or developing players, remove the live scrum: use three front-row players kneeling or a marked scrum square, start with 8 holding the ball, and teach 8 → 9 → 10 → 12 → 11 at jogging speed. Reduce the pattern to three passes and ask 12 to carry rather than release if handling is inconsistent. Use touch or wrap-only defence and keep the blind channel 10–12 m wide.
For under-16 and senior groups, use a legal, safely coached scrum and retain the 15 m blindside picture. Add a live guard, a folding flanker, and a defender who can read 10’s body shape. The non-negotiables remain the same: a stable base, late 9 arc, square 10, inside-shoulder 12, and an early ball to a winger who has support.
