Support Running and Angles: Building Effective Attack Depth
Master the three critical support angles — flat, wide, and depth — that transform isolated ball carriers into a connected, unstoppable attacking unit.

Equipment Needed
Overview
Effective support running is the single most important attacking skill a rugby team can develop. Without it, even the most gifted ball carrier becomes isolated, and possession is lost at contact. This drill trains players to understand and execute the three primary support angles — flat support, wide support, and depth support — and to read in real time which angle is required based on the defensive alignment in front of them.
Use this drill in the attacking skills block of any training session, ideally after a warm-up that includes dynamic movement and short passing. It is equally effective as a standalone session focus or as the technical foundation before a full-contact phase-play session. The drill scales from unopposed skill-building through to live 3v2 and 4v3 scenarios, making it appropriate for teams at every level.
Setup

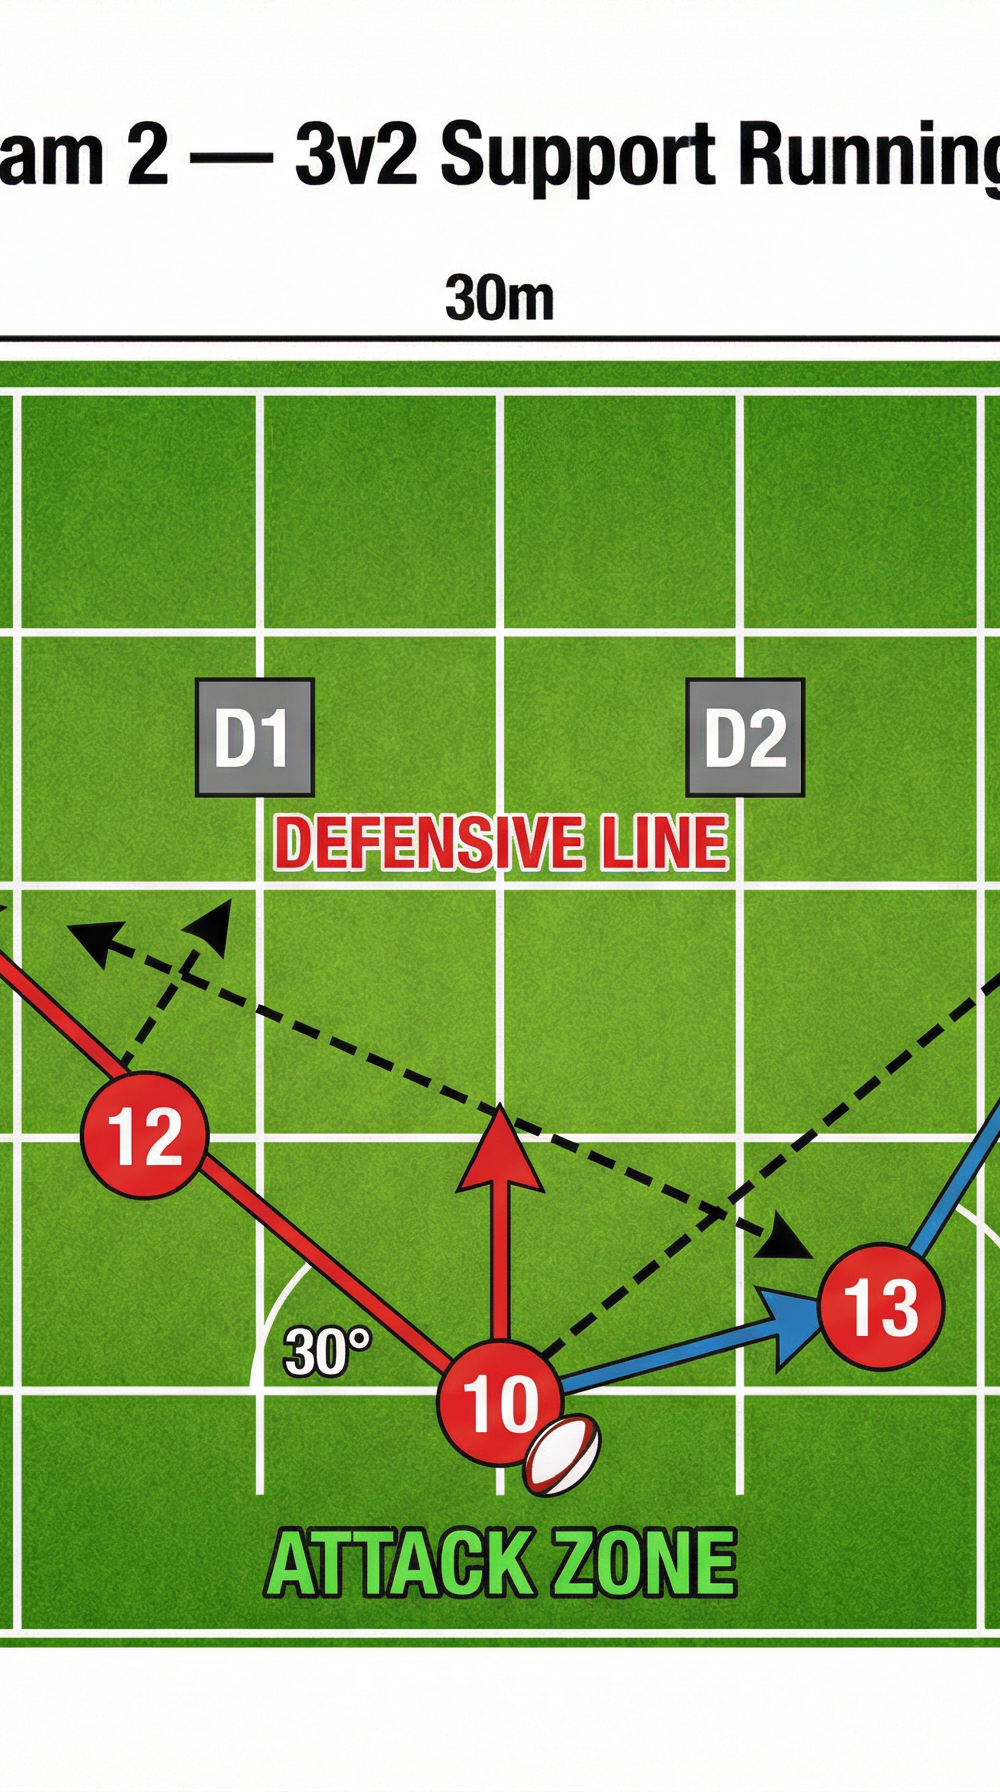
Grid Dimensions: Mark out a 30m x 20m channel using cones. This represents a realistic attacking channel on a standard 100m x 70m pitch. The width of 20m mirrors the space available between a ruck and the touchline in a typical wide-channel attack.
Equipment Required:
- 12 cones (orange or yellow for high visibility)
- 4–6 match balls
- Tackle shields (2, for the progression phase)
- Coloured training bibs (2 sets: red for attackers, blue for defenders)
- Whiteboard or coaching clipboard (optional, for pre-drill walkthrough)
Player Positions and Numbers:
- Minimum: 9 players (3 attacking units of 3, rotating)
- Optimal: 12–15 players
- Roles in each unit: No. 10 (Fly-Half) as primary ball carrier, No. 12 (Inside Centre) as flat/inside support, No. 13 (Outside Centre) as wide/outside support
- Defenders (progression phase): 2 players in shield or passive defence
Divide players into groups of three. Each group will work as an attacking unit for one full repetition before rotating to the back of the queue. Defenders rotate in after every two attacking runs.
Step-by-Step Instructions


Phase 1 — Unopposed Angle Familiarisation (10 minutes)
- Position the No. 10 at the bottom centre of the 30m x 20m grid, holding the ball. No. 12 stands 2m to the left and 1m behind. No. 13 stands 2m to the right and 1m behind.
- On the coach's call of "Flat", No. 12 accelerates forward at a 30-degree inside angle, drawing level with No. 10 within 5m. No. 10 passes to No. 12. No. 13 simultaneously loops wide to provide the next support option.
- On the call of "Wide", No. 13 accelerates on a 60-degree outside arc, staying 2m deeper than No. 10. No. 10 passes to No. 13. No. 12 adjusts to become the inside support for No. 13.
- On the call of "Depth", No. 12 drops 3–4m behind No. 10 at a 45-degree angle, acting as a safety valve. No. 10 drives forward before offloading back to No. 12.
- Repeat each angle call three times per group before rotating. Emphasise clean footwork and calling the ball loudly.
Phase 2 — Decision-Making with Passive Defenders (10 minutes)
- Introduce two passive defenders (standing, arms folded) positioned 8m ahead of the attacking unit. Defenders stand 3m apart.
- The No. 10 now reads the gap between the two defenders and calls the angle themselves — no coach call. If the gap is central, use the flat support. If a defender drifts wide, use the depth support to draw and pass.
- Attackers must complete the move and ground the ball over the far try line (30m away). If possession is lost or a defender tags the ball carrier, the rep is reset.
- Rotate after every two reps. Defenders must stay passive — their role is to create a realistic picture, not to compete.

Phase 3 — Live 3v2 Competitive Drill (10 minutes)
- Defenders are now active and hold tackle shields. The attacking unit of three must score over the far line against the two defenders.
- The ball carrier (No. 10) initiates from the bottom of the grid. Defenders start on their feet 8m ahead and may move laterally but not forward until the ball carrier crosses the 5m line.
- Attackers score one point for a try. Defenders score one point for a turnover or a successful tag (if contact is restricted). First team to five points wins the set.
- Rotate all three roles within the attacking unit across sets so every player experiences carrying, flat support, and wide support.
Key Coaching Points

1. Depth Before Width. The most common error in support running is arriving too flat too early. Support runners must establish depth first — at least 1–2m behind the ball carrier — before committing to their angle. This preserves the passing window and prevents the support runner from running into contact alongside the carrier.
2. Read the Defender's Hips, Not Their Shoulders. Teach players to watch the nearest defender's hips to determine which angle to take. If the defender's hips are square and moving inward, the wide support angle opens up. If the hips are drifting outward, the flat inside angle becomes available.
3. Communicate Early and Loudly. Support runners must call for the ball — "Here! Here!" — as soon as they are in a viable passing position. This removes decision-making pressure from the ball carrier and speeds up the offload.
4. The Ball Carrier Must Commit the Defender. A support runner is only effective if the ball carrier draws the defender toward them first. Reinforce the concept of "fixing" a defender: the carrier must run hard at the defender's inside shoulder, forcing a commitment, before releasing the pass.
5. Hands Ready, Eyes Up. Support runners must present a target with both hands extended at chest height as they approach the passing window. Eyes must be on the ball carrier, not on the ground or the next defender.
6. Maintain Shape After the Pass. The player who passes the ball does not stop — they immediately become the next support runner for the new ball carrier. This continuous loop of support is what sustains multi-phase attacks.
Common Mistakes
Running Across Instead of Forward. Players instinctively drift laterally to stay in the play, which takes them across the pitch and reduces the space available for the next phase. Correct this by placing a cone 5m directly ahead of each support runner's starting position — they must run to the cone before adjusting their angle.
Arriving Too Early at the Pass Point. When support runners arrive at the ball carrier's shoulder before the defender is committed, the passing lane is immediately closed. Use a verbal cue — "Wait... wait... NOW" — to train players to time their acceleration to the moment the defender commits.
Ball Carrier Holding On Too Long. Under pressure, carriers tend to hold the ball past the optimal release point, forcing the support runner to slow down or stop. Introduce a rule in Phase 2 that the ball must be released within 3 seconds of the support runner calling, reinforcing quick decision-making.
Support Runners Bunching Together. Two support runners taking the same angle eliminates one option and creates an easy defensive read. Physically mark the two support corridors with cones (inside corridor and outside corridor) and assign each runner to their corridor at the start of the drill.
Flat Passes Under Pressure. When the ball carrier is under pressure, they often pass flat and hard, making the ball difficult to catch in stride. Emphasise a slightly looping pass that arrives in front of the support runner's chest, not behind them.
Variations and Progressions
Variation 1 — Conditioned Game (Wider Grid, More Players). Expand the grid to 40m x 30m and run a 4v3 scenario, adding a No. 11 (Wing) as a fourth attacker and a third defender. This replicates the wide-channel attack more authentically and introduces a second-phase support decision after the first pass.
Variation 2 — Ruck Entry Trigger. Begin each rep with a simulated ruck: the No. 9 (Scrum-Half) feeds the ball from a ruck pad on the ground to the No. 10. This adds a realistic starting trigger and trains the No. 10 to assess the defensive picture from the moment the ball is in their hands, rather than from a standing start.
Progression — Contact Phase. Remove the tackle shields and introduce full contact (appropriate for senior and academy players). The ball carrier must now make a genuine decision: pass before contact, offload in contact, or go to ground and present. Support runners must react to all three outcomes, adding the ruck-support angle as a fourth option alongside the three running angles.
Age Adaptations
| Age Group | Grid Size | Contact Level | Key Focus | Simplification |
|---|---|---|---|---|
| Under 10 | 20m x 15m | Tag rugby only | Flat support angle only | Coach calls the angle; no decision-making required |
| Under 12 | 25m x 15m | Tag rugby | Flat and wide angles | Two attackers vs. one passive defender |
| Under 14 | 30m x 20m | Shield contact | All three angles, Phase 1 & 2 only | Defenders remain passive in Phase 2 |
| Under 16 | 30m x 20m | Full contact | All phases including live 3v2 | Reduce defender numbers if skill gap is large |
| Open/Senior | 40m x 30m | Full contact | 4v3 progression, ruck trigger | Add second-phase continuity requirement |
For younger age groups, the priority is building the habit of running into space rather than running to the ball. Use simple verbal cues — "Make a Y shape!" — to help younger players visualise the three support angles without needing to understand the tactical rationale. As players mature, replace the visual cue with the language of reading the defender, building toward the autonomous decision-making required at senior level.