Wide Overlap Play from Lineout: Creating the Edge Advantage
Master the wide overlap play from lineout — a structured set piece that fixes the defence inside and creates a clear try-scoring opportunity for your winger in the wide channels.

Equipment Needed
1. Overview
This set play is designed to create a significant numerical advantage in the wide channels, leading to a clear try-scoring opportunity for your winger. By using a standard lineout as the launchpad, we draw the opposition forwards into a confined space before rapidly shifting the ball to the open side. The core principle is to fix the internal defenders and exploit the space on the edge of the field before the defensive line can realign.
This play is most effective when executed from a lineout inside the opposition's half, ideally between the 10-meter line and the 22-meter line. It works best against teams that have a tendency to commit a large number of players to the lineout, or those with slower loose forwards who struggle to cover the width of the 100m x 70m pitch.
2. Setup

Equipment
You will need a full set of rugby balls, cones or markers to delineate channels and starting positions, and a full-size rugby pitch (100m x 70m).
Pitch Setup
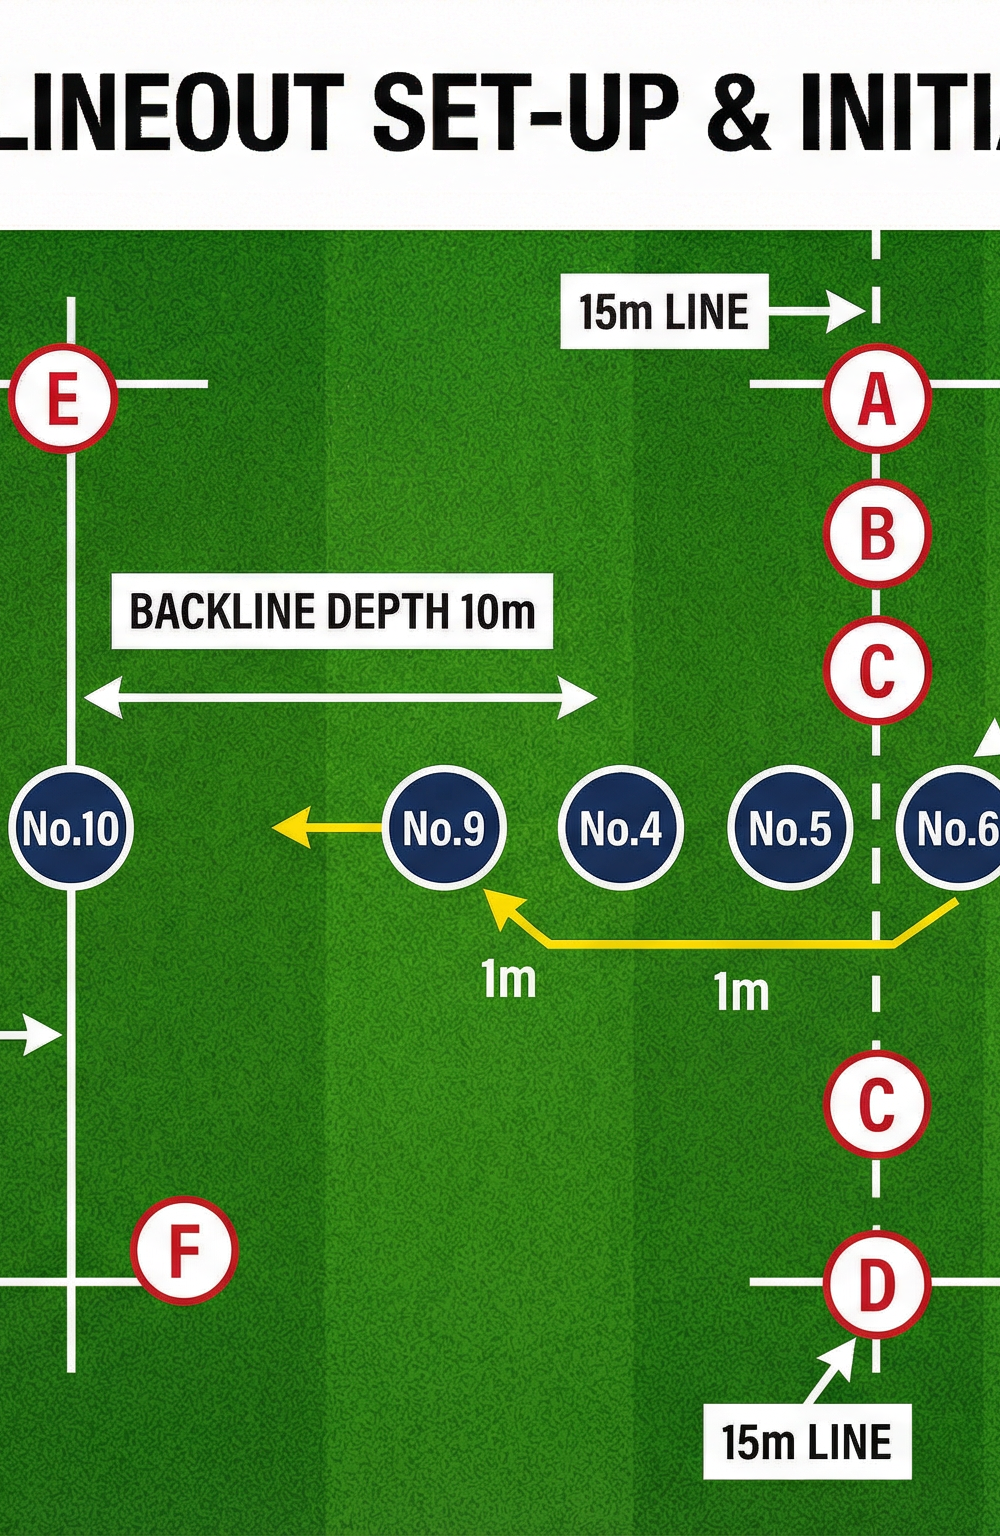
The play is run from a lineout on either the left or right side of the pitch. Place a cone on the 15m line to mark the fly-half's starting position, and place another cone 10m back from the 15m line to ensure the backline maintains appropriate depth throughout the move.
Player Positions
| Position | Number | Starting Location |
|---|---|---|
| Hooker (Thrower) | No. 2 | On the touchline |
| Lineout Jumper | No. 6 | Middle of lineout |
| Lifters | No. 5 & No. 7 | Either side of No. 6 |
| Lineout Props | No. 4 & No. 8 | Front & rear of lineout |
| Scrum-Half | No. 9 | Front of lineout, 1m back |
| Fly-Half | No. 10 | 15m line, 10m deep |
| Inside Centre | No. 12 | 2m outside No. 10 |
| Outside Centre | No. 13 | 5m outside No. 12 |
| Left Wing | No. 11 | Wide left, near touchline |
| Fullback | No. 15 | Deep, 10m behind backline |

3. Step-by-Step Instructions
The Throw & Catch: The Hooker (No. 2) executes a clean throw to the middle of the lineout, targeting the No. 6 jumper. The lifters (No. 5 & 7) must provide a stable platform for a clean catch and immediate delivery. Timing between the thrower and the jumper is non-negotiable.
The Transfer: The No. 6 jumper, upon landing, immediately transfers the ball to the Scrum-Half (No. 9), who has moved into position at the front of the lineout to receive it. The transfer should take no more than 1–2 seconds.
The First Pass: The Scrum-Half (No. 9) delivers a flat, fast pass to the Fly-Half (No. 10). The pass must be in front of the Fly-Half, allowing them to run onto the ball at pace and immediately threaten the defensive line.
The Decoy & Draw: The Fly-Half (No. 10) runs a hard, straight line to engage the first defender. The Inside Centre (No. 12) runs a parallel straight line to fix their opposite number. The critical coaching point here is that both players must commit their defenders — if they drift, the defence will not be held.
The Wide Pass: As the inside defenders are fixed, the ball is moved quickly through the hands of No. 10 and No. 12 to the Outside Centre (No. 13). Speed of ball movement is essential here — every second of delay allows the defensive line to recover and drift.
Creating the Overlap: The Outside Centre (No. 13) now has the crucial role. They must run a hard, arcing line towards the outside shoulder of the defending winger. Simultaneously, the Fullback (No. 15) runs a sharp decoy line inside the defending winger, putting them in a 2-on-1 situation.
Finishing the Move: The Outside Centre (No. 13) reads the defence and selects from three primary options:
- Option A — The Wide Ball: Draw the last defender and deliver a clean pass to the Winger (No. 11) to score in the corner. This is the primary option and should be the default when the overlap is clear.
- Option B — The Inside Ball: If the defending winger drifts out to cover the attacking winger, the No. 13 uses a short inside pass to the Fullback (No. 15), who hits the gap at pace.
- Option C — Back Yourself: If the defence is slow to react and the No. 13 has a clear lane, they take the ball to the line themselves.

4. Key Coaching Points
Pace and Accuracy of Pass. The ball must travel quickly and accurately through the hands. Every pass should be delivered in front of the receiver, allowing them to run onto the ball at speed. Slow or inaccurate passing gives the defence time to drift and cover the overlap.
Depth of the Backline. The backline must maintain a minimum depth of 10m from the lineout. If they are too flat, they will run out of space and the passes will become forced. Use cones in training to mark the correct starting depth and enforce it until it becomes habitual.
Running Straight to Fix Defenders. Players must run hard, straight lines to hold their defenders. The Outside Centre's arcing run and the Fullback's decoy line are only effective if the inside backs have already committed the defence. Any drifting by No. 10 or No. 12 will allow the defence to slide and kill the overlap.
Communication. Clear and concise communication is essential throughout the move. Players must call for the ball, confirm their position, and signal their intentions. Establish a clear call word that triggers the play from the lineout.
Decision Making at the Point of Attack. The Outside Centre (No. 13) must make the correct decision based on their defensive read. Emphasise that the primary option is always the wide ball to No. 11, and the inside ball to No. 15 is only taken when the defence has clearly drifted. Decision-making improves through repetition and deliberate practice.
Lineout Ball Speed. The entire play depends on the quality of the lineout delivery. A slow, messy lineout gives the defence time to organise. Drill the lineout unit separately until the delivery is consistently fast and clean.
5. Common Mistakes
Slow Ball from the Lineout. A slow or untidy delivery from the lineout will kill the play before it starts. The forwards must be drilled to provide quick, clean ball. If the lineout is consistently slow, address the technical issues in a dedicated forwards session before running the full play.
Backline Too Flat. If the backline starts too close to the lineout, they will run out of space and the passes will be forced. Use cones to mark the correct starting positions and enforce them consistently in training. A depth of 10m from the lineout is the minimum requirement.
Inside Backs Drifting. If No. 10 or No. 12 drift across the field rather than running straight, they will not fix their defenders and the overlap will not be created. Use a simple drill where defenders are placed in front of each back and the attacking players must run straight at them before passing.
The Final Pass Under Pressure. A poor final pass can undo all the good work. Players must practise passing under pressure, particularly the Outside Centre's pass to the winger in the corner. Introduce a passive defender to create pressure in training.
Fullback Mistiming Their Run. The Fullback must time their run to perfection. Too early and they crowd the space; too late and the opportunity is gone. The trigger for the Fullback's run should be when the ball reaches No. 12 — this gives them enough time to build pace and arrive at the right moment.
6. Variations & Progressions
Progressions
Begin by running a simple 3-on-2 drill in a 20m x 20m grid. This teaches the core principle of drawing a defender and creating an overlap without the complexity of the full play. Once players understand the concept, progress to a 5-on-4 drill that introduces the full backline and a second line of defence. The final progression is to run the play against a live, full defensive unit in a game-like scenario, where the defence is given the freedom to react as they would in a match.
Variations
The Skip Pass. The Fly-Half (No. 10) throws a skip pass directly to the Outside Centre (No. 13), bypassing the Inside Centre (No. 12). This is a higher-risk option that requires a longer, more accurate pass, but it can be very effective if the defence is narrow and the No. 12 channel is well-defended.
The Switch. The Inside Centre (No. 12) runs a switch line with the Fly-Half (No. 10), taking the ball on a hard inside line. This variation is used to hold the inside defenders when the opposition is defending well and drifting early. The switch buys time for the outside backs to get into position.
7. Age Adaptations
| Age Group | Adaptation |
|---|---|
| Under 12s | Use an uncontested lineout. Focus on basic handling and running lines using a 2-on-1 or 3-on-2 drill. Reduce the pitch width to 40m. |
| Under 14s | Introduce the 5-man lineout and the full backline. Focus on timing of passes and correct running lines. Use passive defenders initially. |
| Under 16s | Run the full play with all variations. Emphasise decision-making by the Outside Centre and the timing of the Fullback's run. Use active defenders. |
| Open Age | Execute at full pace with a high degree of accuracy. Introduce complex variations and expect players to make correct decisions under full match pressure. |