The 22-Metre Fortress: Wide Exit Strategy Play
Master a structured, multi-phase exit strategy to safely and aggressively clear your lines from deep within your own 22-metre area.

Equipment Needed
1. Overview
Exiting your own 22 safely and effectively is a cornerstone of winning rugby. A poorly executed exit invites pressure, concedes territory, and often leads to opposition points. The Wide Exit Strategy Play is designed to provide a structured, low-risk, yet aggressive method for clearing your lines from a defensive lineout or scrum deep in your territory.
This play aims to stretch the defensive line laterally on the first phase, creating wider channels or isolated defenders for a secondary kicking or running option. By utilizing decoy runners and pulling the opposition's back three out of position, you dictate the terms of the exit rather than simply hoisting a hopeful box kick.
When to use it:
- Following a defensive lineout or scrum inside your own 22.
- When the opposition has committed numbers to the breakdown, leaving wide channels vulnerable.
- When your primary kicking options (No.9 or No.10) are under heavy pressure.
2. Setup
To execute this play effectively, precision in positioning is paramount. Ensure your players understand their roles and starting points relative to the pitch markings (100m x 70m).
Equipment Needed:
- 1 Rugby ball (match standard)
- 15 players (Attacking team)
- Opposition players (Defending team) or cones to simulate the defensive line.
- Pitch with clear markings (Try line, 22m line, 10m line, Halfway line, Touchlines).
Pitch Setup & Player Positions:
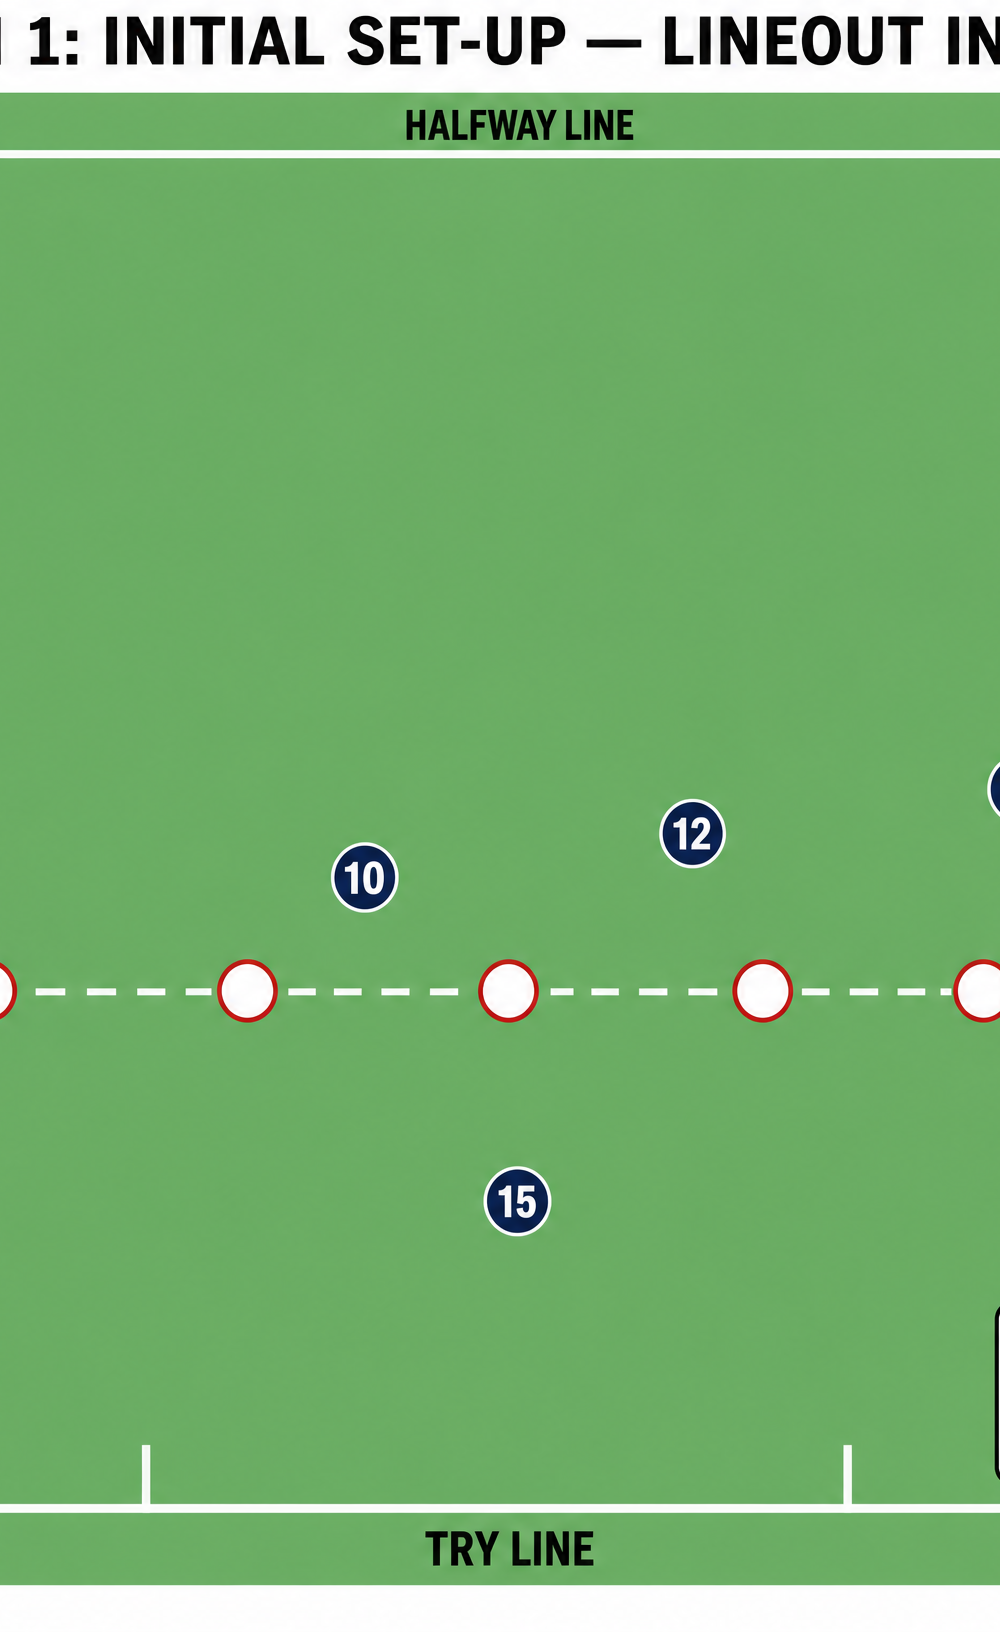
The play initiates from a lineout on the left touchline, approximately 5-10 metres from your own try line.
- Forwards (No.1 to No.8): Standard lineout formation. No.8 positions at the tail of the lineout.
- No.9 (Scrum-half): Standing 1 metre from the lineout, ready to receive the ball.
- No.10 (Fly-half): Positioned 10 metres infield from the lineout, slightly deep (about 5 metres behind the 22m line).
- No.12 (Inside Centre): Standing 15 metres infield, aligned slightly outside and behind No.10.
- No.13 (Outside Centre): Positioned 25 metres infield, ready to run a wide arc.
- No.11 (Left Wing): Positioned near the left touchline, about 10 metres upfield from the 22m line.
- No.14 (Right Wing): Holding width near the right touchline.
- No.15 (Fullback): Positioned 15 metres behind the 22m line, central to the pitch, ready to inject pace into the line.

3. Step-by-Step Instructions
Execution requires timing, accurate passing, and committed running lines.
Phase 1: The Setup Carry
- The Throw: No.2 (Hooker) delivers a crisp throw to the middle or back of the lineout.
- The Peel: No.8 catches or receives the tap down and immediately peels around the back of the lineout, driving hard and low to establish a strong platform.
- The Ruck: Forwards secure the breakdown quickly, ensuring lightning-fast ball availability. The ruck should be formed roughly 5 metres infield from the left touchline.
Phase 2: The Wide Strike
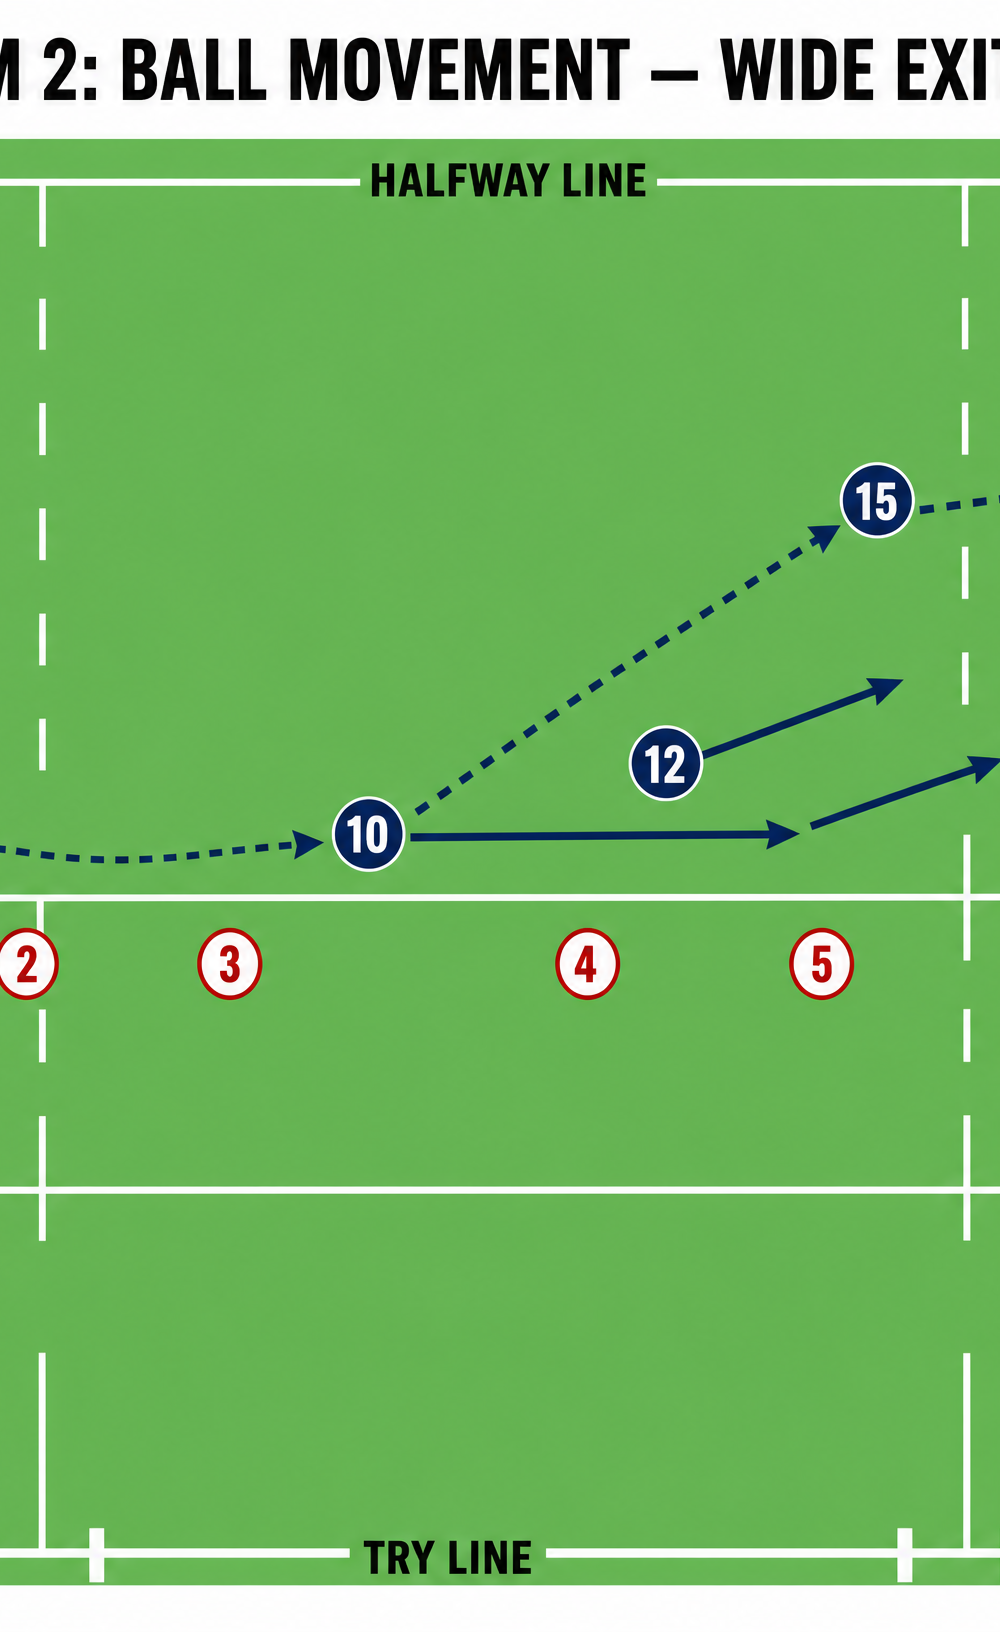
4. The Delivery: No.9 clears the ball rapidly from the base of the ruck with a long, flat pass to No.10.
5. The Decoy: Simultaneously, No.11 (Left Wing) cuts hard infield on a short, aggressive decoy line to hold the inside defenders.
6. The Attack: No.10 catches the ball on the move, running a hard, flat line to engage the opposition's midfield defense.
7. The Options:
- Option A (The Hands): No.10 passes to No.12, who ships it quickly to No.13 running a wide arc. No.15 enters the line at pace between No.13 and No.14, creating an overload on the outside edge.
- Option B (The Miss Pass): If the defense drifts early, No.10 throws a miss pass directly to No.15, who then links with No.14 in the target space.
4. Key Coaching Points
To ensure success, focus on these critical elements during practice:
- Ruck Speed is King: The entire play hinges on lightning-fast ball from the initial Phase 1 carry. If the ball is slow, the defense will set, and the wide strike will fail.
- Commitment of Decoys: No.11 and the forwards not involved in the ruck must run genuine, convincing decoy lines. If they don't look like they want the ball, the defense won't bite.
- Depth and Pace: No.10, No.12, and No.13 must maintain depth to give themselves time to read the defense and execute passes at full pace.
- Communication: No.15 must communicate clearly when entering the line, calling the play to ensure No.10 or No.13 knows exactly where the support is arriving.
- Ball Presentation: The No.8 must present the ball immaculately after the first carry. A messy ruck disrupts the timing of the entire backline movement.
5. Common Mistakes
Watch out for these frequent errors that can derail the exit strategy:
- Drifting Sideways: Backs catching the ball and running laterally instead of attacking the gain line. This eats up space and allows the defense to slide easily.
- Telegraphing the Pass: No.10 looking exactly where they are going to pass before they receive the ball, allowing the defense to intercept or drift early.
- Poor Ruck Protection: Forwards being slow to secure the Phase 1 ruck, leading to a turnover or slow ball inside the 22—a disastrous scenario.
- Fullback Arriving Too Early: No.15 overrunning the play and arriving before the ball, destroying the element of surprise and the numerical advantage.
6. Variations & Progressions
Once the core play is mastered, introduce these variations to keep the defense guessing.
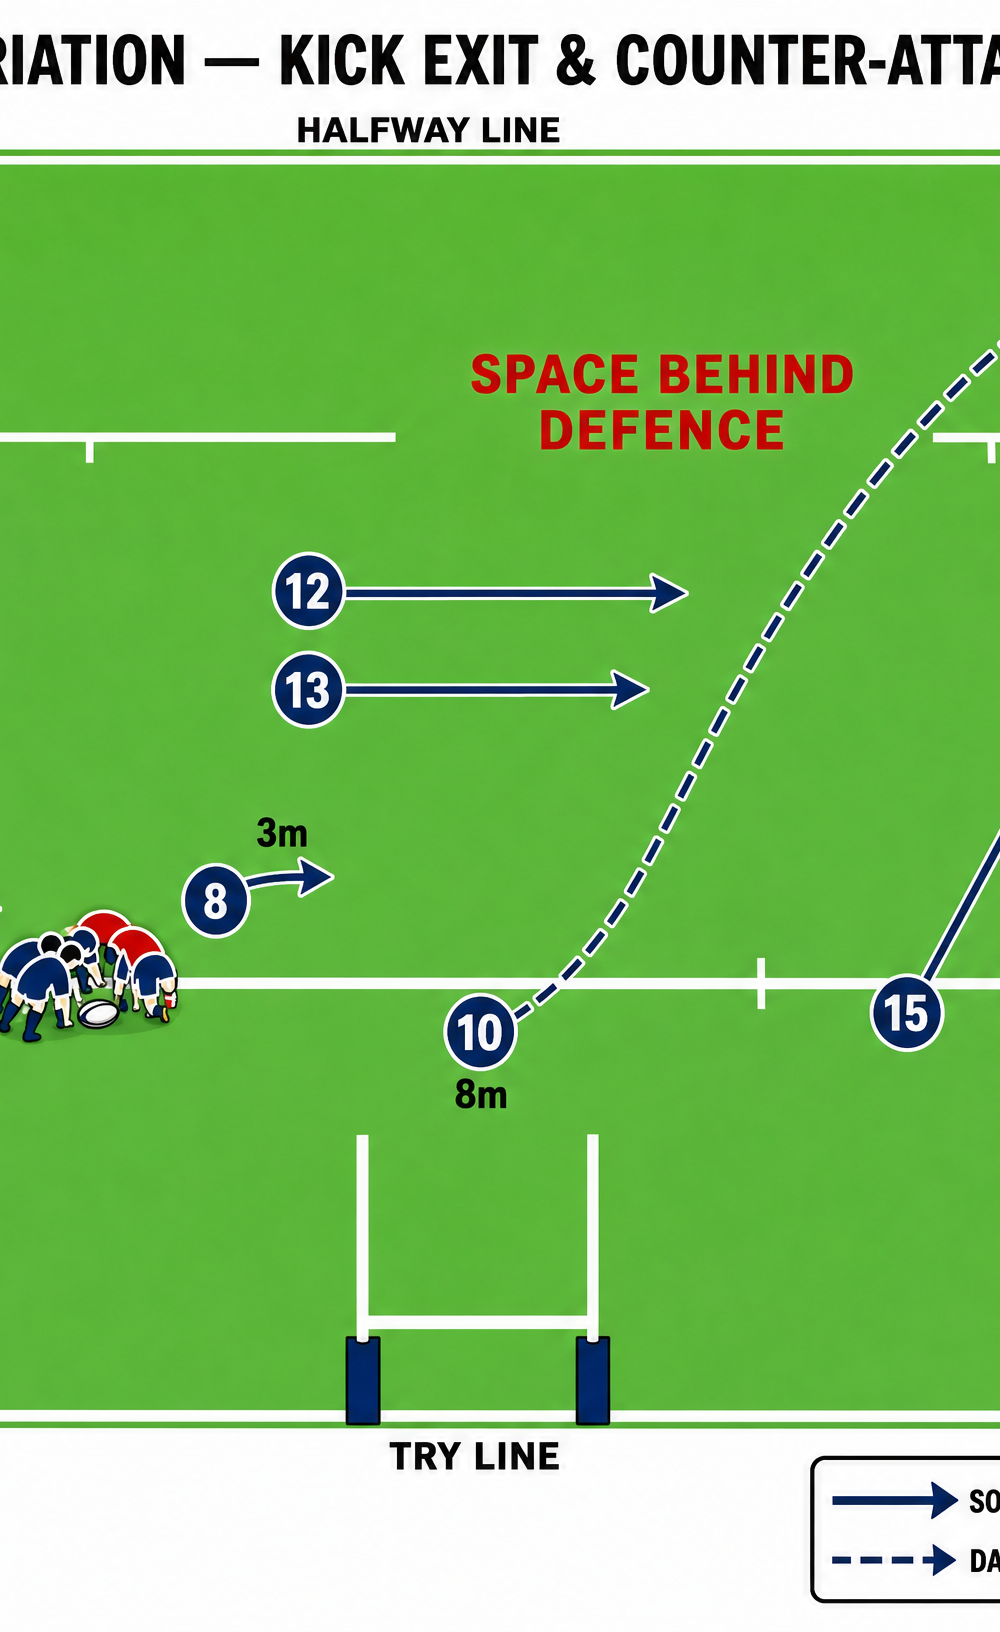
Variation 1: The Cross-Field Kick Exit
If the defense compresses heavily to stop the wide running game, exploit the space behind them.
- Instead of passing wide, No.10 recognizes the compressed defense and executes a precise, diagonal cross-field kick toward the 10-metre line on the opposite side.
- No.14 and No.15 chase aggressively to either catch the ball or tackle the receiver immediately, turning an exit into a counter-attack opportunity.
Variation 2: The Inside Switch
If the defense drifts aggressively to cover the wide threat, punish them on the inside.
- No.10 receives the ball and shapes to pass wide.
- No.12 runs a hard 'overs' line (drifting out), while No.11 (who was the decoy in the original play) runs a sharp 'unders' line (cutting in) off No.10's shoulder to receive a short pop pass.
7. Age Adaptations
Tailor the complexity of the play to suit the age and skill level of your squad.
- Under 10s / Under 12s: Focus purely on Phase 1 (securing the ball) and a simple pass from No.9 to No.10, followed by a strong carry or a simple kick to touch. Remove the complex backline movements.
- Under 14s / Under 16s: Introduce the wide passing movement (Option A) but keep the fullback (No.15) out of the line initially to simplify the decision-making for No.10 and No.12.
- Open / Senior: Execute the full play with all variations, emphasizing the reading of the defense by No.10 to select the correct option (Hands, Miss Pass, or Kick) under pressure.