Half-Court Trap Press: Forcing Turnovers at the Midline
Master the half-court trap press to suffocate ball handlers at the midline, generate turnovers, and shift defensive momentum in your favour.
Equipment Needed
Overview
The Half-Court Trap Press is a high-intensity defensive set play designed to ambush the opposing ball handler as they cross the half-court line. Rather than sitting back in a conventional half-court defence, your team applies coordinated two-man pressure at the midline while the remaining three defenders rotate aggressively to deny passing outlets and protect the basket.
This play is most effective in the following game situations: when your team needs to manufacture a turnover in the final two minutes of a quarter; when the opposition's point guard is under pressure or has a weak left hand; immediately after a time-out when the opponent expects you to drop into a zone; or when you hold a lead and want to disrupt the opposition's offensive rhythm. The trap works because it forces a decision in under three seconds — the ball handler must pass, pick up their dribble, or commit a violation.
On a standard FIBA court (28m × 15m), the trap is triggered in the Trap Zone: a roughly 4m × 4m area on either side of the half-court line, between the sideline and the centre circle. Confining the ball handler to this zone is the single most important tactical objective of the play.
Setup

Equipment Required
| Item | Quantity | Purpose |
|---|---|---|
| Basketballs | 4–6 | Continuous reps without retrieval delays |
| Cones (orange) | 8 | Mark the Trap Zone boundaries |
| Defensive pinnies | 5 | Distinguish defensive unit |
| Whiteboard / tablet | 1 | Pre-session diagram walkthrough |
| Stopwatch | 1 | 3-second trap timing drills |
Court Setup
Use the full FIBA half-court (14m × 15m defensive half). Place two cones at the half-court line, 2m in from each sideline, to visually define the Trap Zone corners. This gives players a clear spatial reference during early learning stages.
Player Positions — Initial Alignment
| Position | Label | Starting Location |
|---|---|---|
| Point Guard | 1 (PG) | Ball handler crossing half-court |
| Shooting Guard | 2 (SG) | Left wing, ~3m inside three-point line |
| Small Forward | 3 (SF) | Right wing, ~3m inside three-point line |
| Power Forward | 4 (PF) | Left elbow / high post |
| Centre | 5 (C) | Paint / low post |
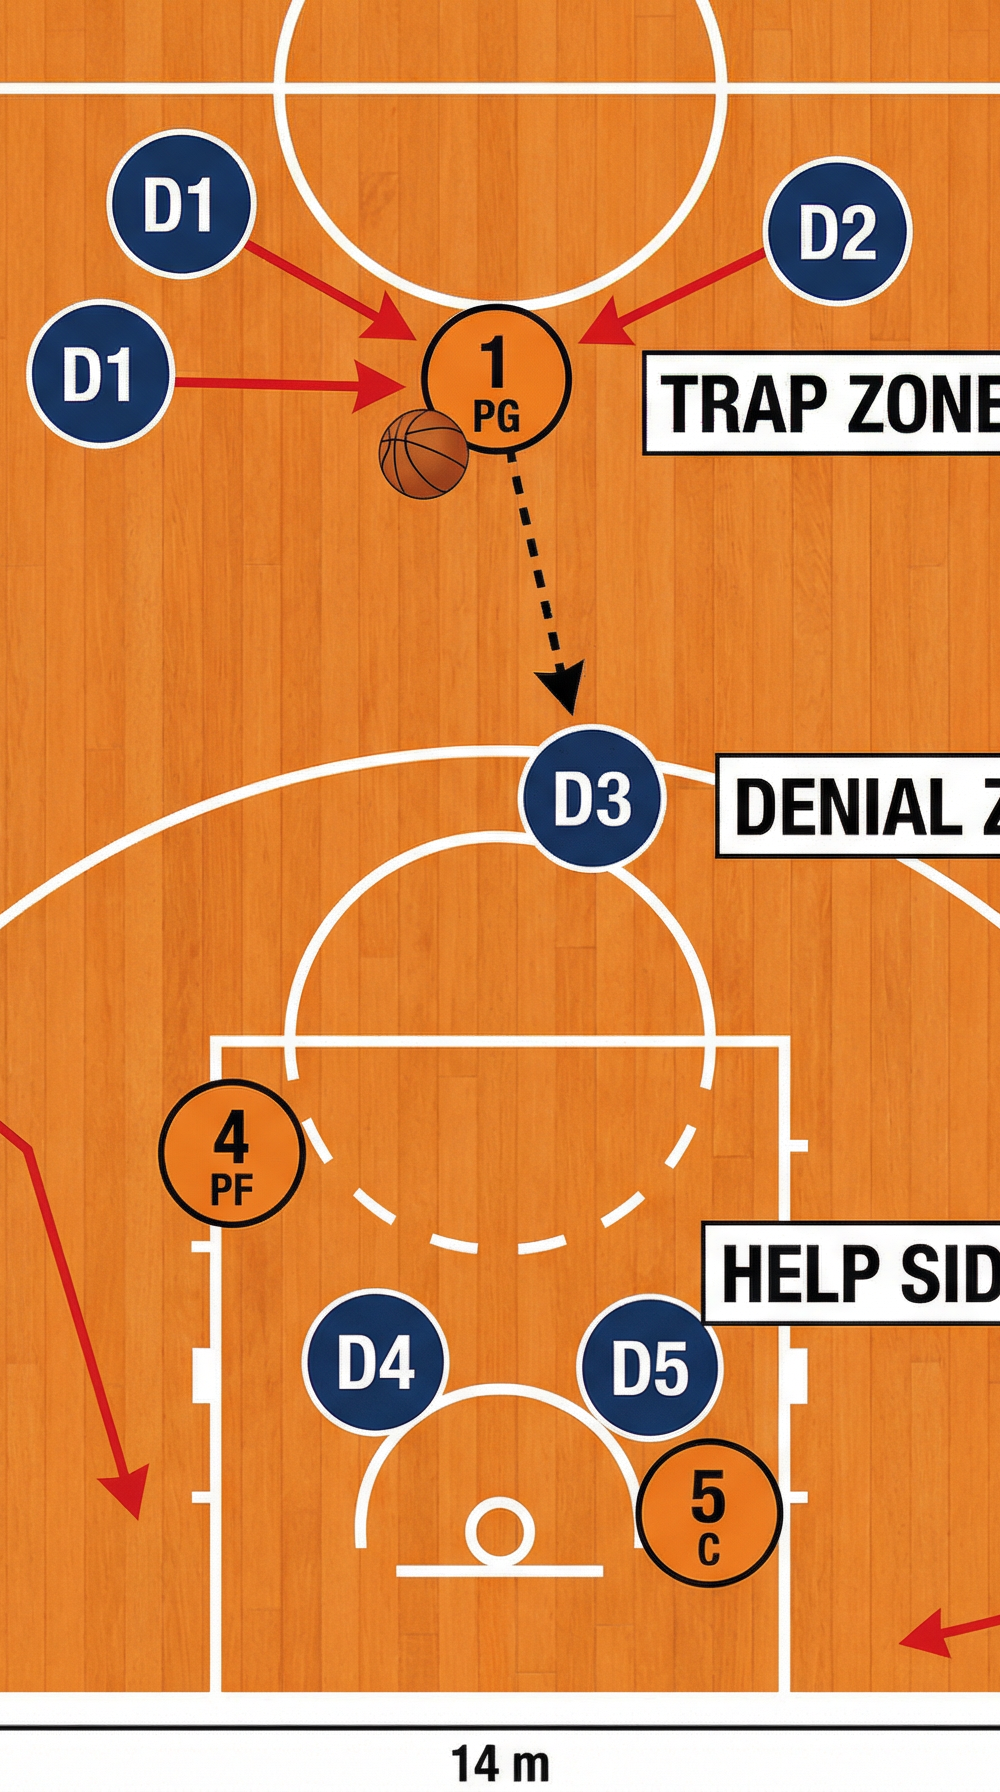
| Defender 1 | D1 | Ball-side guard — primary trap initiator |
| Defender 2 | D2 | Weak-side guard — secondary trap closer |
| Defender 3 | D3 | Top of the key — pass denial |
| Defender 4 | D4 | Elbow — deny wing pass |
| Defender 5 | D5 | Paint — basket protection |

Diagram 1 — Initial Setup: D1 and D2 converge on the ball handler (1/PG) in the Trap Zone near the half-court line. D3 positions in the Denial Zone at the top of the key. D4 and D5 protect the paint and help side.
Step-by-Step Instructions

Step 1 — Signal the Trap (Pre-crossing)
As the opposing point guard approaches the half-court line, D1 calls "TRAP" (or uses a pre-agreed hand signal). This alerts all five defenders to activate their assignments simultaneously. The call must happen when the ball is approximately 3–4m from the half-court line — too early and the ball handler retreats; too late and the trap is beaten before it forms.
Step 2 — D1 Channels the Ball Handler
D1 (the on-ball defender) applies immediate ball pressure but deliberately overplays to the ball handler's strong hand, forcing them toward the nearest sideline. D1's goal is not to steal the ball yet — it is to channel the dribbler into the Trap Zone. D1 maintains a low defensive stance, feet shoulder-width apart, active hands below the ball.
Step 3 — D2 Closes the Trap
As the ball handler enters the Trap Zone (within 1–2m of the sideline and half-court line), D2 sprints from the weak side to form the second jaw of the trap. D2 approaches from a 45-degree angle, cutting off the ball handler's retreat toward the centre circle. D1 and D2 are now within arm's reach of the ball handler, forming a wall. Both defenders keep their hands active and high — no reaching, no fouling.
Step 4 — D3 Denies the Primary Outlet
The moment the trap is sprung, D3 reads the ball handler's eyes and rotates to deny the most dangerous pass — typically to the nearest wing (Player 2 or Player 3). D3 positions themselves in the passing lane, one arm extended toward the ball, body turned to see both the ball and their assigned offensive player. D3 must be within 1.5m of their mark.
Step 5 — D4 Rotates to the Elbow
D4 abandons their direct assignment and rotates to the high elbow area (approximately 5m from the basket, on the ball side). This position intercepts any skip pass or lob over the trap. D4 must be in a position to deflect or intercept, not simply to contest — they are the "rover" of the rotation.
Step 6 — D5 Anchors the Paint
D5 does not leave the paint under any circumstances during the trap. They position themselves between the ball and the basket, ready to contest any pass into the low post or any drive that beats the trap. D5 communicates loudly, calling out "help" positions to D3 and D4 as the play develops.
Step 7 — Recover or Capitalise
If the trap forces a turnover (five-second violation, bad pass, or stolen ball), all five defenders immediately sprint into transition offence. If the ball handler escapes the trap with a pass, all defenders recover to their nearest opponent in a match-up zone, preventing the easy basket. The play resets if the ball is returned to the backcourt.

Diagram 2 — Trap Fully Sprung: D1 and D2 have sealed the ball handler in the corner. D3 rotates to intercept the outlet pass to Player 2. D4 denies the pass to Player 3 at the elbow. D5 anchors basket protection. Dashed arrows show the passing lanes being cut off.
Key Coaching Points

1. The Trap is a Team Action, Not a Gamble.
Every player must execute their role the instant the trap is called. A trap where only D1 and D2 commit — while D3, D4, and D5 stand flat-footed — is simply a 3-on-5 disadvantage. Drill the rotation until all five players move as one unit.
2. Channel Before You Trap.
D1's job in the first two seconds is to steer, not steal. Coaches must correct any tendency to lunge at the ball prematurely. The sideline and half-court line are your two extra defenders — use them by forcing the ball handler into the corner of these boundaries.
3. No Reaching — Active Hands.
Teach defenders to keep their hands moving in the passing lanes rather than reaching for the ball. Reaching fouls extend the opponent's possession and put your best defenders in foul trouble. The goal is to make the ball handler panic and make a bad decision, not to strip the ball.
4. D3 Must Read Eyes, Not Feet.
The most common breakdown in this play is D3 following the offensive player's movement rather than reading where the ball handler is looking. Train D3 to watch the ball handler's eyes and shoulders — these telegraph the pass 0.5–1 second before it is released.
5. Communication is Non-Negotiable.
D5 must be the loudest player on the court during the trap. Constant verbal cues — "ball," "help right," "skip" — allow D3 and D4 to rotate without taking their eyes off their assignments. Run communication-specific reps where you grade defenders on their vocal output.
6. Commit to the Rotation After the Trap.
If the ball escapes the trap, the worst outcome is five defenders ball-watching while the offence finds an open cutter. Drill the recovery: the nearest defender to the ball applies pressure, the other four sprint to the closest offensive player in a match-up zone.
Common Mistakes

Mistake 1 — Trapping Too Early or Too Deep in the Backcourt.
If D1 and D2 trap before the ball handler crosses half-court, the ball handler simply retreats and the trap is wasted. The Trap Zone is specifically at the half-court line — the 8-second rule adds pressure and the sideline provides a natural boundary. Correct this by placing cones and requiring D2 to wait until the ball crosses the line before closing.
Mistake 2 — D3 Chasing Their Man Instead of the Passing Lane.
When D3 follows the offensive player's cuts rather than positioning in the passing lane, they create a clear outlet for the ball handler. Correct this with a specific drill: run the trap with D3 blindfolded to their man's movement, forcing them to read the ball handler's body language only.
Mistake 3 — D5 Leaving the Paint.
An overeager D5 who steps out to help the trap leaves the basket completely unguarded. A single lob pass over the top results in an uncontested layup. Reinforce D5's role with a simple rule: "If you can see the trap, you are too far from the basket."
Mistake 4 — Both Trap Defenders Reaching Simultaneously.
When D1 and D2 both lunge for the ball at the same moment, they create gaps between themselves that a skilled ball handler can split. Teach the "active hands" principle: one defender pressures the ball while the other mirrors the ball handler's pivot foot, ready to deflect any pass attempt.
Mistake 5 — Failing to Recover After a Broken Trap.
The most dangerous moment is immediately after the trap is beaten. Defenders who stand and watch the ball handler escape give the offence a 5-on-4 or 5-on-3 advantage in transition. Drill the recovery sprint as a mandatory final step of every trap repetition.
Variations & Progressions

Variation 1 — Weak-Side Trap (Easier)
Instead of trapping on the ball handler's strong side, D1 channels the ball handler toward their weak hand and the weak-side corner. This is more predictable for younger or less experienced defenders but is highly effective against ball handlers who struggle to dribble with their non-dominant hand. Adjust D2's approach angle to close from the strong-side baseline rather than the centre.
Variation 2 — Delayed Trap (Intermediate)
Rather than triggering the trap at the half-court line, D1 allows the ball handler to advance 2–3m past the line before D2 closes. This catches the ball handler when they are already committed to their dribble direction and have fewer escape options. The delayed trigger also disguises the trap as a conventional man defence in the early seconds.
Progression — 3-on-3 Trap Drill (Beginner → Intermediate)
Run the trap with three defenders (D1, D2, D3) against three offensive players (1, 2, 3) on a half-court. This simplifies the rotation and allows players to master the trap-and-deny fundamentals before adding the complexity of D4 and D5 rotations. Progress to 5-on-5 once the three-player unit executes the trap and denial correctly five consecutive times.
Progression — Live 5-on-5 with Transition (Advanced)
Run the full trap in a live 5-on-5 scrimmage where, if the offence beats the trap, they immediately push into a fast break. This creates genuine urgency and forces defenders to commit to the recovery sprint. Award bonus points in the scrimmage for successful traps that force a turnover, incentivising aggressive but disciplined execution.
Age Adaptations
| Age Group | Key Modifications |
|---|---|
| Under 10 | Use a 3-on-3 format on a reduced court (14m × 10m). Teach only D1 and D2 roles. Replace the trap with a "shadow" drill where two defenders shadow the ball handler without stealing — focus on footwork and channelling only. |
| Under 12 | Introduce the full 5-player trap but use a walk-through pace for the first four sessions. Mark the Trap Zone with cones. Allow the ball handler to use two hands (no live dribble) so defenders can focus on positioning rather than reacting to dribble moves. |
| Under 14 | Run the trap at game speed but with a rule that the ball handler cannot pass — they must try to dribble out. This isolates the trapping technique and builds D1/D2 confidence before introducing live passing decisions for D3/D4. |
| Under 16 | Full 5-on-5 live trap with transition. Introduce the verbal call system and hold players accountable for communication. Add a shot clock (24 seconds) to replicate game conditions. |
| Open / Senior | Incorporate the trap as a called set from the bench (hand signal or verbal code). Run it as a surprise tactic — maximum two to three times per quarter to preserve the element of unpredictability. Pair with a conventional 2-3 zone to keep the opposition guessing. |