Half-Court Trap Press: Sideline Funnel, First-Pass Rotation & Recovery
Teach your team to funnel the ball into a controlled sideline trap, steal the first release pass, and recover into a disciplined half-court defence.
Equipment Needed
Overview
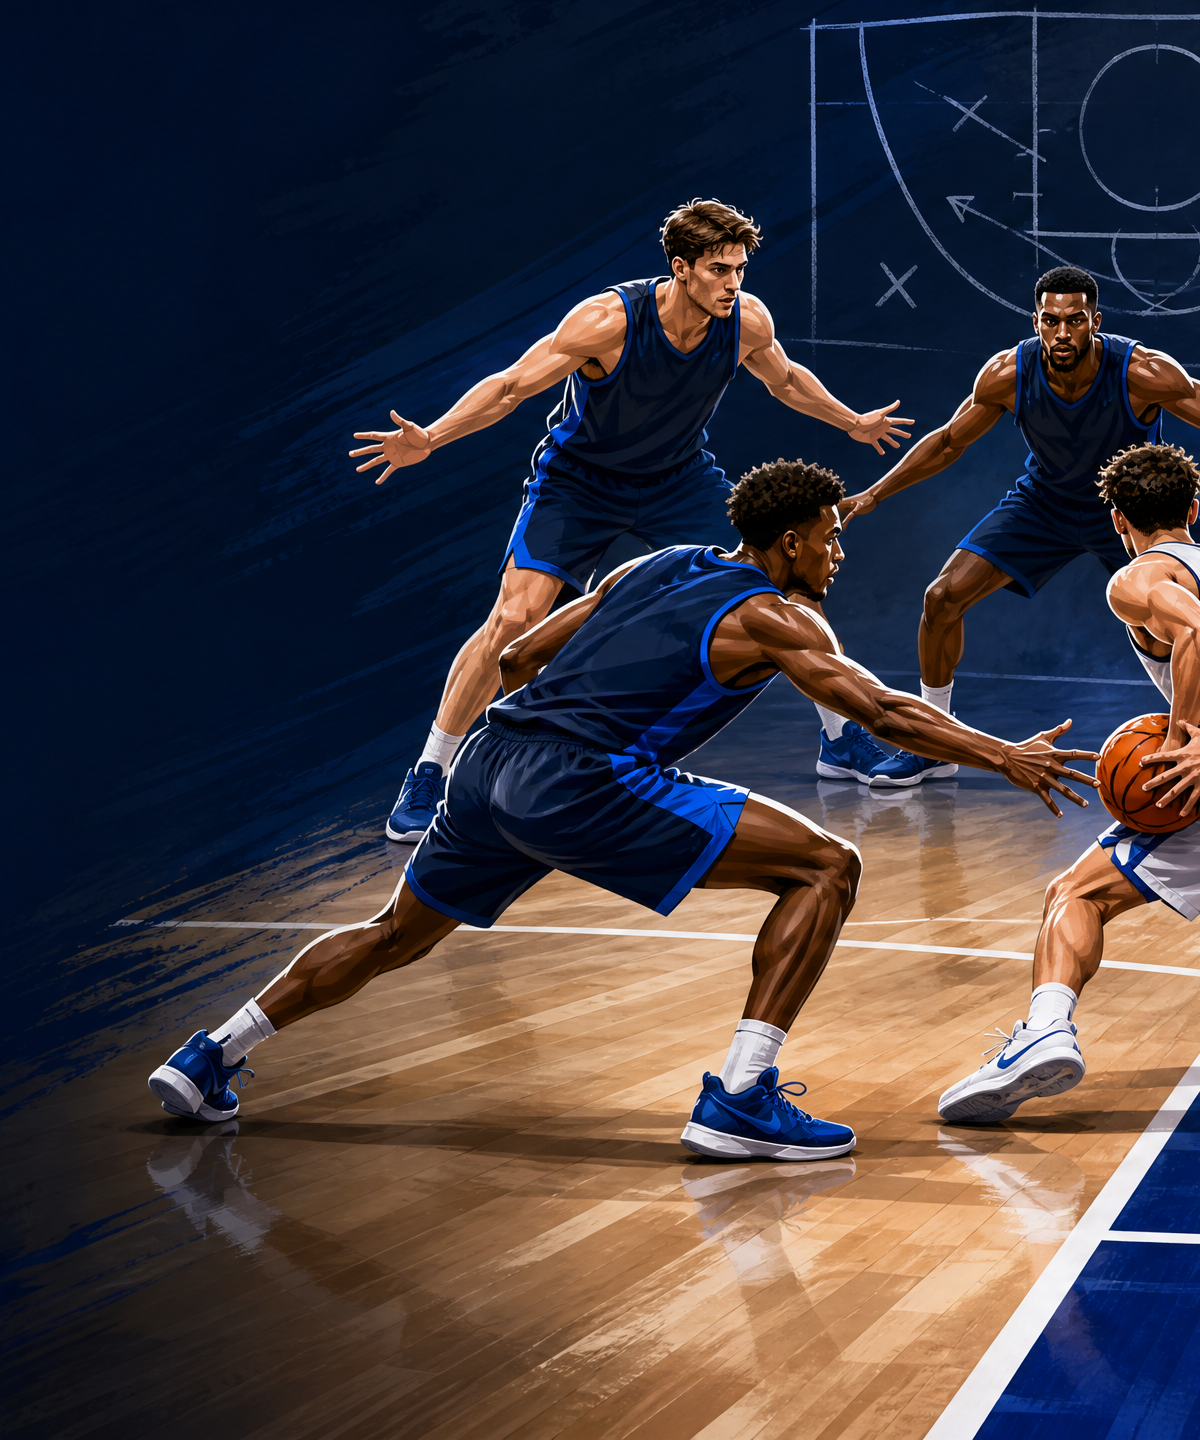
The half-court trap press is not a reckless double-team. It is a coordinated pressure package that removes the centre of the floor, sends the ball-handler toward the sideline, and makes the first release pass predictable. Use it after a made basket, a dead ball, or when an opponent’s primary handler is uncomfortable changing direction under pressure. The goal is not simply a steal; the goal is to create a rushed decision, a sideline turnover, a deflection, or a late-clock offensive possession.
Run this as a selective pressure call, not as your every-possession identity until your players can rotate. The court in this resource is scaled to the FIBA inner playing area of 28 m × 15 m, with the trap designed to close just beyond the 14 m centre line and 0.5–1.0 m inside the sideline.1
Setup
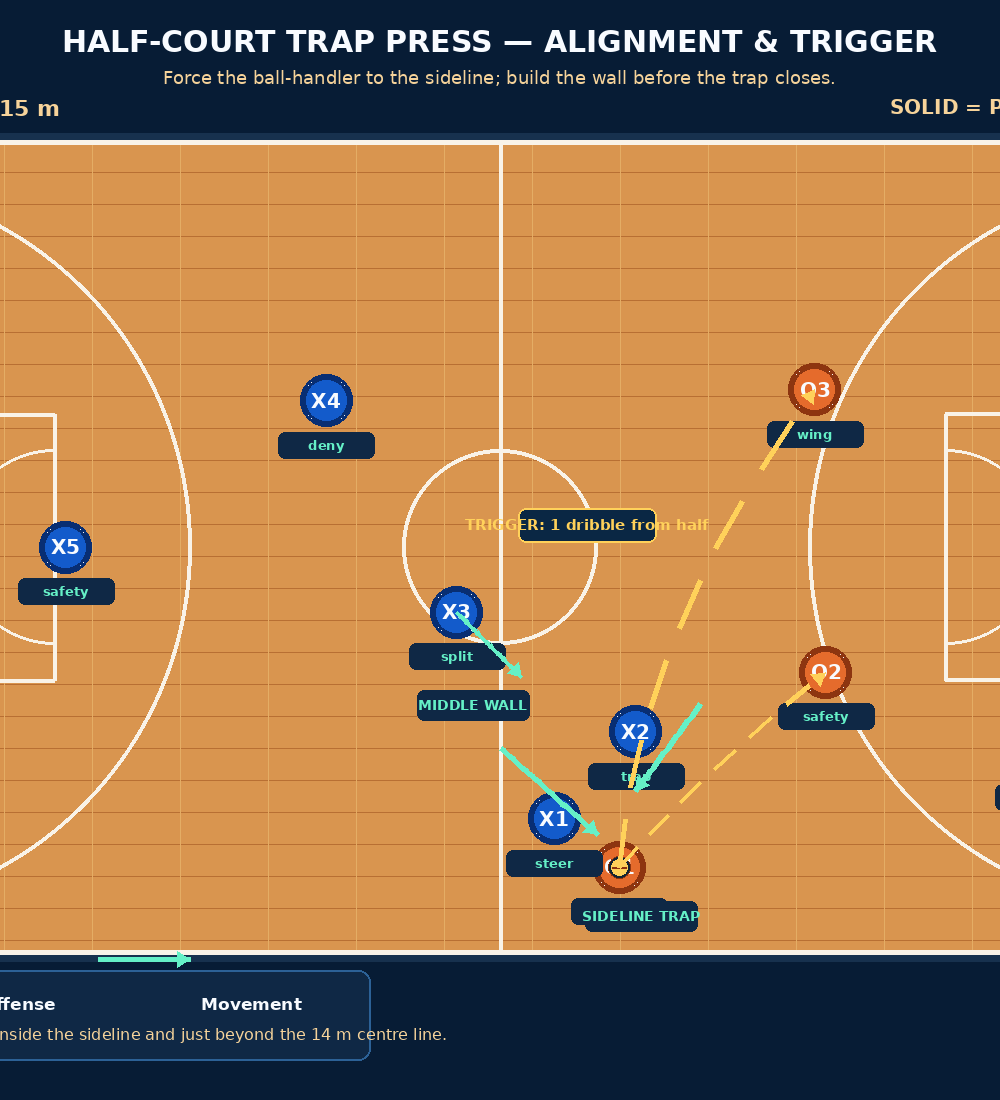
Set up on a full FIBA court with 10 players, one ball, two colours of practice jerseys, 12 flat cones, and a whistle. Place one cone 0.5 m inside each sideline at the centre line and a second cone 2 m beyond it in the backcourt-to-frontcourt direction; this creates a clear visual trap window. Place two cones at the nail area to remind the back line where the middle must be protected.
| Position | Starting job | Exact reference point |
|---|---|---|
| X1 — point defender | Steer the dribbler out of the middle. | Start 1.5–2.0 m in front of O1, with inside foot shading the centre. |
| X2 — trap defender | Close the rear/escape side of the trap. | Start 1.5 m off the nearest wing, ready to sprint at the trigger. |
| X3 — middle interceptor | Own the first middle release. | Begin 2–3 m inside the centre circle, one step toward the ball side. |
| X4 — weak-side rotator | Take the nearest weak-side receiver after the release. | Start near the far elbow line, chest to the ball and both weak-side threats. |
| X5 — safety | Protect the rim and eliminate the lay-up. | Stay between ball and basket, roughly at the top of the far lane. |
The offensive group should align naturally: O1 advances the ball near the sideline, O2 presents as the middle outlet, O3 occupies the far wing, O4 trails, and O5 stays near the rim. Tell the offense to play quickly and to score if it escapes the trap. That gives the defensive unit an honest consequence for poor spacing.
Step-by-Step Instructions
1. Call the coverage before the ball is live
Use one short team call, such as “Blue!” Your players must hear the call before X1 engages; silent traps become late traps. X1 points the ball to the sideline with an open stance, while X2 shows patience and does not leave the wing early.
2. Funnel O1 into the trap window
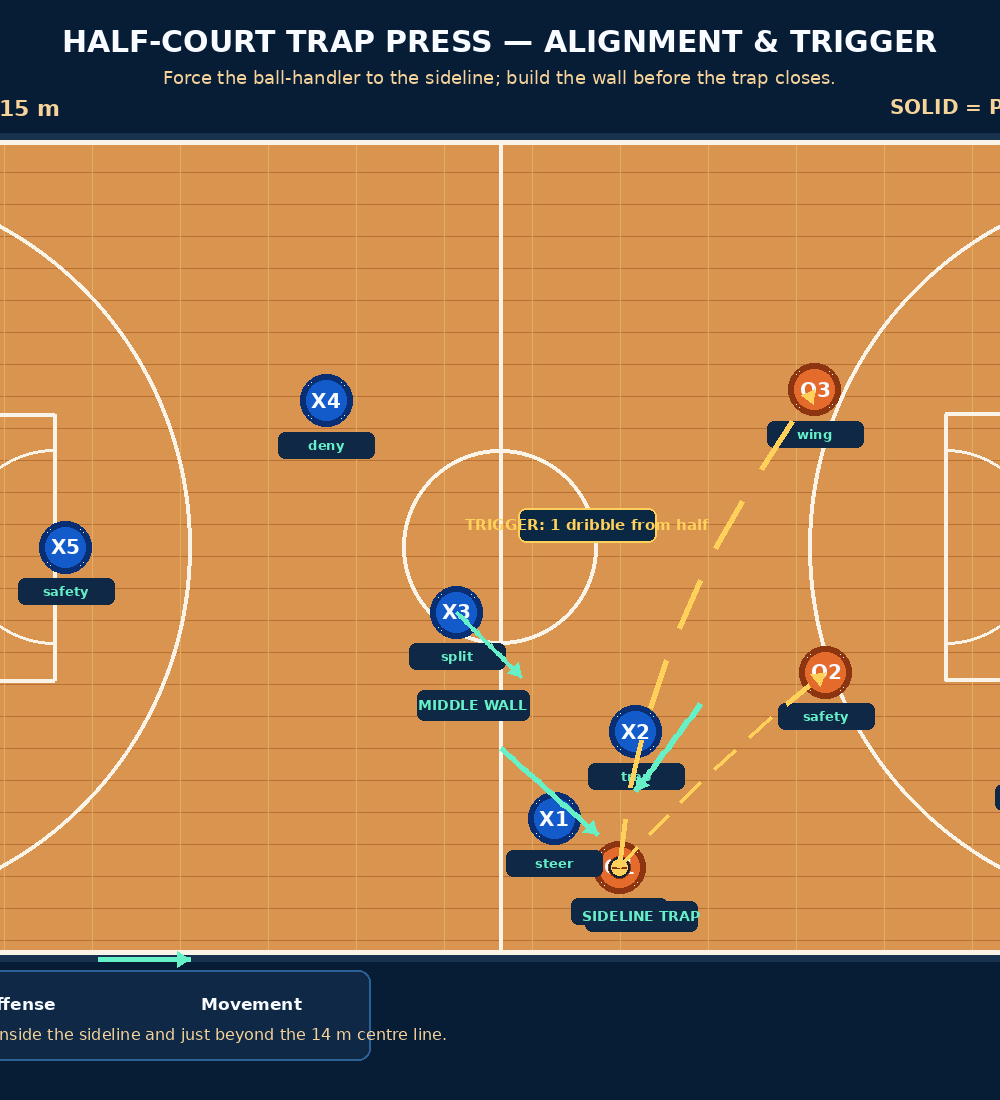
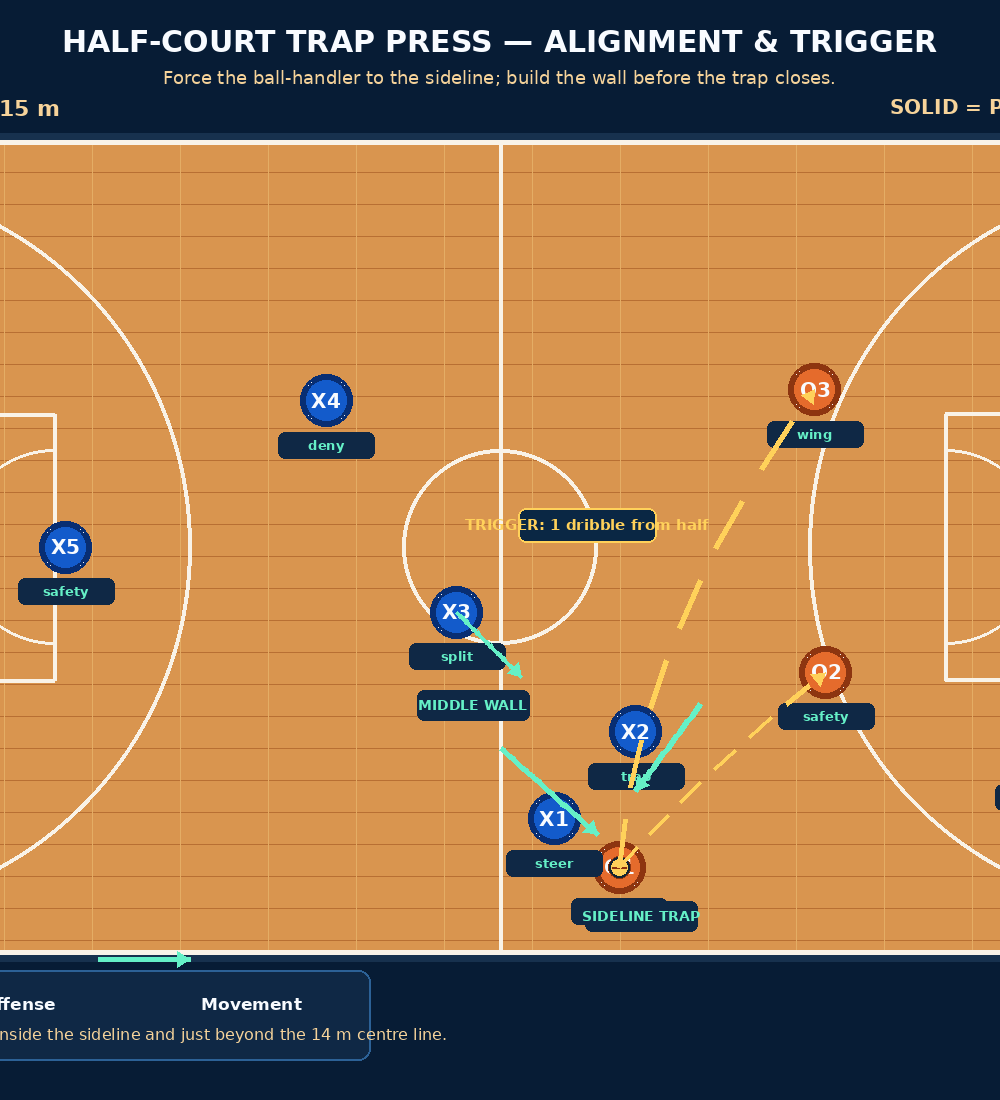
X1 meets O1 1.5–2.0 m away, keeps the chest square to the dribbler, and places the inside foot slightly higher to deny the middle. Do not reach. X1’s job is to make O1 take one or two controlled dribbles toward the sideline and past the centre line. The trigger is the first dribble into the cone window, not the first sight of the ball near a sideline.
3. Close the double-team on the catch side
When the trigger occurs, X2 sprints to the outside hip of O1 and arrives on balance with both hands high. X1 closes the front/inside hip. The two defenders must be 0.6–0.9 m apart: tight enough to remove the split, wide enough to avoid fouling or colliding. Their feet should form a shallow “V” that points O1 toward the sideline and backcourt, never toward the middle.
4. Build the interception wall before the pass leaves
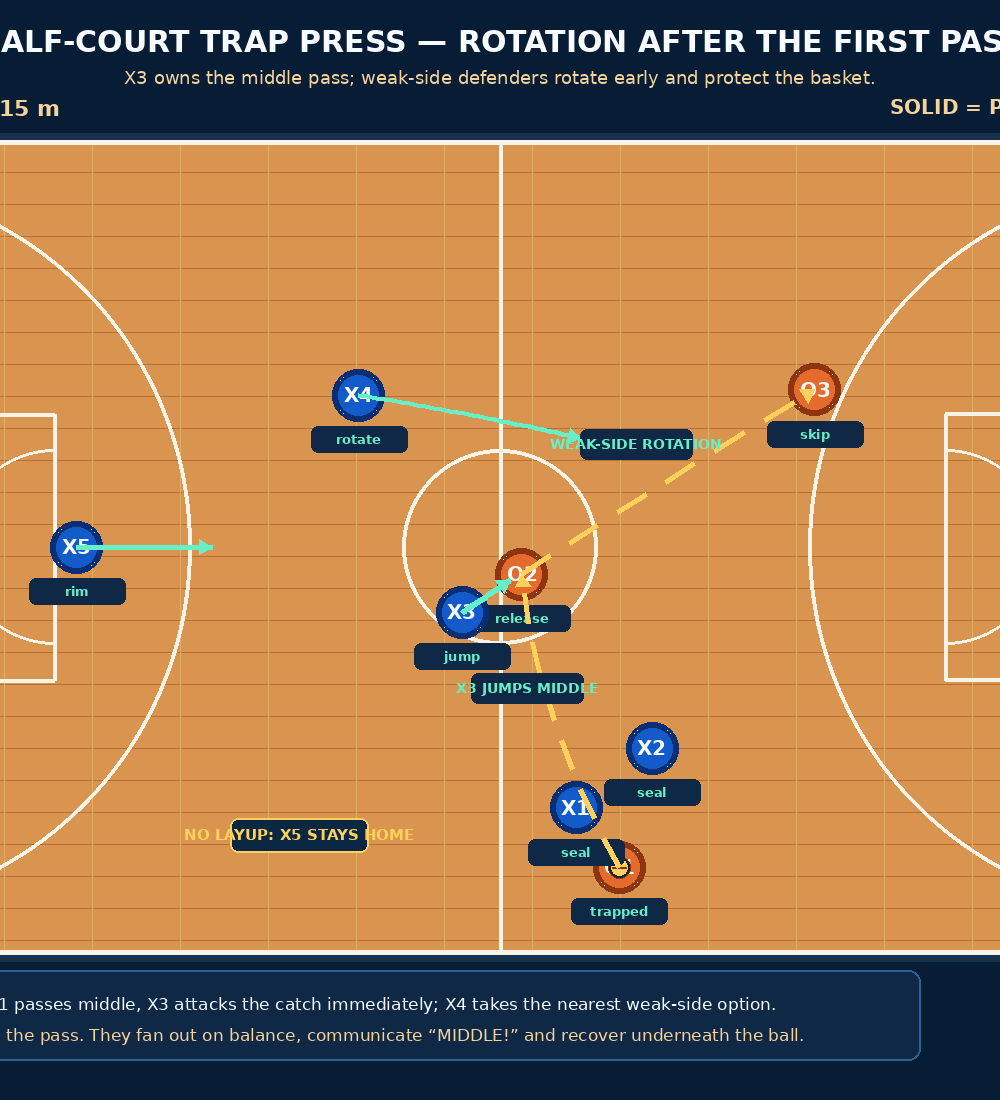
The trap only works if the other three defenders move early. X3 steps into the middle passing lane, ball-you-man, with active hands and vision of O2. X4 sinks toward the far-side elbow and identifies the nearest weak-side receiver. X5 stays below the ball between O5 and the basket; do not allow the trap to create a direct rim run. Coach the communication sequence: “Trap!” — “Middle!” — “I’ve got ball!” — “Match!”
5. Attack the first release pass, not the air around it
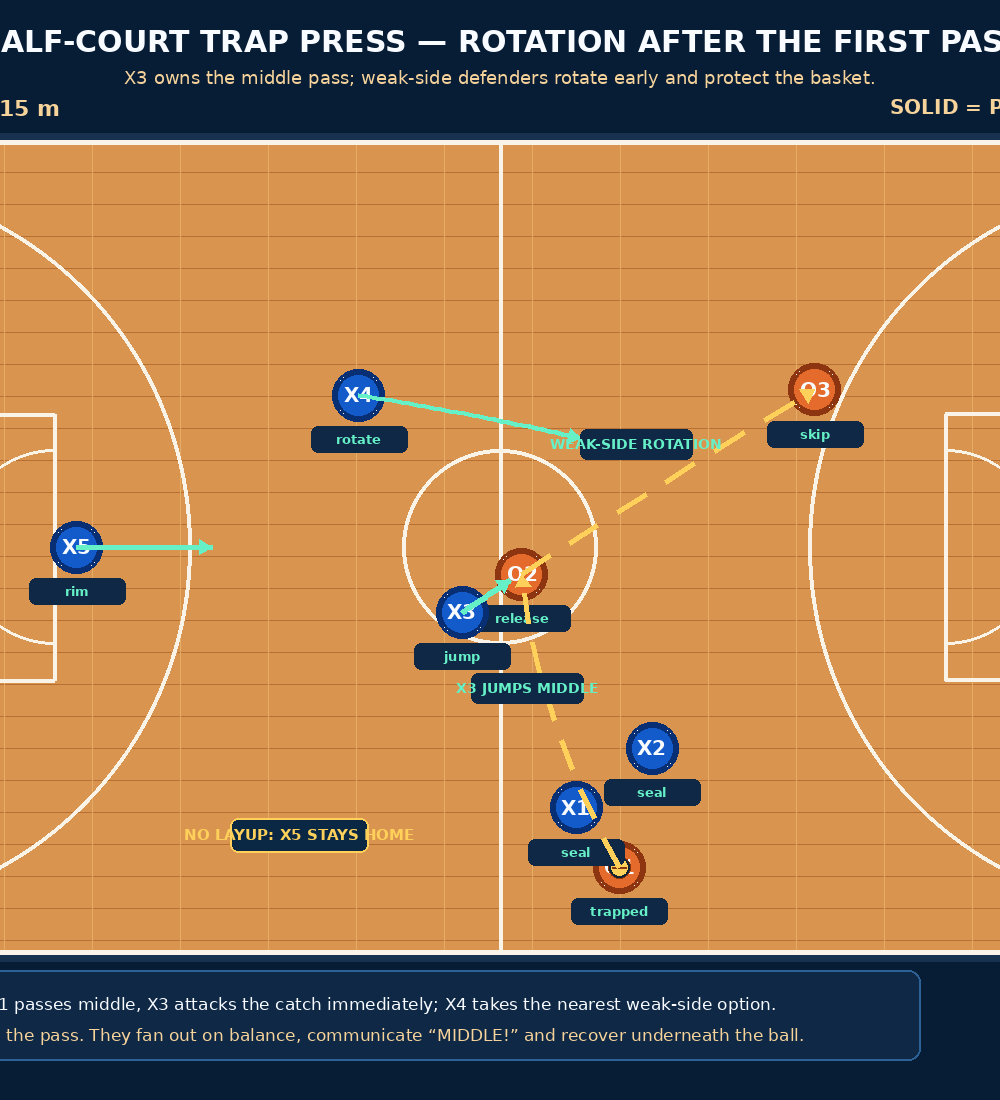
If O1 passes to O2 in the middle, X3 attacks the catch with a controlled closeout and high hands. X4 rotates to O3 or the closest weak-side scoring threat. X1 and X2 fan out underneath the pass; they do not both chase it. The first post-trap objective is to force another lateral pass, not to gamble for a second steal.
6. Recover into a connected half-court shell
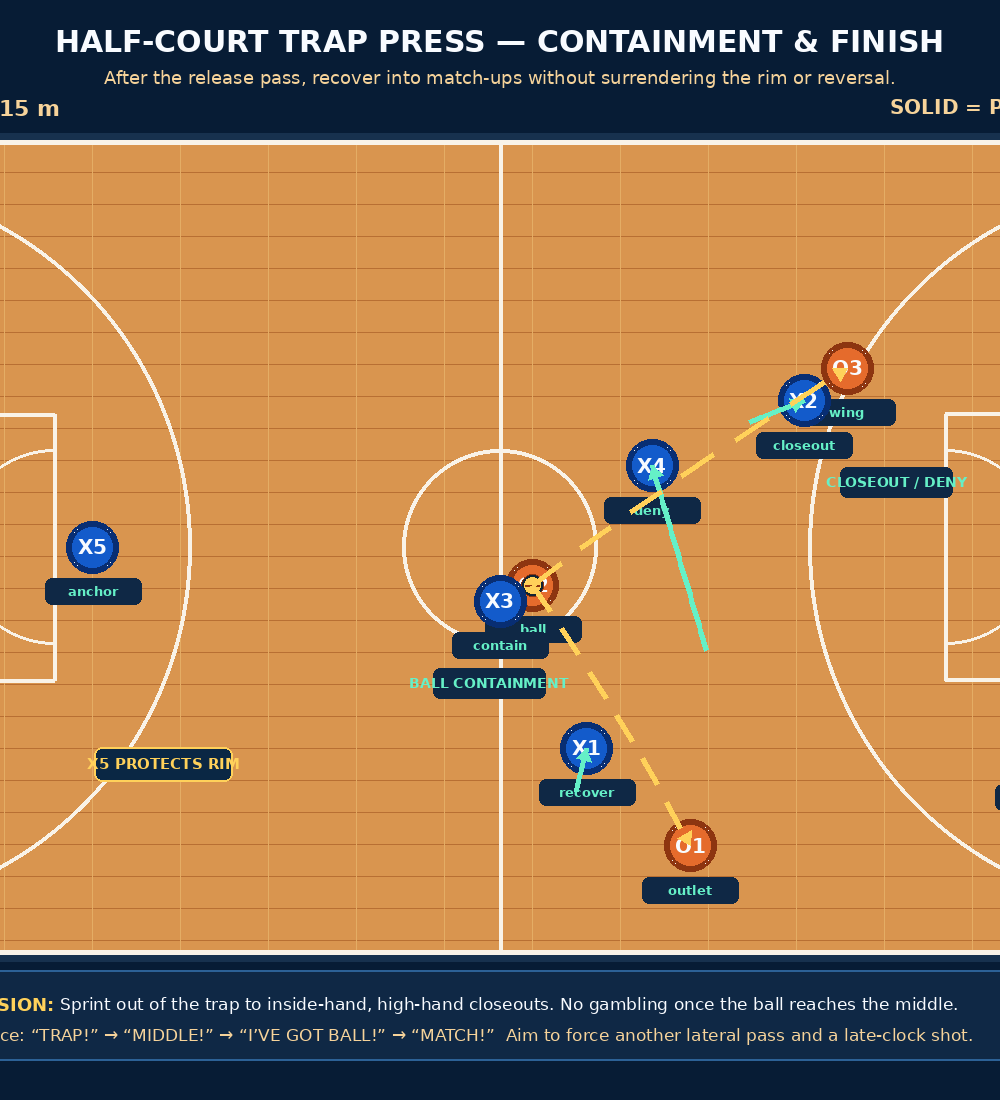
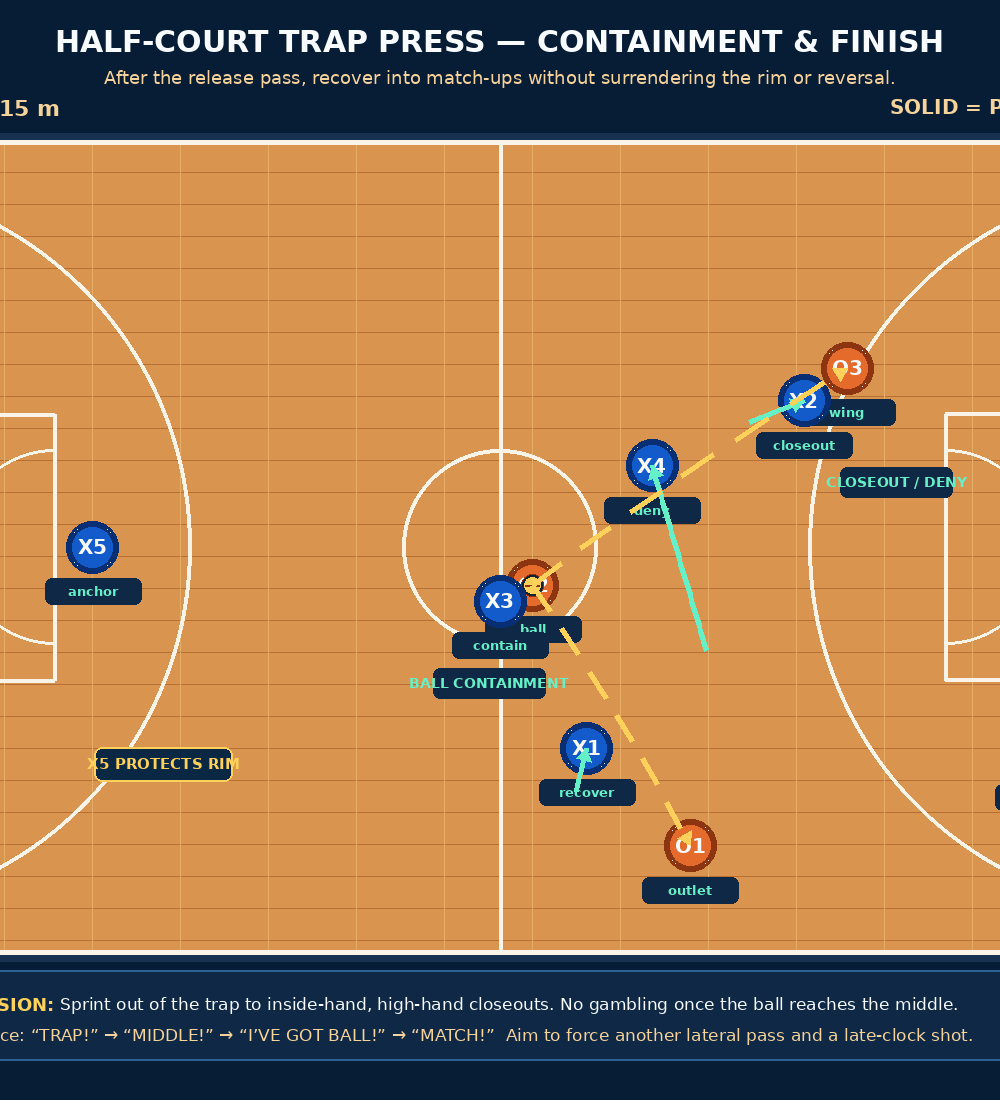
Once the ball reaches the middle, the trap is over. X3 contains the ball without reaching, X1 recovers to the nearest outlet, X2 closes out to the wing, X4 denies the next reversal, and X5 anchors the paint. Demand an inside-hand, high-hand closeout with no straight-line drive. If your league uses a closely guarded count, remind players that the pressure must be legal and rule-code specific.
7. Finish the possession
Your final standard is no lay-up, no uncontested reversal, no unnecessary foul. The trap has done its job if it consumes time, pushes the offense toward a late-clock shot, or makes the opponent start its half-court action late. Chart deflections, forced lateral passes, and clean recoveries alongside steals; those are the behaviours that make this press sustainable.
Key Coaching Points
| Coaching point | What to demand in the gym |
|---|---|
| Win the angle first | X1 steers with feet and chest; hands stay disciplined. |
| Trap on balance | X2 arrives under control, with no fly-by and no blind reach. |
| Take away middle early | X3 moves before O1 passes, not after O2 catches. |
| Protect the rim always | X5 remains the safety until another defender clearly assumes that job. |
| Talk in a sequence | Players use the same four calls every repetition: “Trap, Middle, Ball, Match.” |
| Recover, don’t gamble | After the ball is released, the priority becomes contain-and-match. |
Common Mistakes
The most common failure is trapping too soon. When X2 leaves before O1 commits to the sideline, the offense simply reverses the ball into space. Correct it by holding X2 at the wing until the first sideline dribble enters the cone window. A second error is a narrow trap where both defenders stand square; teach the shallow V and show the players which hip each defender owns.
A third error is X3 staring at the ball and arriving late on the middle outlet. Freeze the rep at the moment X2 goes: X3 should already be one step into the O1–O2 line. Finally, teams often create their own lay-up by pulling X5 too high. Make X5’s rule non-negotiable: the rim is protected until the ball is contained and a teammate has recovered behind it.
Variations & Progressions
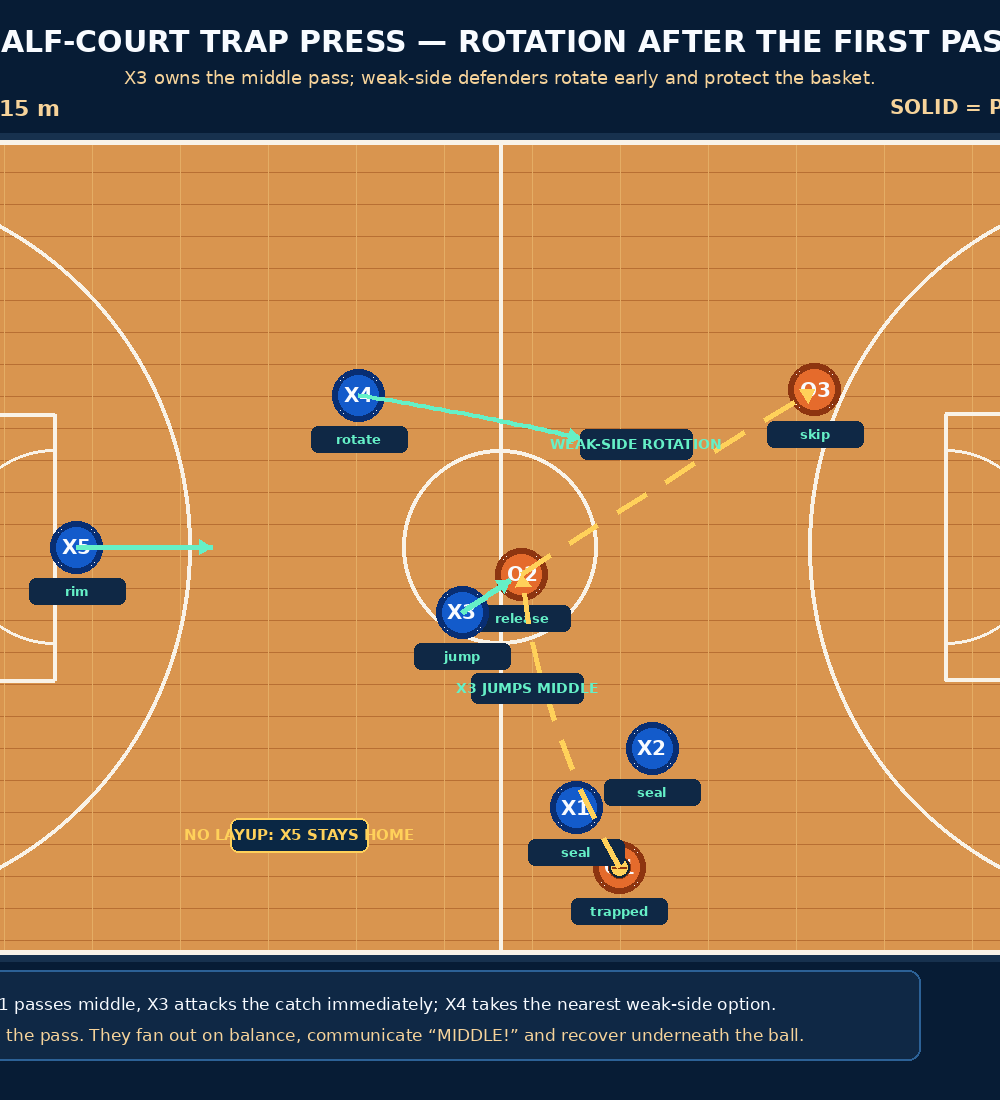
Start with a guided 3v3 on the ball-side half of the court: O1, O2, and O3 versus X1, X2, and X3. The coach calls the trigger and freezes each rotation. Progress to 4v4 by adding X4 and a weak-side receiver, then use 5v5 with O5 at the rim and a live scoring finish. For the hardest version, allow the offense to use a middle flash, a skip pass, or a pass-and-follow action, while the defense must create one deflection before it can score in transition.
A useful variation is a soft trap: X2 shows two hard slides without fully committing, then recovers to deny the return pass. Use it against strong handlers who split tight traps. A second variation is to call the press only on a designated handler or after a made free throw; this protects your players’ energy and makes the call harder to scout.
Age Adaptations
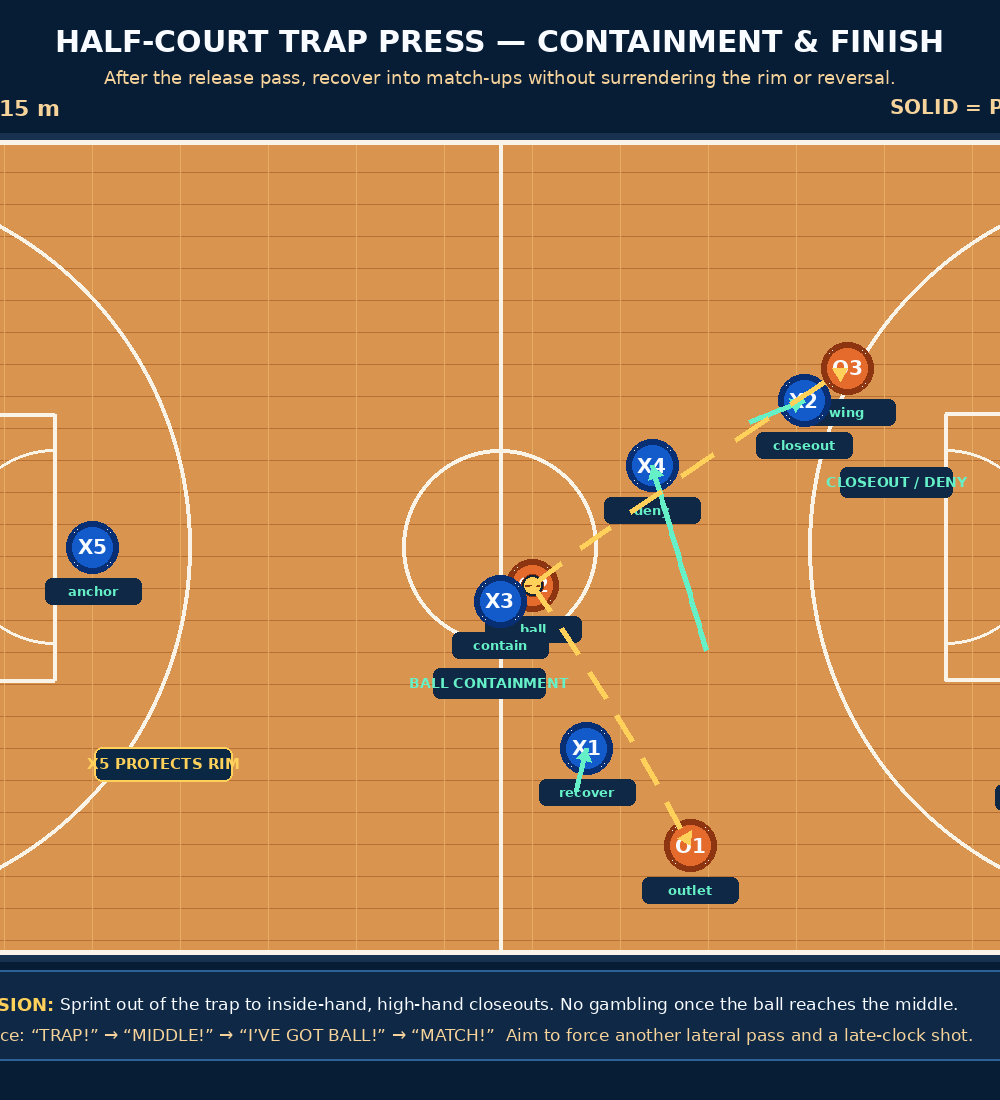
For Under-8 and Under-10, teach the idea as a two-player “sideline wall” with no live steal requirement. Use a 12 m × 10 m space, allow two dribbles before the trap closes, and reward stance, spacing, and communication. For Under-12, use 4v4, limit the offense to one middle outlet, and introduce X5 as a paint safety. At Under-14, install the full 5v5 version exactly as shown, but stop play after the first pass to correct rotation shape. For Under-16 and open-age teams, make it fully live, chart deflections and recovery errors, and layer in opponent-specific scout calls.
Session standard: Do not advance the drill because the players can produce a steal. Advance it when they can trap, rotate, and protect the rim for three consecutive live possessions without a foul or an uncovered middle pass.

