Basketball
Hammer Cross: Sideline Inbound Play Against Man-to-Man
Teach a reliable sideline inbound sequence that creates a front-rim layup, a switch counter, and a safe perimeter release against man-to-man pressure.
What you need
6 basketballs, 10 cones, 2 sets of pinnies, sideline location marker, whistle
Hammer Cross: Sideline Inbound Play Against Man-to-Man
Overview
Hammer Cross is a front-court sideline inbound (SLOB) designed to give the inbounder a fast, low-risk first pass and then create a layup at the front of the rim. The action is particularly useful after a timeout, following a dead ball in the frontcourt, or whenever the defense is in man-to-man and wants to deny the initial catch. The set does not depend on a perfect lob. It creates a clear read sequence: hit 2 on the safety flash, feed 2 on the cut after 4’s pin, then use 4’s slip or 5’s corner release when the defense switches.
Mirror the action from either sideline. On a FIBA floor, use the full 15 m width to stretch help defenders rather than crowding the sideline action.1
Setup
Use one ball, ten cones, two colours of pinnies, and a whistle. Mark the inbound spot and use the near half-court: 14 m long by 15 m wide.
| Role | Starting spot | Job on the call |
|---|---|---|
| 1 — PG / inbounder | Out of bounds on the sideline, 0.5–1 m above the free-throw-line extension | Deliver the first pass, then clear to the safety area. |
| 2 — SG / primary scorer | About 1.2 m inside the sideline and 2 m above the elbow | Flash to receive, then cut hard off 4’s pin. |
| 3 — wing safety | Weak-side slot, roughly one step above the three-point line | Hold weak-side help, then lift as the release valve. |
| 4 — PF / screener | High elbow, 0.8 m above 5 | Pin X2; slip if X2 top-locks or the defense switches. |
| 5 — C / seal | Low elbow, 0.8 m below 4 | Seal X5 on the cut and drift to the weak-side corner on the counter. |
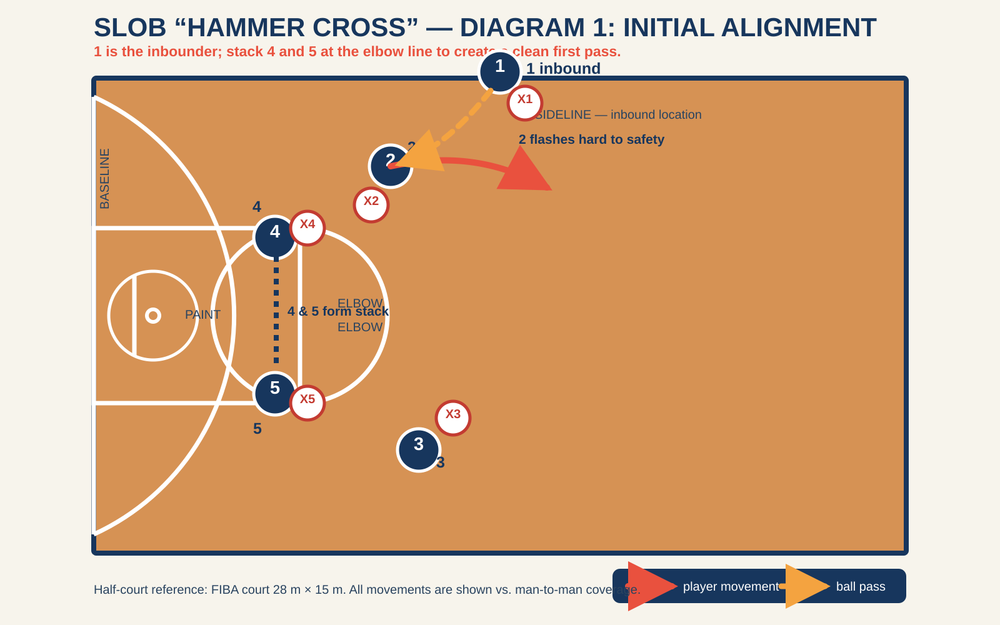
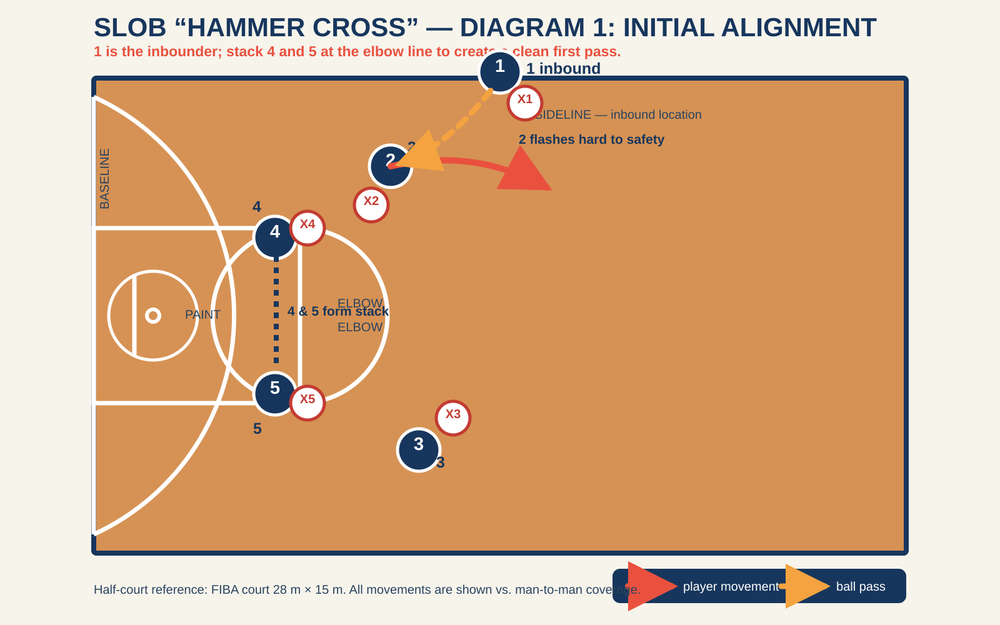
Diagram 1: Initial alignment
Keep 4 and 5 in a narrow vertical stack with both feet set before the ball becomes live. Their stack should sit just outside the lane line, not in the middle of the paint. That placement gives 2 enough room to brush the screen and keeps the passing lane away from baseline help. Inbounder 1 should call “Hammer” only after confirming eye contact with 2.
Step-by-Step Instructions
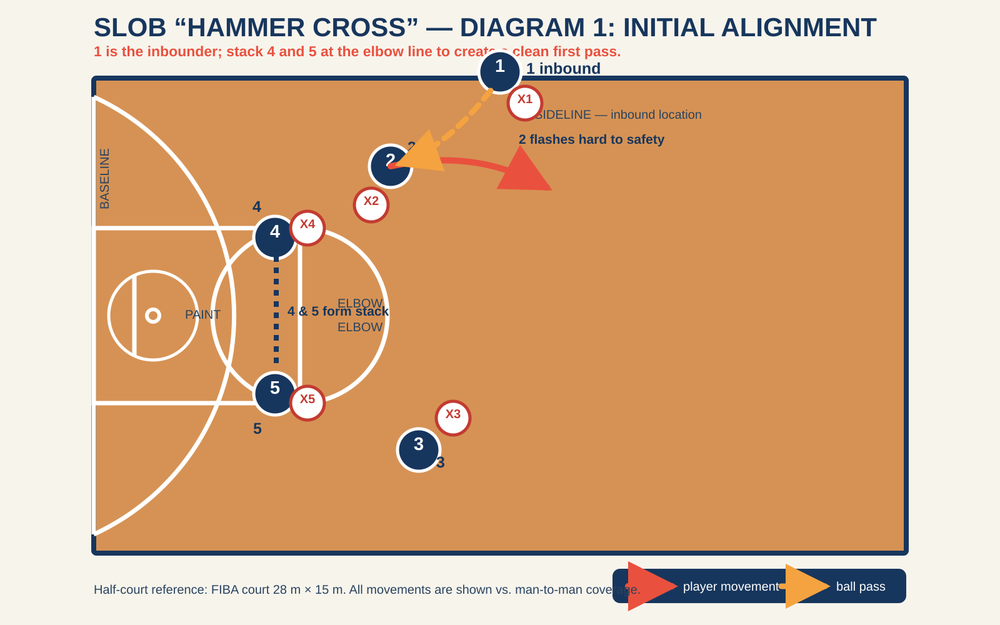
Establish the clock and the first target. On the official’s hand signal, 1 scans 2, then 4 slipping, then 3. Under FIBA rules, the thrower-in has five seconds to release the ball; coach a practice standard of a decisive first pass inside 0.8 seconds.1 A late inbound invites a five-second violation or a trapped catch.
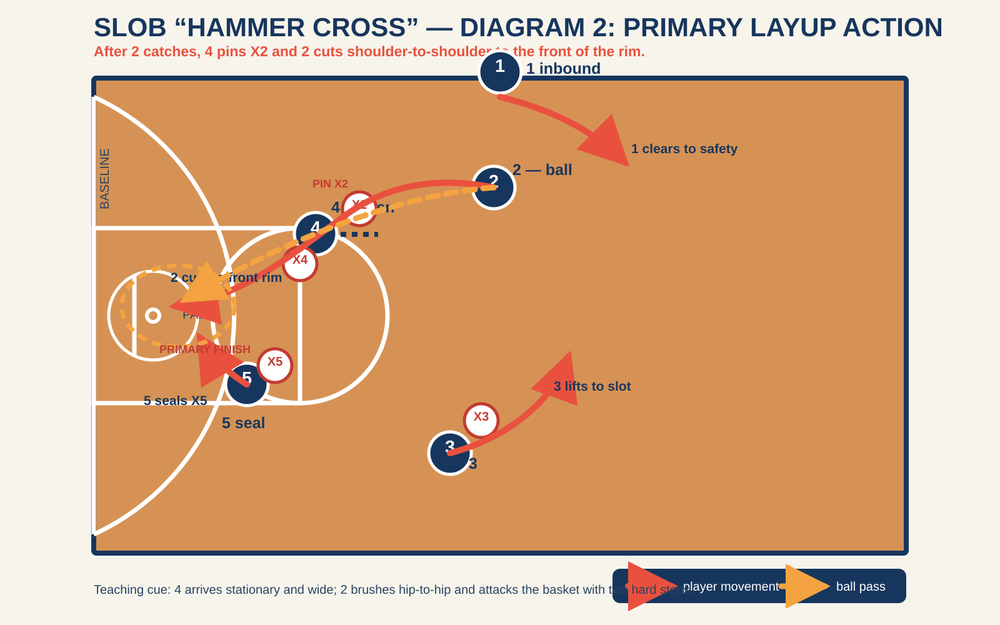
Make the safety flash. As 1 receives the ball, 2 takes two explosive steps toward the ball and shows both hands. 2 catches at least 1 m inside the sideline, pivots to face the basket, and protects the ball with the outside shoulder. 1 passes to 2’s outside hand, not into X2’s chest.
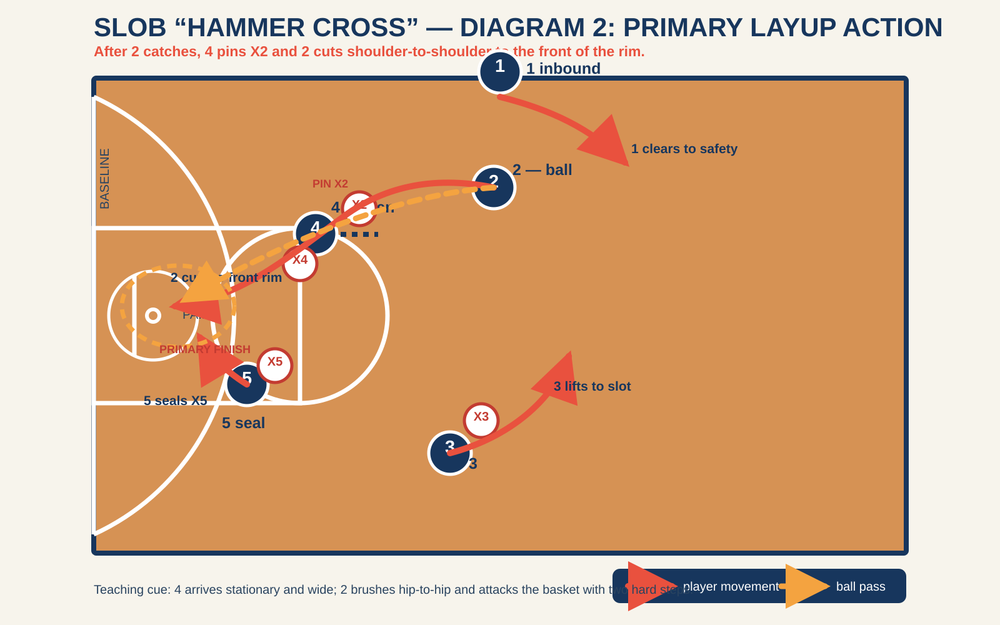
Build the screen legally. On 2’s catch, 4 arrives stationary, chest facing the sideline, with a wide base and hands tucked. 4 pins X2 on the route to the rim. 5 steps toward the lane line, puts the body between X5 and the basket, and holds the seal for one full count. Do not coach 4 to chase X2; the screen must arrive first.
Run the front-rim cut. 2 takes one jab up the sideline to move X2, then brushes 4 hip-to-hip and takes two hard strides to the front of the rim. The target is the near-side restricted-area line, not the middle of the paint. 2 keeps the inside hand available and expects a bounce pass or short chest pass from the first available teammate.
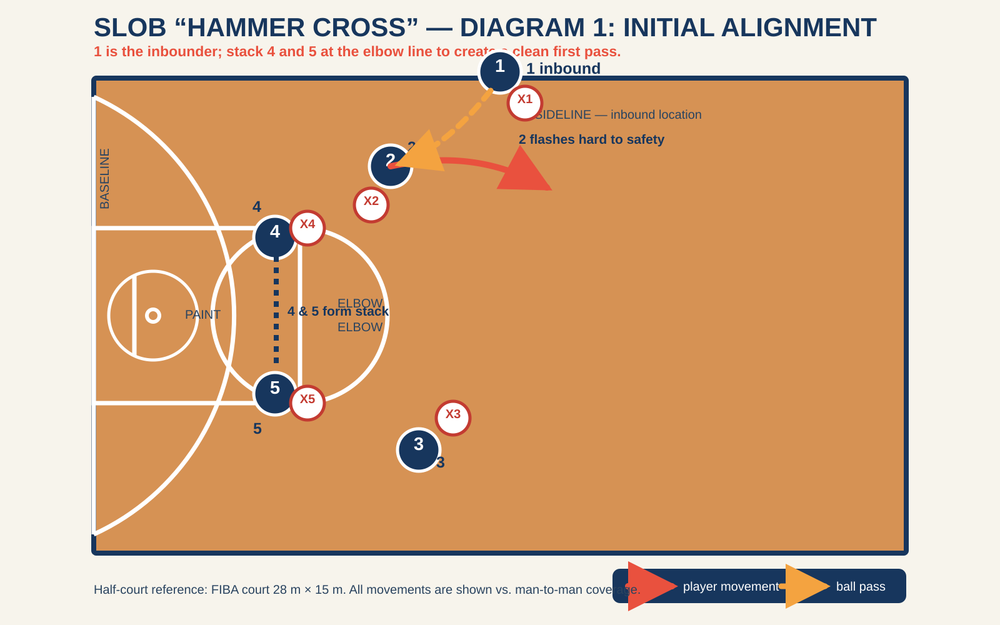
Diagram 2: Primary layup action
Teach the pass and finishing read. If 2 wins the cutter’s lane, 1 or 2 delivers the ball to the space ahead of the cut. 2 finishes with the near-hand layup and uses the rim to shield X2. If X5 steps up to help, 5 should be sealing directly behind that help defender for the drop pass. Meanwhile, 3 lifts from the weak-side slot toward the top, staying square and ready for a catch-and-shoot or a reversal.
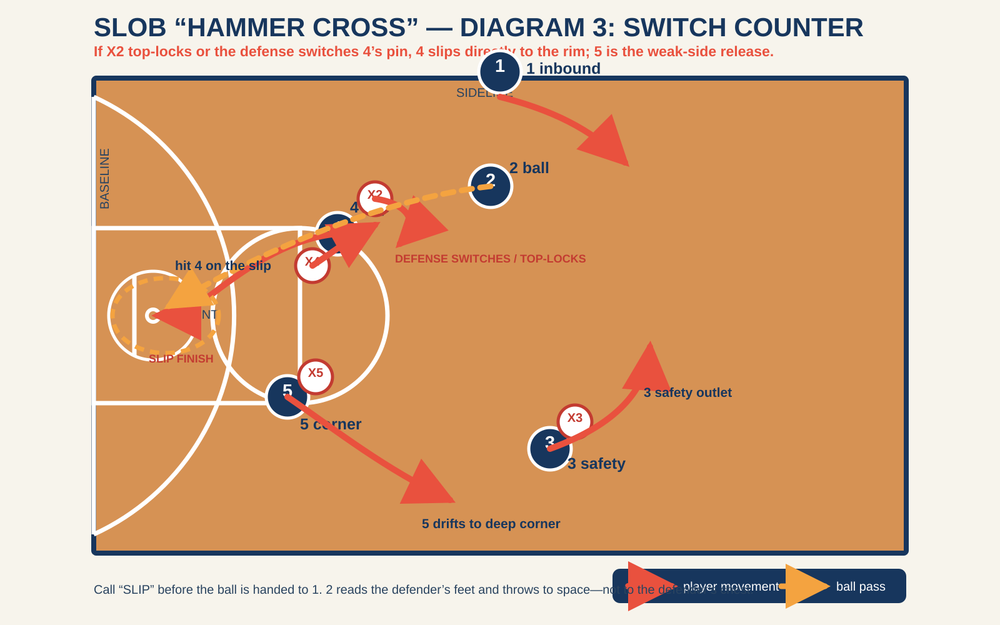
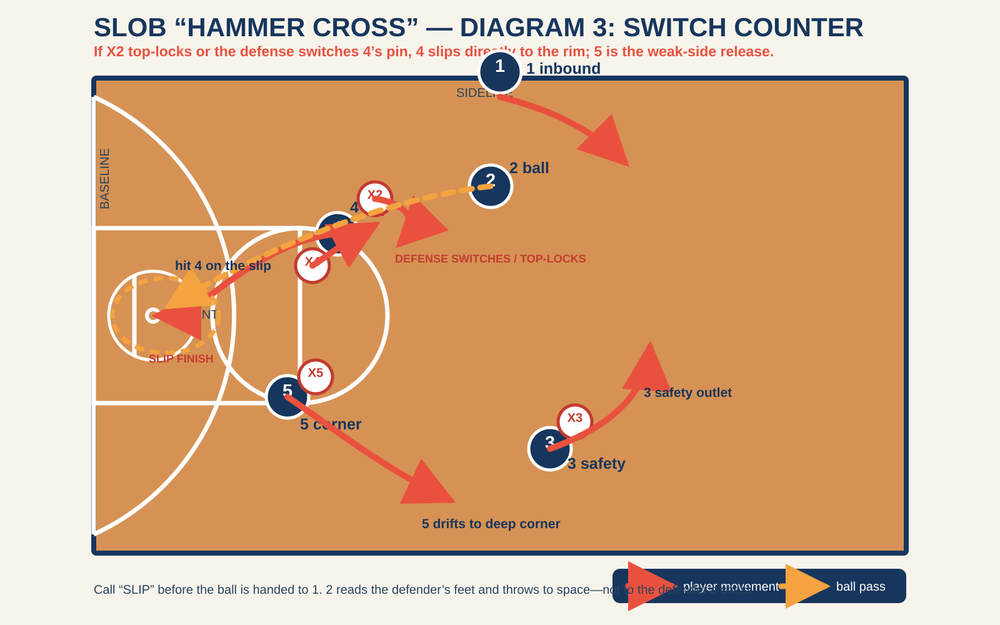
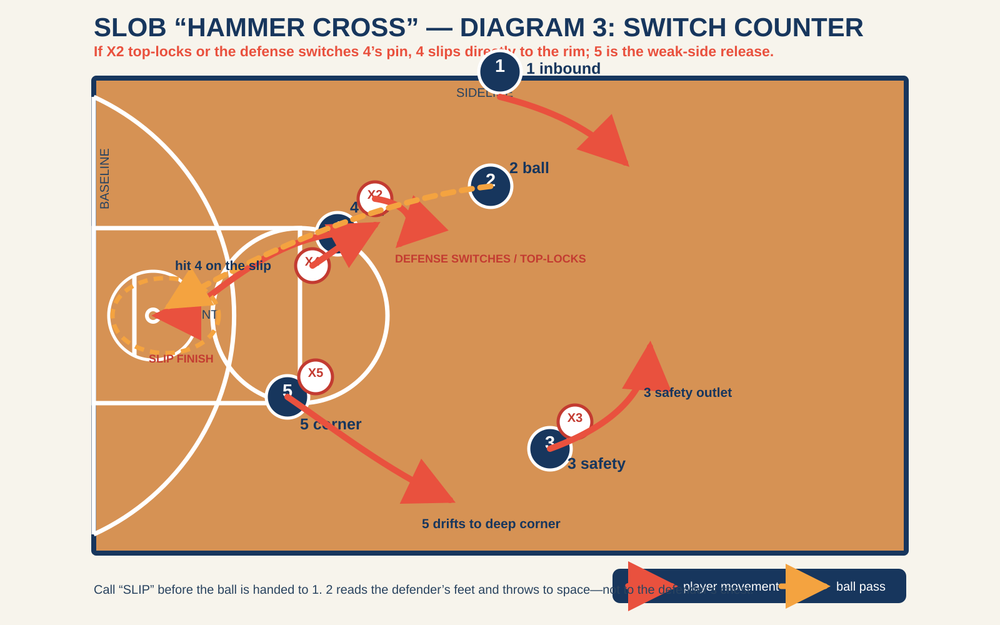
Use the switch counter. If X2 top-locks the cut or X4 switches onto 2, 4 calls “Slip” and dives immediately to the front rim. 2 must throw to open space early. 5 drifts to the deep weak-side corner; 3 remains the safety outlet. This turns the defense’s switch into a big-versus-small finish or a clean corner catch.
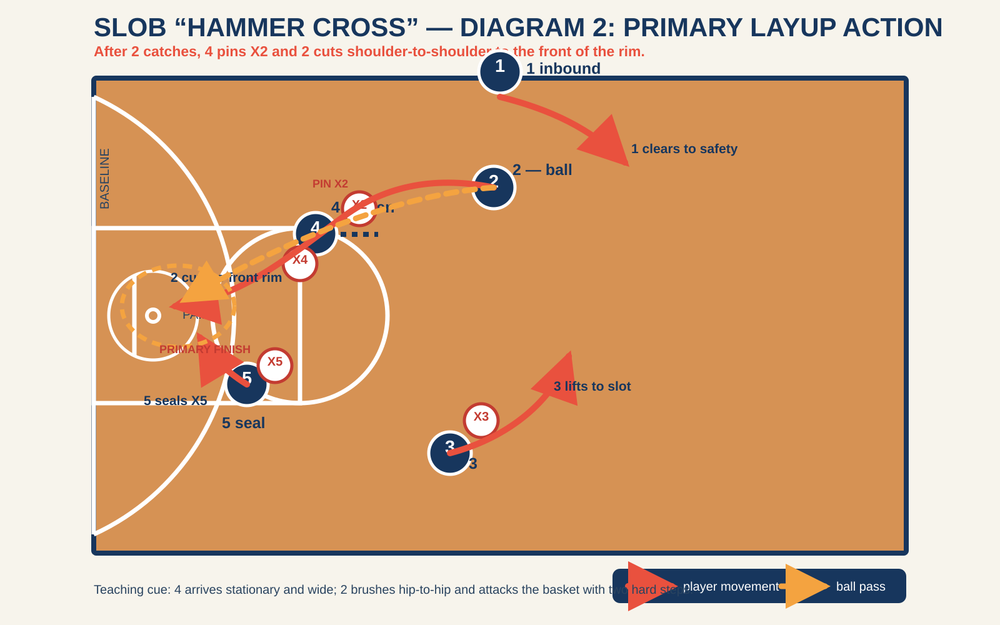
Diagram 3: Switch / top-lock counter
- Finish with balance. 5 attacks near-side glass, 4 reads opposite glass, and 1 gets above the ball. On a missed read, freeze and have the inbounder name the next two options.
Key Coaching Points
| Coaching point | What to demand in practice |
|---|---|
| Win the first pass | 2 shows a target early and catches with two hands, one metre inside the sideline. |
| Screen with discipline | 4 is stationary before contact, with a broad base; no moving screen to chase X2. |
| Cut tightly | 2 brushes 4’s hip. A loose, looping cut lets X2 recover and kills the layup. |
| Pass to space | The passer leads 2 to the front rim and never throws the ball into a defender’s body line. |
| Keep the weak side alive | 3 lifts on time and 5 either seals or drifts; neither player watches the cut. |
| Name the defensive trigger | Call “Slip” only for a switch or top-lock; otherwise stay with the primary action. |
Common Mistakes
The first common error is starting 4 and 5 too wide apart. The stack then looks like two isolated screens and X2 can slide through. Correct it by placing their inside feet no more than 0.8 m apart. Second, 2 often drifts toward the baseline instead of flashing back to the ball; require two steps toward the passer before the cut. Third, 4 leans or moves into X2. Film the screen from the sideline and insist that 4 is stopped before X2 reaches the body. Fourth, the passer stares at the layup long enough for the defense to load the lane. Use the verbal read order: 2, 4, 3. Finally, 3 may stay flat in the corner, shrinking the safety window. Cue “lift on cut” every rep.
Variations & Progressions
Variation 1 — Corner Hammer. Against a defense that crowds the rim, keep 2’s cut as a decoy. 4 pins X2, 5 cross-screens for 3, and 3 sprints to the weak-side corner for a skip pass. This is the best change-up after the layup action has been scouted.
Variation 2 — Immediate slip. Start with the slip call pre-determined. 4 fakes the pin and dives immediately, while 2 holds X2 high for one count. Use it against aggressive switch-everything teams or after 4 has successfully screened twice.
Progression — Live decision game. Begin 5-on-0 for spacing, move to 5-on-5 guided defense where X2 is told to trail, top-lock, or switch, and finish with live 5-on-5. Award the offense two points for a paint touch from the primary action and three points for a correct counter read, regardless of whether the shot falls.
Age Adaptations
| Group | Adaptation | Coaching emphasis |
|---|---|---|
| Under 10 | Use 3-on-3: 1 inbounds, 2 flashes and cuts, 4 screens. Remove the switch counter. | Catching, spacing, jump-stop and safe passing. |
| Under 12 | Use the full five-player alignment but start with a coach as the guided defender on 2. | Legal screening and changing speed on the cut. |
| Under 14 | Add 5’s seal and 3’s lift; allow defenders to top-lock after the first successful rep. | Read the defender’s feet and deliver on time. |
| Under 16 / open | Run all three diagrams live, including switching, zoning up the ball, and late-clock pressure. | Read order, poise, and a second-action finish. |
Practice Prescription
Install this in 15 minutes. Spend three minutes walking the exact starting landmarks, four minutes on 5-on-0 timing, four minutes on guided 5-on-5 reads, and four minutes live with a score/stop consequence. End with two sideline inbound possessions for each unit. A group does not advance until it produces three consecutive legal screens, safe first catches, and a shot or paint touch within four seconds of the inbound.
References