SLOB Elevator: End-of-Game Buzzer-Beater Package (4.8 Seconds)
Teach a reliable sideline-out-of-bounds Elevator action that frees your best shooter for a late-game catch-and-shoot, with a built-in rim counter against top-locking or switching defenses.
Equipment Needed
Overview
Use this front-court sideline out-of-bounds (SLOB) package for one clean late-clock shot when the score is tied or you need a three. In the Elevator action, 4 and 5 form a vertical gate, 2 zippers up from low, and 1 hits the shooter at the top. It is built for 4.8 seconds or fewer, when opponents top-lock or switch the first screen.
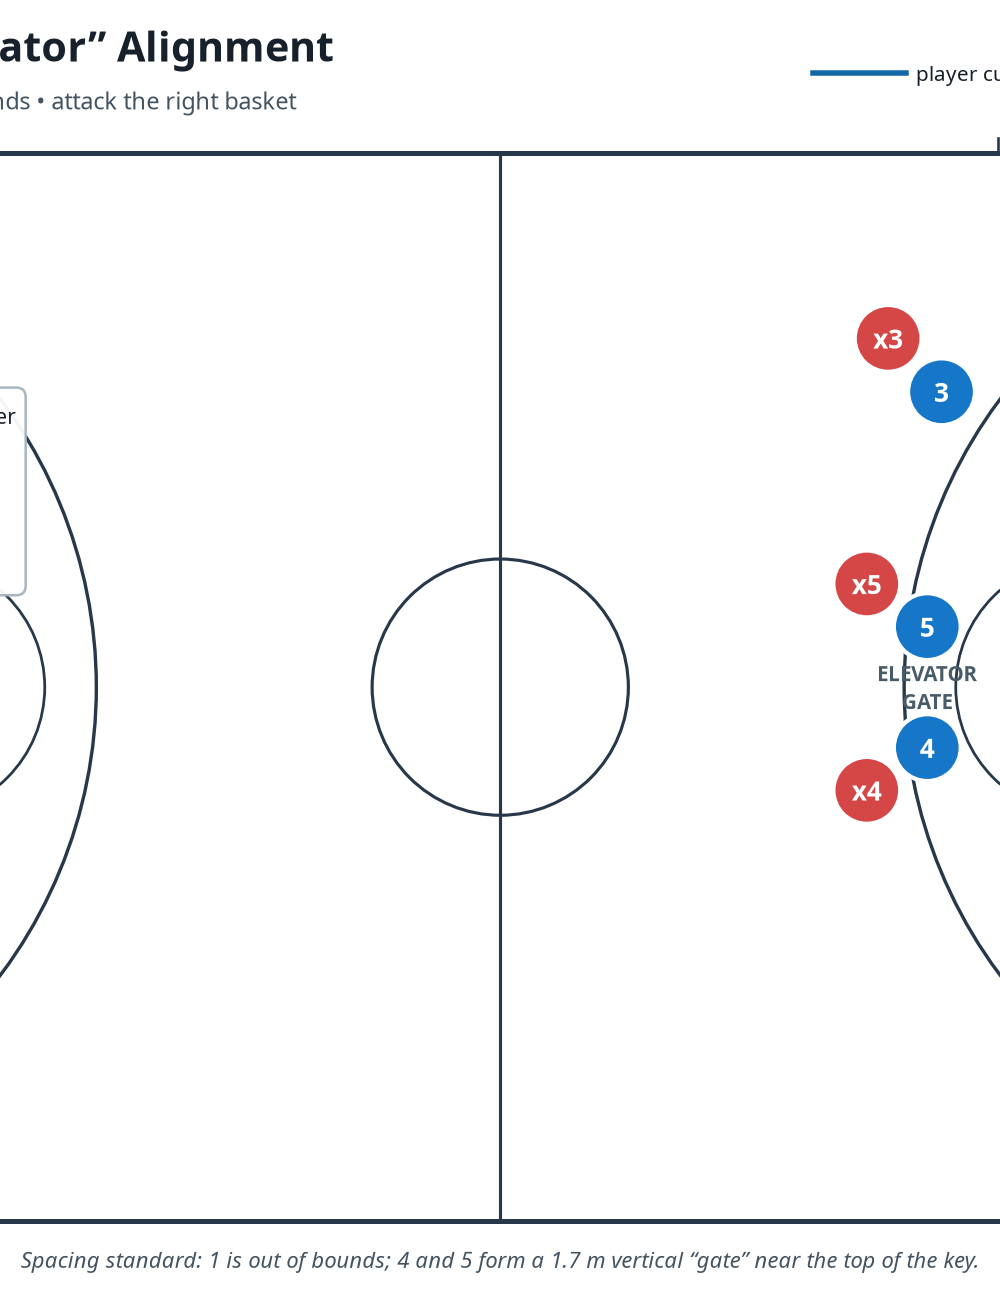
The goal is a passing window that forces x2 through traffic and gives 2 a balanced catch about 7.3 m from the rim. Rehearse it from both sidelines on the 28 m × 15 m FIBA court. If the gate is denied, 2 rejects low immediately for the Diagram 3 counter.
Setup
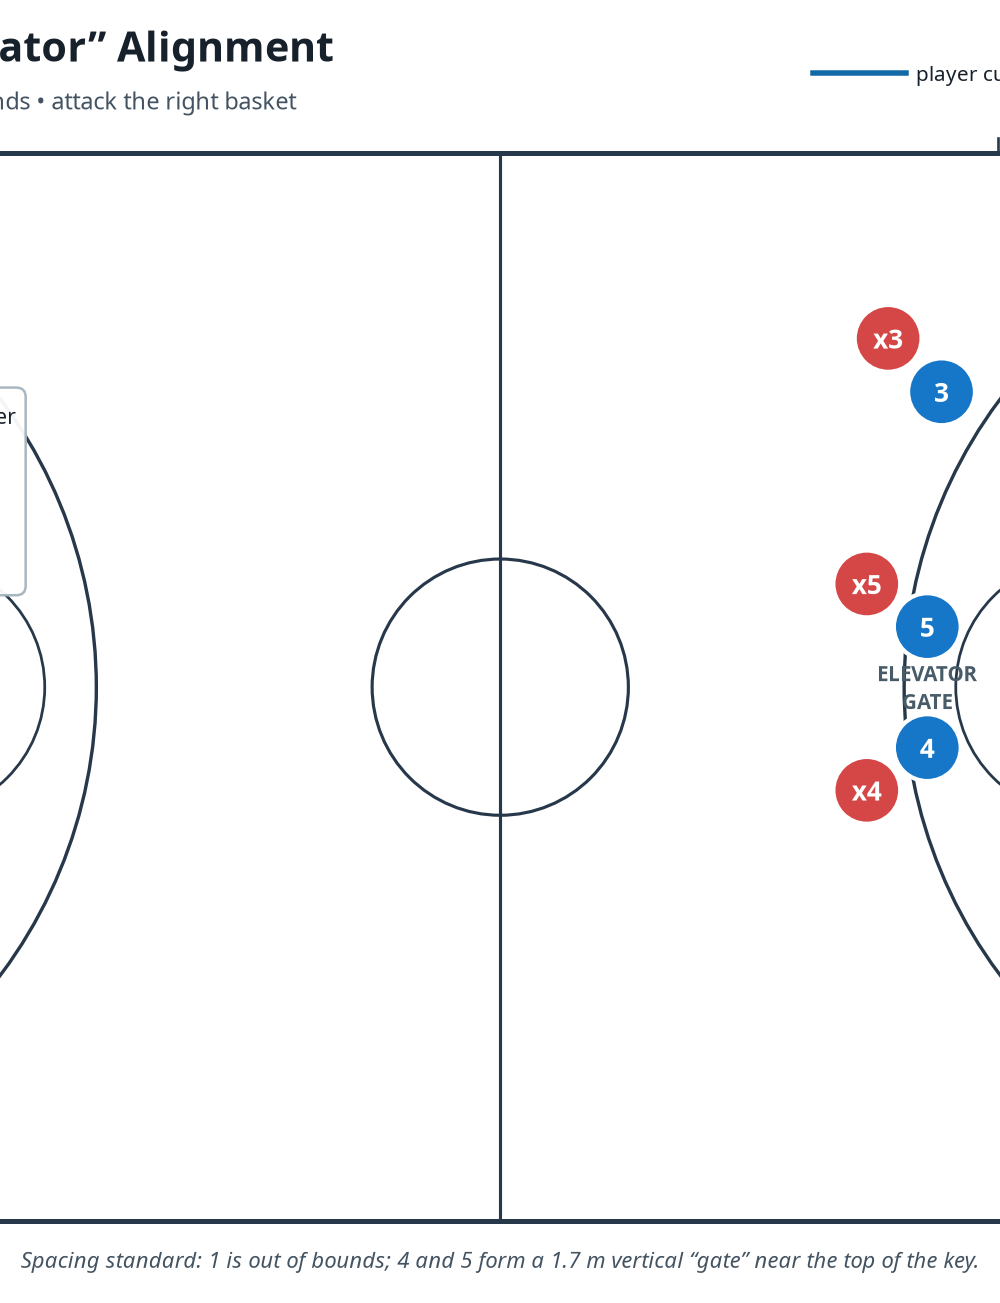
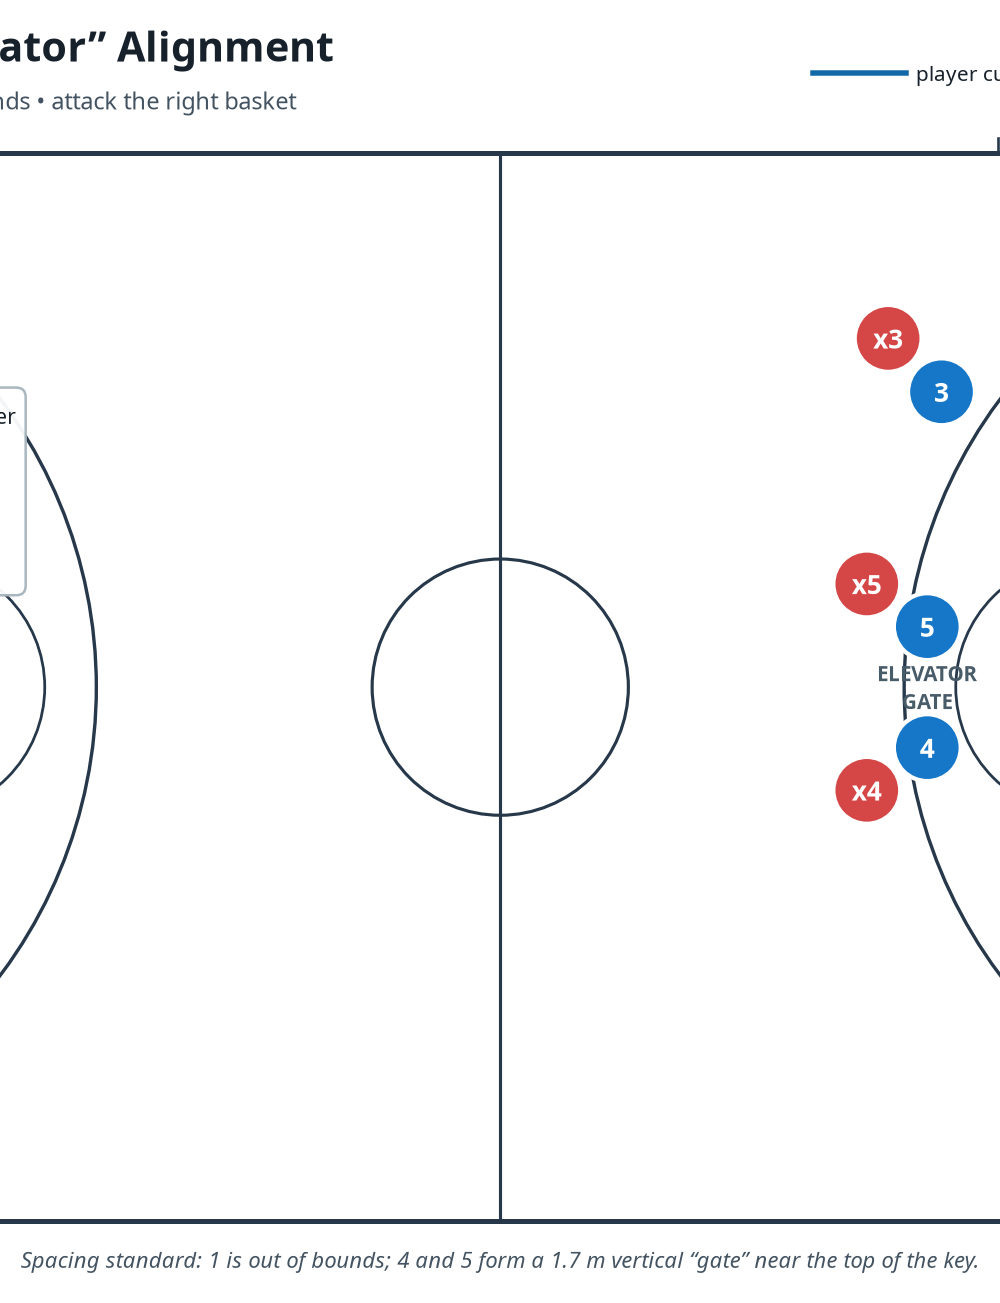
Use a full 28 m × 15 m court, one ball, a visible clock, and five attackers; add five defenders after installation. Place 1 out of bounds on the right sideline, about 4.9 m from the baseline. Set 2 low on the right, 3 high and wide, and 4/5 vertically about 1.7 m apart at the top of the lane.
| Position | Starting job | Non-negotiable detail |
|---|---|---|
| 1 — PG | Inbound, pass, then become safety. | See 2’s numbers; do not drift toward the baseline. |
| 2 — SG | Primary shooter. | Start low, sell the zipper, then plant on two feet in the catch window. |
| 3 — SF | Clear help from the paint. | Sprint to the rim-line/weak-side space without clogging 2’s lane. |
| 4 — PF | Low screen side of the gate. | Present a legal, still body; close only after 2 clears. |
| 5 — C | High screen side of the gate. | Match 4’s timing and seal the trailing defender after the cut. |
Mark 1’s safe stance with a cone 1 m inside the sideline and the catch window with a floor marker. Install 5-on-0, then add x2 before full defence.
Step-by-Step Instructions
Call the package and identify the read. “Elevator” means the primary look; “Reject” warns of a likely top-lock. 1 reads 2’s shoulders, while 2 reads x2’s high hip: space above the gate is primary; a direct rim cut is the answer to denial.
Set the exact alignment. 1 is legal out of bounds with the ball at chest height. 4 and 5 are square, shoulder-width, and 1.7 m apart. Keep 2 low enough to make x2 turn; put 3 high to pull help away from the nail.
Start the clock with 3’s clear. When the ball is live, 3 sprints to weak-side rim-line space and takes their defender away from the gate. 1 triggers the action with one quiet “Go” or the team hand cue.
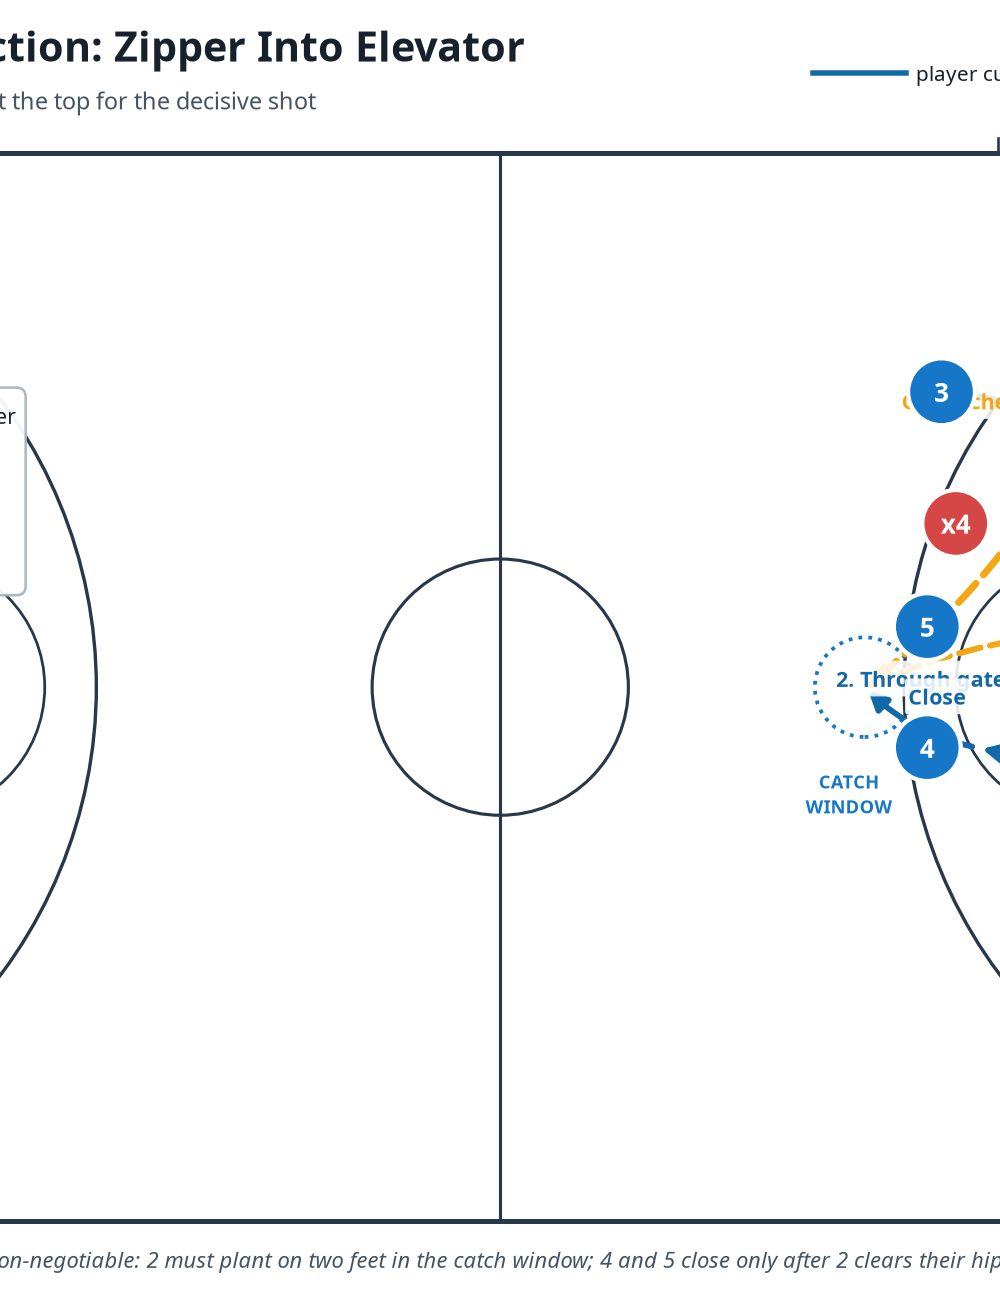
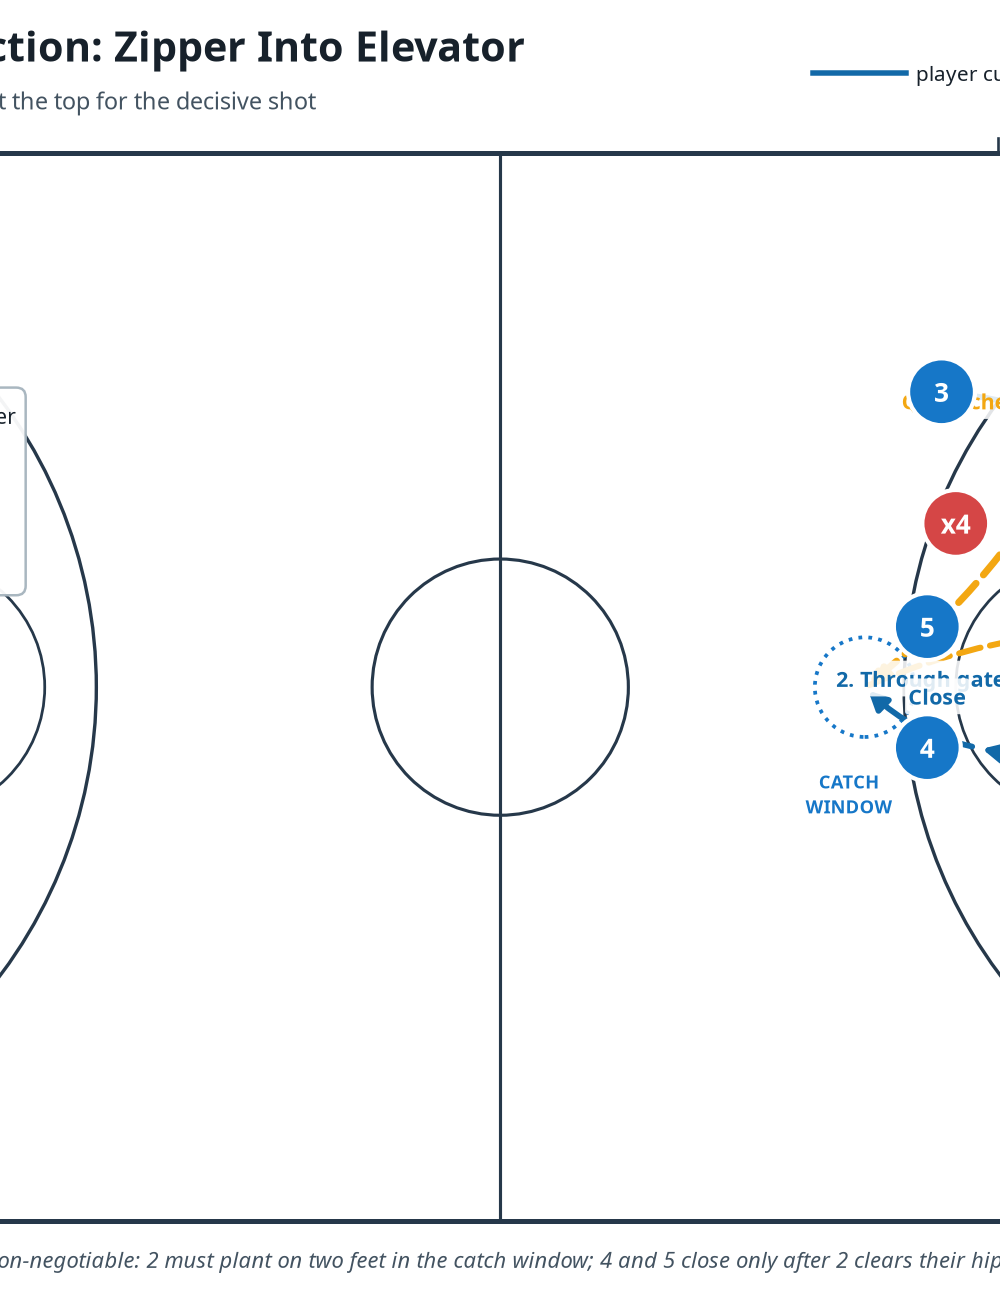
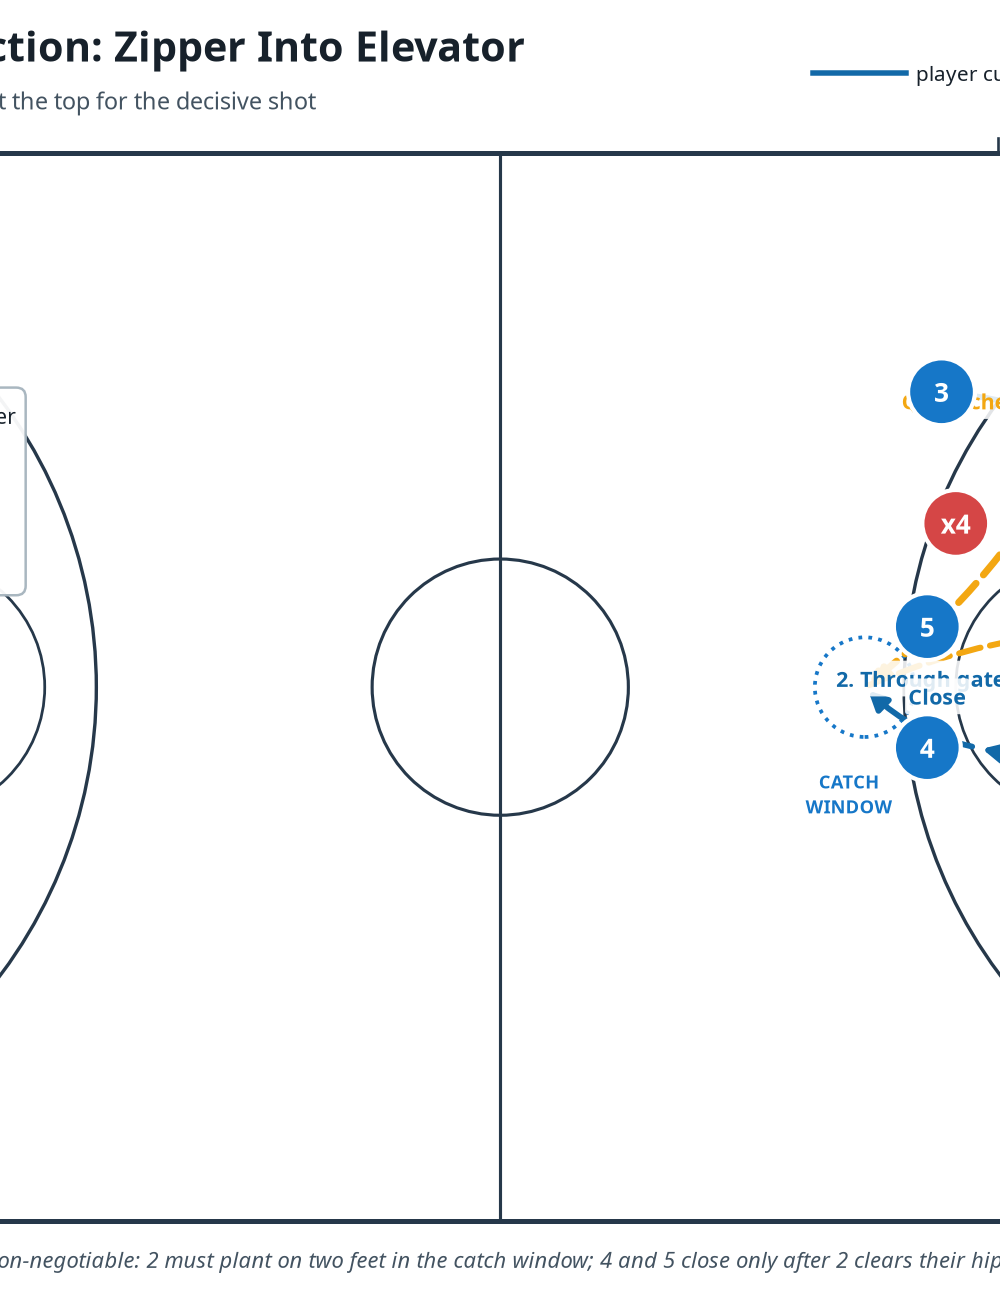
Run the zipper cut. 2 attacks 4’s lower shoulder, showing hands late and staying chest-to-gate. Demand two explosive strides through the first 2.5–3 m, shoulder-to-hip with 4, then a tight turn through the gap.
Build and close the Elevator. 4 and 5 hold space until 2’s hips clear, then step together to close the gate. They must be stationary at contact: a wall, not a moving screen. 5 seals x2’s recovery route while 4 checks lane help.
Deliver the primary pass. 1 fires a chest pass to the marker in front of 2, not the back shoulder, roughly 1.0–1.4 seconds after the ball is live. It arrives on 2’s exit for a two-foot stop and one motion shot. If 1 cannot see 2’s numbers, do not force it.
Finish the shot and occupy rebounding space. 2 catches low and square; the shot is up by the final second without an escape dribble. 4/5 turn into a legal rebound wedge, 3 takes the long-rebound line, and 1 becomes outlet safety.
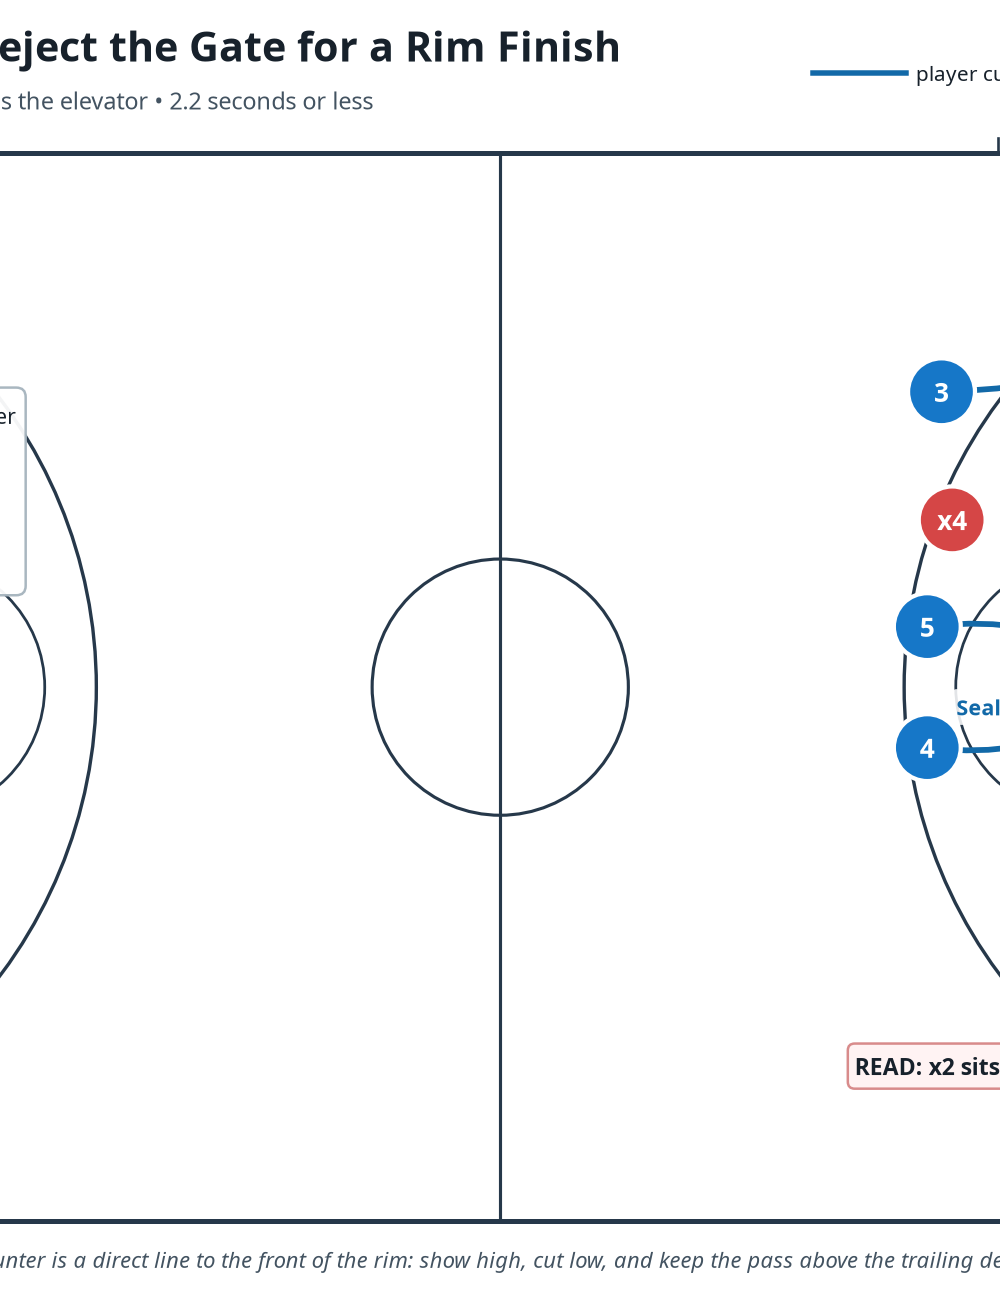
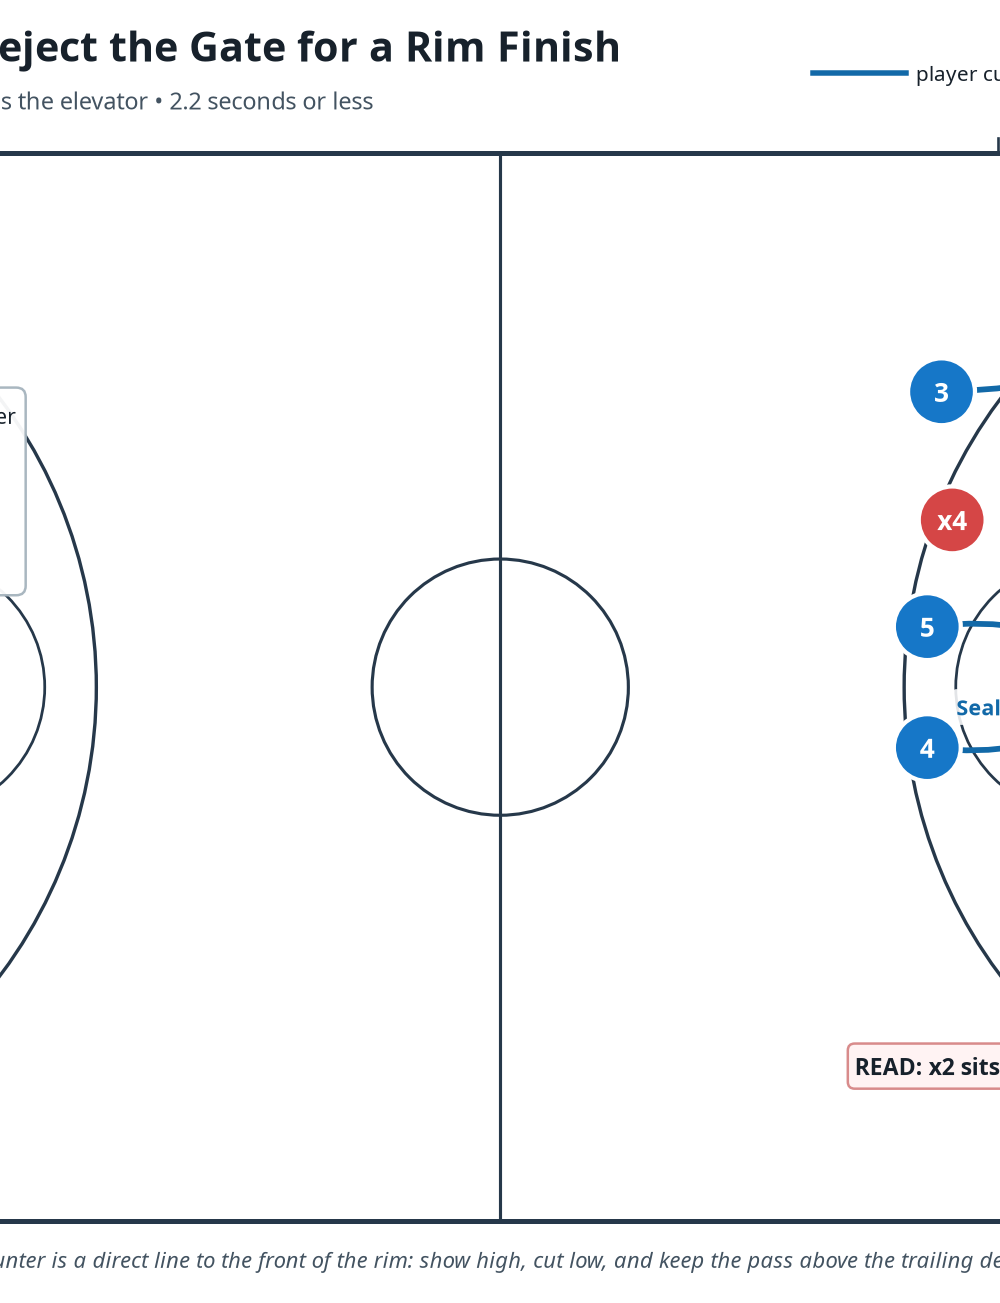
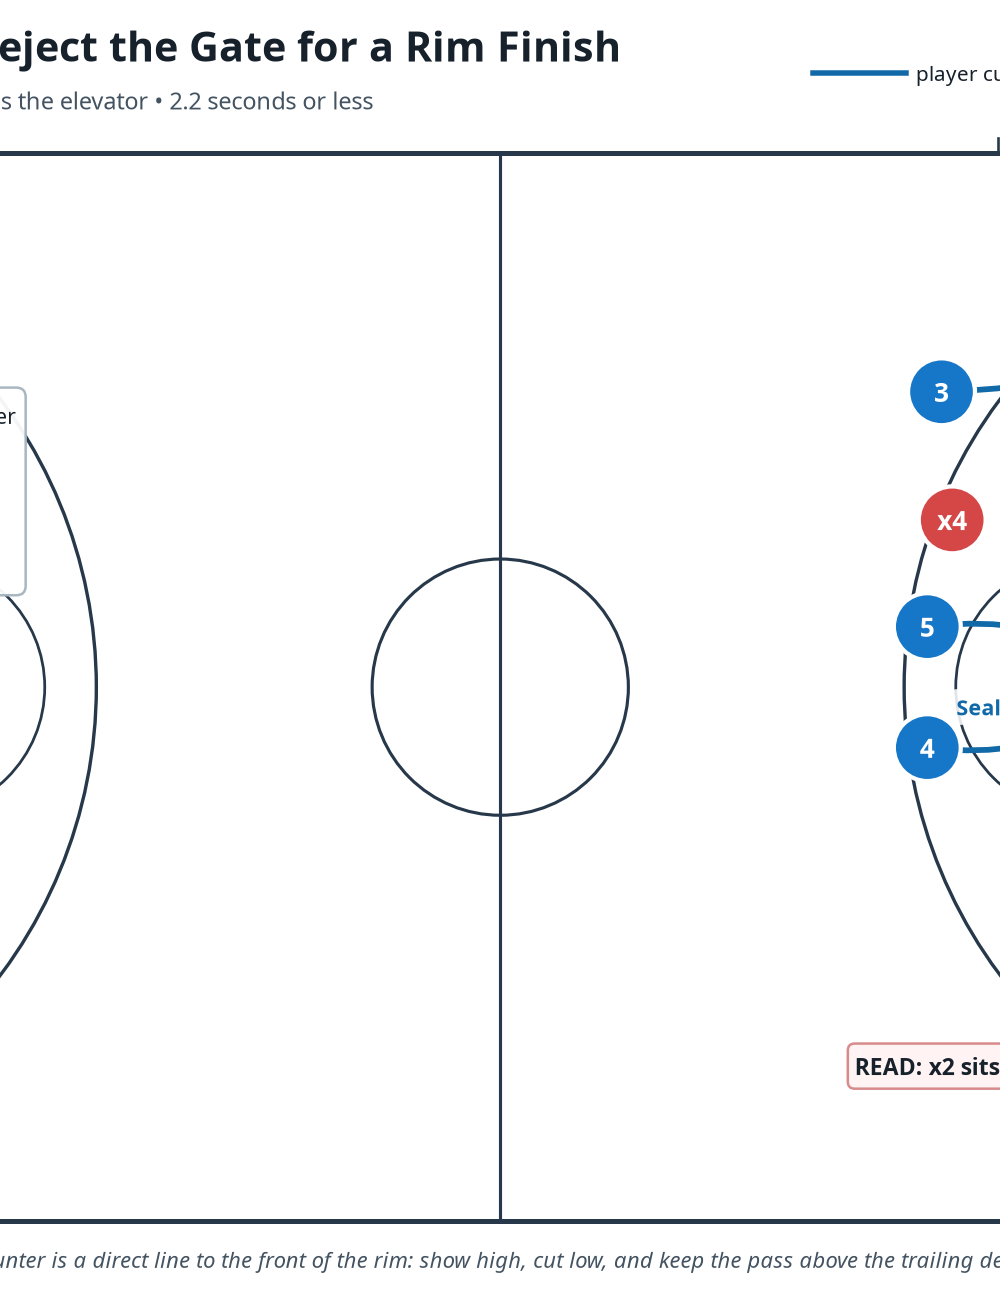
Use the reject counter against denial. If x2 sits above the zipper or the gate is switched, 2 sells high, plants, and cuts low to the rim. 4/5 seal instead of chasing. 1 leads 2 with a lob or bounce pass; with 2.2 seconds or less, this is often the cleaner option.
Key Coaching Points
Coach this as a timing play, not a diagram play. Demand a violent first three steps from 2, a late vertical close from 4/5, and a pass to open space rather than a stationary target. Give 2 permission to reject immediately against a top-lock. Use a visible clock in live reps so players learn that 4.8 seconds supports the primary catch while 2.2 seconds favors the reject. Finish every rep with rebound and safety roles.
Common Mistakes
| Error to catch | Why it fails | Immediate correction |
|---|---|---|
| 2 rounds the zipper cut. | x2 can shoot the gap or recover over the gate. | Put a cone on 4’s hip and demand shoulder-to-hip contact on the cut. |
| 4 or 5 close before 2 clears. | The shooter collides with their own screen or the action becomes illegal. | Use the cue: “Hips through, then close.” |
| 1 stares at 2 too early. | The defender sees the pass and jumps the lane. | Train 1 to keep eyes level, then snap the pass on 2’s exit. |
| 3 watches the action. | Help stays at the nail and ruins the passing lane. | Grade 3’s clear as a sprint that must take a defender beyond the lane line. |
| 2 catches drifting sideways. | A difficult off-balance shot replaces the designed look. | Rehearse a two-foot stop on the floor marker before adding a defender. |
Variations & Progressions
Variation 1 — Reject-to-rim counter. Use Diagram 3 whenever x2 top-locks, denies the zipper, or the defence pre-switches the gate. 2 shows high, cuts low, and receives the lead pass at the front of the rim. This is the fastest answer against aggressive denial.
Variation 2 — Screener slip. If both defenders stay attached to 2 and the low defender leaves early to help, 5 slips directly to the rim after setting the high half of the gate. 1 reads 5’s chest first; 2 continues through the gate to occupy x2. Use this when you need two points rather than a three.
Variation 3 — Inbounder re-entry. Against teams that face-guard 2 and overload the lane, have 1 step inbounds after the pass and receive a quick return from 3 for a sideline three. Keep 4 and 5 ready to screen the return pass but only install this when your group can execute the primary action cleanly.
Progress the drill from 5-on-0 with a stopwatch, to 5-on-1 with x2 chasing, then 5-on-5 with the defence alternating trail, switch, top-lock, and sag calls. End each practice block with three live “make it to win” possessions; the offence earns a point only if the shot leaves the shooter’s hand before the horn.
Age Adaptations
| Age group | Coaching adaptation | Success target |
|---|---|---|
| Under 8 / Under 10 | Use three players: 1 inbounder, 2 cutter, 5 stationary screener. Remove the closing gate and let 2 catch at free-throw range. | A legal inbound and a balanced catch. |
| Under 12 | Add 4 as the second screener but walk the timing first. Use a 6–8 m catch rather than demanding a three. | Tight shoulder-to-hip cut and stationary screens. |
| Under 14 | Install the top-lock read with one live defender on 2 and a visible 5-second count. | 2 calls primary or reject correctly. |
| Under 16 / Open | Run full 5-on-5, make the defence switch and deny, and score only game-clock-valid finishes. | Fast read, legal gate, composed late-game execution. |
Practice Finish
Close with two side-line repetitions from each direction of the floor. Give the offence 4.8 seconds, then 2.2 seconds, and require 1 to name the read after every rep. That simple constraint turns this from a memorised drawing into a dependable end-of-game package.

