Dynamic Maul Formation & Drive Drill
Master the art of the driving maul with this comprehensive drill, focusing on immediate binding, powerful leg drive, and effective ball control to dominate the opposition pack.

Equipment Needed
1. Overview
The driving maul is one of the most potent attacking weapons in modern rugby. When executed correctly, it is incredibly difficult to defend legally and often results in tries, penalties, or yellow cards for the opposition. This drill focuses on the rapid transition from a lineout catch (or open play) into a tightly bound, forward-moving maul. It emphasizes low body height, immediate and secure binding, synchronized leg drive, and secure ball transfer to the back of the pod.
Use this drill during the forward pack's unit skills session to build cohesion and dominance. It is particularly effective when preparing for matches against teams with a strong defensive lineout or when aiming to exploit the 5-metre red zone.
2. Setup
Pitch Setup:
- Mark out a 15m x 15m grid using cones, ideally near the 22m or 5m line to simulate match conditions.
- Place a tackle bag or a heavy hit shield in the center to act as the initial point of contact.
Player Positions:
- Attackers (8 forwards + 1 Scrum-half):
- 1 Jumper (Lock/Number 4)
- 2 Lifters (Hooker/Number 2 and Blindside Flanker/Number 6)
- 5 Support players (Props, remaining Lock, Openside Flanker, Number 8)
- 1 Scrum-half (Number 9)
- Defenders: 3-5 players with hit shields to provide resistance.

3. Step-by-Step Instructions
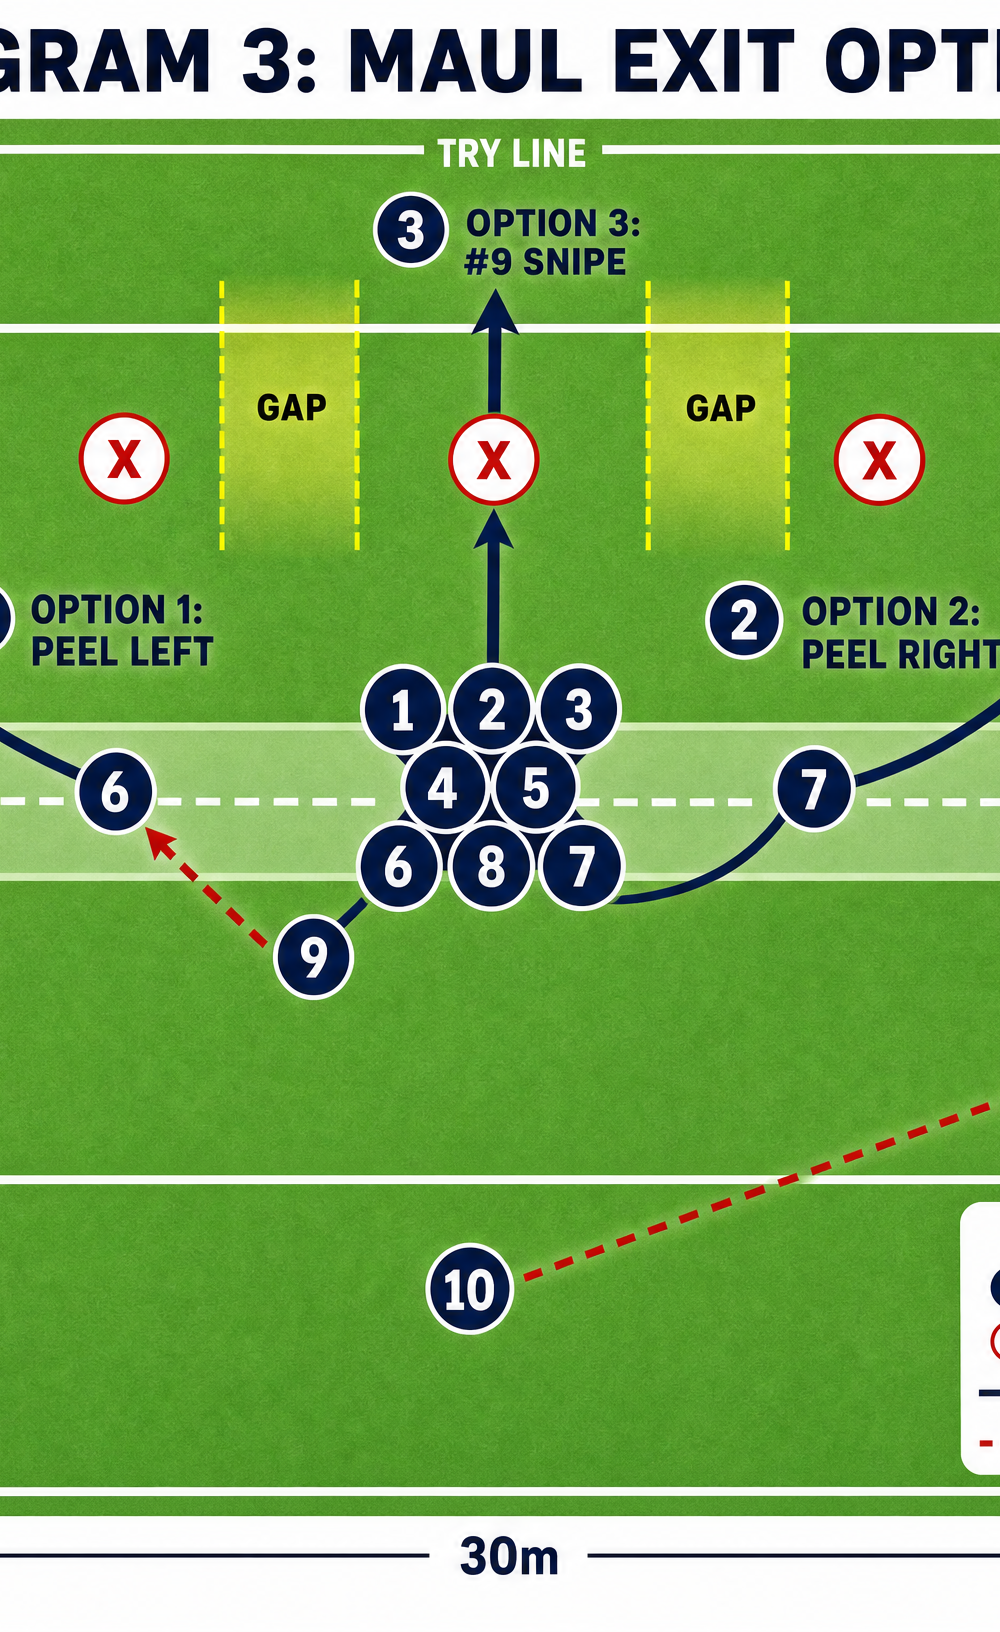
- The Catch and Initial Bind: The drill begins with a simulated lineout throw. The jumper (4) catches the ball at the apex. Immediately upon landing, the lifters (2 & 6) bind tightly onto the jumper, securing the pod. The jumper turns their back to the opposition to protect the ball.
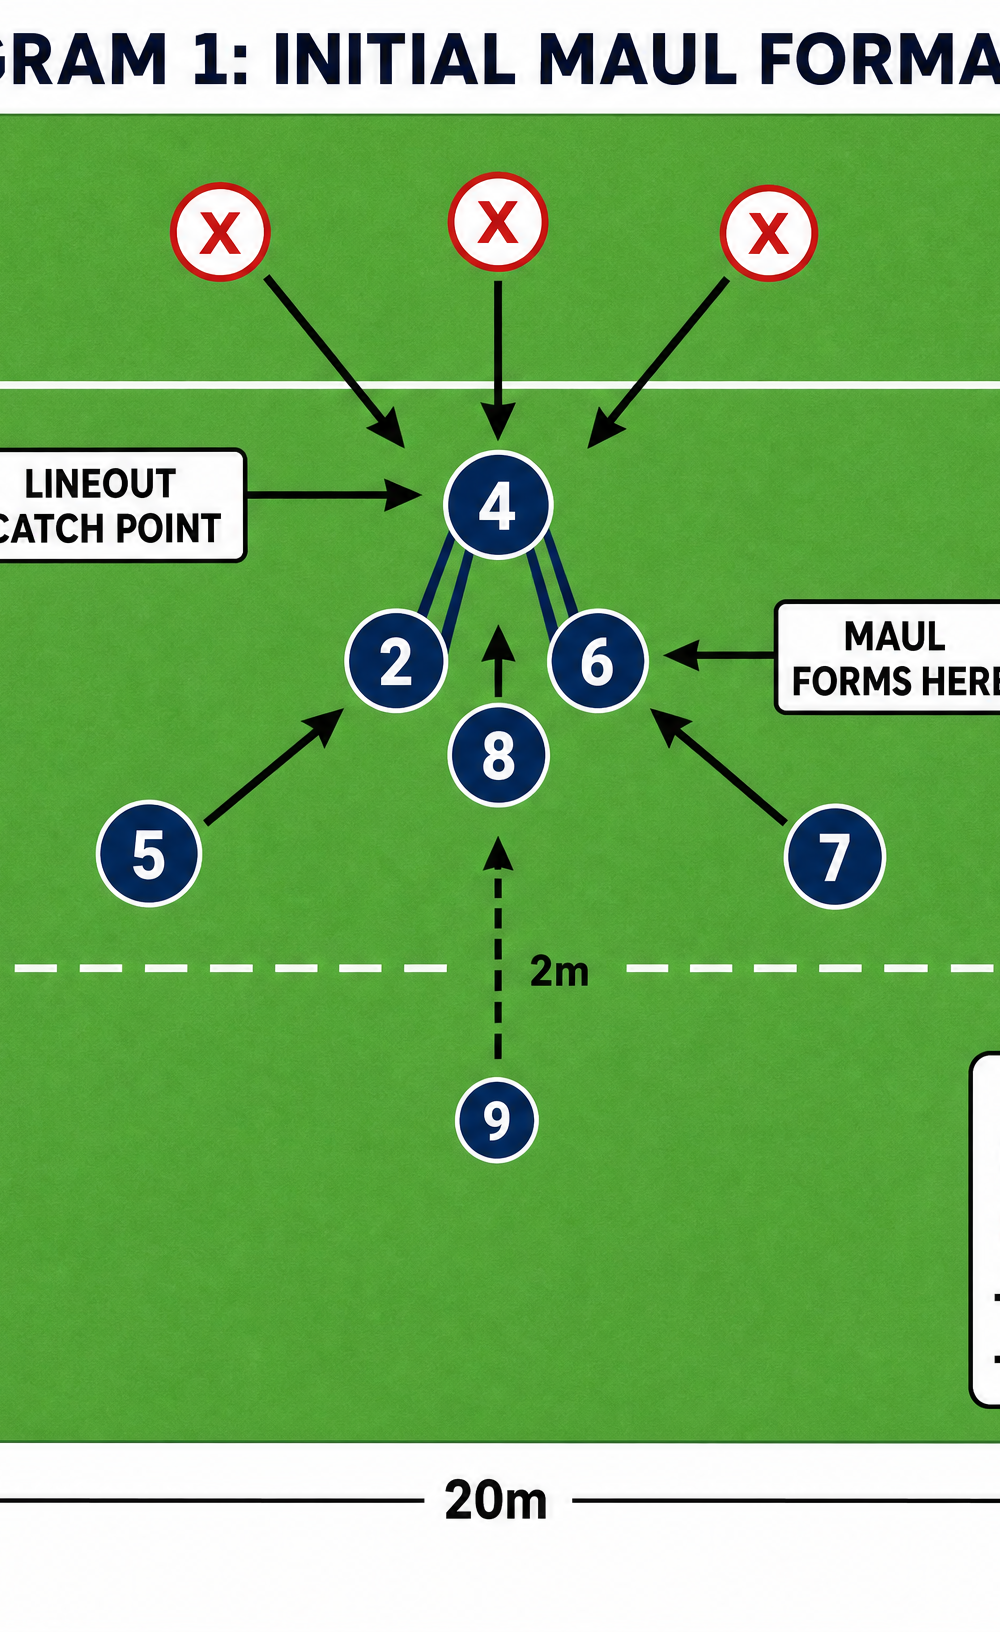
- The Secondary Bind: As the jumper lands, the Number 8 binds directly behind them, taking the ball transfer. Simultaneously, the remaining forwards (1, 3, 5, 7) hit the formation. The Props (1 & 3) bind on the outside of the lifters to seal the edges, while the remaining Lock (5) and Flanker (7) add weight to the rear.
- The Drive: On the call "DRIVE!" from the Number 8 or Scrum-half, the entire pod lowers their body height. The players must take short, synchronized, powerful steps (chopping the feet) to move the maul forward.
- Ball Transfer: The ball must be moved immediately to the player at the very back of the maul (usually the Number 8). This protects the ball from opposition counter-rucking and allows the referee to see it clearly.
- Managing the Defense: The defenders with shields apply pressure to the front and sides. The attacking pod must maintain their bind and adjust their drive to counter the resistance, keeping the maul moving straight or slightly angled away from the heaviest defense.
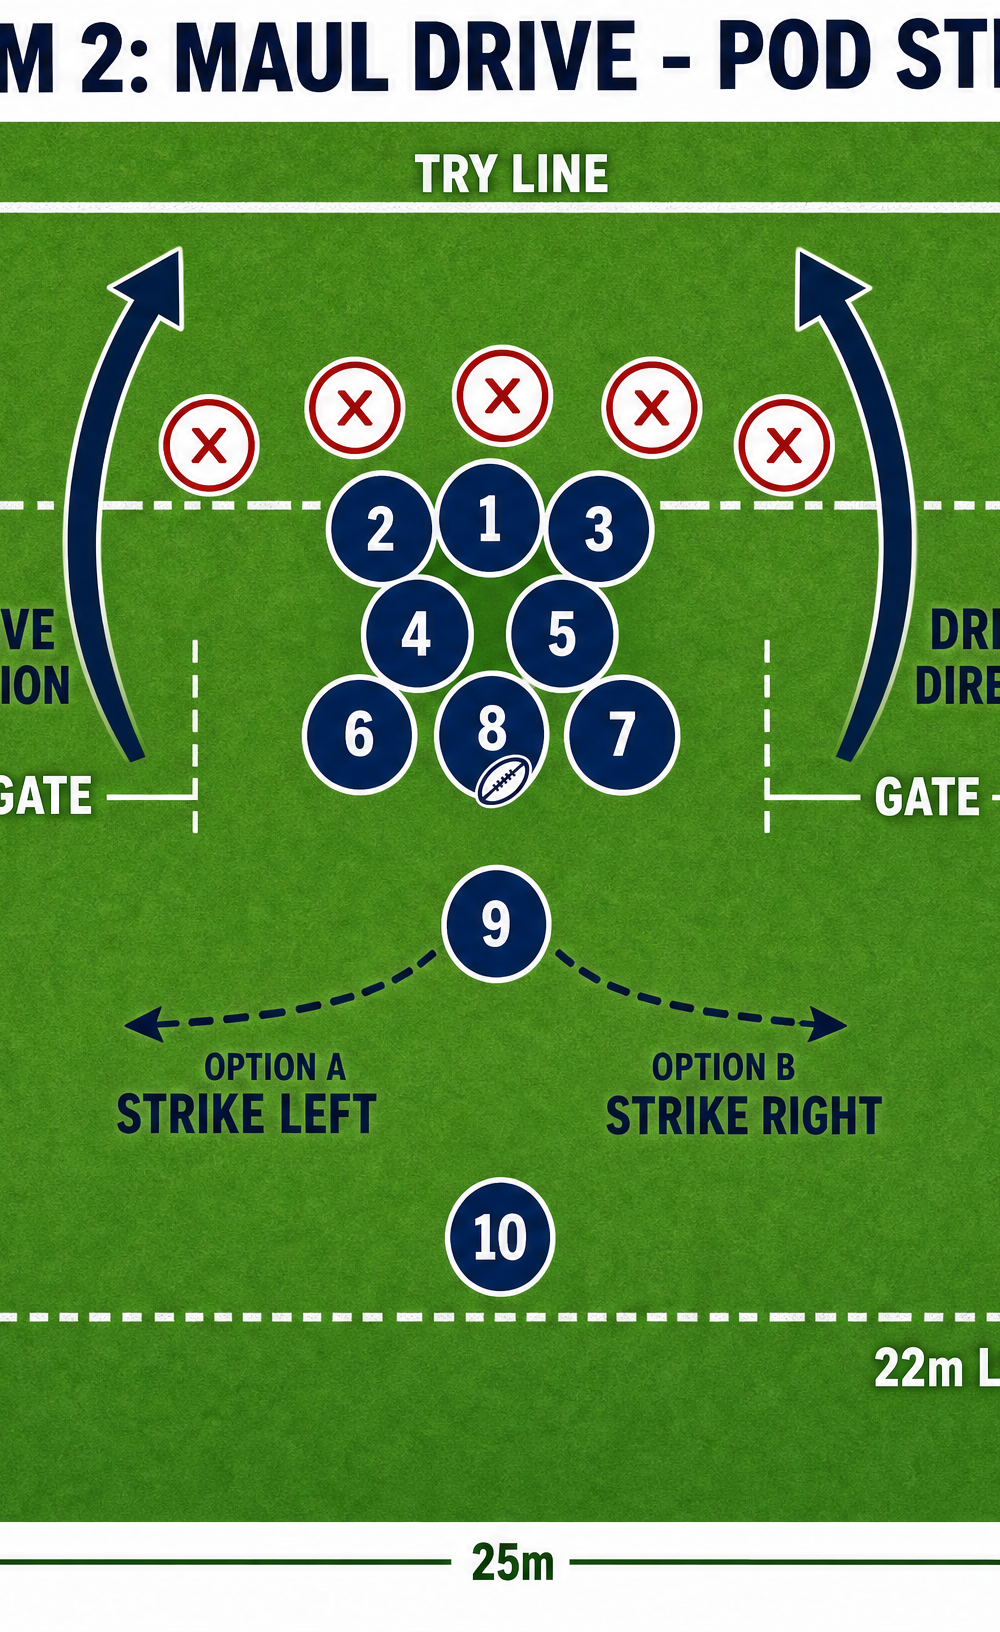
- The Exit: The Scrum-half (9) communicates with the Number 8. Based on the defense, the maul can continue to drive, or the 9 can call for a peel (left or right) or a quick pass out to the backs.
4. Key Coaching Points
- Body Height: "Low to high." Players must enter the maul with a low body position, driving upwards underneath the opposition's center of gravity.
- Tight Binding: "Shoulder to shoulder, hip to hip." There should be no daylight between the players in the maul. Loose binds allow defenders to swim through and collapse the structure.
- Synchronized Footwork: "Chop the feet." Long strides reduce power and balance. Players must use short, rapid steps, keeping their cleats engaged with the turf.
- Patience at the Back: The ball carrier at the back must be patient. Do not break away from the maul too early; let the forwards do the work to draw in defenders.
- Communication: The Scrum-half or the player at the back must act as the "driver," calling the direction and timing of the drive.
5. Common Mistakes
- High Body Position: Entering the maul standing upright makes it easy for defenders to hold the maul up or drive it backward.
- Joining Ahead of the Ball: Players joining the maul must enter from behind the hindmost foot. Joining from the side or ahead of the ball carrier will result in an offside penalty.
- Breaking the Bind: Players peeling off individually before the maul has established dominance weakens the structure and isolates the ball carrier.
- Slow Ball Transfer: Failing to move the ball to the back immediately leaves it vulnerable to being stripped or tied up by the opposition.
6. Variations & Progressions
- Progression 1: Live Defense: Remove the hit shields and introduce live, contested defense. Start with 5 defenders and gradually increase to a full 8-man pack.
- Progression 2: The Shift: Practice shifting the point of attack. On a call, the maul intentionally wheels slightly to one side to attack a weaker point in the defense.
- Variation: Open Play Transition: Instead of starting from a lineout, start the drill from a pick-and-go or a short crash ball in open play to practice forming a dynamic maul on the move.
7. Age Adaptations
- Under 10/12: Focus purely on the safety aspects: low body height, keeping the head up, and safe binding. Do not introduce contested driving. Use tackle bags instead of live defenders.
- Under 14: Introduce 3v3 or 5v5 contested mauling in a controlled environment. Emphasize the legal entry points (through the gate) and the transfer of the ball to the back.
- Under 16/Open: Full 8v8 contested mauling. Focus on advanced tactics like the "shift" drive, peeling off the back, and reading the defensive setup.