Football
Goal-Kick Build-Up: Draw, Fix and Release Beyond the First Press
A coach-ready goal-kick build-up pattern that uses width, a moving pivot and a measured release pass to break the first line of pressure.
What you need
1 full-size goal, 10–14 footballs, 20–24 flat cones, two sets of bibs, stopwatch
Goal-Kick Build-Up: Draw, Fix and Release Beyond the First Press
1. Overview
This is a goal-kick build-up pattern for a team that wants to play through the first line of pressure rather than give the ball away early. The aim is not merely to complete the first pass. It is to use the goalkeeper and centre backs to invite the press, fix the nearest opponent, then release a fullback or number 6 with time to face forward. The team should progress beyond the opponent’s first line within two or three passes.
Use the pattern when the opposition leaves two or three players high and presses the defensive third. It is particularly useful against a front three that closes the centre backs while briefly leaving a fullback or pivot free. Under Law 16, a goal kick may be taken from anywhere in the goal area and opponents must remain outside the penalty area until the ball is in play; build the practice around that opening picture.1
2. Setup
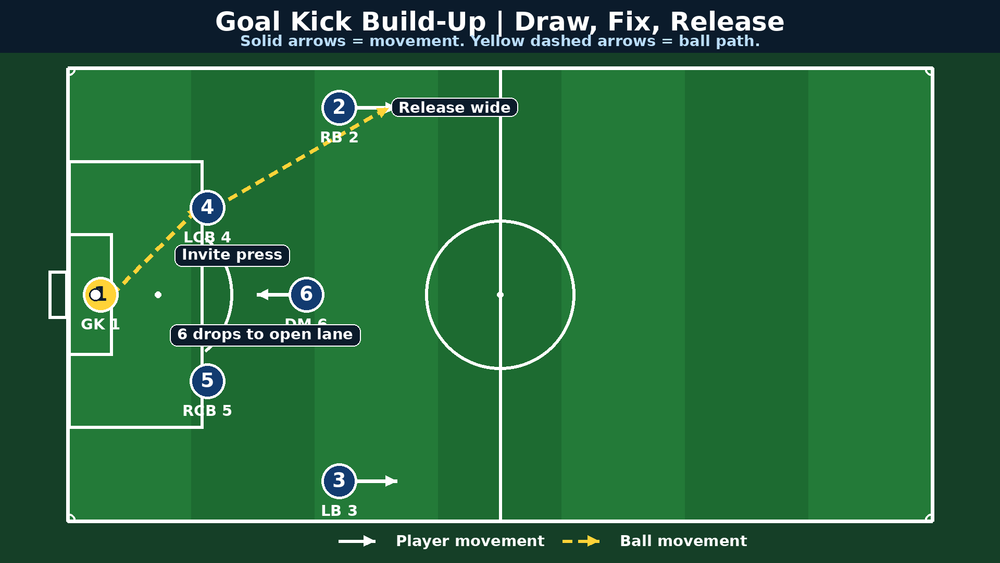
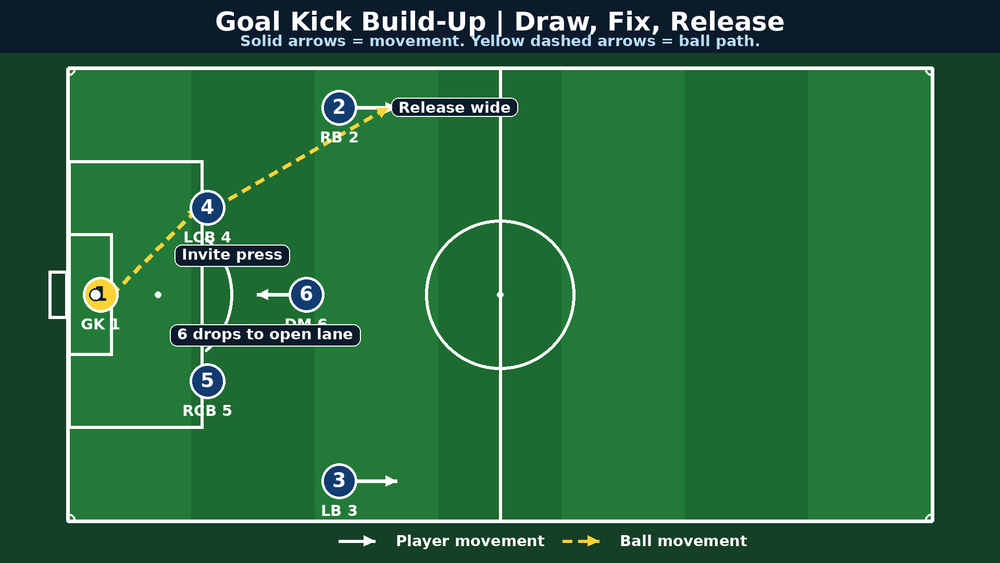
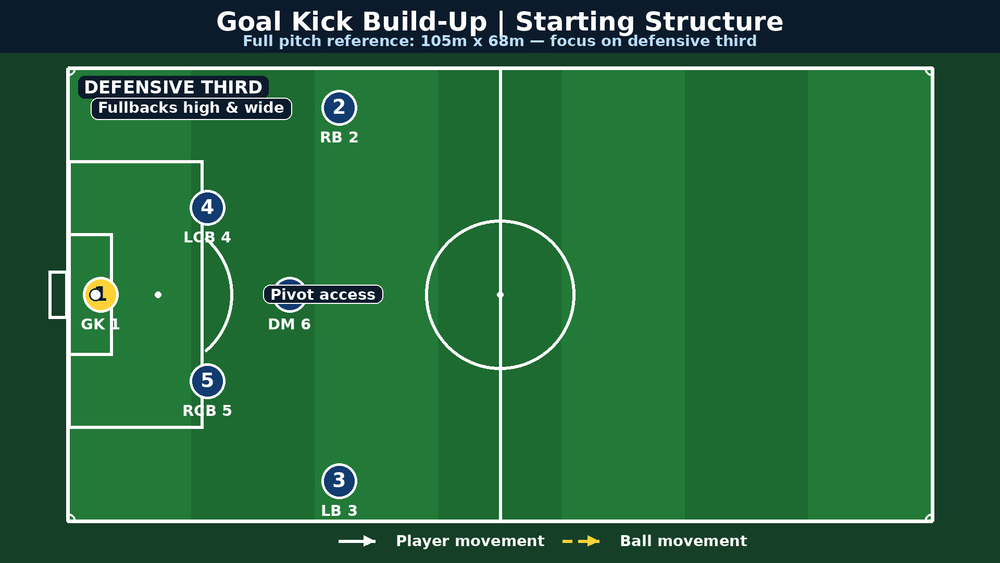
Use a full-pitch reference of 105m x 68m, within the recommended working range of 100–110m by 64–75m. Mark a 45m x 68m defensive-third practice area from the goal line to just beyond the first third. For a phase of play, use 11 attackers versus 6–8 pressing defenders. For a unit practice, use the goalkeeper, back four and number 6 against three or four pressers. Prepare one goal, 10–14 balls, 20–24 flat cones, two colours of bibs and a stopwatch.
| Position | Number | Starting reference | Primary job |
|---|---|---|---|
| Goalkeeper | 1 | In the six-yard area, 3–5m from the ball | Scan, name the free side and play the first secure pass. |
| Centre backs | 4 and 5 | On opposite edges of the penalty area | Split the first line, receive side-on and attract pressure. |
| Fullbacks | 2 and 3 | 8–12m beyond the penalty area, close to touchlines | Give maximum width and become the release option. |
| Defensive midfielder | 6 | 8–12m in front of the centre backs | Connect the build-up, then drop or move away to open a lane. |
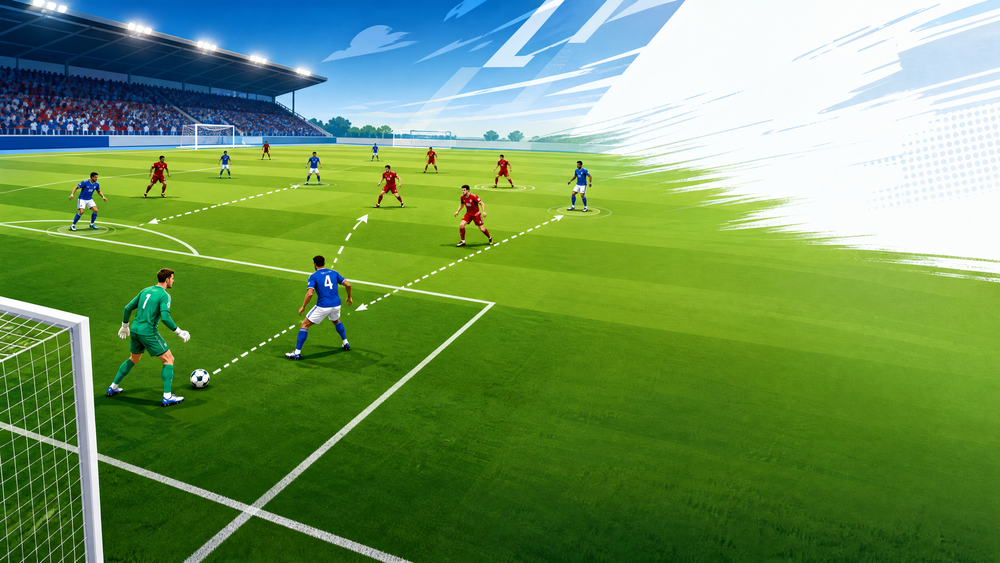
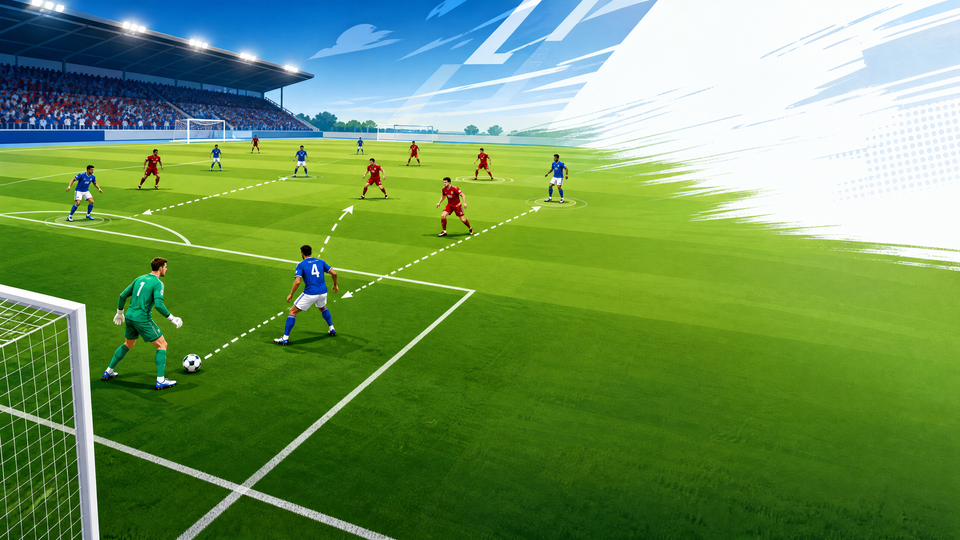
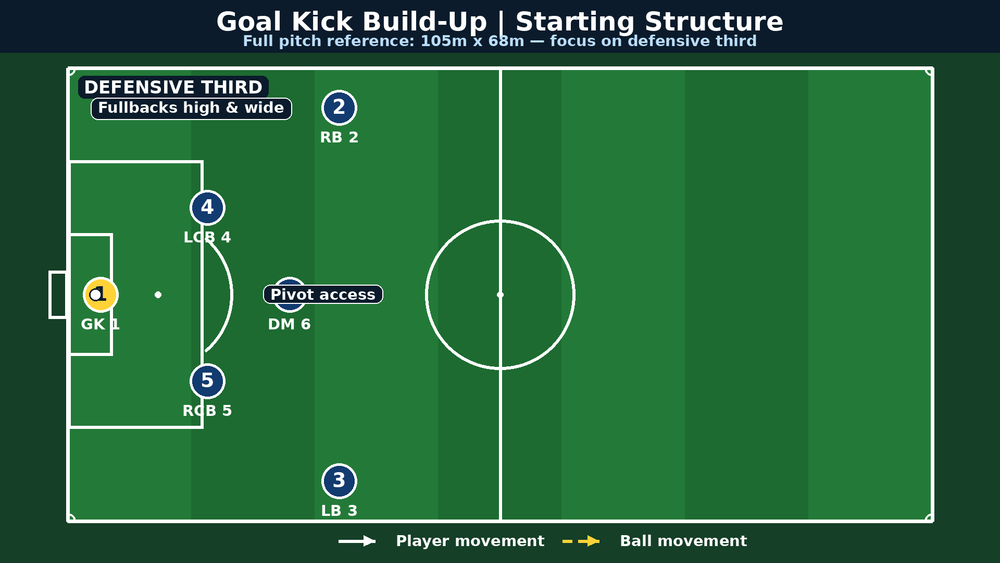
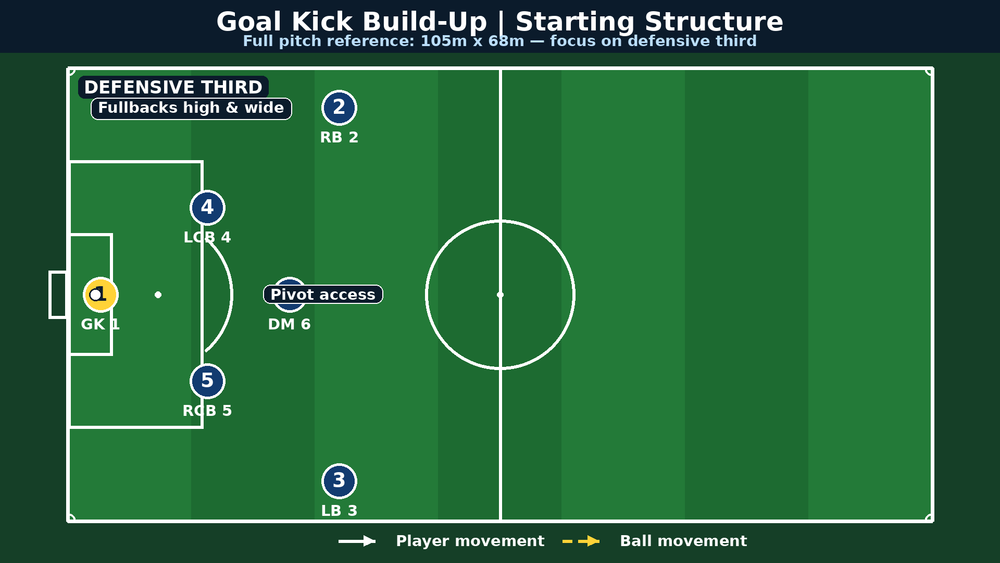
Keep centre backs 18–22m apart. Place fullbacks 10–15m wider than the centre backs and high enough to force a long closing run by the wide presser. Number 6 begins central but must not share the same vertical line as either centre back. Before each restart, identify the intended first release. Here the ball travels 1–4–2, but players must scan and switch if the press removes that route.
3. Step-by-Step Instructions
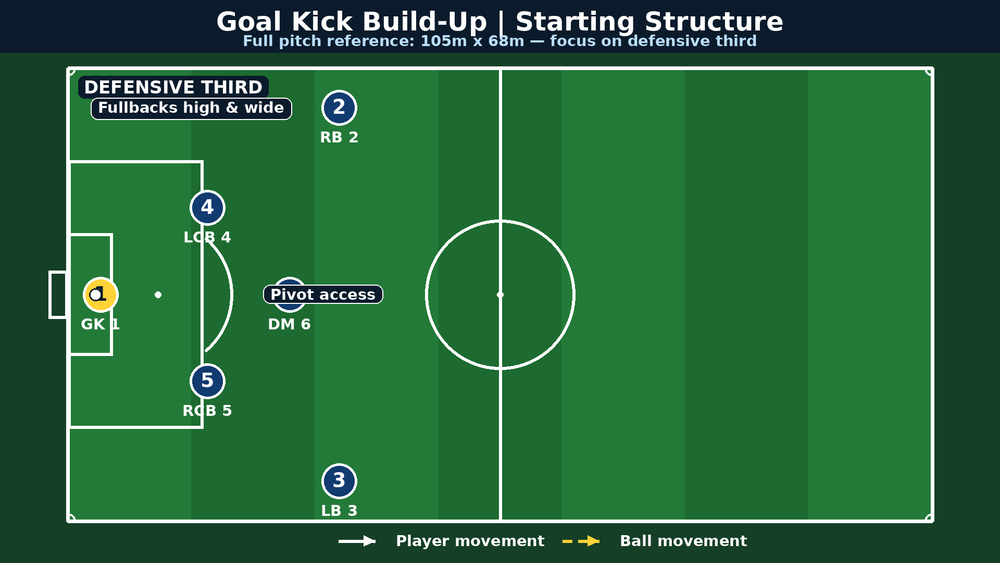
Set the picture before the whistle. Goalkeeper 1 puts the stationary ball in the goal area. Centre backs 4 and 5 split to the penalty-area corners; fullbacks 2 and 3 take wide reference positions; number 6 checks both shoulders in the central pocket. The unit must be calm, side-on and ready before 1 starts the action.
Read the press and name the free player. Goalkeeper 1 scans left, centre and right, then calls “Four”, “Five” or “Six”. The opposite centre back gives a supporting angle as the safety pass. Do not pass to a player whose body is closed to the field and who cannot see a next action.
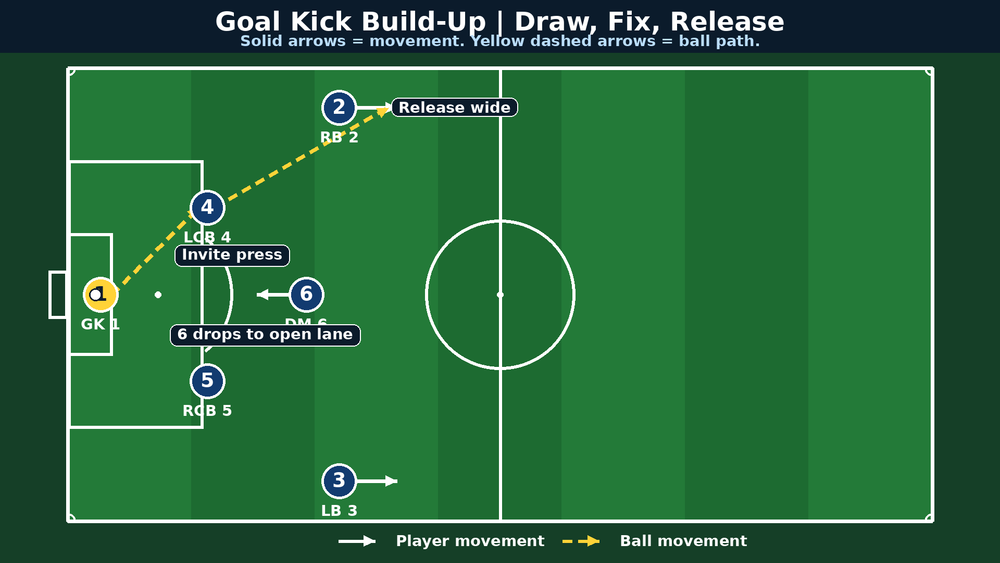
Create the central trigger. As 1 moves to strike the ball, number 6 takes two or three short steps toward or away from the ball according to the marker. The aim is to draw the opponent’s number 10 or widen the space around 4, not necessarily to receive.
Play the first pass with purpose. Goalkeeper 1 plays a firm ground pass into centre back 4’s front foot. Aim the ball 0.5–1m ahead of the back foot, so that 4 can take the first touch forward or out toward the fullback.
Draw and fix the first presser. Centre back 4 takes a positive 2–4m touch into the space in front. The player holds the ball just long enough for the pressing forward or winger to commit, protects it with the body and sees the approach on the near shoulder.
Release wide or use the pivot. When the presser commits, 4 plays a sharp pass into fullback 2’s front foot. Fullback 2 opens to face upfield and takes the first touch away from the line. If the wide lane is blocked, 4 plays to the dropping 6, who sets the ball first time into 2 as the third player. Repeat the same pattern through 5 and 3 on the other side.
Secure the next phase. Once 2 receives, the nearest number 8 or winger supports inside and ahead. Ask, “Can we play forward?” If not, recycle through 6 or 4 rather than forcing the vertical pass. The action is complete when the team carries, passes or receives beyond the 45m line under control.
Run 6–8 repetitions to one side, then reverse it. Start with passive pressure to establish distances. Progress to live defenders who score one point for a regain and shot within eight seconds; attackers score one point for advancing into the next third with control. This creates a real decision rather than a rehearsed sequence.
4. Key Coaching Points
Create width before the ball moves. If fullbacks 2 and 3 stay close to the centre backs, their passing angles vanish and the press stays compact.
Receive with an open body. Centre backs and fullbacks must arrive side-on with the back foot ready to take the ball forward. Demand two scans: one before the pass and one as it travels.
Use the goalkeeper as an outfield player. Goalkeeper 1 should move 3–6m to create the correct line and communicate the free side early. A return pass to 1 is a useful switch mechanism, not failure.
Make the press travel. The centre back’s positive first touch is tactical. A backward touch keeps the opponent comfortable; a forward touch makes the opponent commit and opens the release lane.
Pass into the next action. Deliver to the receiver’s front foot whenever possible, allowing 2, 3 or 6 to play forward in the next touch rather than stopping to reset.
5. Common Mistakes
| Common error | What it looks like | Immediate correction |
|---|---|---|
| Centre backs remain narrow | The first pass enters traffic inside the box. | Reset 4 and 5 on penalty-area edges before every repetition. |
| Number 6 hides behind a marker | The goalkeeper cannot see a central option. | Cue “show–move–show”: appear, move the marker, reappear. |
| Fullback receives flat-footed on the line | The first touch goes backwards or out. | Start 2m inside the line and cue an open body. |
| Centre back releases too early | The presser recovers to stop the wide pass. | Demand one positive touch that fixes the presser. |
| Players force a vertical pass | Possession is lost after breaking the first line. | Reward secure circulation and the switch. |
6. Variations & Progressions
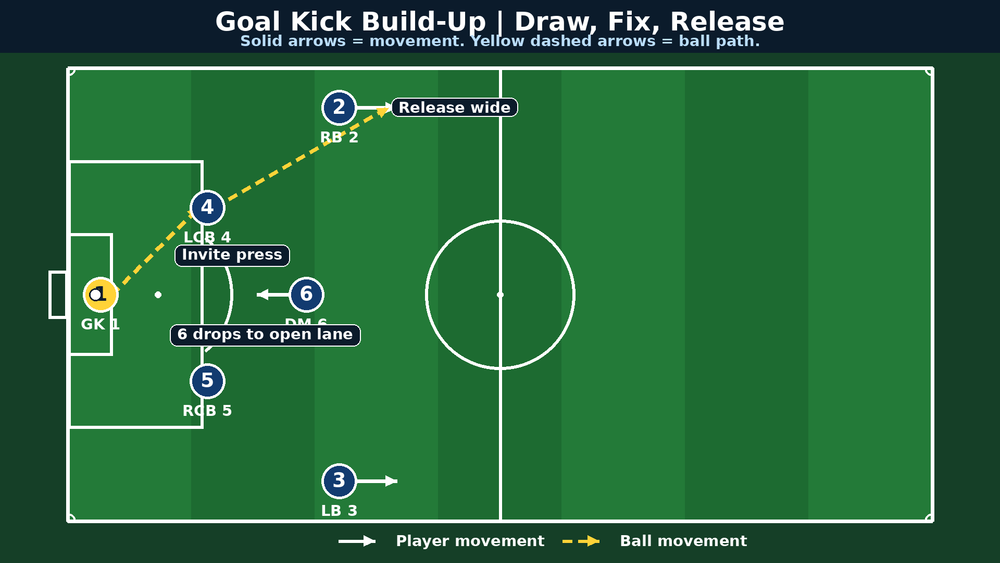
Bounce-pass variation. If the opposition winger locks onto the fullback, 4 passes into 6, who uses one touch to set 2. This third-player combination is valuable when the front line presses aggressively but the midfield screen recovers slowly.
Goalkeeper-switch variation. If the press overloads the left, 1 plays to 4, receives the return and switches to 5. Coach 1 to move diagonally before receiving so the return pass does not trap them on the goal line.
Harder progression. Play 7v7 plus goalkeeper in the 45m x 68m area. Start every action from a goal kick. Award two points for entering the next third through a controlled pass or carry and one point for a successful switch. Award defenders two points for a regain followed by a shot within eight seconds.
7. Age Adaptations
For Under 8–Under 10, use a 30m x 40m area with a goalkeeper, two defenders and two wide players. Remove live pressure initially and teach the language “wide, open, pass, move.” Prioritise confidence over exact spacing.
For Under 12–Under 14, use a 40m x 50m area with a goalkeeper, back four, number 6 and three pressers. Introduce the pivot’s movement to affect a marker, then add a delayed three-second press.
For Under 16–Open, use the full defensive-third area and real pressing cues. Demand goalkeeper scanning, clear calls, return passes and switches when the first option closes. Add transition scoring so the team connects brave build-up with disciplined rest defence.
Reference