

Football
The Quick Advantage Throw-In: Breaking the First Line of Pressure
A dynamic throw-in set play designed to bypass the opponent's initial pressing line using coordinated movement and decisive third-man runs.

What you need
Footballs, Flat markers, Cones, Bibs/Pinnies
The Quick Advantage Throw-In: Breaking the First Line of Pressure
A well-executed throw-in can instantly transition a team from a static restart into a dynamic attacking phase. The Quick Advantage Throw-In is designed to exploit the disorganized moments immediately following the ball going out of play. By utilizing coordinated movement, quick combinations, and decisive third-man runs, this set play bypasses the opponent's initial pressing line and opens up the attacking half-spaces.
This resource provides a comprehensive guide for coaches to implement this pattern, focusing on timing, spatial awareness, and decision-making under pressure. It is particularly effective in the middle third of the pitch, where opponents often compress the touchline to force turnovers.
Overview
The primary objective of this set play is to draw the opposition's defensive block toward the touchline and rapidly expose the space they vacate behind them. It relies on a synchronized three-player rotation involving the thrower (typically the Right Back or Left Back), a wide player (Winger or Wide Midfielder), and an interior support player (Central Midfielder or No. 10).
When executed correctly, it forces the opposing defenders to make immediate choices. If they track the initial movements, passing lanes open up internally. If they hold their positions, the thrower or wide player can receive the ball in isolation to turn and drive forward.
Setup and Positioning
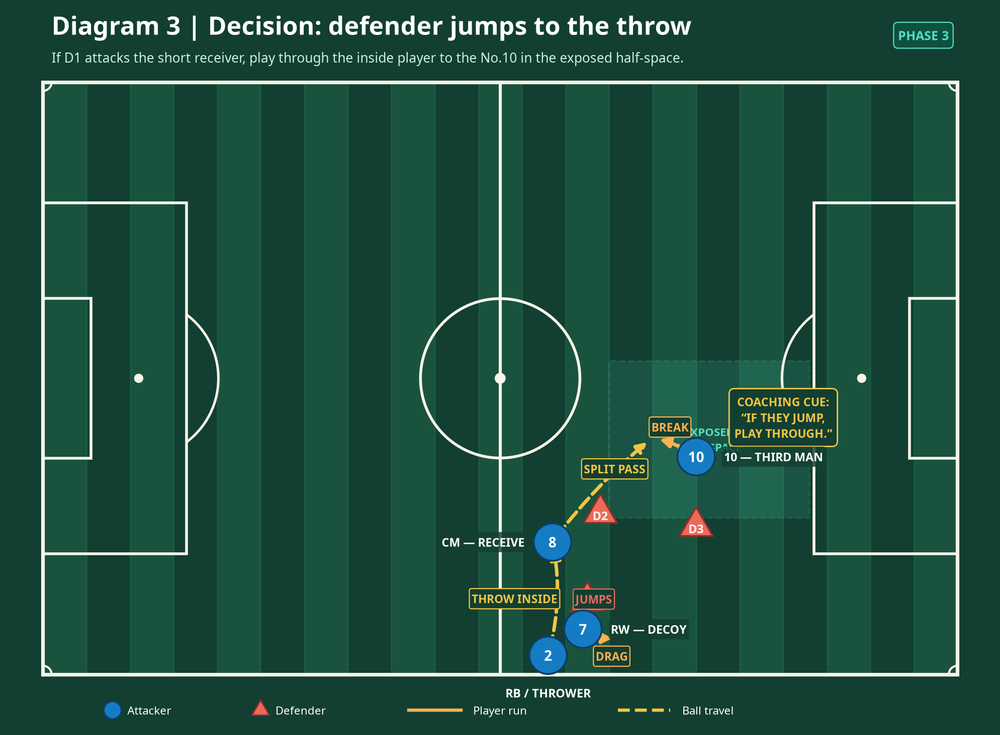
To effectively drill this pattern in training, coaches should set up a realistic match scenario on a standard 105m x 68m pitch.
Pitch Setup
Mark out a 30m x 20m playing area along the touchline, situated between the halfway line and the attacking third. Use flat markers or cones to define a "Quick-Advantage Corridor" near the touchline and an "Exposed Half-Space" positioned 15-20 meters centrally.
Player Roles
The play requires four key attacking roles, typically operating against three active defenders to simulate a localized overload:
- The Thrower (RB/LB): Initiates the play and immediately transitions into a dynamic attacking runner.
- The First Option (RW/LW): Makes the primary checking run to drag the closest defender and either receive the ball or act as a decoy.
- The Bounce Player (CM): Provides the crucial inside support angle to receive and quickly distribute the ball.
- The Third Man (No. 10 / Striker): Positions higher up the pitch to pin the defensive line and exploit the space created by the initial movements.

Step-by-Step Instructions
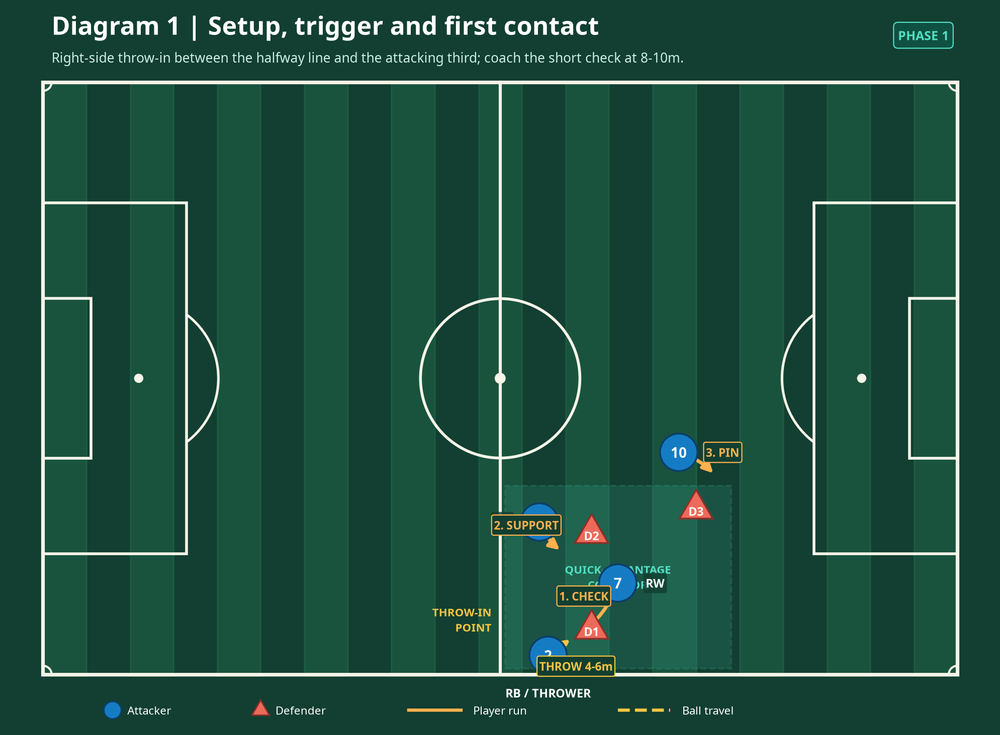
The success of this set play hinges on the precise timing of movements and the speed of the ball circulation.
Phase 1: Trigger and First Contact
The sequence begins the moment the thrower approaches the touchline.
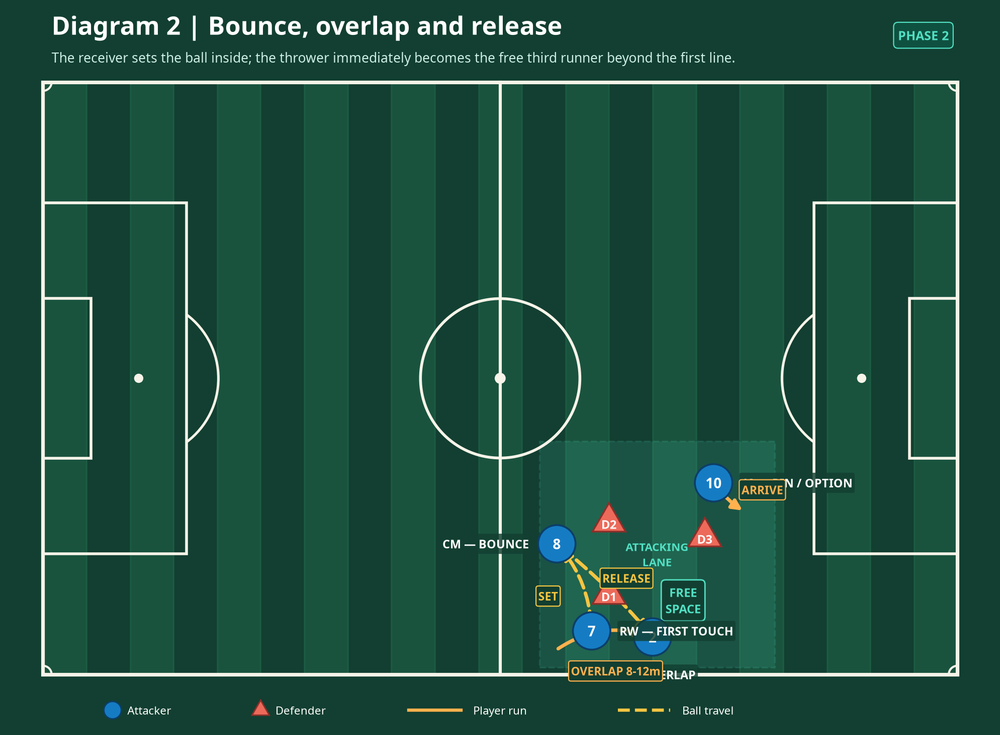
- The Check: The wide player (RW) makes an aggressive, short checking run toward the thrower, arriving at a distance of 8-10 meters. This movement is designed to drag the opposing full-back (D1) out of position.
- The Support: Simultaneously, the central midfielder (CM) drifts into the inside channel, providing a secondary passing option slightly deeper than the wide player.
- The Pin: The No. 10 positions themselves higher up, pinning the opposing center-backs and preventing them from stepping up to close the space.
- The Throw: The thrower delivers a firm, flat throw to the feet of the intended receiver.
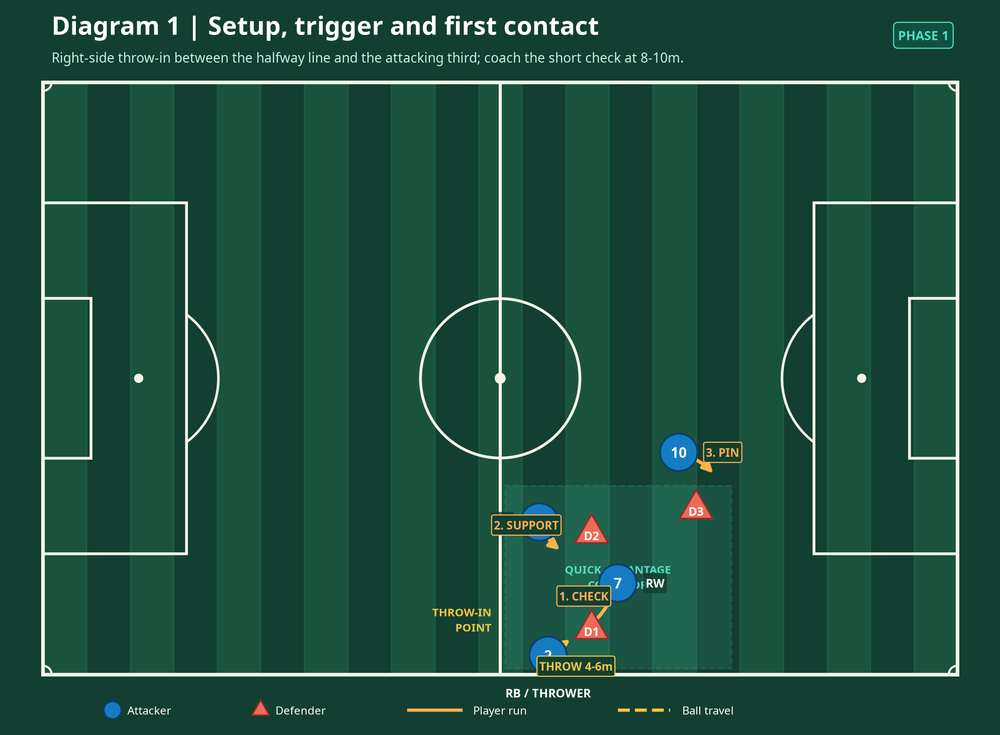
Phase 2: Bounce, Overlap, and Release
Once the ball is in play, the objective shifts to rapid progression.
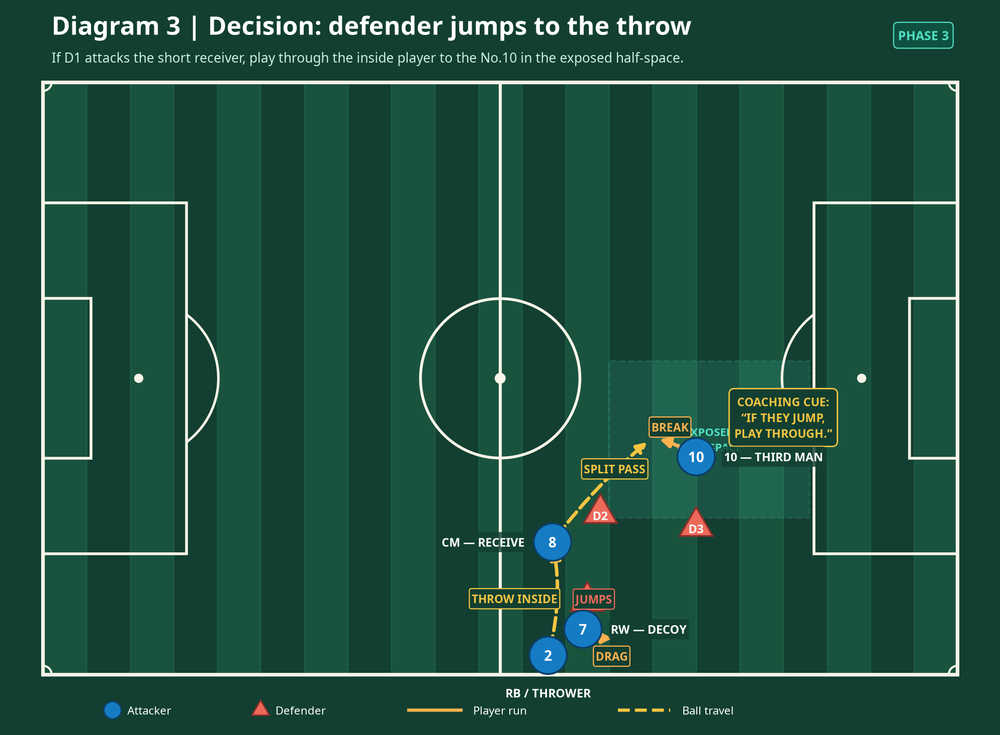
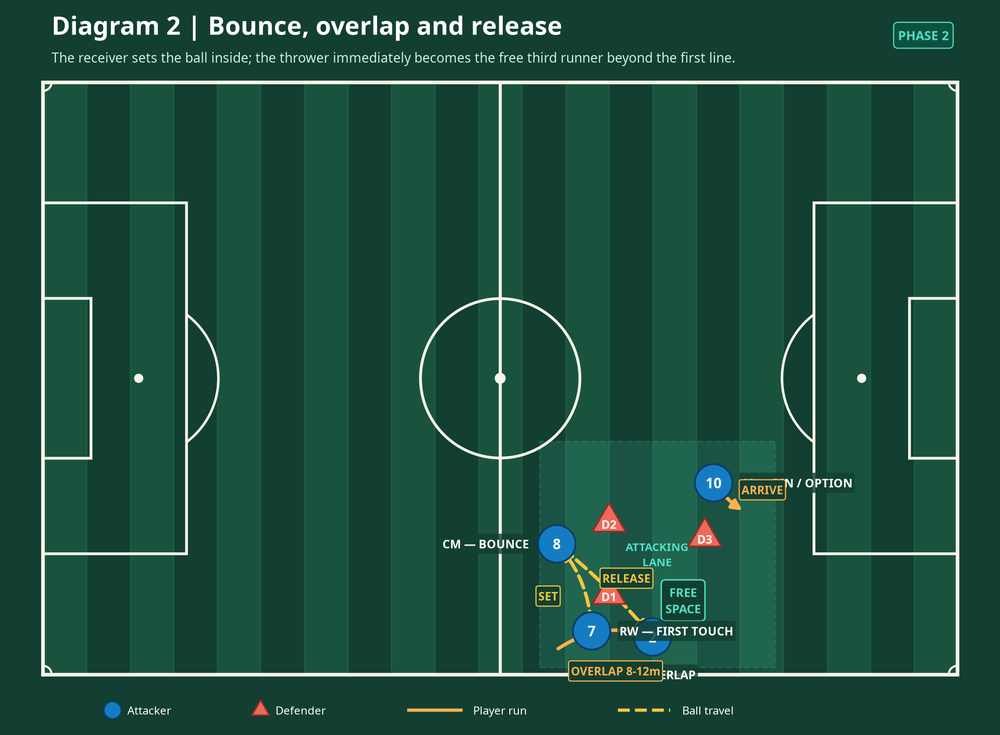
- The Set: If the throw goes to the wide player, they immediately play a one-touch bounce pass inside to the supporting central midfielder.
- The Overlap: The moment the ball leaves their hands, the thrower sprints onto the pitch, making an overlapping run into the space vacated by the wide player.
- The Release: The central midfielder receives the bounce pass and instantly plays a weighted through ball into the path of the overlapping thrower, bypassing the initial defensive pressure.
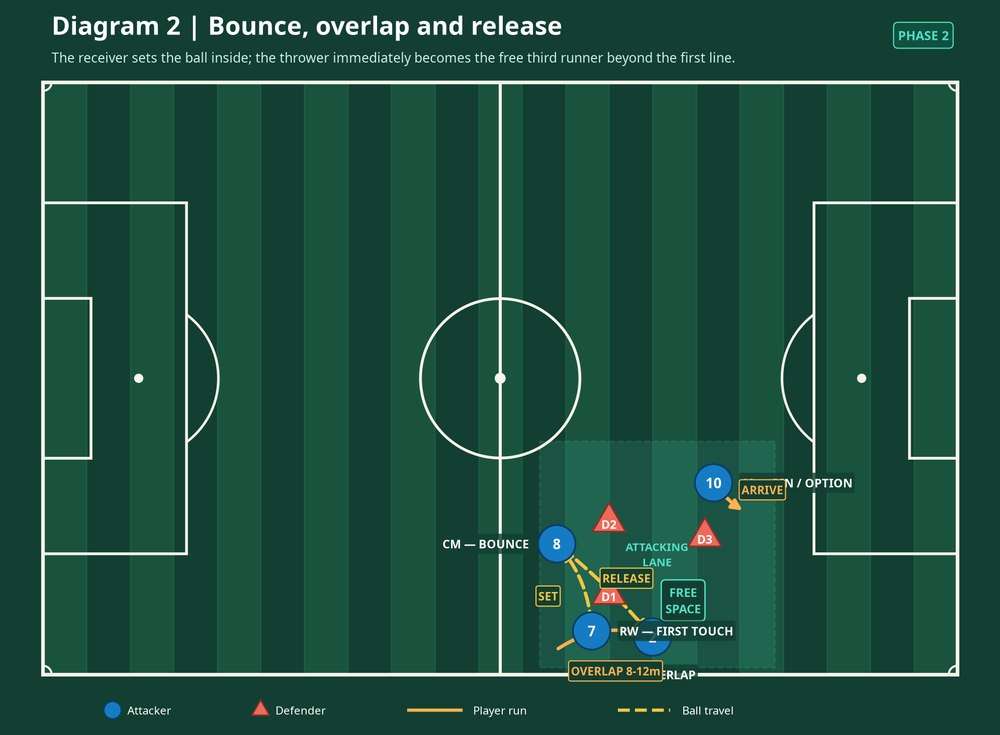
Phase 3: Decision-Making Under Pressure
Defenders will not always react predictably. The attacking players must read the defensive response and adjust accordingly.
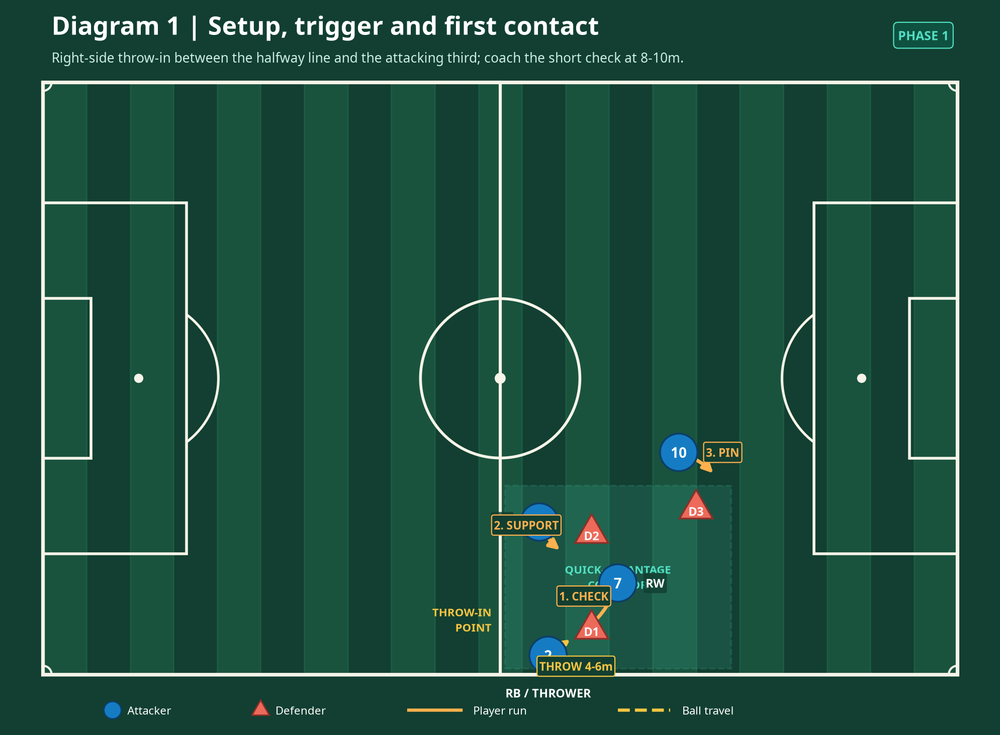
- The Defender Jumps: If the opposing full-back (D1) aggressively jumps to intercept the throw to the wide player, the thrower must recognize this trigger.
- The Inside Option: Instead of forcing the ball to the marked wide player, the thrower directs the ball inside to the central midfielder.
- The Split Pass: The central midfielder receives the ball on the half-turn and immediately plays a split pass through the disorganized defensive line to the No. 10, who breaks into the exposed half-space.
Key Coaching Points
To ensure the team executes this play consistently during matches, coaches should emphasize the following critical details during training sessions:
- Urgency is Paramount: The play must be initiated before the opposition has time to establish their defensive shape. The thrower should retrieve the ball quickly and look to play immediately.
- Quality of the Throw: The throw must be treated as a pass. It should be firm, flat, and aimed directly at the receiver's preferred foot to facilitate a clean first touch. Looping throws give defenders time to recover.
- Timing the Movements: The checking runs must be synchronized with the thrower's readiness. If players move too early, they kill the space; if they move too late, the passing lanes will be closed.
- The Thrower's Transition: The thrower cannot admire their pass. The instant the ball is released, they must aggressively step onto the pitch to become an active attacking option.
Common Mistakes
When introducing this set play, coaches will often observe several recurring errors. Identifying and correcting these early will accelerate the learning process.
- Static Throwing Stance: Throwers often stand flat-footed after releasing the ball. This eliminates the numerical advantage and stalls the attack. Encourage the thrower's momentum to carry them onto the pitch.
- Showing Too Early: Receivers who check toward the ball before the thrower is ready allow defenders to anticipate the play and close the distance prematurely.
- Poor Body Shape on the Bounce: The central midfielder must receive the ball with an open body shape, allowing them to see both the incoming pass and the intended target for the release. Receiving square to the touchline limits their options.
Variations and Progressions
Once the team has mastered the basic pattern, introduce variations to keep the opposition guessing and increase the cognitive load on the players.
- The Underlap: Instead of overlapping down the touchline, the thrower makes an aggressive underlapping run through the inside channel, while the wide player holds the width. This variation is particularly effective against teams that defend narrowly.
- The Direct Switch: If the opposition heavily overloads the ball-side touchline to stop the quick combination, the central midfielder can receive the bounce pass and immediately play a long diagonal switch to the opposite flank, exploiting the weak-side space.
Age Adaptations
This set play can be modified to suit the developmental stage and technical proficiency of the players.
- Youth Levels (Under-10 to Under-12): Focus entirely on the mechanics of a legal, accurate throw-in and the concept of the immediate checking run. Remove the third-man combination and simply encourage the thrower to get the ball to a teammate's feet and step onto the pitch.
- Intermediate Levels (Under-14 to Under-16): Introduce the bounce pass and the overlapping run. Emphasize the speed of play and the quality of the first touch under pressure.
- Advanced Levels (Under-18 to Open): Implement the full pattern, including the decision-making phase based on the defender's reaction. Focus on the subtle details: body shape, disguised movements, and the precise weighting of the final release pass.
