Mastering the Maul: Formation, Drive, and Dominance
A comprehensive guide to building, driving, and executing a devastating attacking maul to dominate the opposition forward pack.

Equipment Needed
1. Overview
The maul is one of the most potent attacking weapons in modern rugby. When executed correctly, it forces the opposition to commit multiple defenders, draws penalties, and creates a platform for both direct scoring and wide attacking play. This drill is designed to teach the fundamental mechanics of maul formation, the sequence of player arrivals, and the coordinated drive necessary to overpower the defense.
Coaches should use this drill to instill discipline, timing, and physical dominance in their forward pack. It is particularly effective when preparing for matches against teams with a strong set-piece or when looking to establish physical superiority early in the game.
2. Setup
Pitch Area: A 20m x 20m grid, ideally marked between the 22m and 5m lines to simulate realistic attacking scenarios.
Equipment: 1 Rugby ball, 4-6 tackle shields or hit shields (for defenders), cones to mark the grid.
Players: 8 Attacking forwards (Numbers 1-8), 1 Scrum-half (Number 9), 4-6 Defenders holding shields.
Player Positions
- Ball Carrier: Initiates contact.
- Binders (Flankers 6 & 7): Secure the ball carrier and provide initial width.
- Driver/Ripper (Number 8): Secures the ball and anchors the back of the maul.
- Power Drivers (Locks 4 & 5): Provide the main forward thrust.
3. Step-by-Step Instructions

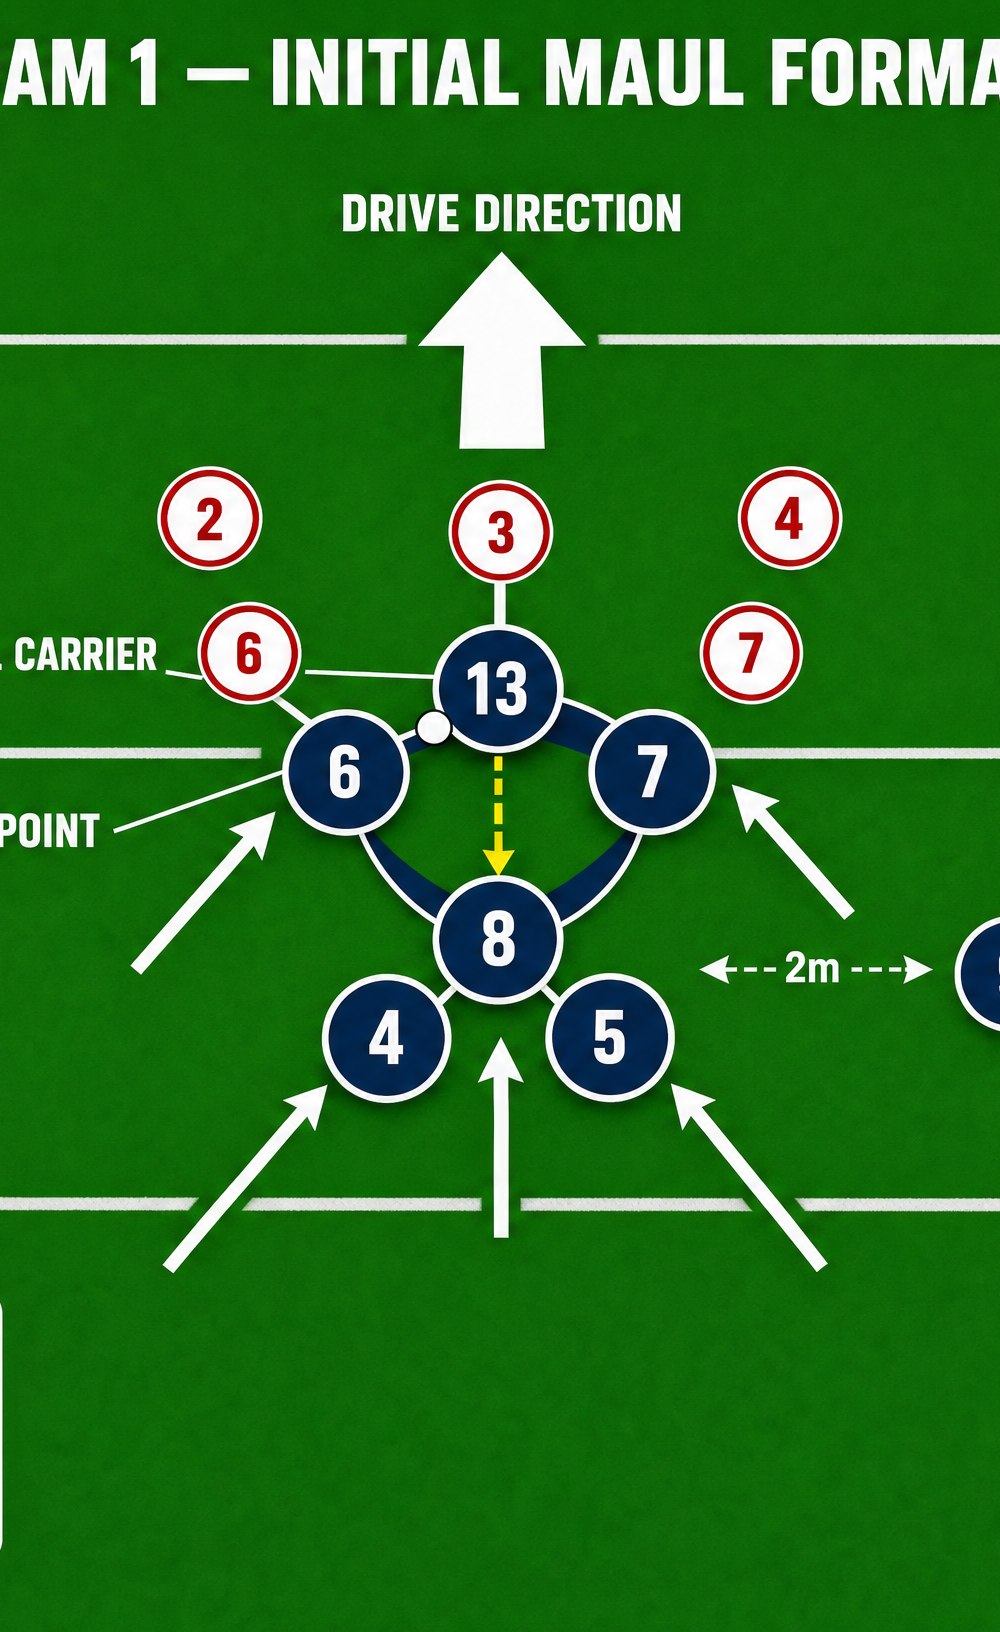
- Initiate Contact: The Ball Carrier takes the ball into contact against a defender holding a shield. The carrier must stay on their feet, turn their back to the opposition, and present the ball securely.
- First Arrivers (The Bind): The two flankers (6 and 7) arrive simultaneously. They bind tightly onto the Ball Carrier's hips or torso, securing the player and establishing the front wall of the maul.
- The Rip and Anchor: The Number 8 arrives immediately behind the Ball Carrier. The 8 rips the ball from the carrier and anchors themselves at the back, securing possession away from the opposition.
- The Power Drive: The two locks (4 and 5) arrive and bind onto the hips of the flankers and the Number 8. They must keep their body positions low, with flat backs and driving legs.
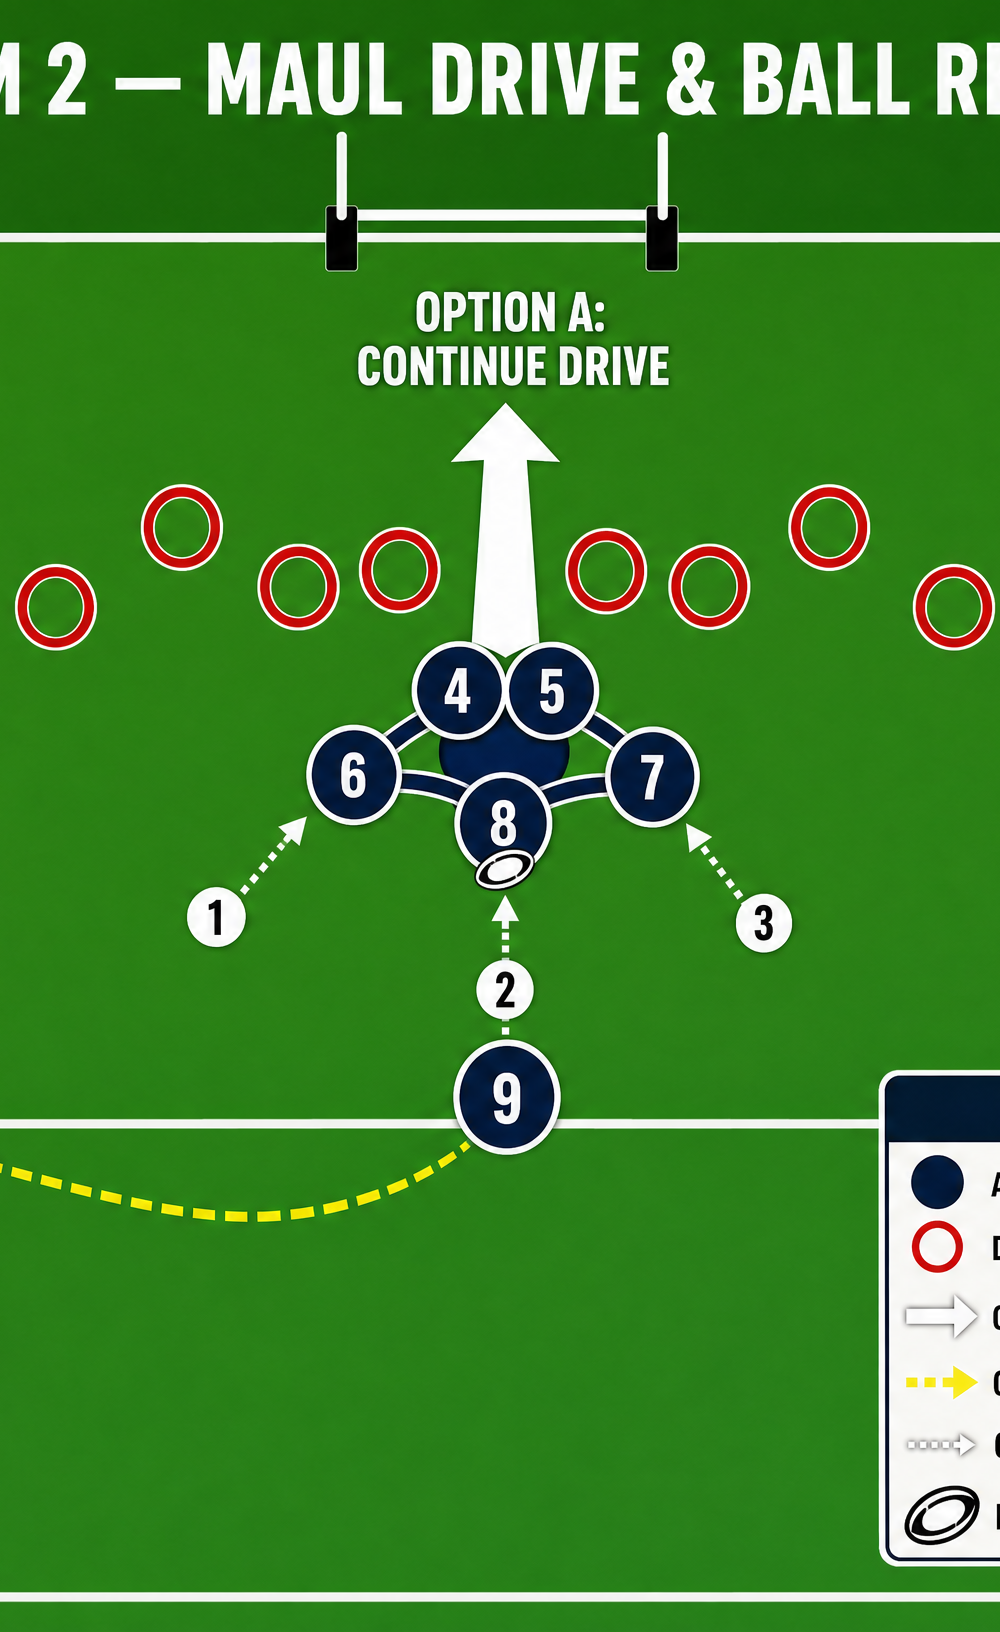
- The Coordinated Push: On the call of the Number 8 or the Scrum-half, the entire pod drives forward in unison, taking short, powerful, synchronized steps.
- Decision Making (Recycle or Continue): As the maul drives forward, the Scrum-half (9) communicates with the Number 8. If the maul stalls, the 9 calls for the ball to be recycled wide (Option B). If the momentum continues, the drive is sustained toward the try line (Option A).
4. Key Coaching Points
- Stay Square and Low: All players must maintain a low body height with their shoulders above their hips and backs flat. Driving upwards will cause the maul to collapse or be turned over.
- Tight Binding: The strength of the maul comes from the tightness of the binds. Players must bind onto bodies, not jerseys, to ensure maximum power transfer.
- Synchronized Footwork: The drive must be coordinated. Players should take short, choppy steps together rather than long strides, which can break the formation.
- Ball Security: The ball must be moved to the back of the maul as quickly as possible. The player at the back must protect it with their body and be ready to distribute.
5. Common Mistakes
- Arriving Too High: Players entering the maul upright lose power and are easily counter-driven or stripped of the ball.
- Loose Binding: Failing to bind tightly allows defenders to splinter the maul and isolate the ball carrier.
- Disconnecting from the Drive: Players pushing individually rather than as a cohesive unit reduces the overall force and makes the maul vulnerable to collapsing.
- Slow Ball Transfer: Leaving the ball at the front of the maul exposes it to turnovers and disrupts the momentum of the drive.
6. Variations & Progressions
- Add Defenders: Gradually increase the number of defenders with shields, then progress to live, full-contact defending to increase the challenge.
- Dynamic Start: Instead of a static start, have the ball carrier receive a pass on the run before initiating contact, simulating a lineout catch and drive.
- Directional Changes: Call out directions (e.g., "Left!", "Right!") during the drive to force the maul to adjust its angle while maintaining structure.
7. Age Adaptations
- Under 10s / Under 12s: Focus purely on the safety of the body position and the mechanics of the bind. Do not emphasize the drive. Use walking pace and soft pads.
- Under 14s / Under 16s: Introduce the concept of the coordinated drive and ball transfer. Emphasize communication and timing. Limit the number of defenders to ensure success.
- Open / Seniors: Full progression. Incorporate complex lineout calls, live defending, and rapid decision-making at the back of the maul.