

Netball
Baseline Triangle: Attacking Baseline Throw-In
A coach-ready baseline throw-in that creates a safe first pass, a GA re-offer, and a late front-space finish for the GS.

What you need
1 regulation Netball, Full Netball court (30.5m x 15.25m), 2 goal posts, 8–10 flat cones, Two sets of positional bibs, Whistle and session timer
1. Overview
Baseline Triangle is an attacking baseline throw-in designed to win the release pass, create a controlled second pass, and finish with a front-space feed to the Goal Shooter (GS). Use it after an attacking-end baseline exit. GA’s hierarchy is simple: WA first, C second, reset rather than force—not a hero ball to the post.
A regulation court is 30.5 m x 15.25 m with transverse lines dividing it into thirds, a 0.9 m centre circle, and goal circles of 4.9 m radius.1 Rule first: the player taking a goal-line throw-in must stand outside the court with at least one foot within 15 cm of the line, pass into the goal third, and must not enter the court—including the line—until the ball has been released.2 Build that legal starting habit before you add pace.
Play objective: Use GS’s clear to move GK, use WA’s V-cut to win the release, then use GA’s re-offer to feed GS late into front space.
2. Setup
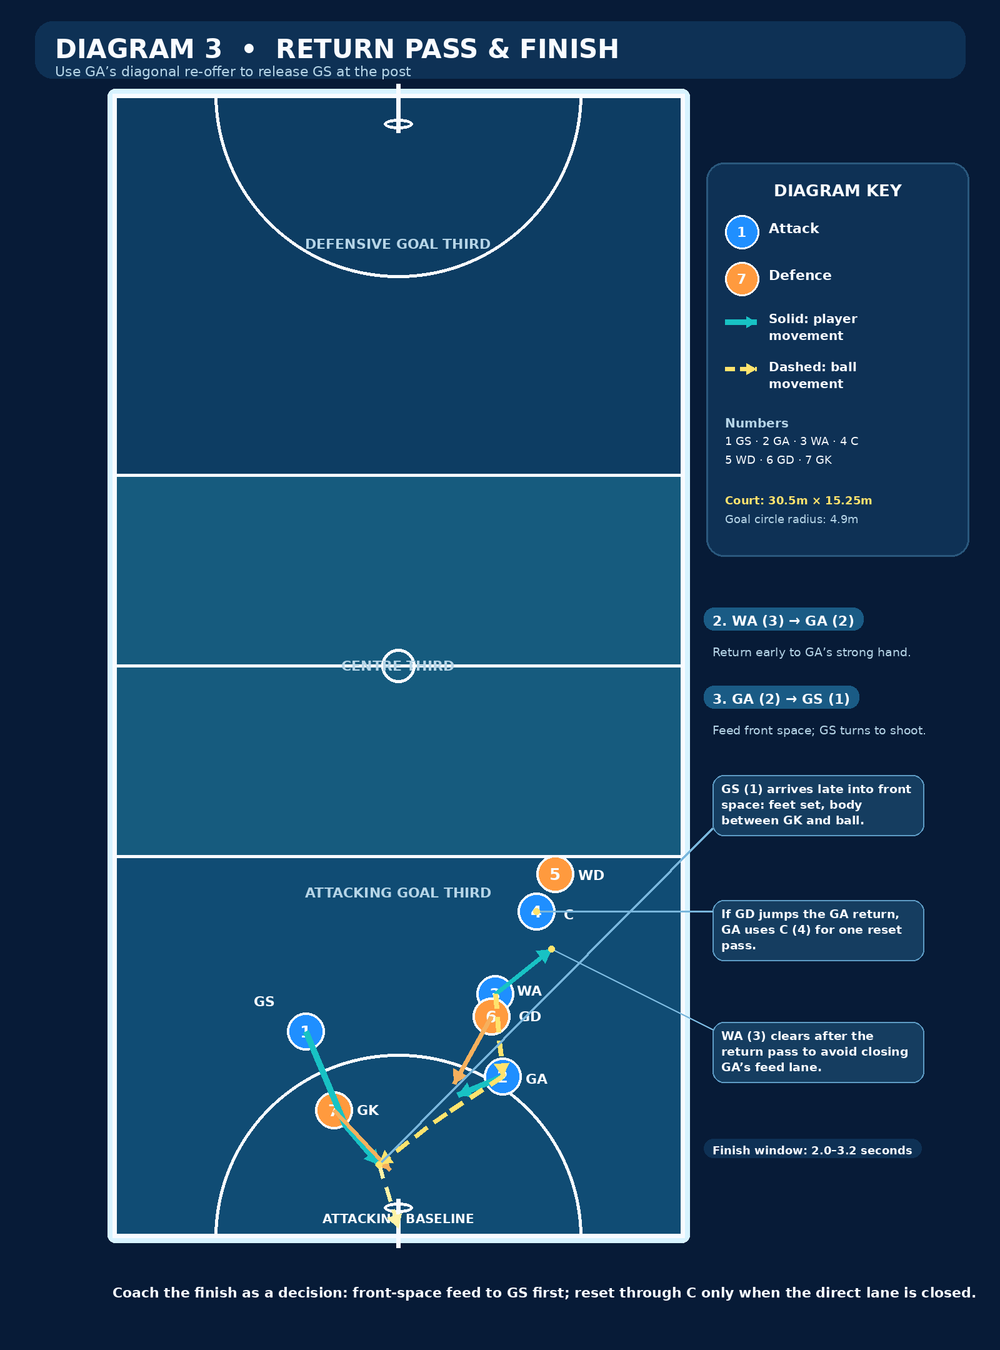
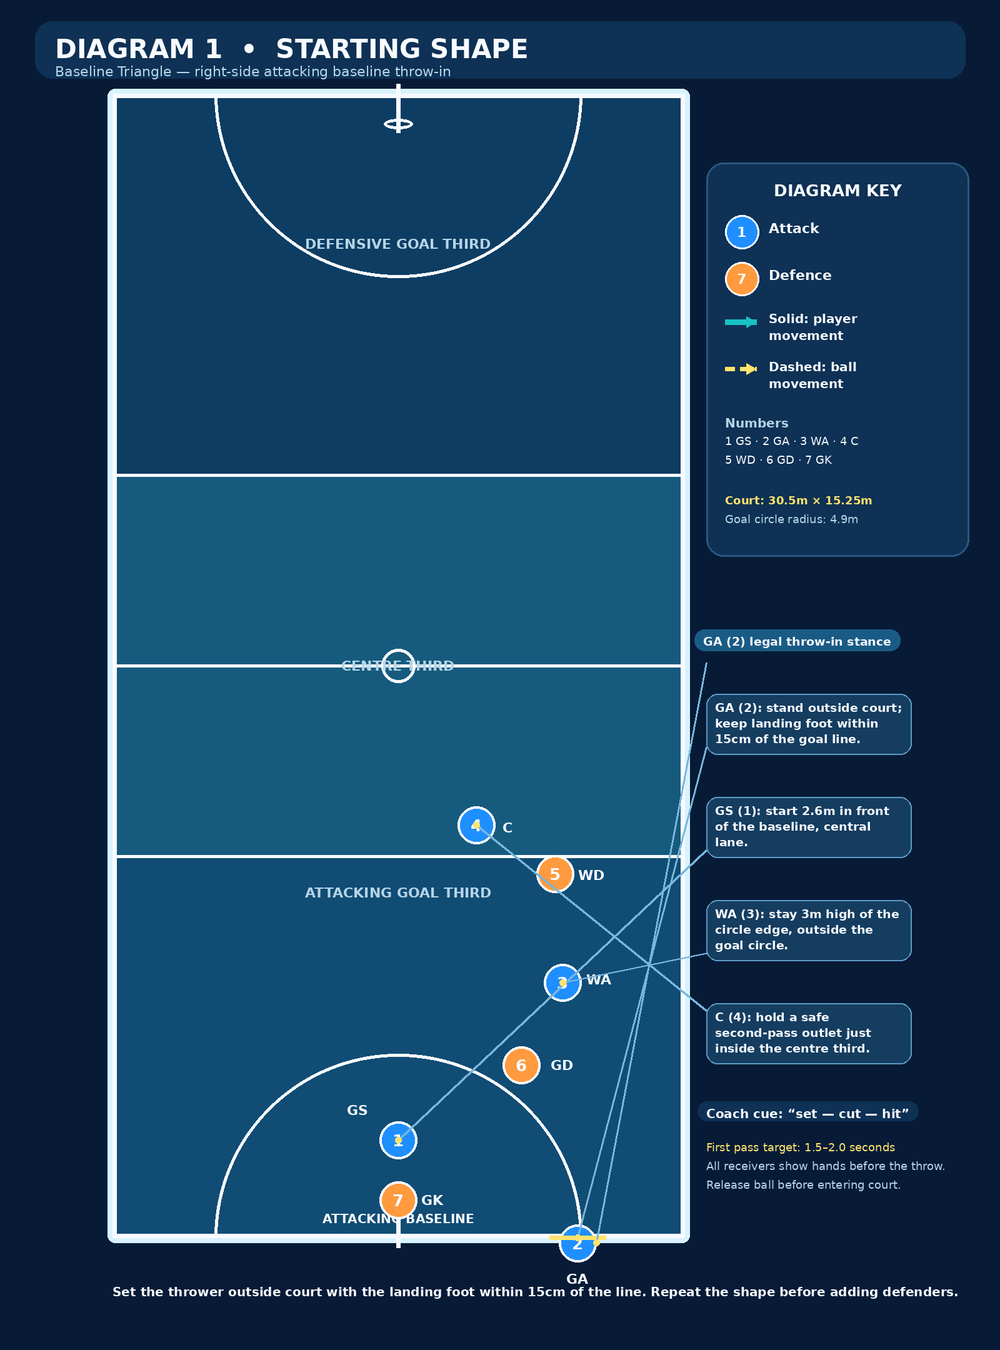
Teach first with four attackers—GS (1), GA (2), WA (3), and C (4)—against passive defenders. Add GK (7), GD (6), and WD (5) once timing is dependable. Start on the right-side baseline, then mirror it left.
| Role | Number | Starting landmark | Job on the first two passes |
|---|---|---|---|
| Goal Shooter | 1 | Central in the goal circle, 2.6 m in front of the baseline | Clear GK, then arrive late into front space. |
| Goal Attack | 2 | Outside the goal line, 15 cm from the line at the throw-in point | Throw in, drive 5 m to re-offer, then feed. |
| Wing Attack | 3 | Outside edge of the goal circle, roughly 3 m high of GA | Sell a baseline jab, V-cut back to receive. |
| Centre | 4 | 1.5–2 m inside the centre third, strong-side lane | Be the safety reset and keep depth. |
| Goal Keeper | 7 | On GS, central to post | Track GS’s clear and recovery. |
| Goal Defence | 6 | Between GA and the circle edge | Contest the re-offer and feed line. |
| Wing Defence | 5 | On WA’s outside shoulder | Deny the release or force WA wide. |

Place cones at GA’s legal throwing point, WA’s 2.5 m jab landmark, and GA’s 5 m re-offer lane. Remove them once players can visualise the lanes.
3. Step-by-Step Instructions
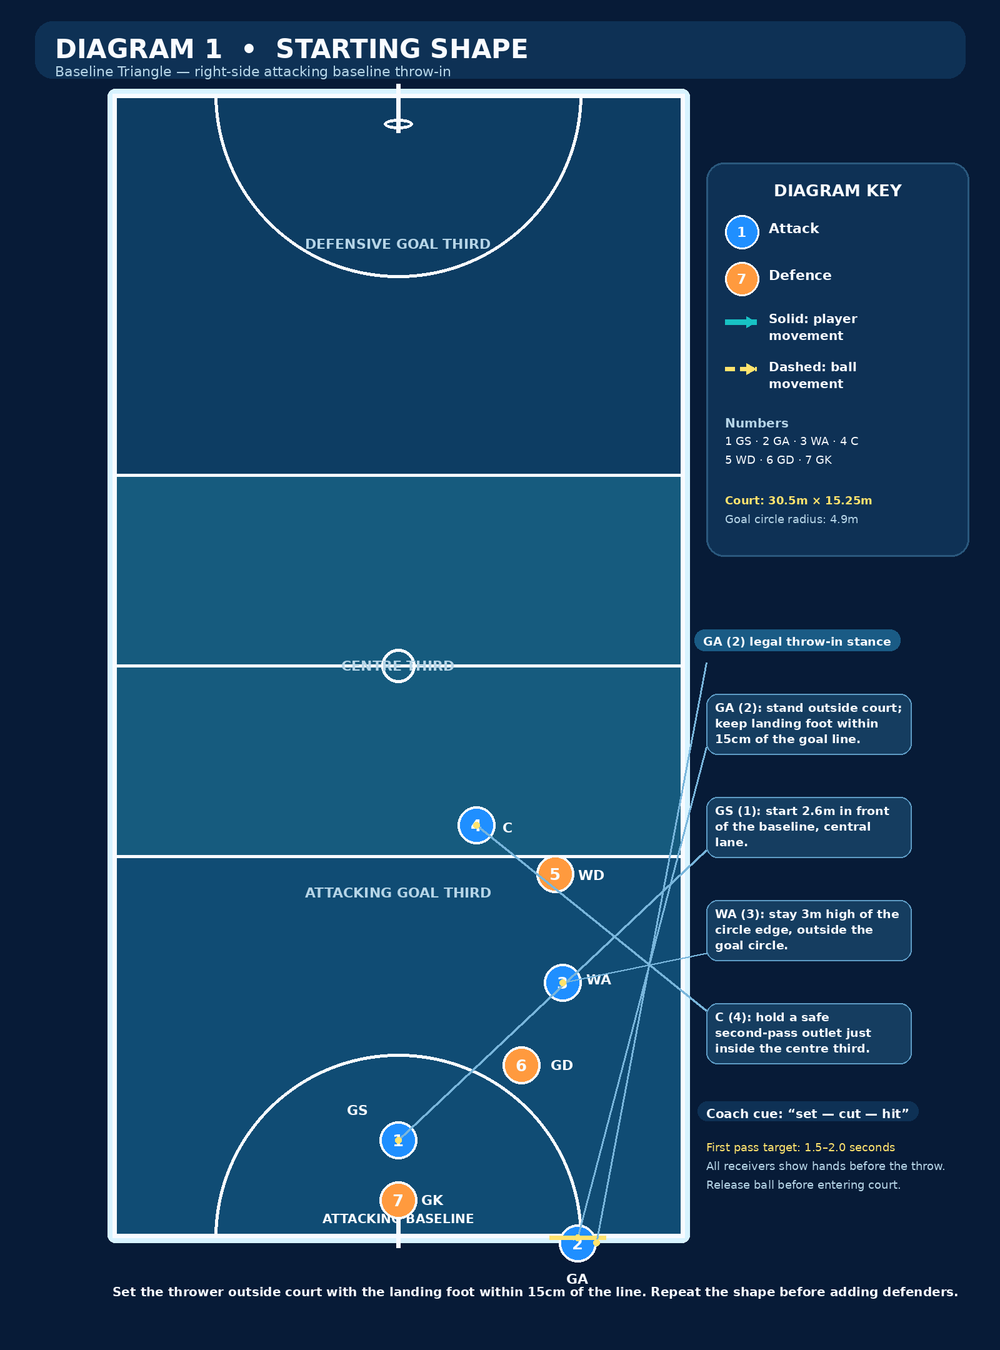
Phase A — Set and release: 0.0–1.6 seconds
- Set the legal base. GA (2) stands outside the court, balanced and side-on, with their landing foot within 15 cm of the goal line. GA scans WA first, C second, and GS only as the final finishing picture. Give the cue: “Set—cut—hit.”
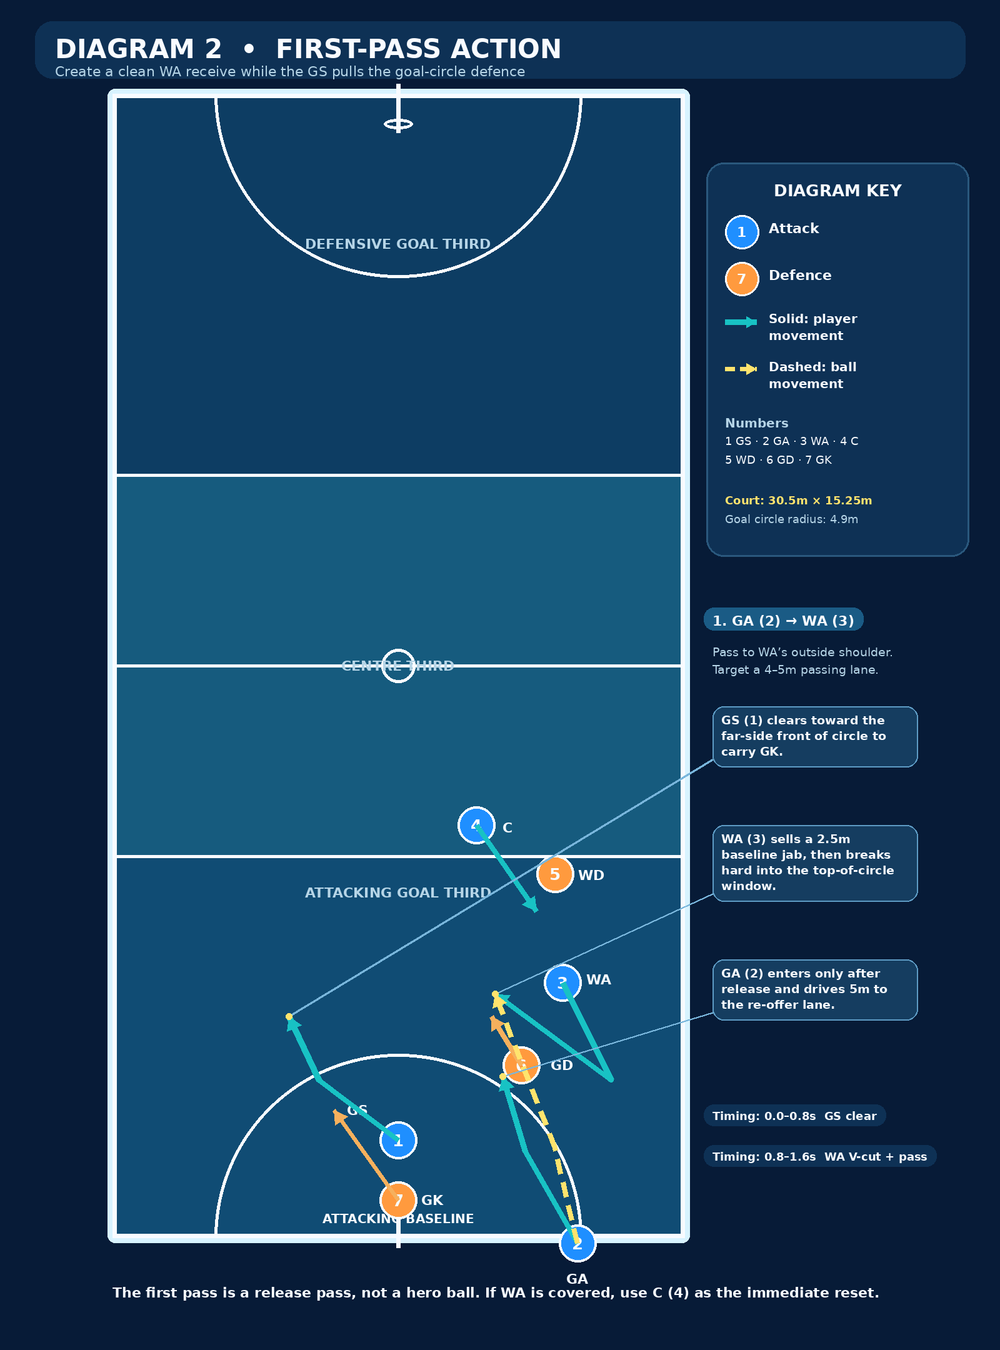
- Clear the post. On “cut,” GS (1) sprints across the face of the circle toward the far-side front. The aim is to move GK (7), not to receive the first ball. GS must show a genuine attacking line and avoid contact.
- Win the release. WA (3) makes a sharp 2.5 m jab toward the baseline, then plants and V-cuts hard toward the top-of-circle window. WA’s hands come early; their outside shoulder stays open to GA.
- Deliver a release pass. GA (2) passes flat to WA’s outside shoulder through a 4–5 m lane. The pass should arrive ahead of WA’s movement, not behind their body. If WD has shut that window, GA immediately uses C (4); do not force a floated ball over the defence.
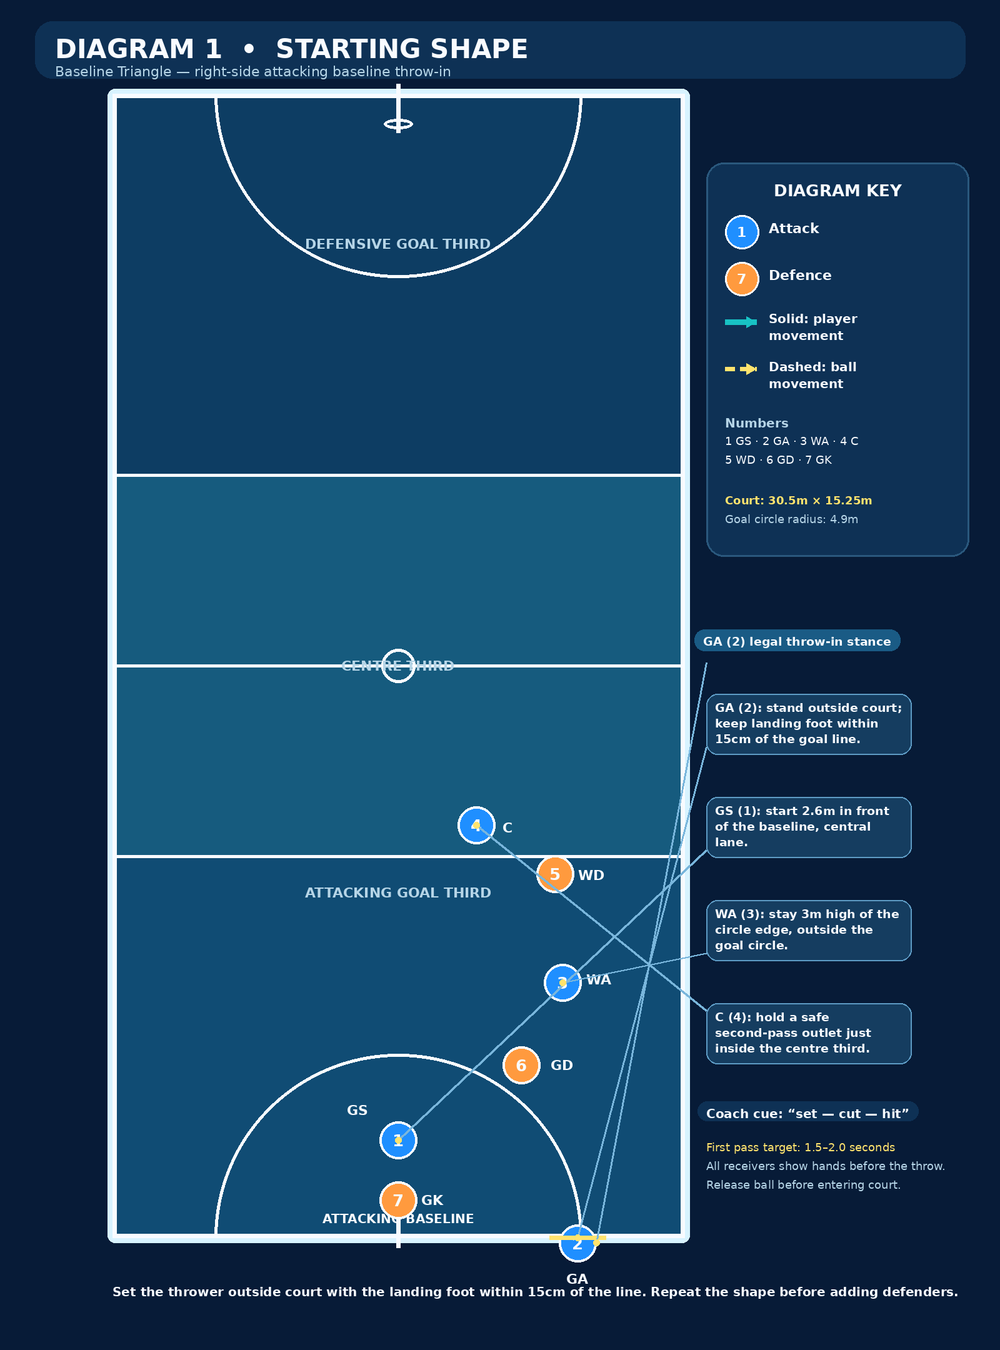
Phase B — Re-offer, feed, finish: 1.6–3.2 seconds
- Drive after release. Once the ball has left GA’s hands, GA enters and drives diagonally about 5 m to the strong-hand re-offer lane. GA stays wide enough to see both WA and the front of the post.
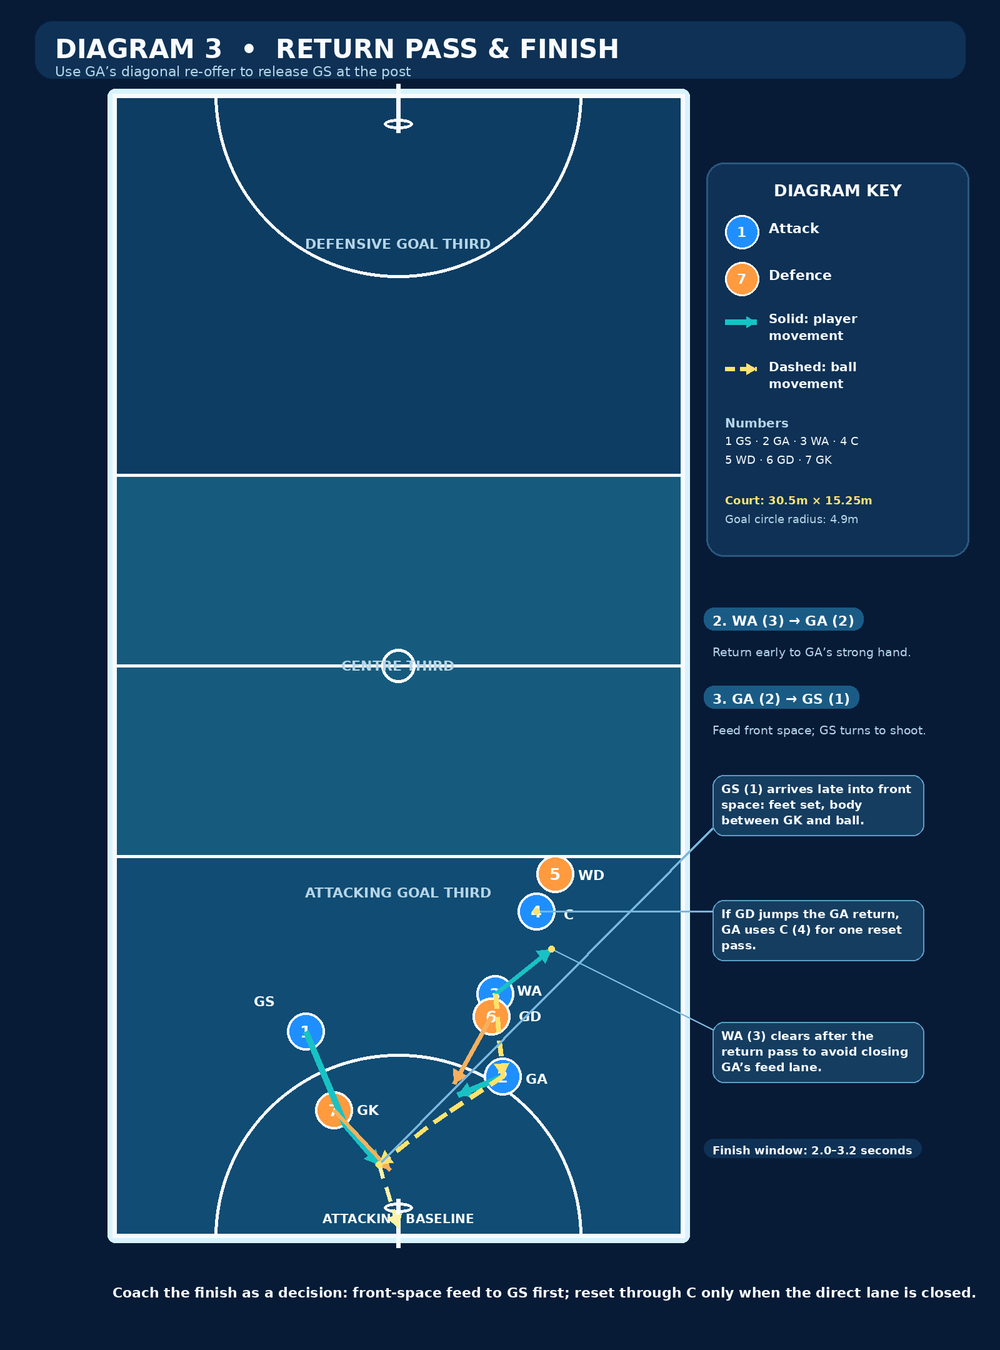
- Return early. WA catches, lands balanced, turns quickly, and returns the ball to GA’s strong hand before GD can close the lane. After the return, WA clears toward the circle edge so they do not block GA’s sightline.
- Arrive late. GS holds the wide clear until GA has the return. GS then cuts back into front space, presenting a strong body line between GK and the ball with feet ready to land and turn.
- Feed the decision, not the picture. GA feeds GS in front space only if the lane is clean. If GD has jumped the return or GK has won front position, GA resets through C (4) rather than forcing a contested feed. GS turns and shoots only when balanced and inside the circle.
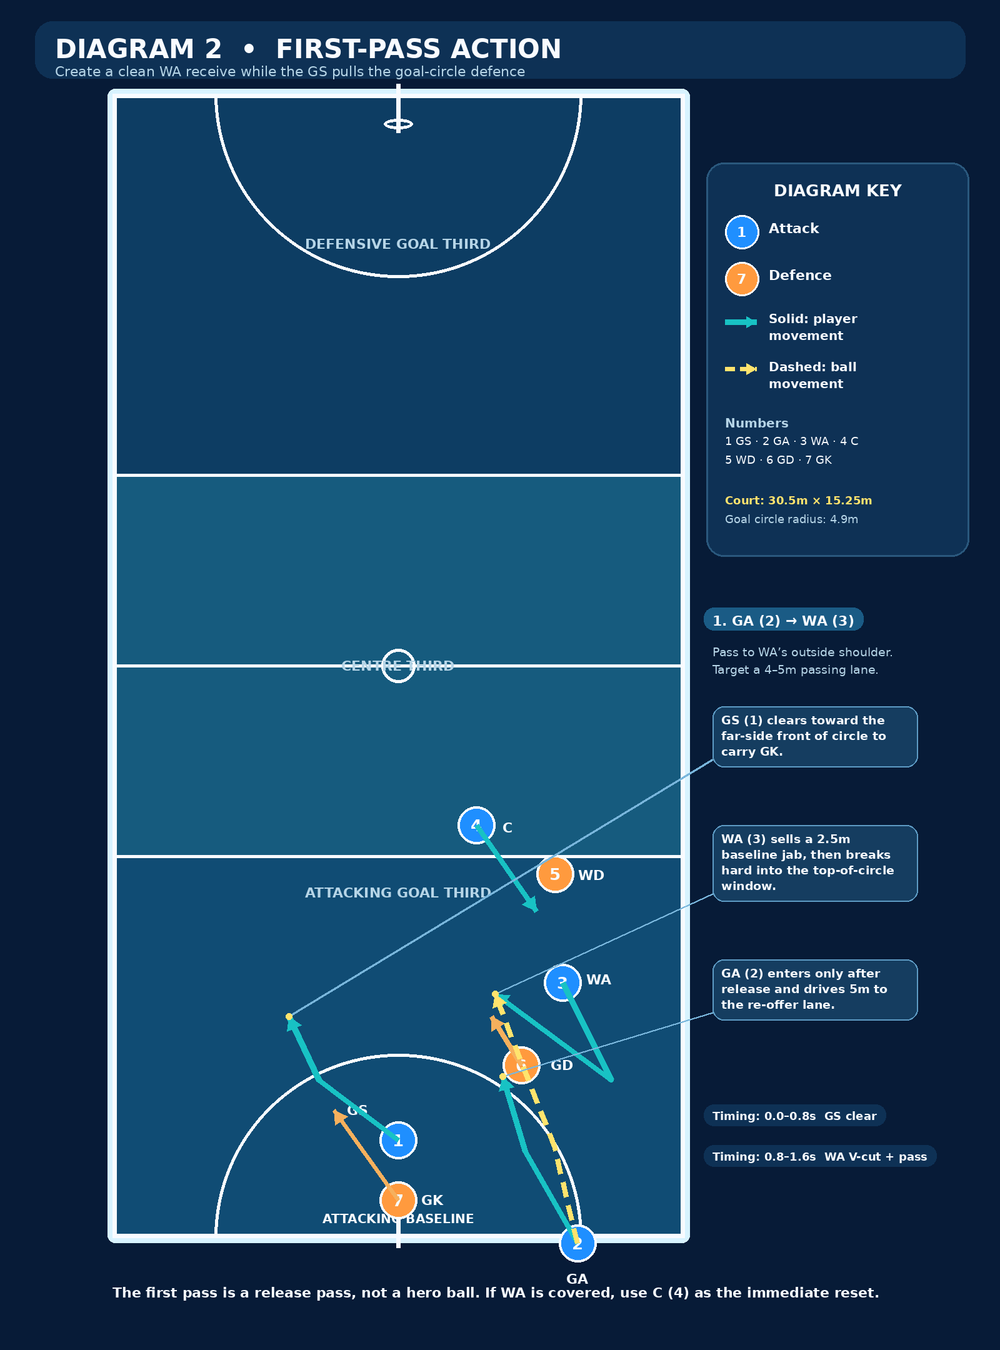
For the first five repetitions, freeze after each pass and ask, “Where is the spare player?” Then run five continuous repetitions at match pace. Set targets of a legal first pass by 1.6 seconds and a shot opportunity by 3.2 seconds.
4. Key Coaching Points
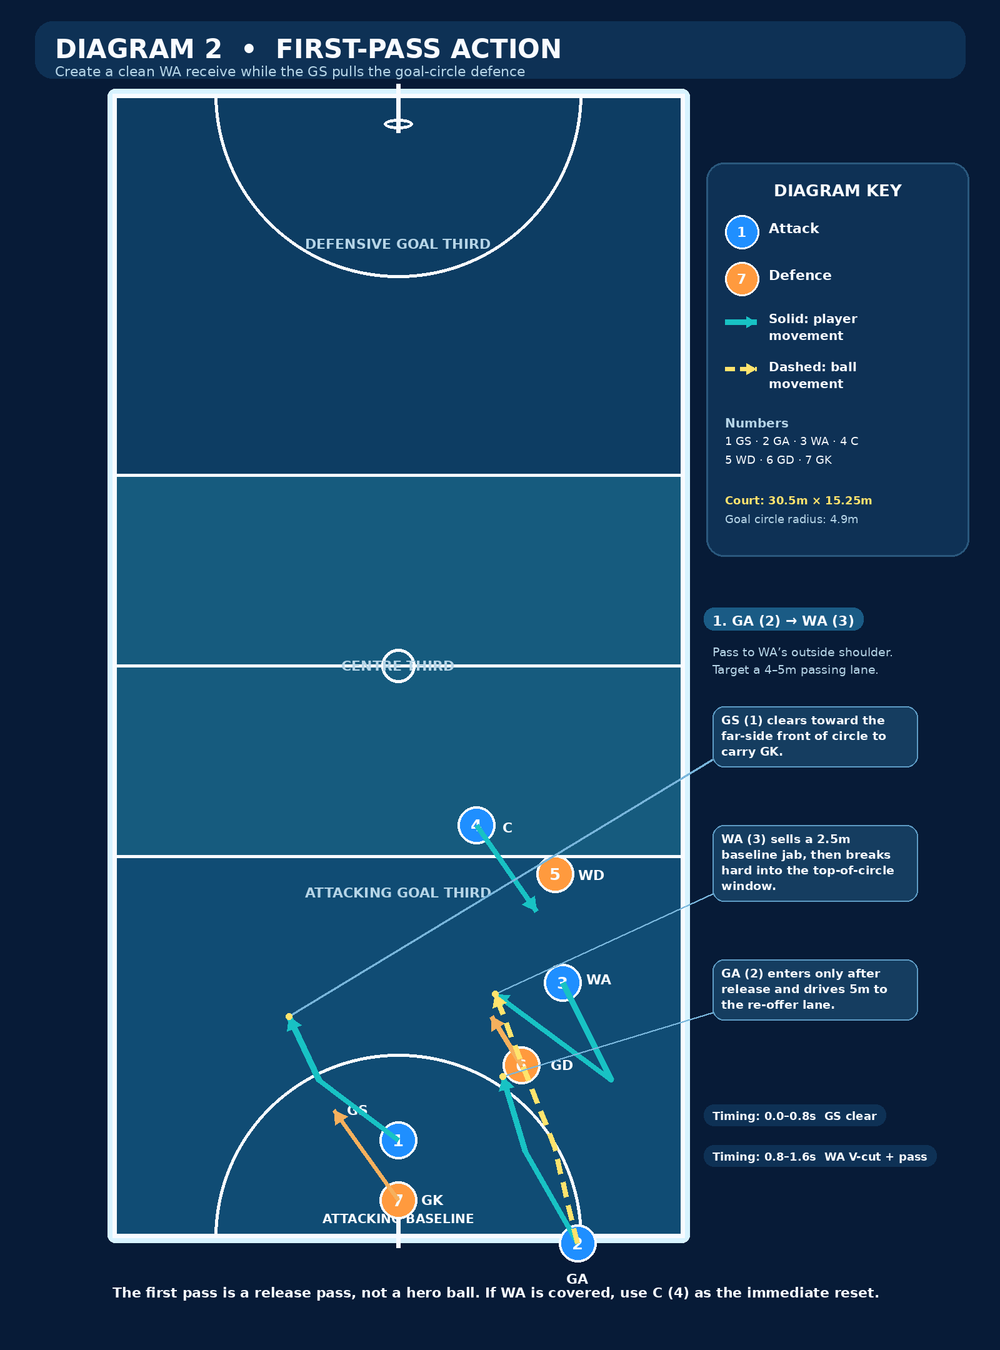
Coach the trigger, not just the route. GS clears first, WA jabs second, and GA releases as WA breaks. If WA moves before GS shifts GK, the picture never changes.
Pass to space and shoulder. GA’s first ball must lead WA’s outside shoulder, away from WD. WA should receive while moving into court, not while drifting back toward the baseline.
Teach GA’s post-release work. GA must release first, then enter and drive. A slow or vertical re-offer closes the return lane; a quick diagonal re-offer keeps GD moving and preserves a clean feed angle.
Demand a late GS arrival. GS is a decoy before they become the finisher. Their return cut must be timed to GA’s catch, not WA’s catch, so GK has to recover into the movement rather than wait on the post.
Keep C as a genuine safety valve. C cannot spectate high up the court. Hold a clear second-pass lane inside the centre third so the attackers can reset without throwing across a defender or over a complete third.
5. Common Mistakes
| Error to watch | What it looks like | Immediate correction |
|---|---|---|
| Illegal baseline entry | GA steps onto the line or into court before release. | Rehearse the landing-foot position with a cone; say “release, then go.” |
| Hero ball to GS | GA throws a high, hopeful first pass over GK. | Stop play and require WA or C to touch the first pass. |
| Soft GS clear | GK stays at the post because GS jogs or looks back. | Repeat GS’s clear at full pace without a ball, then add GK. |
| WA drifts after the jab | WA receives too close to the baseline or with WD in the lane. | Mark the V-cut return window and insist on a hard plant. |
| Early GS return | GS gets back to the post before GA receives. | Use a verbal cue: “GA catches—GS goes.” |
6. Variations & Progressions
Make it easier — guided release. Start with GA, WA, and C only. Hit WA five times in a row before adding GS’s clear.
Make it harder — live GD jump. Tell GD (6) to anticipate the WA-to-GA return. GA must read the jump and use C for one reset pass before re-entering the circle. Score the group only when the reset is calm and the next feed is clean.
Change the picture — mirror and reverse. Mirror the entire pattern to the left baseline. Then reverse the first option: if WD overplays WA’s V-cut, C becomes the planned first receiver and WA becomes the clearing player. This prevents your team from becoming predictable.
7. Age Adaptations
Under 8 and Under 10: Use GA, WA, and GS with passive defenders. Teach the legal stance, one safe pass to WA, and no entry before release. Keep it to two passes.
Under 12: Add GA’s re-offer and a passive GK. Use a wider 2–3 second window; prioritise footwork, landing balance, and communication.
Under 14: Run it against live GK, GD, and WD. Add the GD-jump progression and reward a reset through C when the feed closes.
Under 16 and Open: Demand full match pace, mirrored execution, and a second option. Film five attempts and review legality, WA’s shoulder win, and GS’s late arrival.
