

Netball
Split-Seal Centre Pass
A coach-ready attacking set play for reliable first phase and a front-space finish

Split-Seal Centre Pass
A coach-ready attacking set play for reliable first phase and a front-space finish

Coaching intent: Use the first centre pass to pull the Wing Defence towards the middle, release the Wing Attack into a legal outside catch window, then split the Goal Defence and Goal Keeper so the Goal Shooter can receive in front position.
| Resource detail | Coach use |
|---|---|
| Best moment | Your centre pass, especially after a goal when the opposition has settled into a hard man-on-man press. |
| Primary outcome | A controlled first touch in the centre third, then a Goal Shooter feed inside 8 seconds of the whistle. |
| Core unit | 1 C, 2 WA, 3 GA and 4 GS. The remaining three players give balance and protect the turnover. |
| Court orientation | The attack moves up the diagrams towards the attacking goal. Court dimensions are 30.5 m × 15.25 m, with thirds of approximately 10.17 m. 1 |
| Equipment | One ball, bibs, 12–16 flat markers, a stopwatch and two spare defenders or poles. |
| Recommended group | Confident U15+ players through adult club level. Use the progression below to scale the pressure. |
Why this play works
The play is deliberately simple at the first pass. The Wing Attack begins legally in the attacking third, sells a short movement towards the ball lane, then crosses into the centre third after the whistle. That movement asks the Wing Defence to choose between following the WA tightly and protecting the outside lane. If the defender chases the early picture, the WA creates separation on the change of direction. If the defender holds off, the C has an immediate, safe pass.
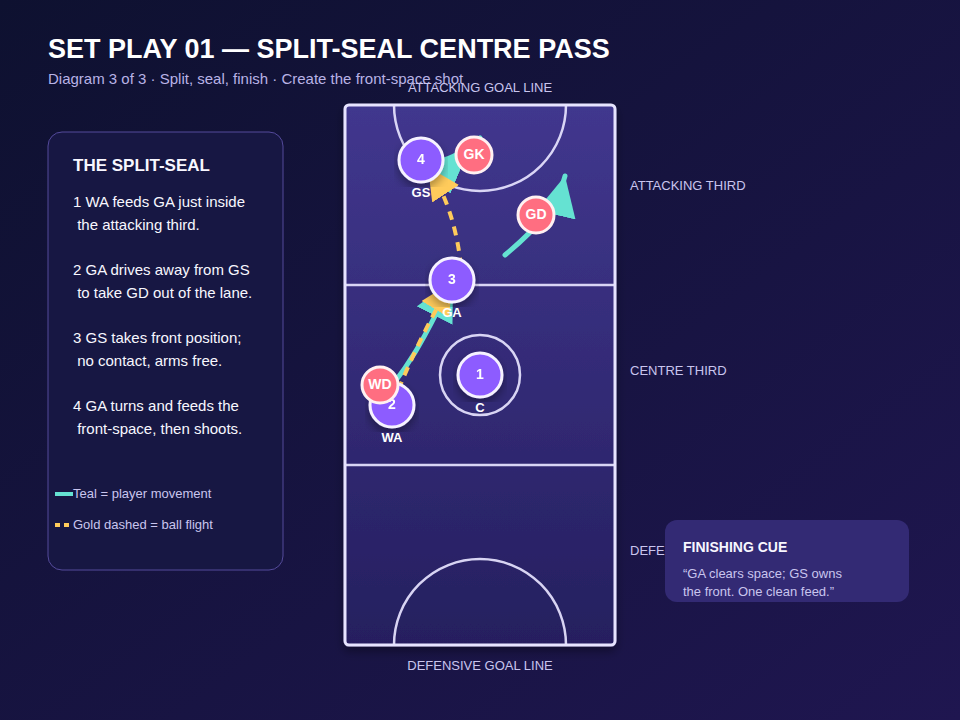
The finish is based on a split rather than a static block. The GA clears away from the GS and drags the GD out of the central feeding lane. The GS claims legal front position on the GK, then shows hands early. The best feed is straight into the GS’s front space, not floated behind them. The play gives the ball carrier a clear hierarchy: safe WA first ball, GA entry, GS front-space finish.
Court map and player key

World Netball identifies the seven playing positions as GS, GA, WA, C, WD, GD and GK. The numbers below are coaching references used in this resource, not official squad numbers. Playing areas and centre-pass requirements remain non-negotiable. 1
| Coaching no. | Position | Legal working area | Job in this set play |
|---|---|---|---|
| 1 | Centre (C) | All thirds | Takes the centre pass, reads the WA’s exit, delivers the first ball, then holds a safe re-offer. |
| 2 | Wing Attack (WA) | Centre and attacking thirds | Wins the legal first touch, protects the ball, and feeds the GA’s attacking-third catch. |
| 3 | Goal Attack (GA) | Centre and attacking thirds | Provides the second-phase target, clears the GD, and delivers the front-space feed or shoots. |
| 4 | Goal Shooter (GS) | Attacking goal third | Holds the circle, establishes front position, shows a clear target and shoots. |
| 5 | Wing Defence (WD) | Centre and defensive thirds | Opposition match-up used to pressure the WA’s first lead. |
| 6 | Goal Defence (GD) | Centre and defensive thirds | Opposition match-up the GA aims to pull away from the GS. |
| 7 | Goal Keeper (GK) | Defensive goal third | Opposition match-up the GS must beat to front position. |
Rules checkpoint before teaching
The C must have at least one foot wholly inside the 0.9 m centre circle when taking the pass. Before the whistle, every player must be in the correct third and, apart from the Centres, must not enter the centre third. The C must release within three seconds. The centre pass must then be caught or touched by a player standing, or landing first, wholly in the centre third. 1
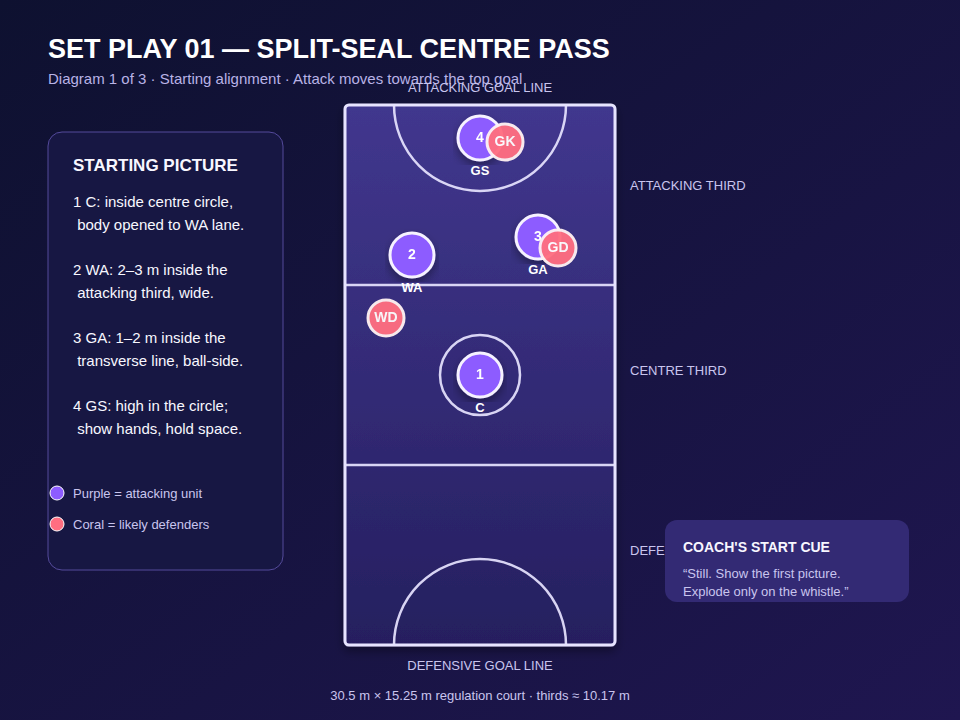
Coach’s practical rule: keep the WA’s starting cone 2–3 m inside the attacking third, wide of the C. The WA may move into the centre third only after the whistle. Demand a centre-third landing rather than an airborne reach across the transverse line.
Diagram legend
| Symbol | Meaning |
|---|---|
| Purple numbered circle | Attacking player and coaching number. |
| Coral circle | Likely opposing defender or pressure point. |
| Teal solid arrow | Player movement. |
| Gold dashed arrow | Ball flight. |
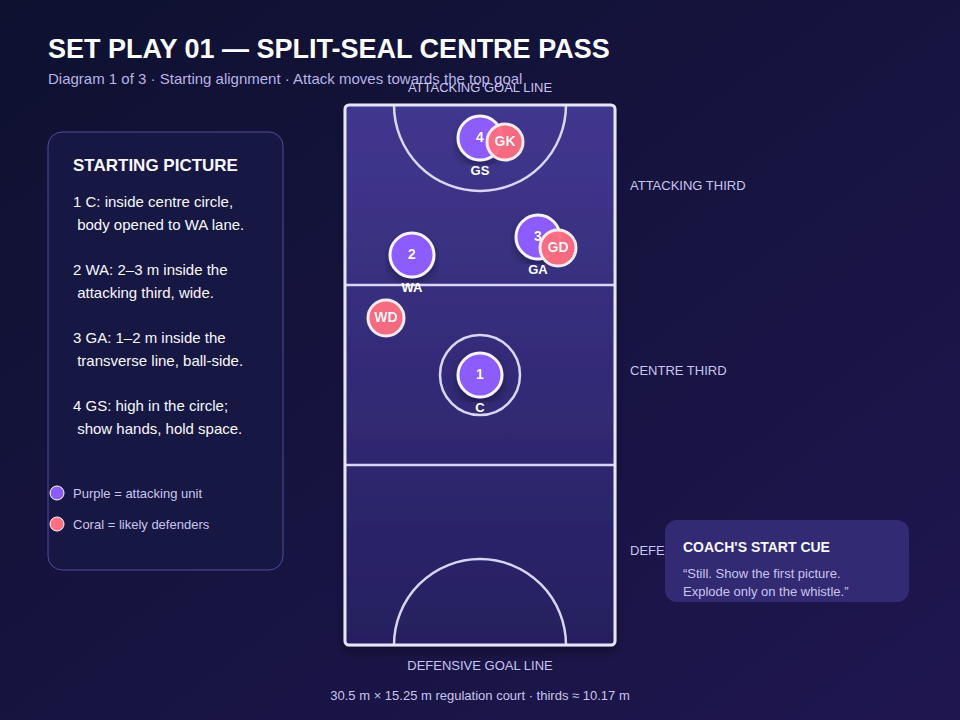
Set-up: the starting picture

Place the C centrally inside the centre circle with their chest opened towards the WA side. The WA starts 2–3 m inside the attacking third and 2–3 m from the sideline-side lane, with the WD on the WA’s back shoulder. This is important: the WA is not in the centre third before the whistle.
Set the GA 1–2 m inside the attacking third, on the same side as the WA’s eventual catch. The GA needs a balanced stance, eyes on both the WA and GS, and enough room to turn out from the GD. Set the GS high inside the goal circle, approximately 1.5–2 m from the circle edge and slightly ball-side of the post. The GS’s first task is not to chase the pass. It is to hold the GK where the GA wants the central channel.
Mark a 3 m × 3 m WA catch window in the centre third, 1–2 m over the transverse line and close to the outside lane. The C should be able to see it without turning their whole body. Mark a second GA receiving pocket 2 m into the attacking third, just inside the same transverse line.
Run it: whistle to shot
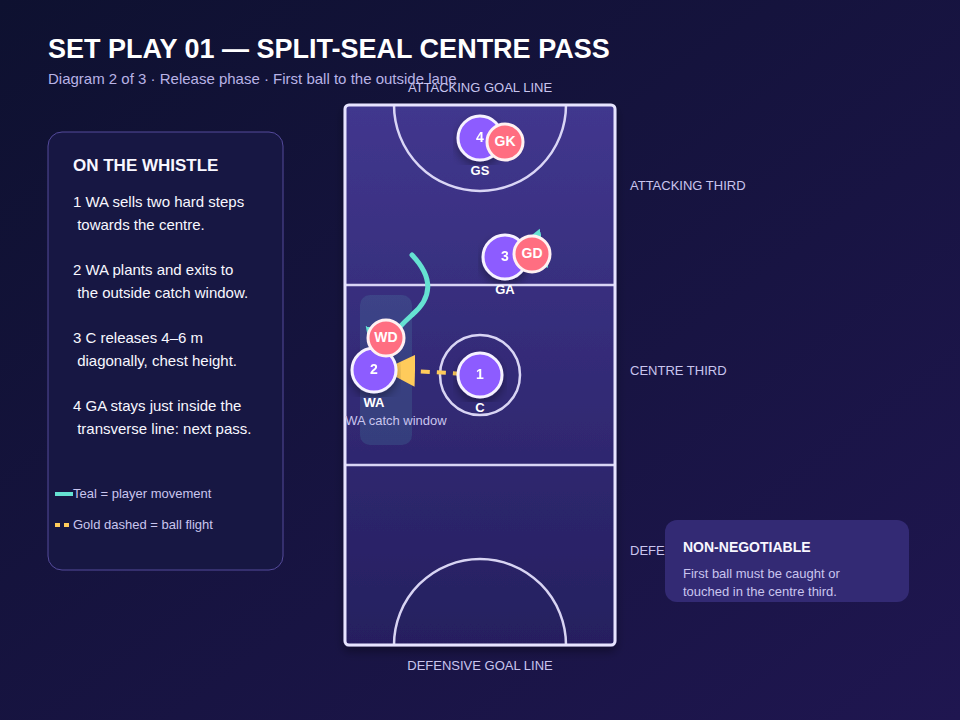
| Timing | Action | Detail to coach | Ball-carrier decision |
|---|---|---|---|
| 0.0 s | Whistle | C stays balanced and establishes the landing foot. WA and GA explode only now. | C scans the WA’s shoulders, not just their hands. |
| 0.2–0.8 s | WA sells middle | WA takes two sharp steps towards the middle lane to draw the WD in. Keep the shoulders square; do not drift sideways. | C waits for the plant. A pass too early allows the WD to sit on the line. |
| 0.8–1.4 s | WA exits and catches | WA plants the outside foot, changes direction and crosses into the marked centre-third window. Catch with first foot clearly in the centre third. | C delivers a 4–6 m, chest-height diagonal into the WA’s forward hand. Release by 1.4 seconds; do not use all three seconds. |
| 1.4–3.0 s | WA secures and scans | WA lands low, pivots off the WD and shows the ball to the GA. C opens to a safety re-offer behind the ball. | WA feeds GA only if the GA’s front shoulder is free. If not, return to C and rebuild. |
| 3.0–4.5 s | GA receives in pocket | GA catches 1–2 m inside the attacking third with hips able to turn either way. GS continues to hold the GK. | WA uses a firm, flat pass. No floated ball across the transverse line. |
| 4.5–6.0 s | Split the defenders | GA drives 2–3 m away from the GS, taking GD with them. GS works across the GK’s front shoulder without contact. | GA sees the GS’s near hand and front foot before feeding. |
| 6.0–8.0 s | Feed and finish | GA sends a short, direct front-space feed. GS lands balanced, sets the feet and shoots. | If front space is closed, GA turns out and uses WA/C rather than forcing the ball. |
Call sequence: “Sell — exit — touch — pocket — split — front — finish.” Use the same language every time. It helps players recognise the picture under pressure.
The scoring phase

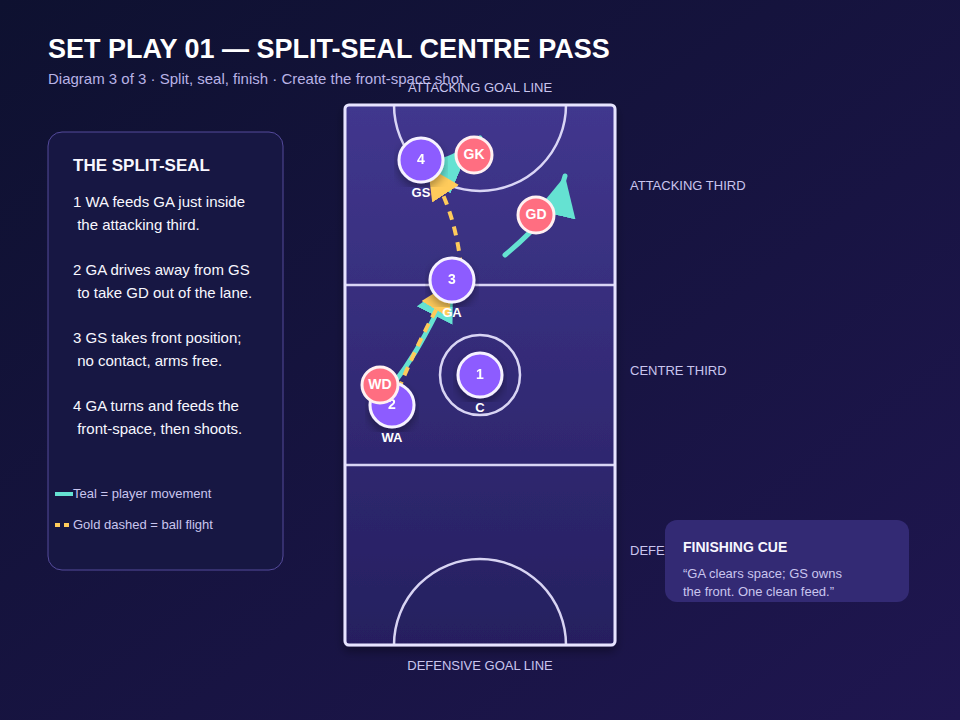
The GA’s clearance is not a physical screen. It is an explosive, legal movement that takes the GD away from the preferred feed line. Coach the GA to drive wide and up-court for 2–3 m, then turn their head back to the GS. Coach the GS to claim space first, keep both arms available and avoid backing into the GK. The GS should be visible to the GA’s peripheral vision before the GA releases the pass.
The pass from GA to GS should travel on a flat, direct line into the GS’s movement. A lob buys the GK recovery time. If the GK sits off, the GS may take the ball and shoot. If the GK fronts aggressively, the GS releases back to GA, reclaims front position and receives the second feed. The finish is a decision, not a pre-programmed throw.
Position-by-position coaching points
| Position | Non-negotiables | Head coach cue |
|---|---|---|
| 1 C | Start legally in the circle; read the WA’s plant; release early; stay available behind the first ball. | “See the exit, then punch the pass.” |
| 2 WA | Start in the attacking third; sell the middle; land first in the centre third; protect the ball with a low base. | “Make the WD bite, then win the outside.” |
| 3 GA | Arrive in the pocket with a turn; clear GD without contact; feed only to visible hands. | “Clear the lane, then see front.” |
| 4 GS | Hold the GK initially; move late; take legal front position; finish balanced. | “Own the front, not the post.” |
| C/WA/GA unit | Maintain a 4–6 m working distance and show a second option immediately after every pass. | “Pass, move, re-offer.” |
Coaching the detail, not just the pattern

Start with the footwork. The C should practise receiving the whistle with both feet inside the circle, then identify the landing foot as they leave. The WA should practise landing wholly in the centre third after the first touch. Use the transverse line as a visible teaching aid: if the WA cannot show the first foot clearly inside the centre third, the repetition does not count.
Next coach the change of pace. Players often make the WA lead too round and too long. Insist on two sharp sell steps, a violent but balanced plant, and an immediate acceleration into the outside catch window. The purpose is separation, not distance. A 1.5 m win is enough if the C releases on time.
Finally coach the picture after the first pass. Strong teams do not celebrate merely getting the centre pass away. The WA must arrive with hips open to the GA. The GA must arrive able to turn. The GS must create a target before the GA catches. When those three actions overlap, the defence has to solve two problems at once.
24-minute teaching progression
| Block | Organisation | Coach focus | Success gate before progressing |
|---|---|---|---|
| 0–5 min: Walk-through | Four attackers, no defenders, cones for the WA window and GA pocket. Walk the sequence at 50% speed. | Legal start positions and named movements. Stop on the whistle if any player is in the wrong third. | Four consecutive legal first touches and a controlled shot. |
| 5–10 min: Pattern at pace | Same unit, one ball, repeat from both sides of the court. Rotate C and WA every three repetitions. | C’s 1.4-second release and WA’s plant/exit timing. | Six of eight first passes hit the marked WA window. |
| 10–16 min: Guided defence | Add passive WD, GD and GK. Defenders track but may not intercept for the first two repetitions. | GA clearance and GS front position. | Four of six attacks create a clear GS front-space target. |
| 16–21 min: Live 4 v 3 | C, WA, GA and GS versus WD, GD and GK. Begin every rep from a whistle. | Read the defender rather than running on rails. | Three legal scores or retained possessions from five attacks. |
| 21–24 min: Consequence game | Live 7 v 7. Award two points for a score reached through the set play and one for any other score. | Transfer to match pressure and communication. | Unit calls the play, adjusts once, and retains composure after a denied first look. |
Use a 20–25 second work-to-rest rhythm for early technical blocks. The set play requires repeat acceleration, deceleration and landing quality. Short, high-quality repetitions are more useful than long sequences with sloppy footwork.
Common faults and immediate fixes
| What you see | Likely cause | Fix it in the next repetition |
|---|---|---|
| WA is penalised for breaking or catches on the line. | Starting cone is too close to the transverse line, or the WA anticipates the whistle. | Move the starting cone 1 m deeper into the attacking third. Require a visible pause before the whistle. |
| C holds the ball until the WD recovers. | C is looking for hands rather than the WA’s plant. | Run five “plant-to-pass” reps with a 1.4-second stopwatch target. |
| WA catches facing the sideline with no next pass. | Catch window is too wide or WA has overrun the lead. | Bring the window 1 m inside and coach a two-foot, hips-open landing. |
| GA receives flat-footed under GD pressure. | GA has arrived too early and waited. | Start GA 1 m higher and cue a late check back into the pocket. |
| GS is trapped behind GK. | GS has followed the ball or tried to push the GK. | Freeze the picture. Rehearse a late front cut across the GK’s shoulder with hands free. |
| Final feed becomes a lob. | GA cannot see a clear target or is forcing the scripted finish. | Give GA a reset rule: if no front hand appears in one second, turn out to WA/C. |
Defensive answers and your counters
| Opposition response | What it means | Counter call |
|---|---|---|
| WD stays off and protects the outside lane. | The WA will not win separation from the first exit. | C takes the free metre forward after the whistle and uses a short pass into WA’s body-side hand. |
| WD fronts the WA early. | The direct outside window is blocked. | WA reverses the exit towards the C’s inside shoulder; C uses a short, safe pass, then WA feeds GA. |
| GD leaves GA to clog the GS feed. | Defence is gambling on the final ball. | GA turns and shoots from the top of the circle if in range, or returns to WA for a second GA entry. |
| GK sits high in front of GS. | The front feed is not on. | GS holds high, GA drives under the GK’s outside shoulder, then receives the return for the shot. |
| Defence switches GA and GD. | The original split picture has changed. | Call “reset”; C and WA retain the ball and re-enter through the opposite side. |
Coach’s observation card
Score one point for each statement during a six-repetition block. A score of 24/30 or better means the unit is ready to trial the play in conditioned match play.
| Observation | Reps 1–6 |
|---|---|
| WA starts in the correct third and enters centre only after the whistle. | ___ / 6 |
| C releases a catchable first ball within 1.4 seconds. | ___ / 6 |
| WA’s first touch and first landing are wholly in the centre third. | ___ / 6 |
| GA catches in the marked attacking-third pocket with turn available. | ___ / 6 |
| GS receives with legal front space or the attack selects a calm reset. | ___ / 6 |
Scaling the play
For developing players, use a larger 4 m × 4 m WA catch window and remove the GD/GK until the first touch is reliable. Keep the legal starting positions; do not simplify away the rules. For a senior side, reduce the WA window to 2 m × 2 m, start the WD one step closer, and demand that the C and WA complete the first pass within 1.2 seconds.
For a left-side version, mirror the whole pattern. Do not call it a different play. Use the same language—sell, exit, touch, pocket, split, front, finish—so the team learns one concept with two entry sides. Once both sides are secure, let the C call the side based on the opponent’s strongest defensive matchup.
Final head-coach message
This is not a trick play. It is a repeatable centre-pass structure that builds good habits: legal preparation, purposeful change of pace, early release, clear second options and a patient shooting-circle finish. Teach the first touch until it is automatic. Then give the players permission to read the defenders and choose the finish that is actually available.
