Explosive Dodging and Leading Drill
Master the art of losing a defender and driving into space with this essential dodging and leading drill designed to improve attacking movement and timing.

Equipment Needed
1. Overview
Creating space in netball is fundamental to maintaining possession and transitioning the ball effectively down the court. This "Explosive Dodging and Leading Drill" focuses on the critical attacking skills of losing a tight defender and driving powerfully into open space to receive a pass. It is designed to teach players how to use sharp changes of direction, deceptive body language, and explosive acceleration to break free from their opponent. This drill is particularly useful for mid-courters (WA, C) and attackers (GA, GS) who frequently need to create separation in congested areas, but the principles of movement and timing are essential for every position on the court.
By repeatedly practicing these movements, players will develop the muscle memory and court awareness required to execute successful dodges under match pressure. The drill progresses from basic unopposed movements to fully contested scenarios, allowing coaches to isolate specific technical flaws before integrating the skills into game-like situations.
2. Setup

Proper setup is crucial for ensuring the drill flows smoothly and players get maximum repetitions. You will need a standard netball court (30.5m x 15.25m), 2–3 netballs, and a set of cones to mark starting positions and target areas if required.
| Role | Player | Starting Position | Notes |
|---|---|---|---|
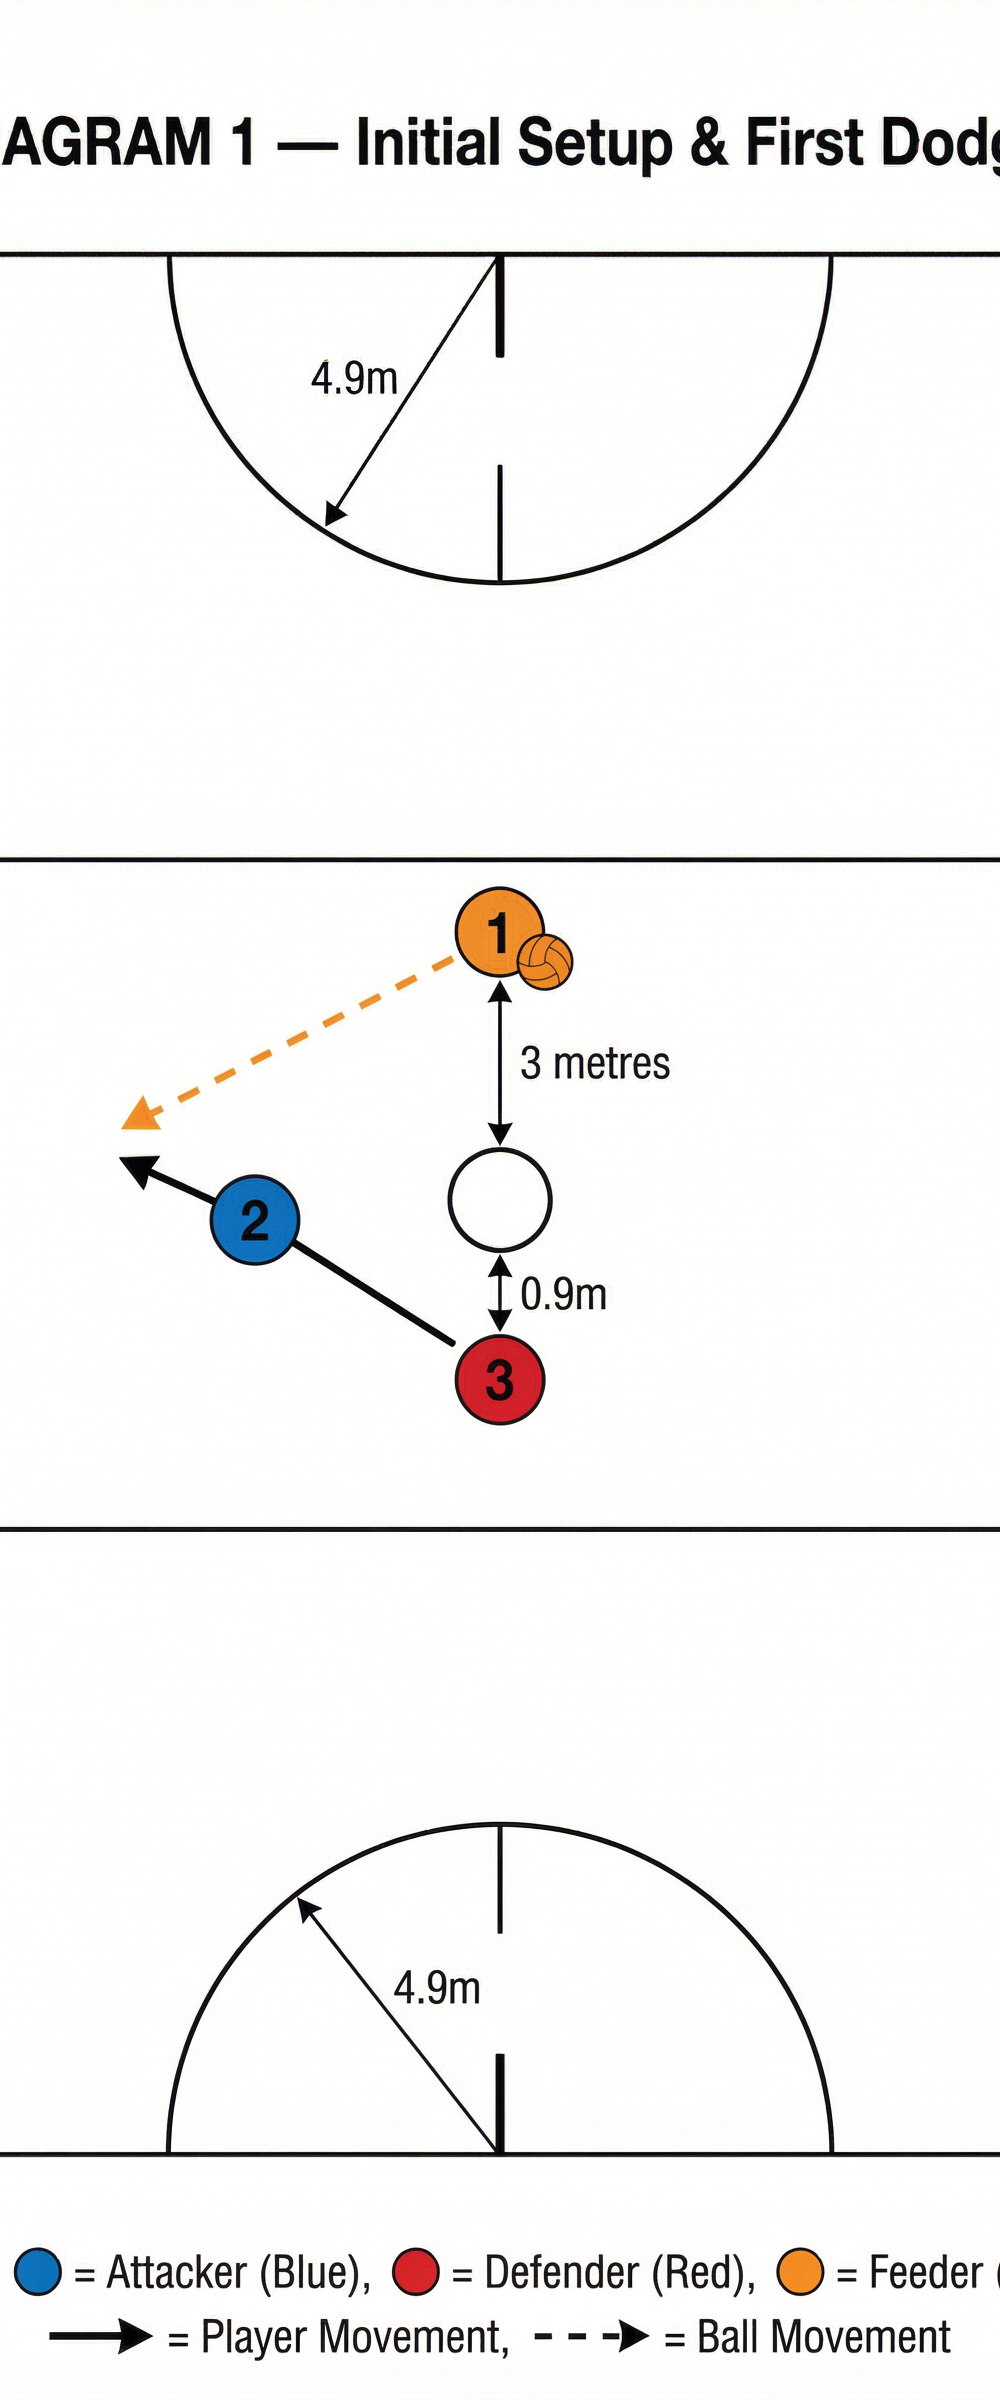
| Feeder | Player 1 | Top of the centre third, with ball | Faces down court |
| Attacker | Player 2 | 3 metres in front of Feeder | Balanced, ready to move |
| Defender | Player 3 | 0.9m behind/beside Attacker | Applies initial pressure |
| Waiting Attacker | Player 4 | Sideline | Rotates in as next Attacker |
| Waiting Defender | Player 5 | Sideline | Rotates in as next Defender |
Equipment Needed: 2–3 Netballs, 4–6 Cones (optional), Bibs (to distinguish attackers and defenders).
Court Setup: The drill primarily utilizes the centre third and one attacking third, but can be mirrored on both sides of the court to involve more players simultaneously.

Diagram 1 — Initial Setup & First Dodge: Player 2 (Attacker) drives hard left to force the Defender to commit, before cutting sharply back to the right. The Feeder delivers a pass into the space ahead of the lead.
3. Step-by-Step Instructions

Follow these steps to execute the drill effectively. Start slowly to ensure correct technique before increasing the speed and intensity.
- Initial Positioning: The Feeder (Player 1) stands with the ball, ready to pass. The Attacker (Player 2) sets up 3 metres away, with the Defender (Player 3) marking them closely at the regulation 0.9m distance. Ensure the Attacker is balanced on both feet and ready to move in either direction.
- The First Movement — The Fake: On the coach's whistle or the Feeder's cue (e.g., a ball tap), the Attacker initiates a sharp, decisive movement in one direction, driving 1–2 hard steps to the left. This movement must be convincing — use the head, shoulders, and eyes to sell the fake direction and force the Defender to shift their weight.
- The Change of Direction: After committing the Defender, the Attacker plants their outside foot firmly and pushes off explosively in the opposite direction, cutting sharply back to the right. This plant-and-cut is the core of the dodge — it must be sharp, not rounded.
- The Lead: The Attacker now drives hard into the newly created space at a 45-degree angle toward the ball, extending both arms to provide a clear target for the Feeder.
- The Pass and Catch: The Feeder delivers a firm, accurate chest or shoulder pass into the space ahead of the Attacker — leading the player, not aiming at their current position. The Attacker attacks the ball, catching it cleanly while landing on their outside foot to maintain balance and pivot to face down court.
- Reset and Rotate: After the catch, the Attacker passes the ball back to the Feeder. Players rotate: Attacker becomes Defender, Defender exits to the sideline, a sideline player becomes the new Attacker, and the Feeder remains for 2–3 rounds before rotating.
Timing Tip: Run 3 sets of 6 repetitions per group (approximately 8–10 minutes of active drill time), then rotate roles. Allow 30 seconds of rest between sets.

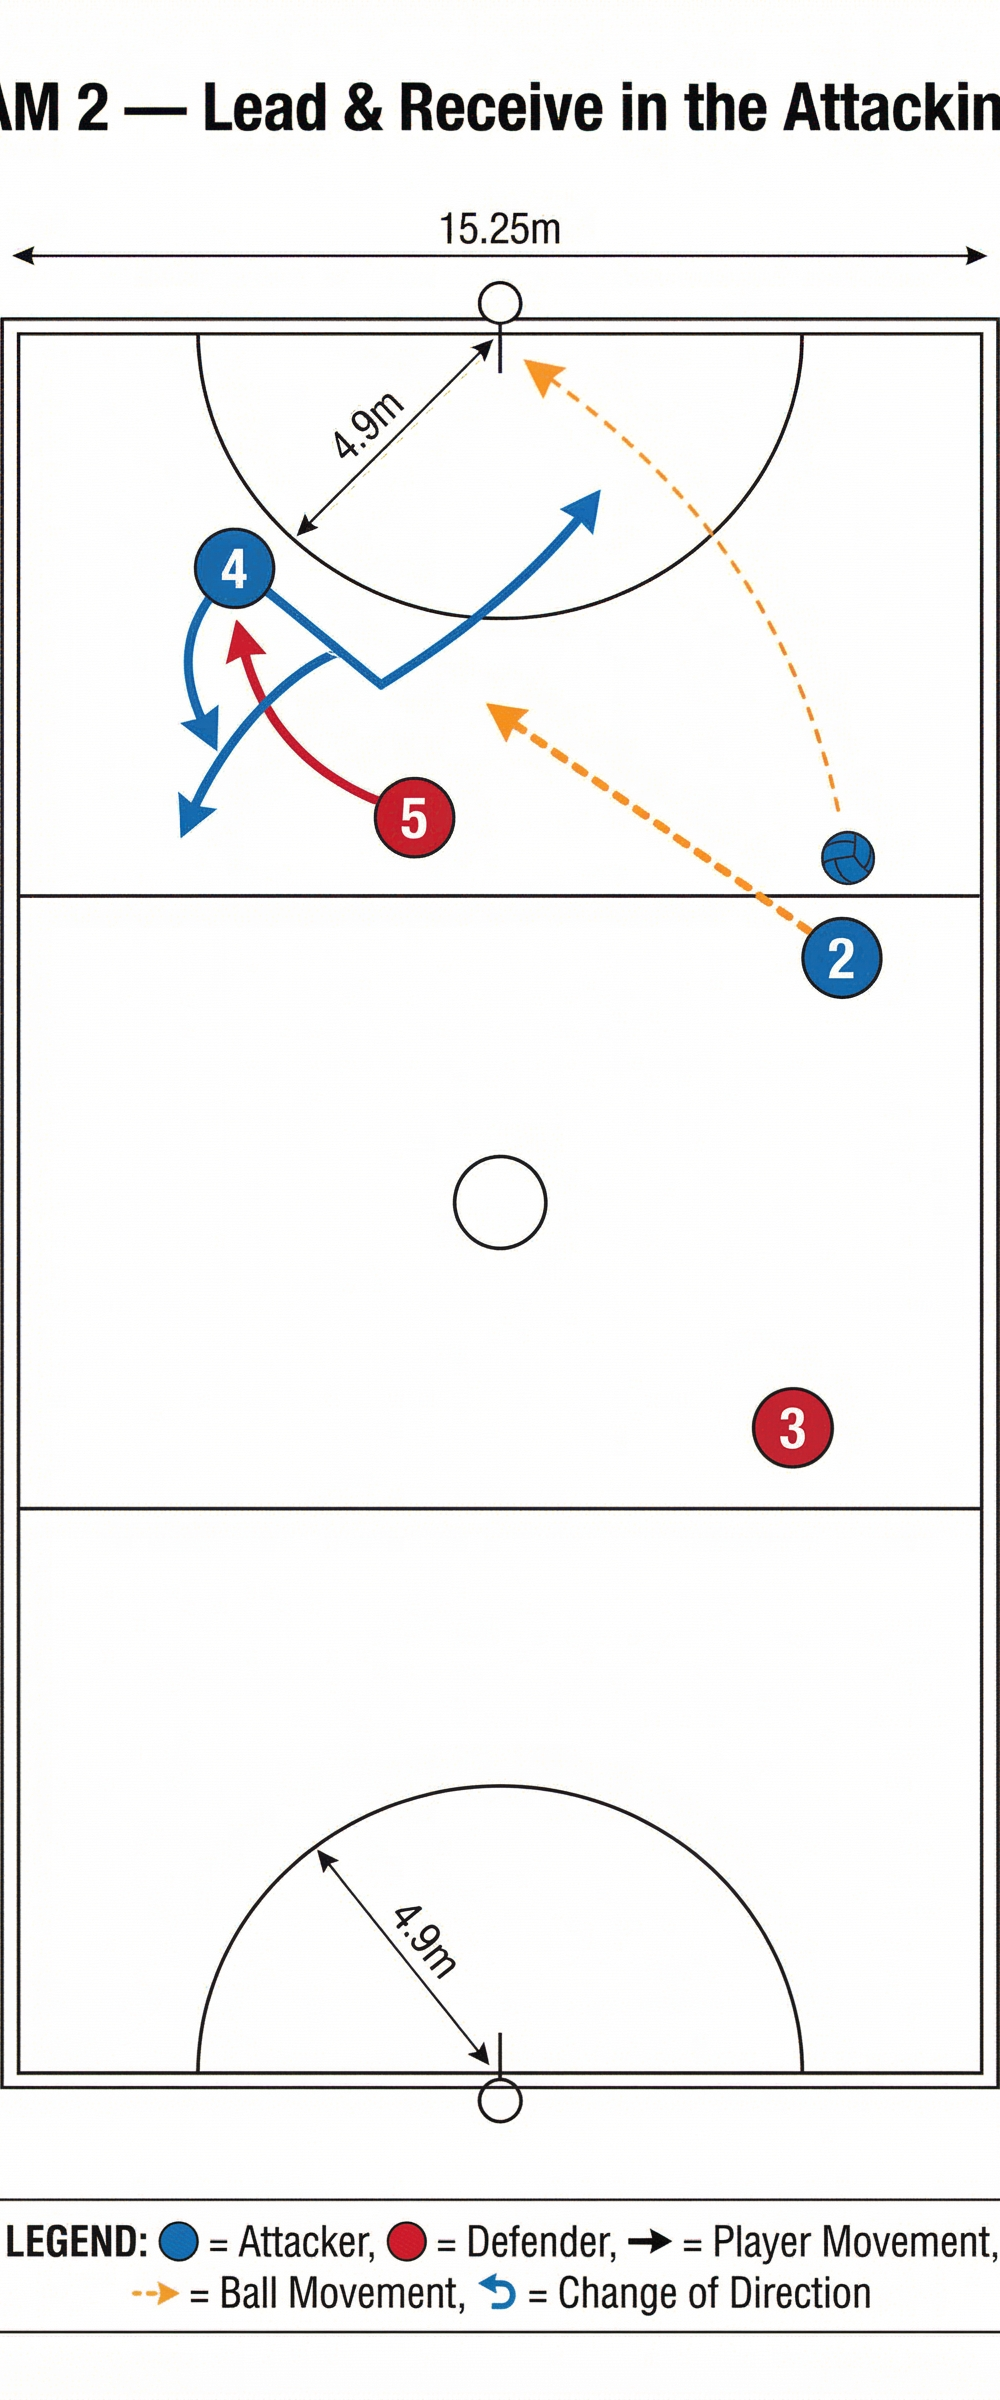
Diagram 2 — Lead & Receive in the Attacking Third: Player 2 has received the ball after a successful dodge and now feeds Player 4 (Shooter/GA), who executes a sharp change-of-direction lead from the edge of the goal circle. Two passing options are shown — a direct pass to Player 4's lead, or a lob into the goal circle.
4. Key Coaching Points

To maximize the effectiveness of this drill, focus on these five critical teaching points during every repetition.
Explosive Push-Off. The change of direction must be sharp and powerful. Emphasize planting the outside foot firmly — the knee should be bent and loaded — before driving off it to create immediate separation from the defender. A weak plant produces a slow, rounded dodge that any defender can recover from.
Deceptive Body Language. The initial movement (the fake) must be convincing. Attackers should use their head, shoulders, and eyes to sell the fake direction before cutting back. If the body language is half-hearted, the defender will not commit and the dodge will be ineffective.
Strong, Angled Leads. The final drive into space should be at a sharp angle (approximately 45 degrees) rather than running flat across the court or directly away from the ball. An angled lead shortens the pass, makes it harder to intercept, and keeps the attacker in a position to face down court on receipt.
Attacking the Ball. Receivers must drive strongly towards the pass, extending their arms to take the ball early and at the highest point possible. Waiting passively for the ball allows the defender to recover and contest the catch.
Timing is Everything. The Attacker must time their dodge so they are breaking into space just as the Feeder is ready to release the ball. A dodge made too early allows the defender to recover; a dodge made too late means the Feeder has already been held for three seconds.
5. Common Mistakes

Watch for these frequent errors and address them with specific, targeted corrections.
| Mistake | What It Looks Like | Correction |
|---|---|---|
| Rounding the dodge | Player runs in a curved arc instead of cutting sharply | Insist on a firm foot plant; use a cone to mark the exact point of the cut |
| Faking without intent | Initial movement is tentative and doesn't move the defender | Demand 2 full, hard steps in the fake direction before cutting |
| Leading too early | Attacker is already standing still in space when the Feeder looks up | Teach players to read the Feeder's eyes and time the lead accordingly |
| Running away from the ball | Lead goes straight down the sideline, away from the Feeder | Reinforce the 45-degree angle rule; use cones to guide the lead direction |
| Dropping the hands | Attacker doesn't extend arms to signal or receive | Make a habit of "show your hands" as a verbal cue on every lead |
6. Variations & Progressions
Adapt the drill to suit the skill level of your players and keep sessions challenging and engaging.
Progression 1 — Double Dodge. If the defender recovers well after the first dodge, teach the attacker to immediately execute a second dodge in the opposite direction before leading for the ball. This simulates the real match scenario where a first dodge is read and countered, requiring a second movement to create space.
Progression 2 — Continuous Down-Court Flow. Instead of resetting after one pass, the attacker receives the ball, pivots, and immediately feeds a second attacker (Player 4) making a lead further down the court toward the goal circle. This simulates a fast transition and adds a shooting element to the end of the drill.
Variation 1 — Restricted Space. Use cones to narrow the area the attacker can lead into, forcing them to use sharper, more precise dodges to get free in a confined space. This is excellent preparation for congested match situations.
Variation 2 — Unopposed Practice. For beginners or when introducing the drill, remove the defender entirely. Focus purely on the footwork mechanics, balance, and quality of the lead. Add the defender only once the movement pattern is established.
7. Age Adaptations
Modify the drill to ensure it is appropriate, safe, and developmentally suitable for each age group.
| Age Group | Key Modifications |
|---|---|
| Under 8s / Under 10s | Remove the defender. Use fun analogies ("run to the red cone, then quickly to the blue cone"). Keep passes short (3–4m) and focus on the concept of moving to get the ball. |
| Under 12s / Under 14s | Introduce passive defense (the defender shadows but does not intercept). Emphasize the quality of the push-off and the timing of the lead. Begin introducing the 45-degree angle concept. |
| Under 16s / Open | Apply full, intense defense. Demand explosive movements, complex double dodges, and flawless timing under pressure. Incorporate the drill into full-court transition scenarios with a shooting finish. |