Netball Footwork and Landing Technique: Stick, Pivot & Release Drill
A progressive, coach-led Netball drill that turns faster leads into balanced landings, legal pivots, and composed first passes under pressure.
Equipment Needed
Overview
Footwork and landing technique drill is a coach-led progression that teaches players to arrive at the ball under control, absorb force through a stable lower body, and make the next decision from a balanced base. The drill moves from a straight lead and two-foot stick to a V-cut, pivot, and live outlet decision. Use it in the first 20 minutes of a skills session, after a lower-limb warm-up, or before match play when your group is producing footwork calls, off-balance passes, or rushed releases.
Use a 7 m x 7 m lane within the regulation 30.5 m x 15.25 m court. Coach players to decelerate with hips back, knees over toes, a tall chest, and level eyes before they pass. Align footwork language with the World Netball 2024 rules and education resources.1
Coach’s outcome: By the final progression, every player should be able to lead, catch, land, hold balance for two seconds, pivot without travelling, and pass accurately while scanning a defender and an outlet.
Setup
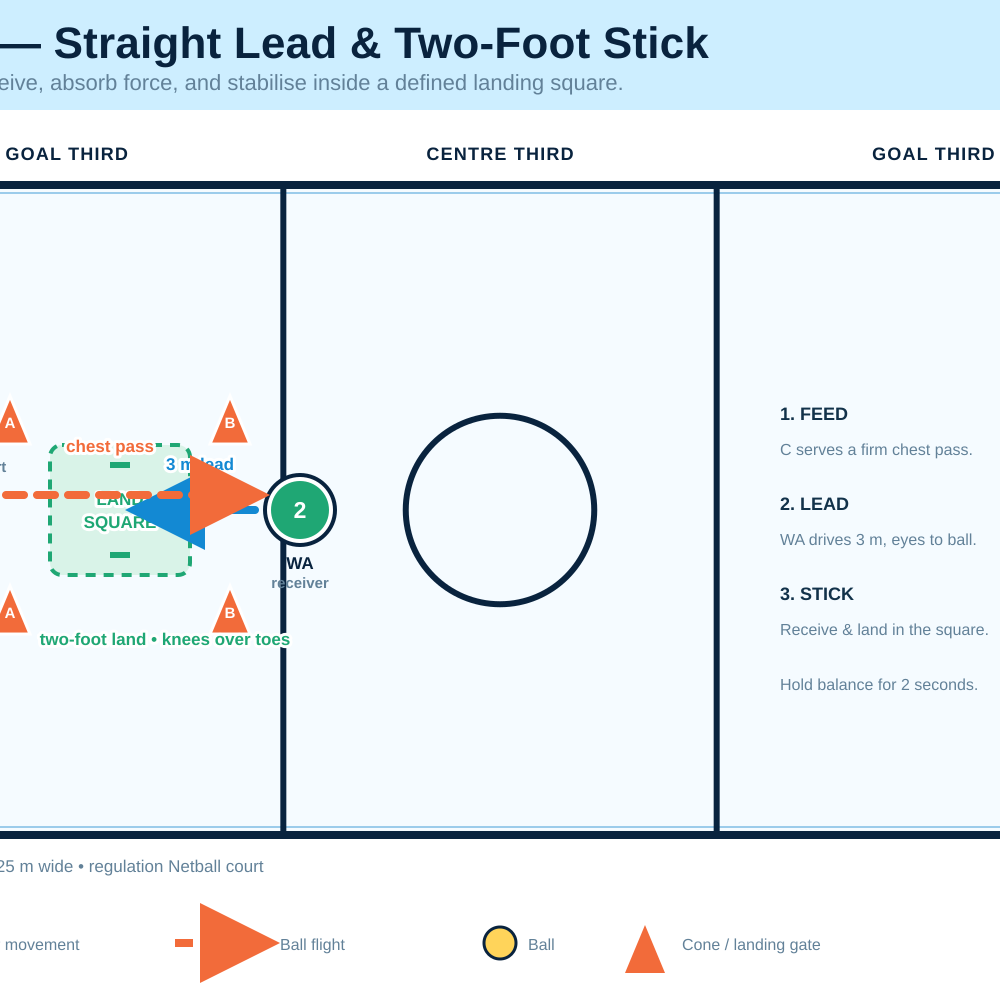
Use three stations for eight to twelve players: a straight-lead landing square, a V-cut landing-and-pivot pattern, and an applied decision station. Begin with one station for novice groups.
| Item | Coaching setup |
|---|---|
| Working area | Use one court third (10.17 m long x 15.25 m wide) or a 7 m x 7 m lane for each small group. Keep at least 2 m between stations. |
| Equipment | 10–14 flat cones, 4 landing squares or hoops, 4–6 Netballs, bibs, whistle, and timer. |
| Numbers | Ideal: 8 players, arranged as four feeder–receiver pairs. Positions are C (1), WA (2), GA (3), WD (4), and GS (5). |
| Work:rest | Use 30 seconds of quality work, 30 seconds to coach and reset, then rotate. Complete three rounds at each station. |
| Landing target | Mark a 1 m x 1 m square with flat cones so a controlled landing is observable. |
Player positions
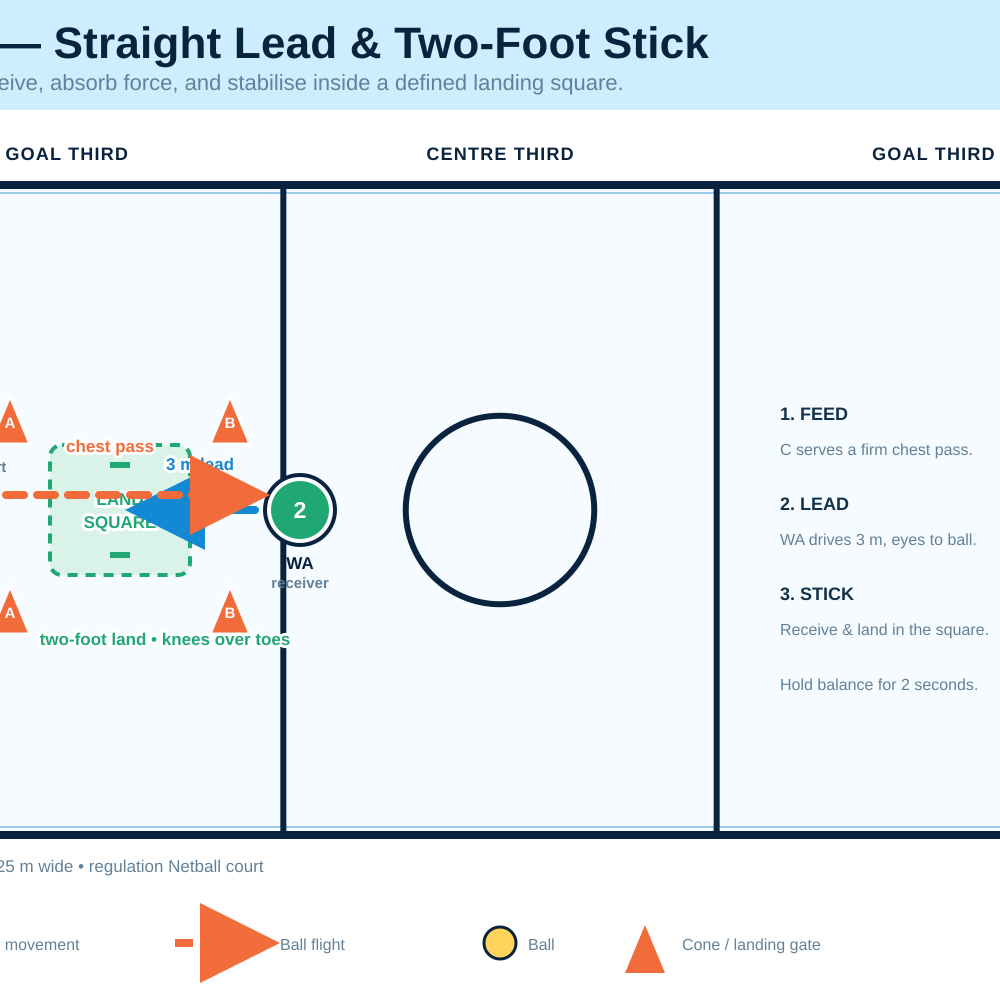
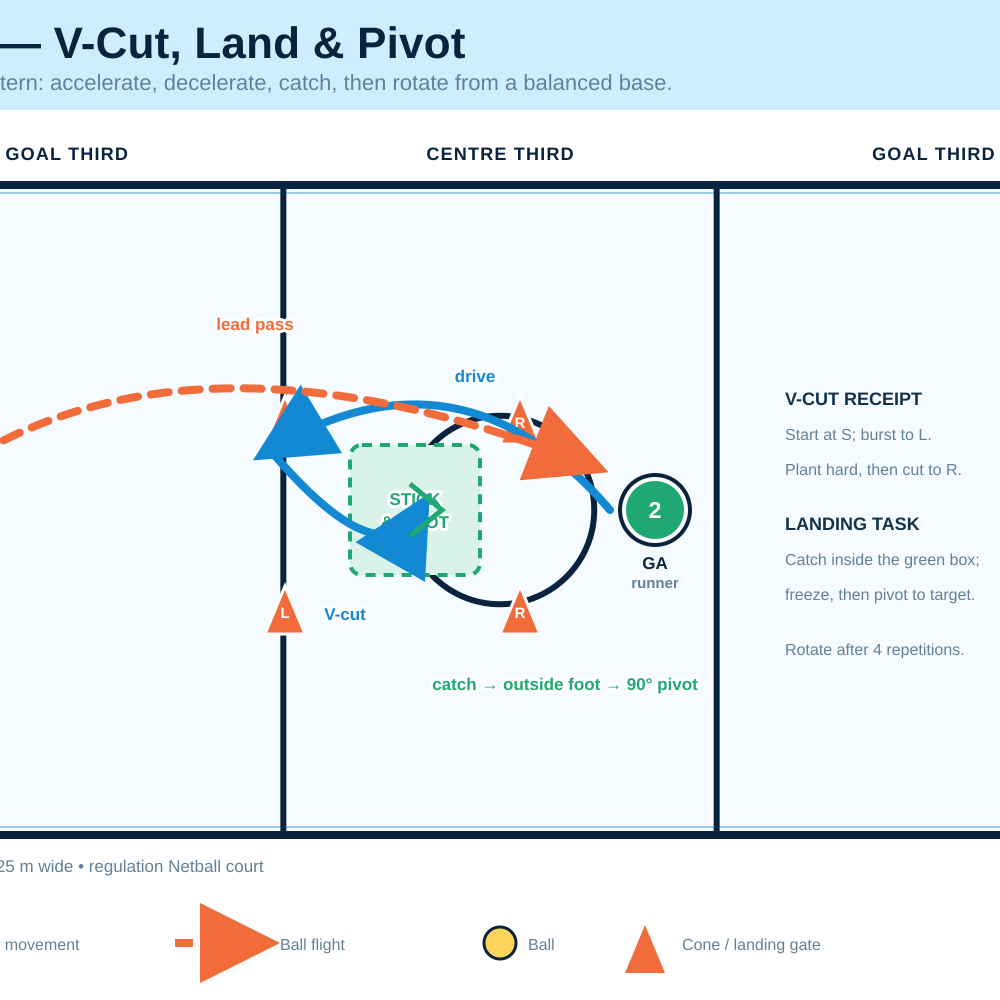
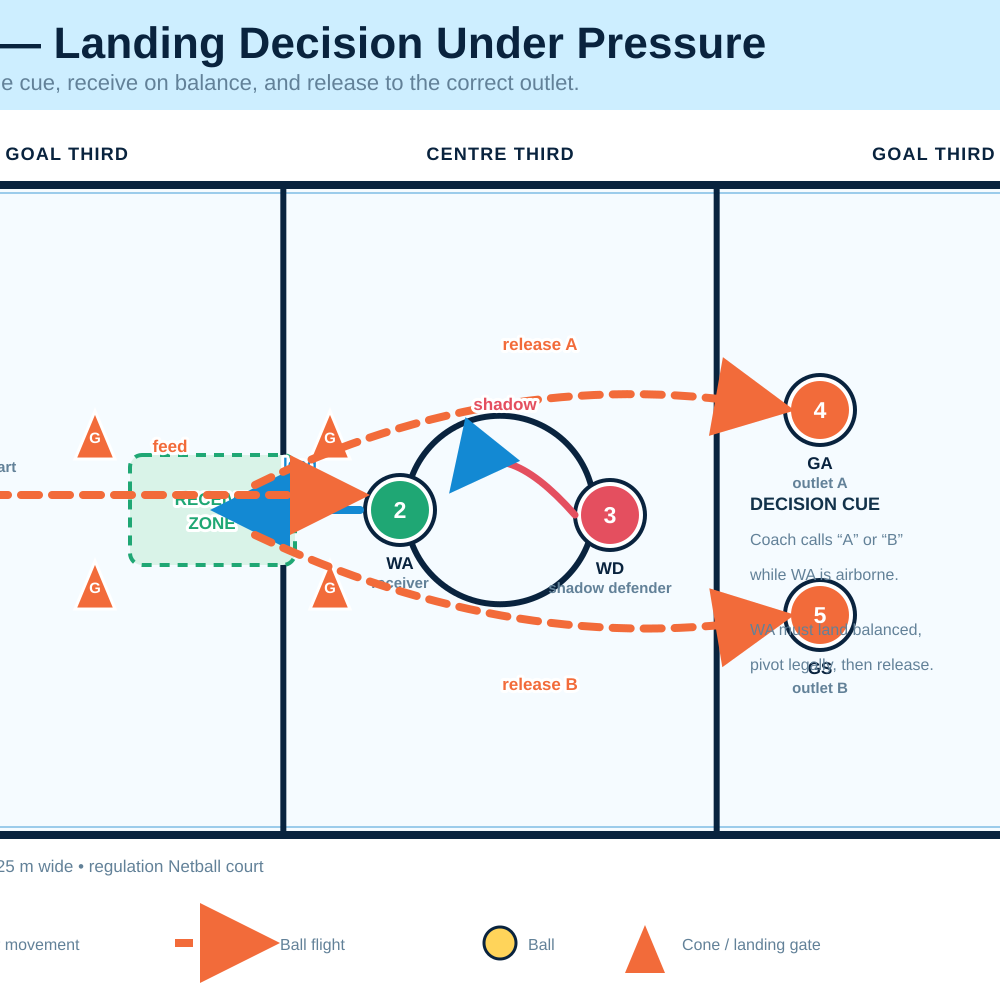
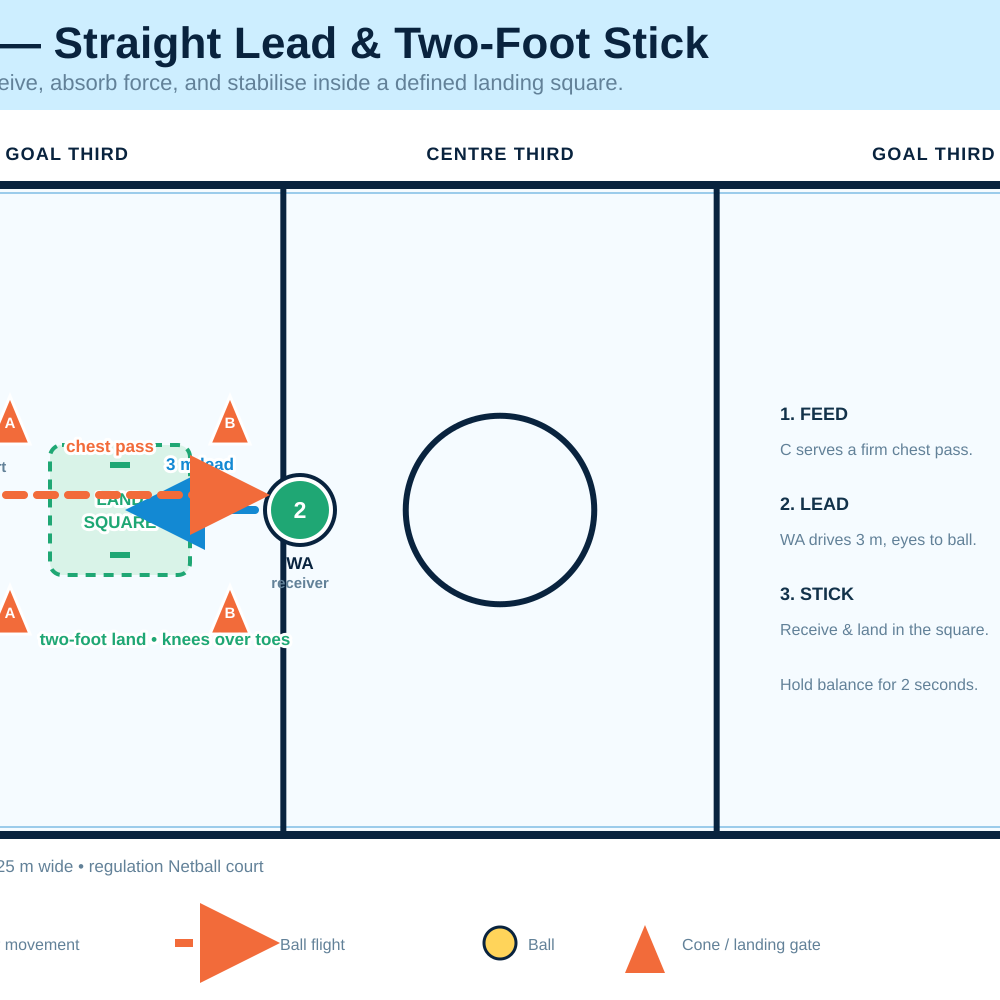
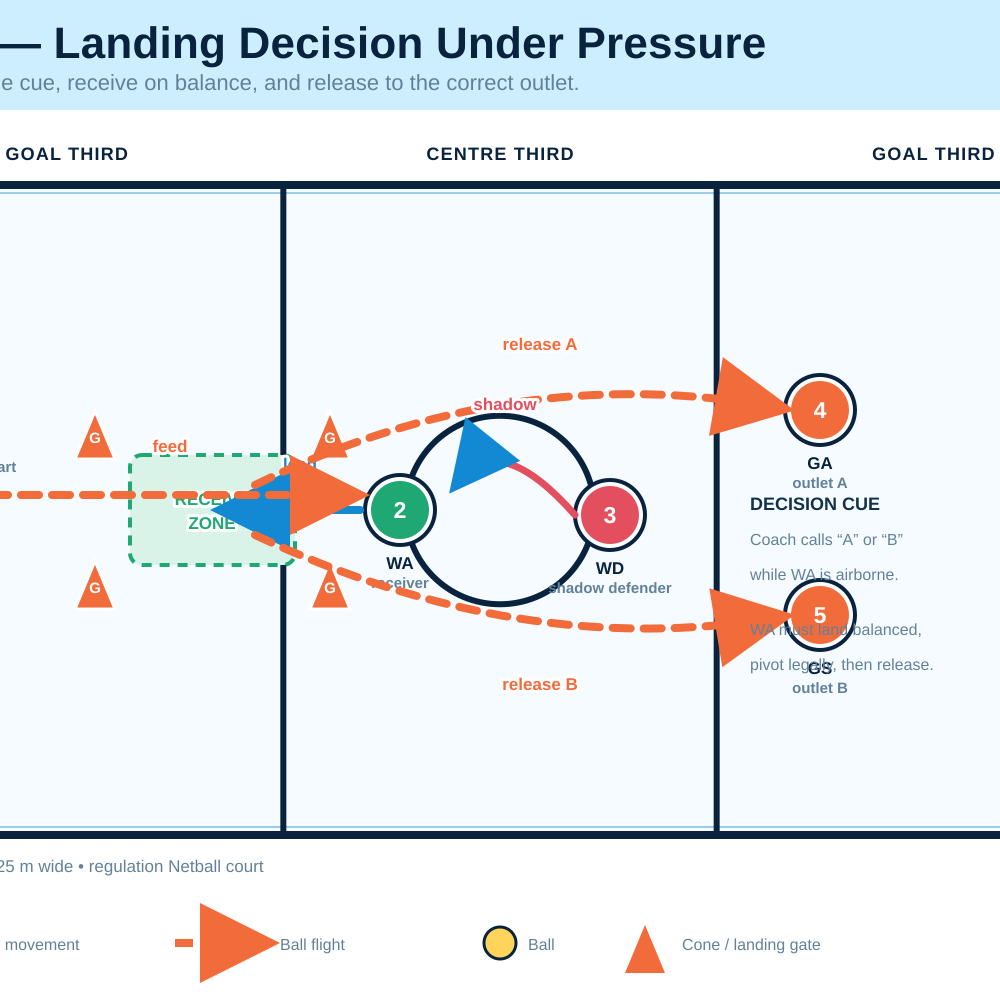
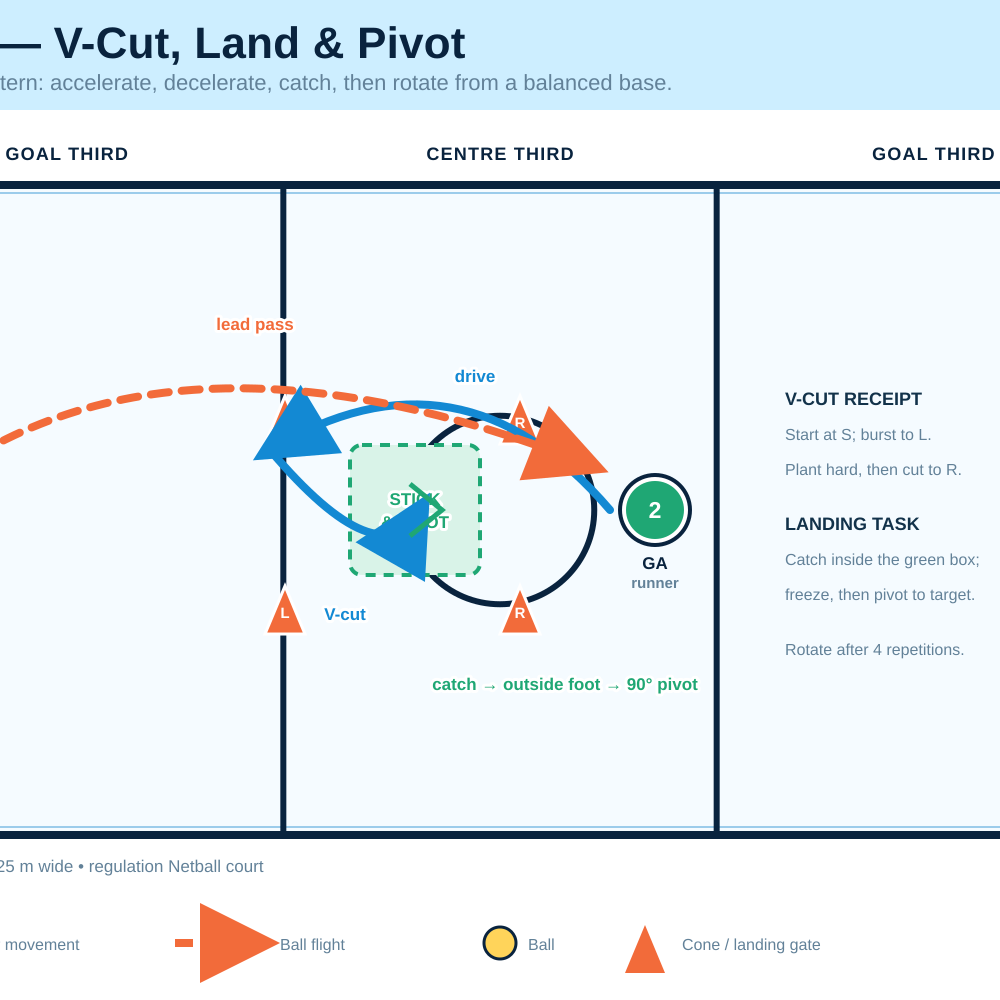
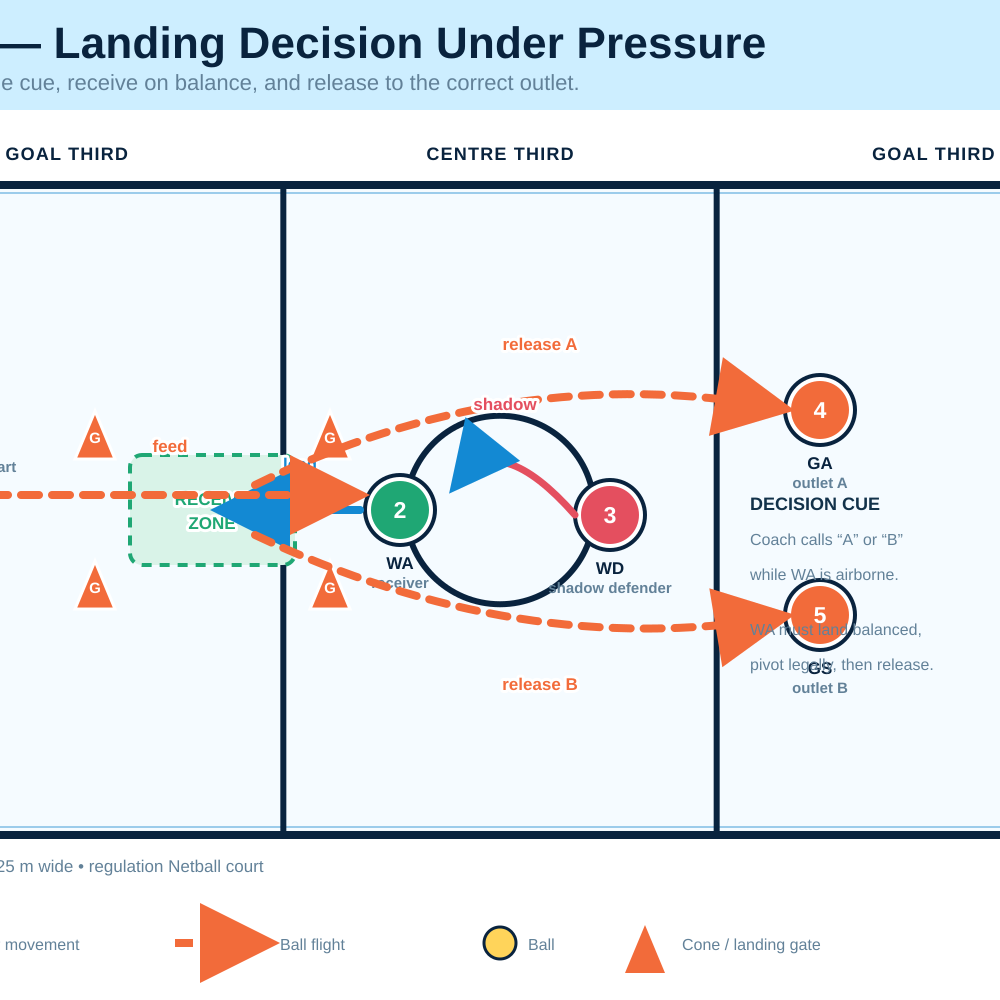
At Station 1, C (1) is the feeder and WA (2) is the receiver. C starts 4 m from the front edge of the landing square; WA begins 3 m beyond the back edge. At Station 2, C (1) feeds GA (2) through a V-cut. At Station 3, WA (2) receives under a shadow WD (3) and chooses GA (4) or GS (5) as the outlet. The numbered markers show rotation order only.
Step-by-Step Instructions
Demonstrate the landing before adding a ball. Show a quiet two-foot landing: feet hip-width apart, knees soft, hips loaded, chest tall, and hands ready. Demand a full two-count; watch the feet and knees, not the ball.
Rehearse the approach line. WA starts 3 m behind the landing square and drives on the coach’s clap. Cue shorter final steps and a lower centre of mass. Land in the 1 m x 1 m square and freeze; complete four repetitions before adding a pass.
Add the feed. C delivers a firm chest pass as WA begins the lead. WA calls, presents early hands, receives in front, and lands inside the square. Insist on a two-second hold and coach side-on for body alignment.
Make the finish directional. After the two-count, WA pivots and passes back to C. Cue: land, own the base, then turn. Swap roles after four catches and repeat from the opposite side.
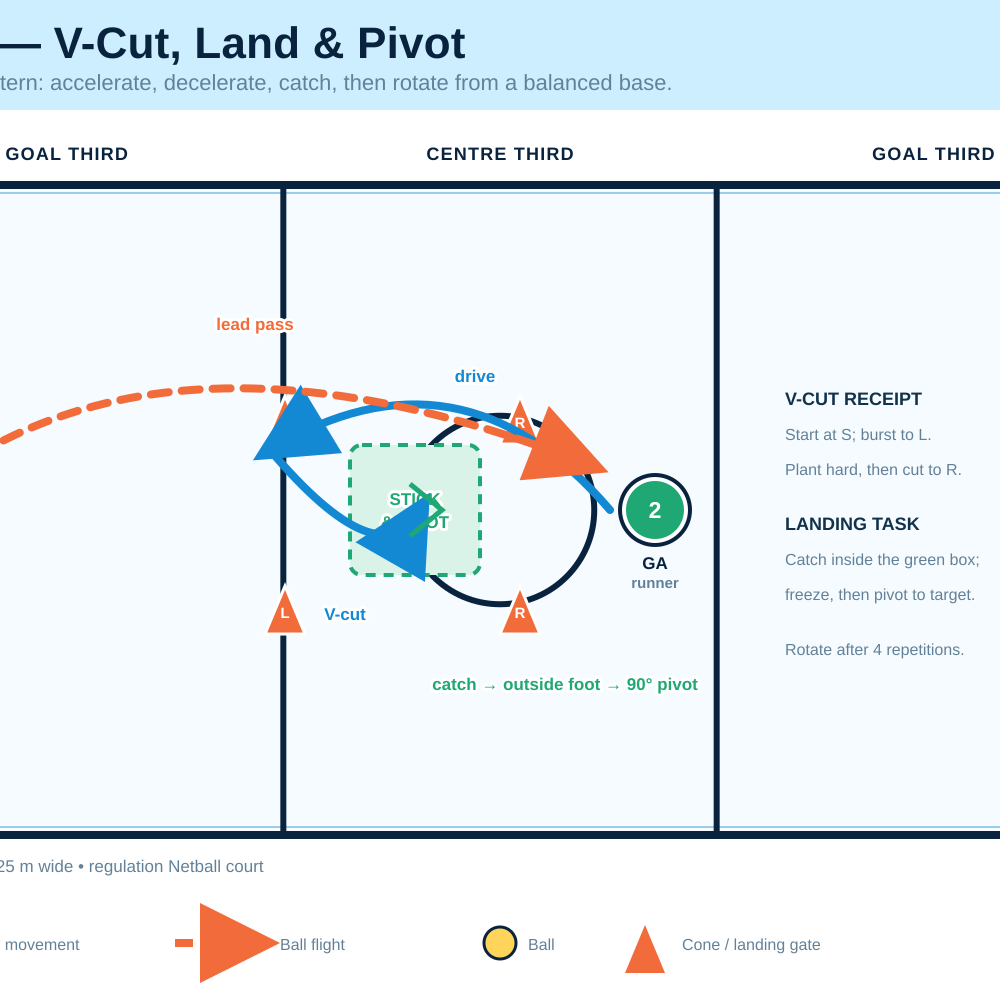
Progress to the V-cut. Set Start, Lead, and Return cones as shown. GA accelerates from Start to Lead, plants, then changes direction into the landing box. C delays the pass until GA has genuinely created separation. GA catches, sticks the landing, pivots 90 degrees, and passes to the nominated target. Run four repetitions on the right and four on the left before rotating.
Add a decision cue. WD tracks at 50 percent pressure from 1.5 m away. As WA travels, the coach calls outlet A or B. WA lands, scans, pivots from a stable base, and releases to GA or GS.
Increase game realism, not chaos. Move WD to live pressure only when receivers consistently hold the landing for one second and make accurate first passes. Use a 6-second cycle: lead, receive, land, decide, release, clear. Keep the next player outside the lane until the ball has left the receiver’s hands.
Score quality. Award one point for a controlled landing inside the target, one for a legal pivot, and one for an accurate release. No controlled landing means no landing point.
Transfer. Play 4 v 4 in one court third. Award a bonus point when a receiver visibly sticks a balanced landing before the next pass.
Key Coaching Points
| Coaching point | What the coach should see and say |
|---|---|
| Decelerate before the catch | “Shorten the last two steps.” The player reduces speed before contact with the ball, not after landing. |
| Build a stable base | “Feet under hips; knees track the toes.” Watch that knees do not collapse inward or weight fall onto the toes. |
| Receive in front | “Show hands early; catch in your window.” The ball should arrive in front of the sternum. |
| Absorb, then balance | “Land quietly and freeze.” Hips and knees flex together while the trunk stays stacked. |
| Separate landing from pivot | “Stick first, turn second.” A controlled base prevents a rescue step. |
| Scan before release | “Eyes up on the second count.” Find the next pass after landing rather than staring at the ball. |
Common Mistakes
| Error to watch for | Immediate correction |
|---|---|
| Catching while travelling too fast | Remove the pass, rehearse the last two steps, then reintroduce a slower, earlier feed. |
| Knees collapsing in on landing | Narrow the approach speed and cue “knees over middle toes.” |
| Landing outside or on the edge of the box | Reduce the lead from 3 m to 2 m and make the receiver call earlier. |
| Pivoting before balance is secured | Require an audible two-count and visible freeze before any pivot or pass. |
| Feeder throwing late or behind the runner | Coach C to release to the receiver’s running line, not the starting point. |
Variations & Progressions
1. Easier: catch-and-stick with a tossed ball. In pairs at 3 m, the receiver drops into the landing square, catches a gentle toss, and holds for three seconds. This removes speed and lets you coach shape.
2. Harder: one-foot entry and escape. The receiver approaches from an angle, establishes the landing foot, then pivots and releases. Use this only when the two-foot base is robust; explicitly identify the landing foot before the next repetition.
3. Advanced: coloured outlet and live defender. GA and GS wear different bibs. The coach calls a colour on the catch while WD defends at safe match intensity. This links landing mechanics to perception, composure, and a correct first-pass choice.
Age Adaptations
| Group | Adaptation |
|---|---|
| Under 8 | Use 2 m leads, large 1.5 m squares, soft tosses, and a three-second statue hold. Praise quiet landings and space awareness over speed. |
| Under 10 | Use 3 m leads and chest passes. Teach one cue at a time: quiet feet, then soft knees, then eyes up. Keep WD passive. |
| Under 12 | Use the full Station 1 and Station 2 progression. Introduce simple pivot choices and short decision calls. |
| Under 14 | Add live WD pressure, late outlet calls, and a 6-second cycle. Ask players to self-assess whether they were balanced before release. |
| Under 16 / Open | Use full-speed V-cuts, one-foot landings, deceptive leads, and 4 v 4 transfer. Film two repetitions per player and review first contact. |
Coach’s Close-Out
Debrief with two questions: “What made your landing controlled?” and “When did you know your next pass?” Reinforce that speed matters only when the player can brake, balance, and decide. Revisit this progression weekly as a quick landing diagnostic before centre-pass, circle-edge, or defensive-intercept work.

