

Rugby
Own 22 Double-Backfield Touch Exit
Teach a 10-player, second-receiver exit that moves the kick away from pressure and links a disciplined far-side chase.

What you need
balls, cones
Overview
This 10-player Double-Backfield Touch Exit creates a calm route out of the own 22 from a right-side ruck. 10 attracts the first defender, 12 screens hard, and 15 arrives late as second receiver. The ball goes behind pressure to 15 for a right-foot spiral toward far touch. Target touch is between the opposition 10-metre line and halfway; against an empty backfield, kick contestably into the left-wing corridor.
Use it from a ruck 12–16 metres from the own try line and 10–15 metres in from right touch. 9 owns the scan, 10 sells the front door, and 15 waits for commitment. Transfer and kick inside 4.0 seconds; connect the chase by 5.5 seconds.

Setup
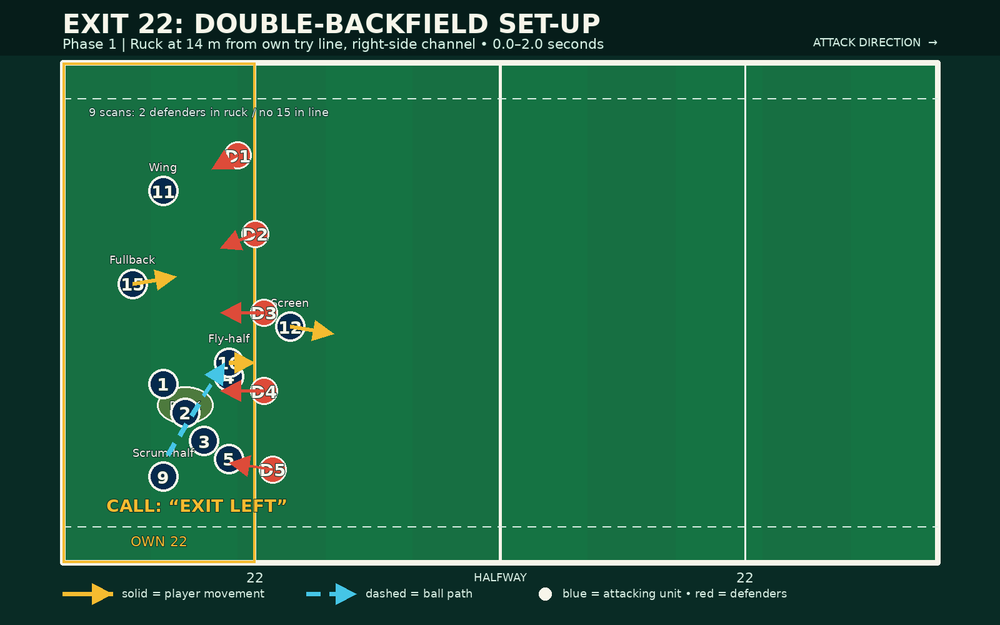
Put 1–5 around the ruck: three secure the ball and two shield the inside chase. 9 is a step behind the back foot, square to 10. 10 starts 6 metres from the ruck; 12 sits 8–10 metres wider as a genuine running threat. 11 begins wide left and closes into the chase lane. 15 starts 7–9 metres behind and 4 metres inside 11, facing the ball.
The call is “Exit Left”. Before 9 touches the ball, they must count the defenders in the ruck and locate the opposition fullback. Green light: two or fewer defenders committed to the ruck, the defensive 15 is in the line or central, and there is space beyond the far-side touchline. Amber light: the backfield is covered but the line is advancing hard—play for touch. Red light: loose ball, no picture, or 15 has already drifted wide—9 calls “hold” and the side uses a simple 10 clear or carries with 12.
Step-by-Step Instructions
0.0–0.5 seconds — platform and picture. 1–5 create a long, stable back foot. 9 scans ruck numbers, opposition 15 and far touchline. 15 arcs behind 10 without sprinting early. 11 takes two steps infield toward the landing zone.
0.5–1.2 seconds — first pass. 9 fires chest-height to 10, in front of their body. 10 catches square, takes one attacking step and shows both hands to hold the first defender. 12 runs a hard, legal forward screen outside 10.
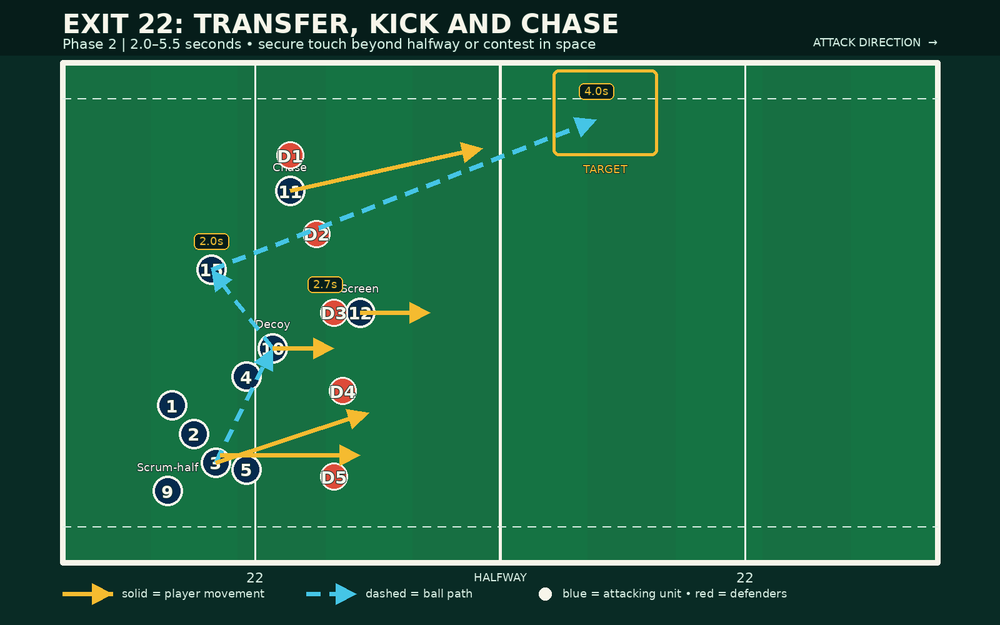
1.2–2.0 seconds — transfer. On the second foot plant, 10 gives a flat two-handed pass inside to 15 on the second-receiver line. 15 calls “mine”, catches hip-to-chest and takes the ball across their body. The pass travels behind 10’s original line, buying kick time without retreating.
2.0–3.2 seconds — kick. 15 takes one settling step, points the left shoulder at far touch and strikes a right-foot spiral through the lower half. From around 17 metres out, target 56–68 metres from the own try line and within 5 metres of touch. Prioritise touch over hang-time. 10 continues as decoy then folds inside.
3.2–5.5 seconds — chase and reload. 11 is first chaser, staying 4–6 metres inside touch so they can react to a bounce back infield. 10 is second chaser, 6–8 metres inside 11. 12 tracks the middle of the field rather than overrunning the ball. 9 and 5 sweep behind the first line to cover a return. The chase call is “blue”: 11 claims the air contest if it stays in field; “touch” tells the line to stop, set quickly and own the next lineout.
Key Coaching Points
- Secure the ruck. 9 only plays from a clean ball and stable back foot.
- Sell the front door. 10 stays square; early drift exposes 15.
- Depth without retreat. 15 receives roughly 2 metres behind 10 and kicks after one settling step.
- Kick to the picture. Far touch is default; contest infield only when their fullback is late and 11 has a lane.
- Chase in layers. One contests, one protects inside, one reloads.
Common Mistakes
- 9 passes before scanning. The group runs an exit into a set backfield. Fix it by making 9 call the colour—green, amber or red—before lifting the ball.
- 10 turns their shoulders too soon. This telegraphs the transfer and lets the line fly at 15. Coach a square catch, one positive step and late hands.
- 12 blocks rather than screens. A static or lateral blocker risks obstruction. Keep 12’s line forward, narrow and believable.
- 15 catches too deep or kicks across the ball. The result is a short, hanging ball in the 22. Mark a receiving cone and insist on one balanced step through contact.
- 11 chases outside the ball. The first chaser must stay inside the touchline and inside the ball’s likely bounce, not drift into the dead space.
Variations & Progressions
Start unopposed, then run at 70% with a coach calling green, amber or red. Add three defenders who advance after 9’s hands. Finally add a backfield defender and score: three for touch beyond halfway, two for a regather, one for touch beyond the 10-metre line.
Variation 1 — 10 kick. If the opposition edge defender jams on 12 and their fullback stays central, 10 ignores the transfer and kicks immediately to the same far touch target. 15 becomes the first sweeping defender.
Variation 2 — 15 counter. If the far wing folds into the line and 15 has a clear outside lane, 15 catches, gives a short pass to 11 and the pair counter for three phases before returning to the exit menu. Use this only after the defence has repeatedly over-chased the kick.
Age Adaptations
For Under 12, use 9–10–15 only and let 15 punt straight from a marked box; coach safe technique and support. For Under 14, add the transfer, passive defenders and a 35–45 metre target. For Under 16 and open age, use a live line, 9’s traffic-light call, and 15’s touch, contest or counter choice. Rehearse the legal screen before full pressure.
Tags
