

Rugby
5-Man Lineout: Front Dummy to Middle Lift-and-Play Drill
Build a reliable five-man lineout that sells a front-jump picture, wins clean ball in the middle and connects immediately to your scrum-half.

What you need
3 rugby balls, 12 flat cones, 2 touch flags, training bibs, whistle, optional jump pads
\n\n## Overview\n\nThis is a set-piece ownership drill for coaches who want their pack to execute a simple five-man lineout under match-like pressure: a front-pod dummy creates doubt, the middle pod lifts accurately, and the ball is delivered to No. 9 with no wasted movement. Use it early in the week to establish your calling language and again in the captain’s run as a sharp, low-volume rehearsal. The drill is best suited to U16, school, club and senior players who already understand safe lifting positions.\n\nThe core picture is deliberately simple. No. 4 shows at the front; No. 5 clears; No. 6 is lifted in the middle; No. 2 throws; No. 9 receives and plays away. Coaches should demand repeatable rhythm rather than cleverness: one clear call, one synchronized movement, one accurate throw, one clean transfer. The lineout area sits between the 5 m and 15 m lines from touch, while the wider reference pitch is 100 m x 70 m.[1]\n\n> Coach’s outcome: by the end of the activity, your unit should complete eight of 10 legal, clean catches to No. 9 in under 4 seconds from the thrower’s movement.\n\n## Setup\n\nWork on one touchline in the attacking half. Mark a 15 m-wide channel from the touchline with flat cones, then lay a 12 m long operating zone along that channel. This mirrors the practical lineout corridor without unnecessarily consuming the entire 100 m x 70 m pitch. Put one cone on the 5 m line, one on the 15 m line, and a receiving cone 4 m infield from the rear of the line for No. 9. Place a second cone 8 m beyond No. 9 to define the first phase’s direction of travel.\n\n| Item | Requirement | Coaching use |\n| --- | --- | --- |\n| Players | 11 minimum; 14–16 ideal | 2, 4, 5, 6, two lifters for 6, 9, plus defenders or shadow players |\n| Equipment | 3 balls, 12 flat cones, 2 touch flags, bibs | Keep repetitions quick and roles visually clear |\n| Space | 15 m x 12 m lineout grid, then 10 m exit lane | Rehearses the law-relevant corridor and first-phase connection |\n| Work:rest | 6 quality reps, 45 seconds rest, 3 sets | Preserves jump, lift and throw quality |\n\nAssign the thrower as No. 2 (hooker). Set No. 4 as the front caller/decoy, No. 5 as the transition player, and No. 6 as the primary middle jumper. No. 1 and No. 3, or two nominated forwards, are No. 6’s front and rear lifters. No. 7 and No. 8 may stand behind the line as screen and protection players; No. 9 waits 3–4 m infield and 2 m behind the receiver. On initial teaching, use passive opposition only; do not add a contest until the lifters are stable and the jumper’s landing is controlled.\n\n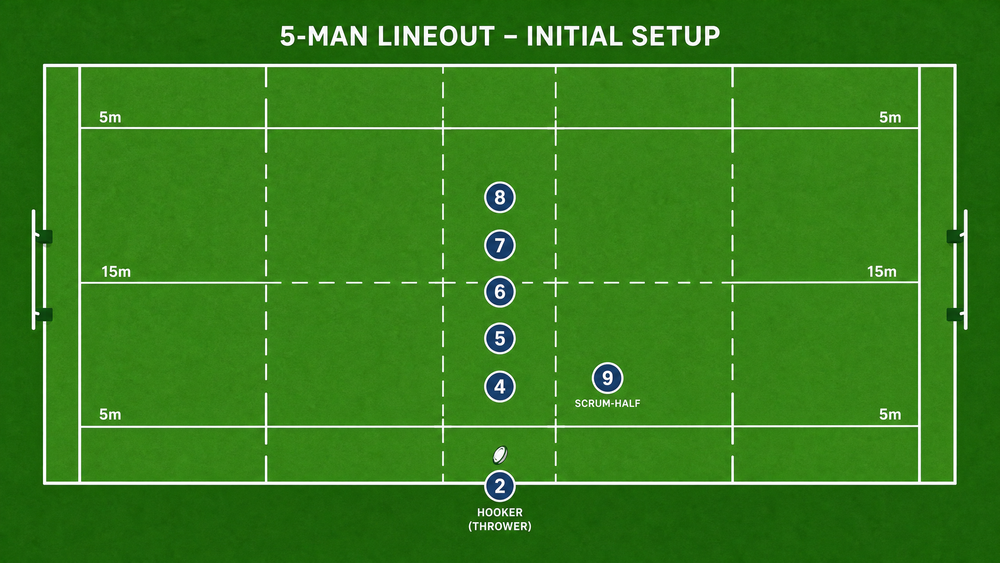 \n\n### Safety and standards before the first ball\n\nBrief the unit in 30 seconds. Lifters keep a square, athletic base, eyes on the jumper’s hips and hands placed consistently at the thigh/shorts area. The jumper calls early, stays long through the trunk, catches with two hands and returns the ball only once the lift is stable. Stop the repetition immediately if a player is lifted off balance, if a lifter loses contact before landing, or if a player moves under a jumper’s descending line.\n\n## Step-by-Step Instructions\n\n1. Build the picture. Put the five-man unit on the 5–15 m channel, facing No. 2 on the touchline. No. 4 is 5 m from touch; No. 6 is 9–10 m from touch; No. 9 sets 3–4 m infield behind No. 6. Walk the players through the sequence without a ball once.\n\n2. Call and settle. No. 4 gives the agreed call. On the trigger, the line stays square and quiet for one beat. No. 2 holds the ball at chest height, fixes the target with their eyes and begins the throwing action only when No. 6’s pod is ready.\n\n3. Sell the front picture. No. 4 takes one sharp step forward and presents hands as if to jump. Their lifters may show a short, legal lift shape but do not elevate the jumper during the initial technical phase. The purpose is to make the defensive front pod hesitate, not to create unnecessary traffic.\n\n4. Clear the middle window. As No. 4 shows, No. 5 clears one step back and toward the rear, opening a clean lifting lane for No. 6. Keep this movement tight: a 1–1.5 m adjustment is enough. Over-running the space makes the thrower’s target vague and exposes the jumper.\n\n5. Lift and throw. No. 6 steps into the middle space, plants with a balanced base and calls “up.” The two lifters elevate vertically, not sideways. No. 2 delivers a flat, catchable throw to No. 6’s outside shoulder and hands, with the ball arriving at the top of the lift. Aim for the ball to travel 9–10 m from the touchline rather than chasing height alone.\n\n
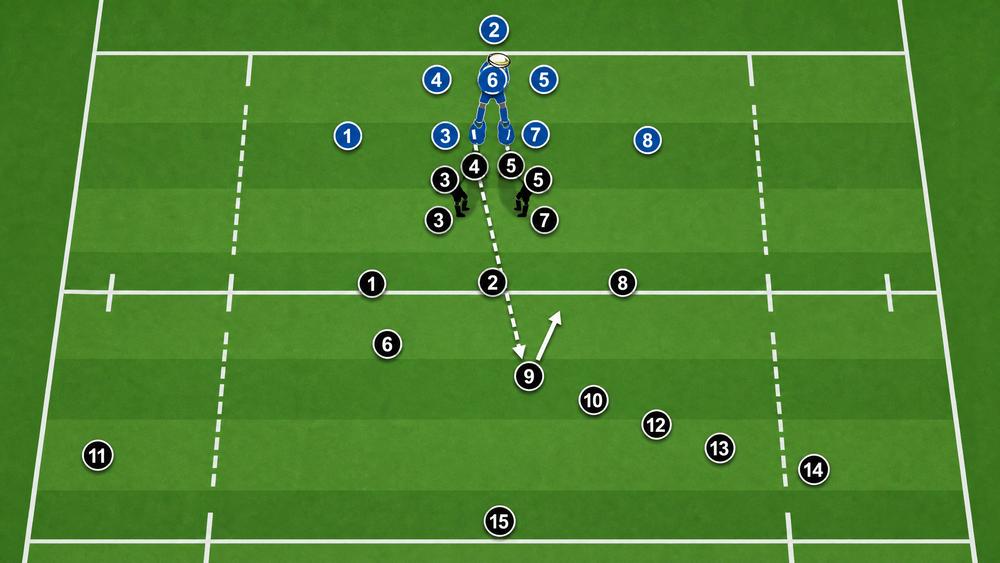
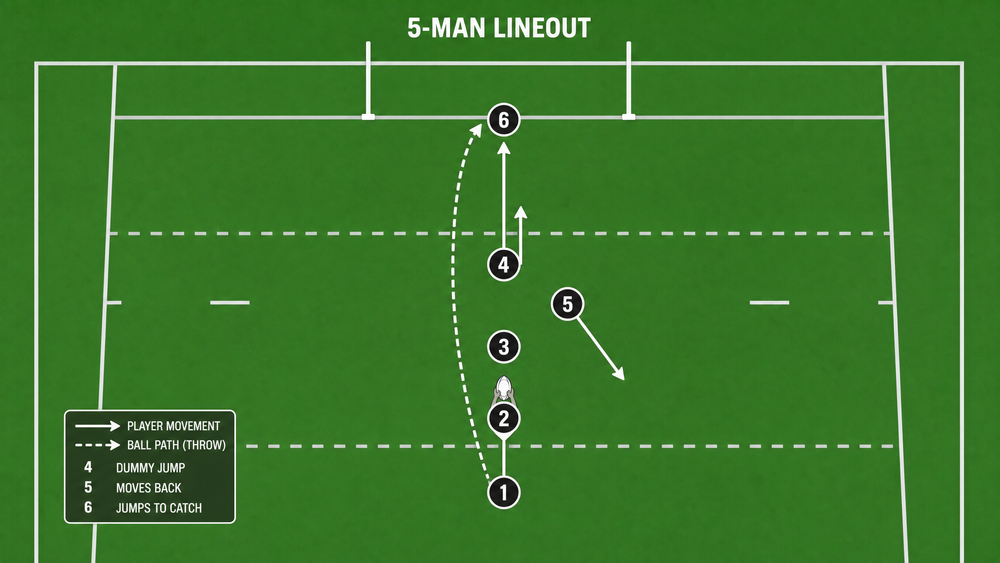 \n\n6. Secure the catch and land. No. 6 catches with two hands above eye line, pulls the ball into a strong chest position and communicates “mine.” Lifters lower under control, keeping their feet moving only enough to protect a vertical landing. No. 7 and No. 8 close around the landing area as realistic protection, without forming a static ruck.\n\n7. Transfer to No. 9. Once both of No. 6’s feet are grounded, the receiver turns their shoulders toward No. 9 and gives a short, accurate pass. No. 9 communicates early, catches while moving toward the exit cone and plays a two-handed pass to a support runner or carries through the 8 m exit lane. Time this from No. 2’s first throwing movement: set a target of four seconds or less.\n\n8. Reset with feedback. Run six repetitions from the same call. Give only one correction between reps—for example, “No. 5, clear later,” or “No. 2, lead the target by half a metre.” Rotate No. 4, No. 5 and No. 6 after each six-ball block so more players gain ownership of the pictures.\n\n
 \n\n## Key Coaching Points\n\n| Focus | What the coach should see | Intervention cue |\n| --- | --- | --- |\n| Call clarity | One decisive call before movement | “Call it once; trust the picture.” |\n| Front dummy | No. 4 threatens without drifting across the lane | “Show front, don’t chase front.” |\n| Lift timing | No. 6 is elevated as the ball leaves No. 2 | “Up with the throw.” |\n| Throw accuracy | Ball meets No. 6’s hands at full extension | “Throw to hands, not to space.” |\n| Landing | Controlled descent with lifters connected | “Own the way down.” |\n| Exit speed | No. 9 is early, square and moving forward | “Talk early; play through.” |\n\n## Common Mistakes\n\nThe most frequent error is that No. 4 jumps too early or too fully, turning the dummy into the first option. Correct it by using a two-step rehearsal: show, then hold. A second error is No. 5 drifting too far backward, which stretches the line and telegraphs the middle target; constrain the clear to one cone-width. Third, coaches will see No. 6 reaching for a late ball because the thrower has released before the lift is ready. Use a verbal “up” call and make No. 2 wait for it. Fourth, No. 9 often stands flat and watches; insist they arrive on the receiving cone while the ball is in the air. Finally, do not accept a careless descent. A won ball is not a completed ball until the jumper has landed safely and the unit can play from it.\n\n## Variations & Progressions\n\nBegin with a walk-through progression: no opposition, no lift above shoulder height, and a pause at the top so No. 2 can see the target. Then progress to full legal lifting with a passive opposing middle pod that shows hands but does not compete. Finally, use an opposed score challenge: field two five-man units, award one point for a clean catch, one for a pass to No. 9 inside four seconds and a bonus point for a successful 10 m exit. Change the target on the same call occasionally—front, middle, or rear—only after the middle option is dependable; variation must not erode your base detail.\n\n## Age Adaptations\n\nFor U12 and younger, remove lifting entirely. Use a standing catch or a low throw to a marked target, teaching spacing, communication and a fast pass to No. 9. For U13–U15, introduce lifting progressively with coached body positions, short throws and passive opposition; prioritize safety over height and limit fatigue. For U16 and open-age squads, use full legal lifts, active contesting pods and a live first phase after No. 9 receives. At every age, keep the language consistent: call, show, lift, catch, land, play.\n\n## References\n\n[1]: https://www.world.rugby/the-game/laws/law/18 "World Rugby Law 18: Touch, Quick Throw and Lineout"\n
