

Rugby
Forward Pod Attack: The Late Offload Option
Equip your forward pack to bend the defensive line with connected carrying, and teach them to read the contact picture to deliver a devastating late offload.

What you need
Rugby balls, Tackle shields, Cones for grid marking, Training bibs
1. Overview
The connected forward pod is the engine room of a modern Rugby Union attack. When your team carries the ball in isolated, one-off collisions, the defence can easily fold the carrier to the floor and slow down your ruck speed. However, when three forwards arrive together in a connected pod, they present multiple threats. This specific set play focuses on a tight, three-man forward pod receiving the ball from the Scrum-half (9). The primary goal is to carry aggressively and bend the defensive line. The secondary goal—the true weapon of this play—is the late offload option. By maintaining a support runner on the outside shoulder, the pod forces the second defender to commit fully to the tackle. If that defender bites, the offload lane opens; if they hesitate, the carrier wins the collision line.
This play is best used between the 22-metre lines when you need to generate momentum, narrow the defensive width, and create front-foot ball for your backline.
2. Setup
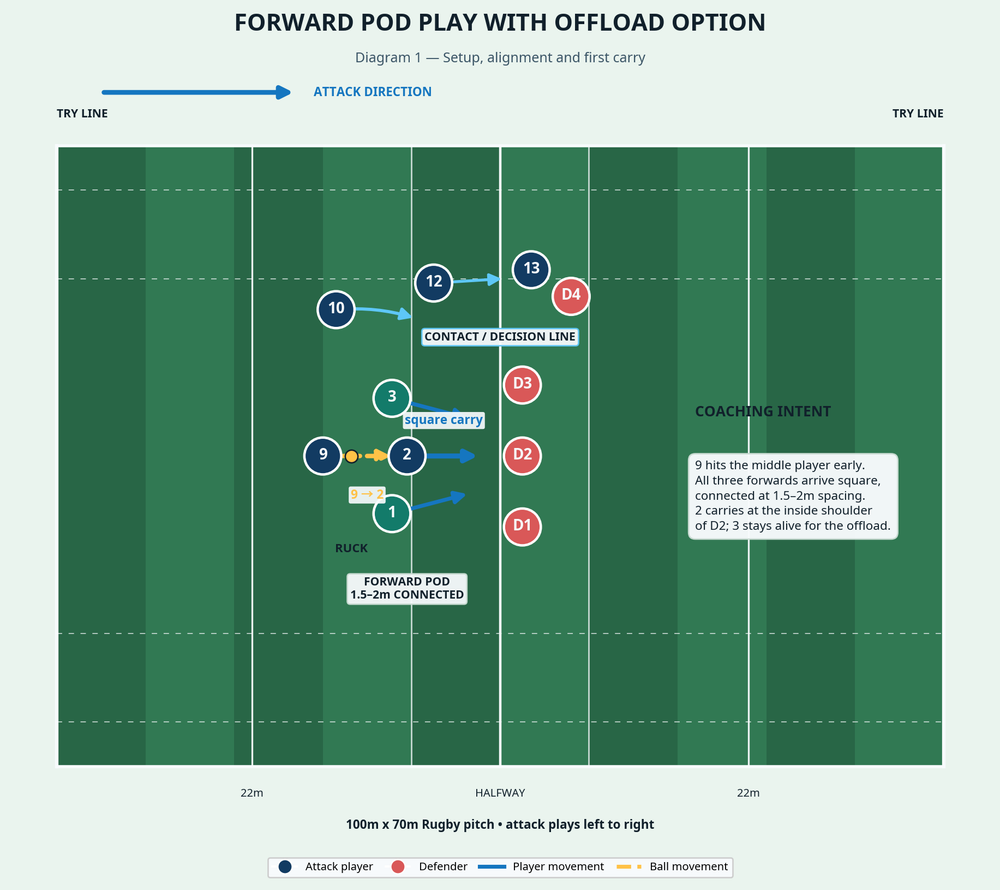
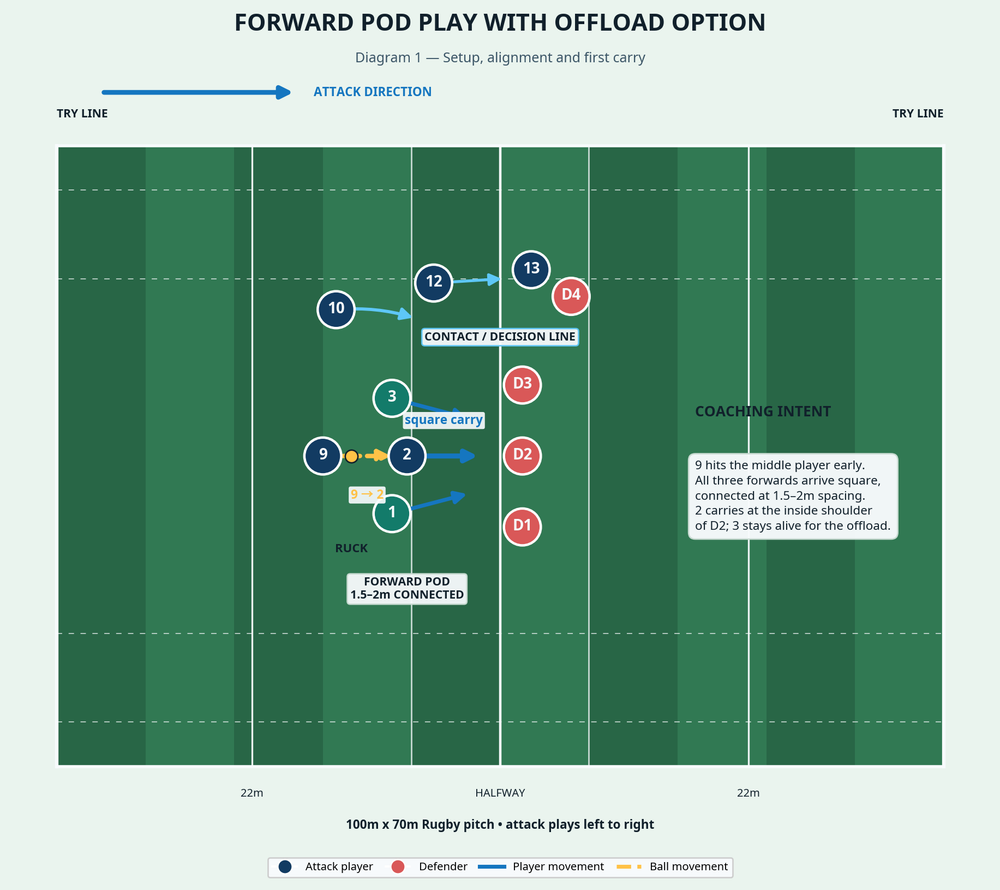
To run this play effectively, you need a full-width 100m x 70m Rugby pitch, or a marked 40m x 40m grid for training repetitions. You will need a minimum of 10 attacking players and 4 defensive players holding tackle shields.
Player Roles and Positioning
- Scrum-half (9): Positioned at the base of the ruck, ready to deliver a fast, flat pass.
- Hooker (2) - Ball Carrier: Aligned 12 to 15 metres infield from the ruck, running a hard, square line.
- Loosehead Prop (1) - Inside Support: Positioned 1.5 to 2 metres on the inside shoulder of the Hooker. Their role is to protect the inside channel and secure the ruck if the offload is not on.
- Tighthead Prop (3) - Outside Support (The Offload Option): Positioned 1.5 to 2 metres on the outside shoulder of the Hooker. They run a late, tracking line, waiting for the defender to commit before accelerating into the offload lane.
- Fly-half (10) and Centres (12, 13): Holding width outside the pod, ready to sweep behind or call for the ball if the defence over-commits to the forwards.
3. Step-by-Step Instructions
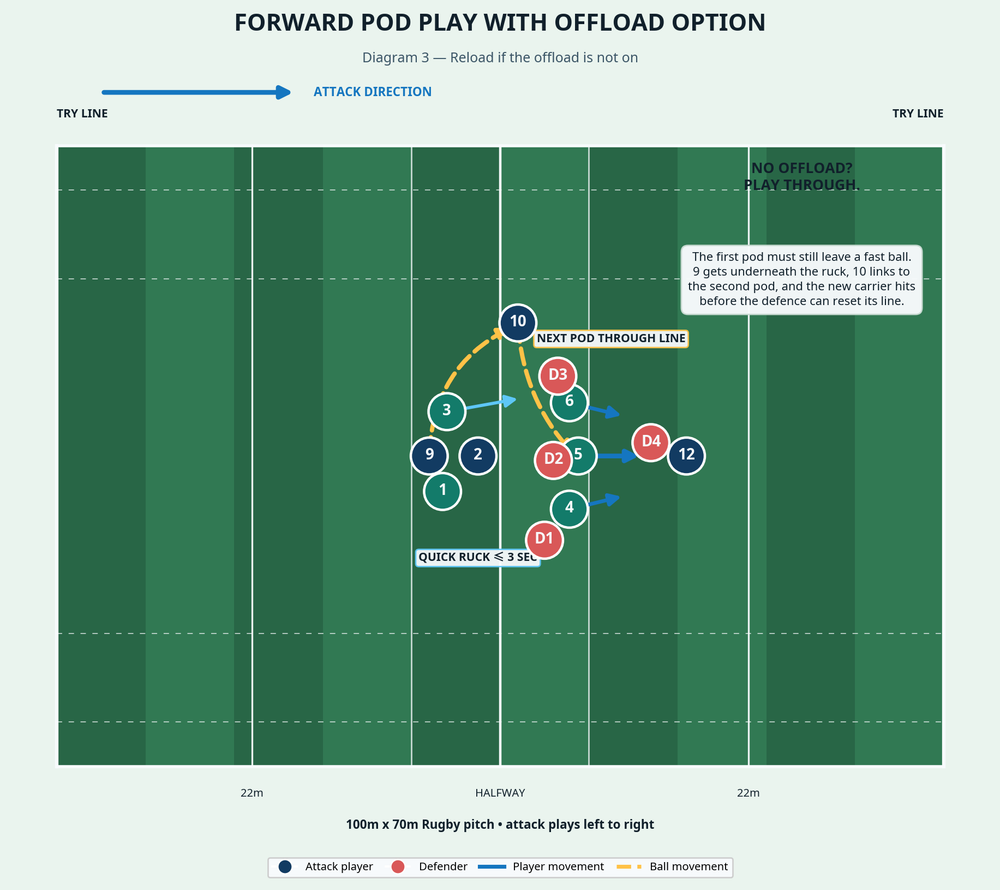
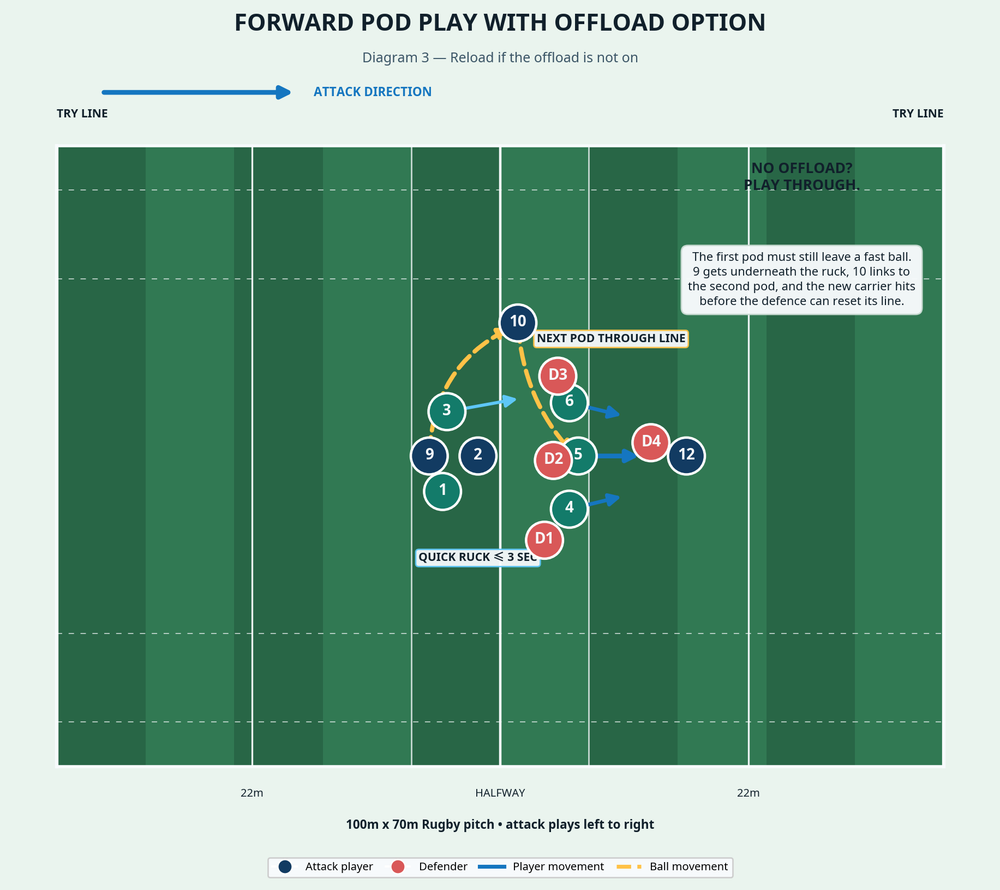
- The Alignment: The Scrum-half (9) identifies the defensive spacing and calls the pod into position. The three forwards (1, 2, and 3) align in an arrowhead formation, standing 12 to 15 metres infield. They must be connected, with no more than 2 metres of lateral space between them.
- The Delivery: The Scrum-half clears the ball from the ruck with a crisp, flat pass directly to the middle forward, the Hooker (2).
- The Square Carry: The Hooker catches the ball early and accelerates squarely up the pitch. They must not drift sideways. The target is the inside shoulder of the second defender (D2).
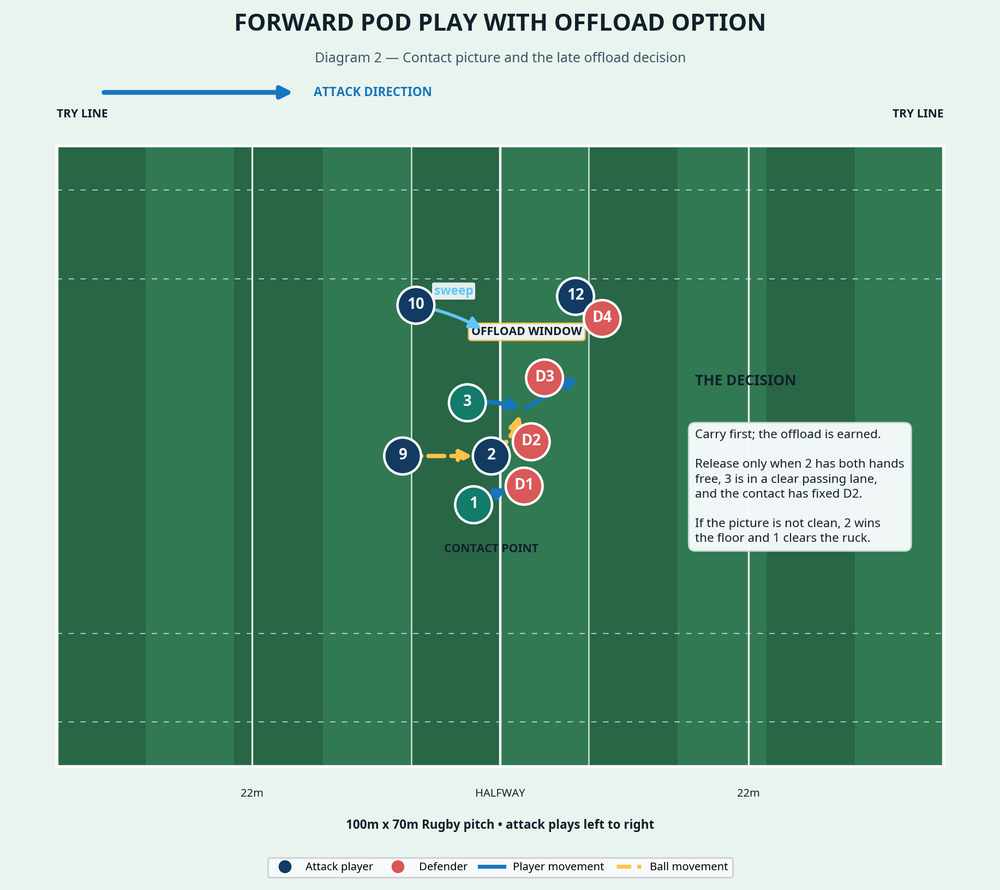
- The Inside Latch: The Loosehead Prop (1) tracks the carrier's inside hip. As the Hooker makes contact, the Loosehead drives through the collision zone to secure the ball presentation.
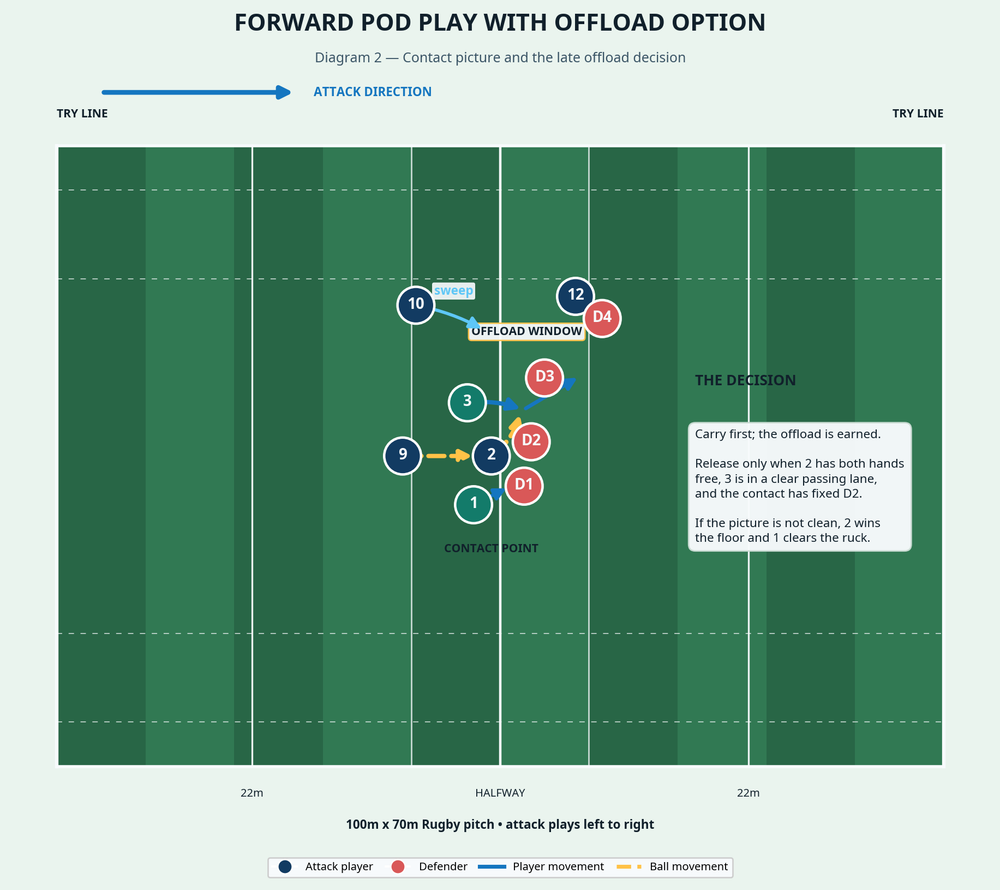
- The Late Offload Decision: The Tighthead Prop (3) holds their depth slightly longer than the carrier. As the Hooker engages D2, they fight to keep their hands free. If D2 commits fully to the tackle, the Hooker delivers a legal, two-handed offload to the Tighthead, who accelerates through the resulting gap.
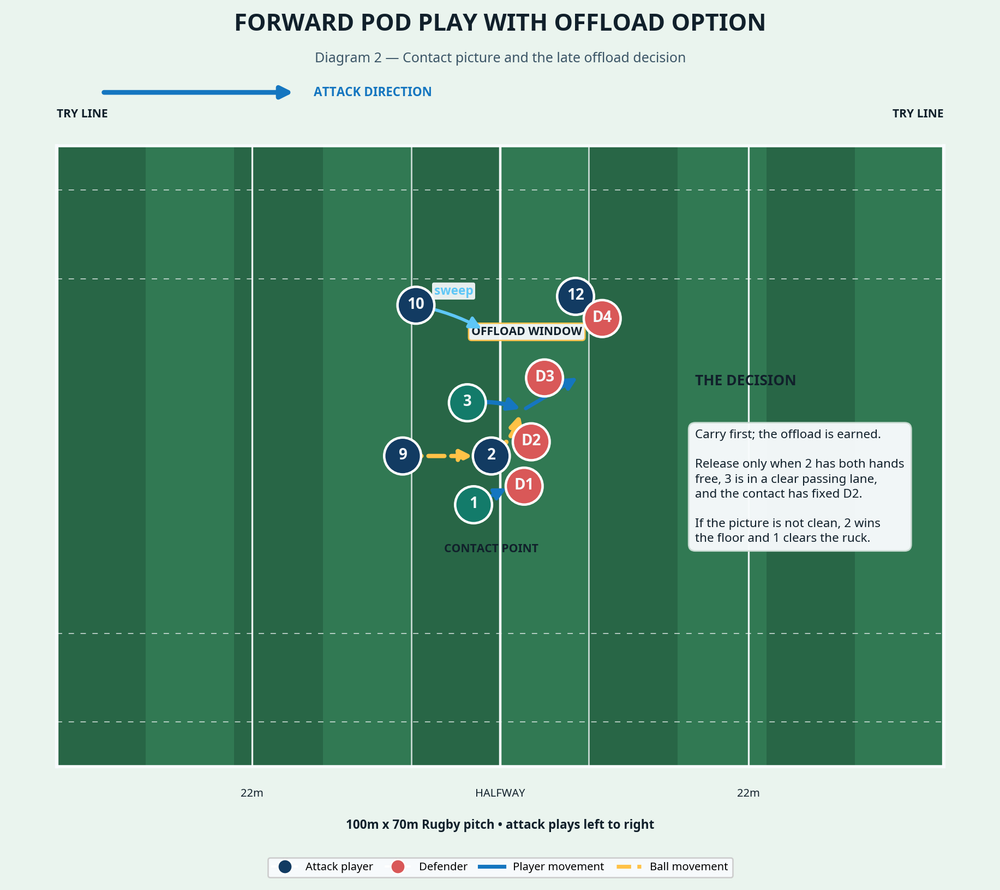
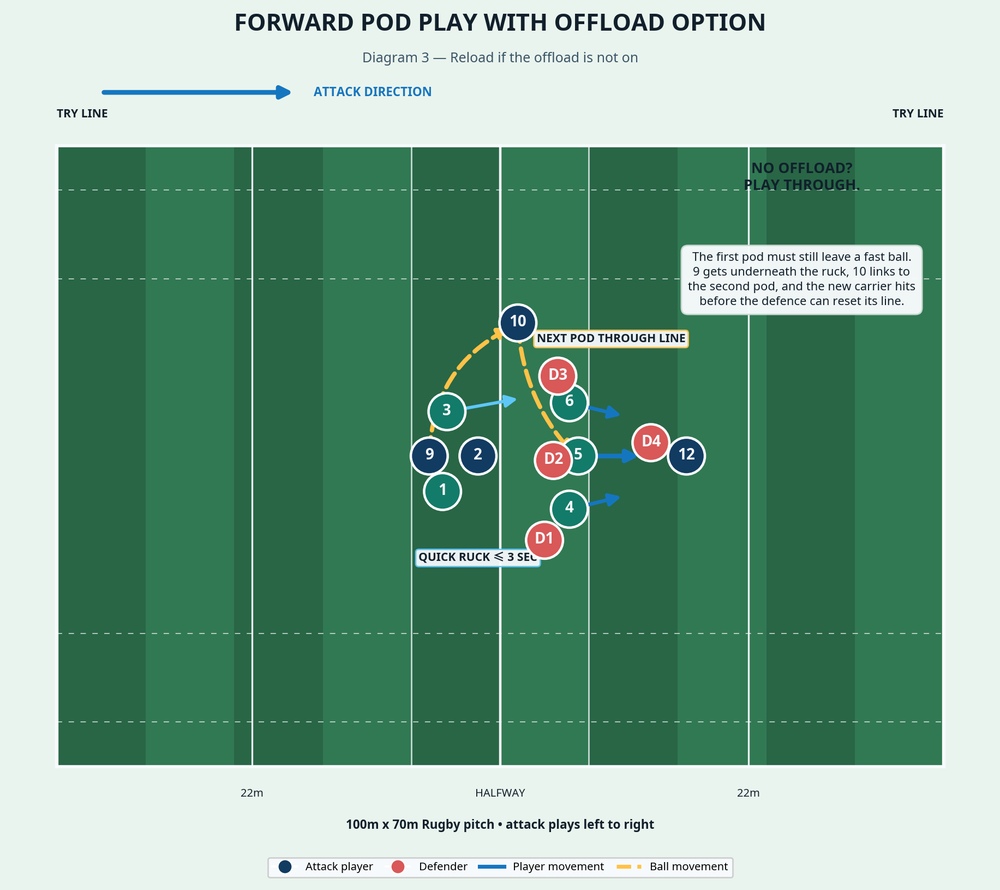
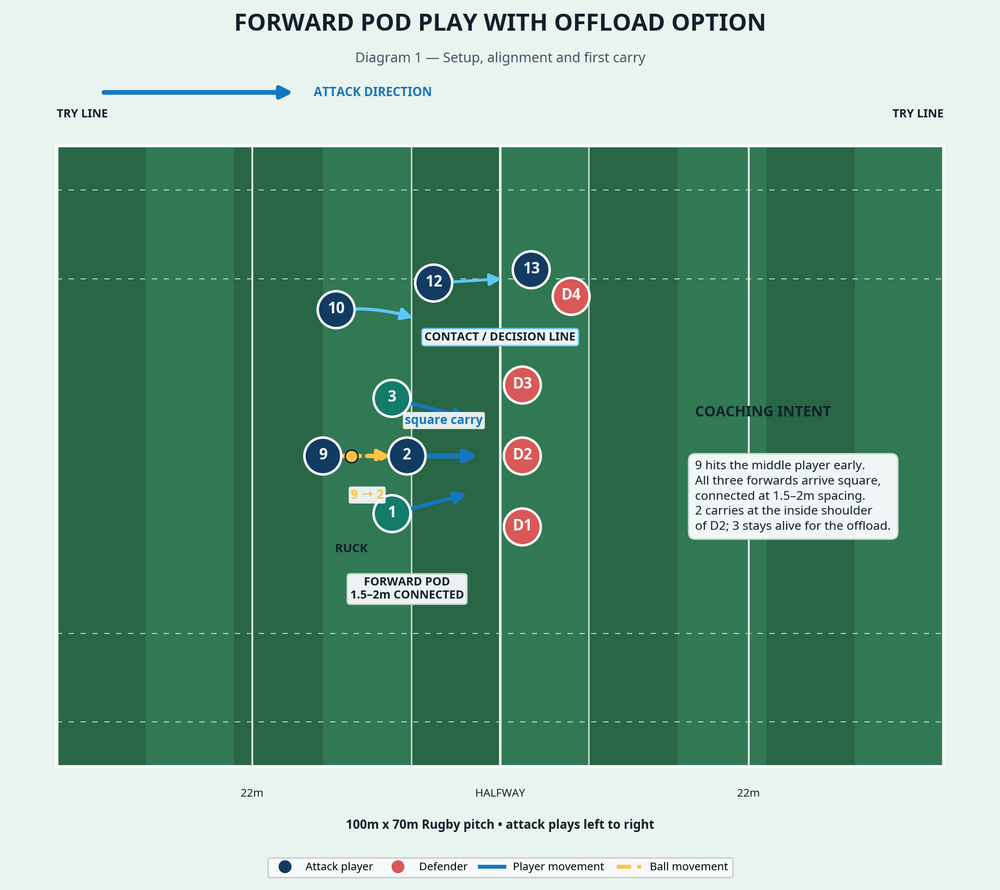
- The Reload (If the Offload is Closed): If D2 executes a dominant tackle and wraps the ball, the Hooker immediately fights to the floor and presents the ball cleanly. The Loosehead and Tighthead clear the threat within 3 seconds. The Scrum-half steps over the ball, and the Fly-half (10) immediately links to the next forward pod (4, 5, 6) crashing through the adjacent channel.
4. Key Coaching Points
- Catch Early, Carry Square: The ball carrier must take the ball moving forward and keep their shoulders parallel to the try line. Drifting sideways allows the defence to slide and cover the offload option.
- Fight for the Free Arms: The carrier must initiate contact on their terms, dropping their body height and using footwork to step slightly away from the primary tackler's dominant shoulder, keeping the ball alive.
- Patience on the Outside: The offload receiver must not overrun the carrier. They must hold their depth, read the defender's hips, and only accelerate into the lane once the defender has committed to the tackle.
- Earn the Right to Offload: The offload is a privilege earned by a dominant carry. If the collision is lost or the picture is messy, the pod must default to ball retention. A quick ruck is always better than a forced, spilled offload.
5. Common Mistakes
- Flat Alignment: The pod aligns too flat, meaning they receive the ball standing still. They must start deep enough to hit the gain line at pace.
- Forcing the Pass: The carrier attempts a miracle offload while falling backwards or wrapped by two defenders, resulting in a turnover. Teach your players to accept the tackle and win the floor when necessary.
- Overrunning the Carrier: The outside support runner gets ahead of the ball carrier, making a legal, backwards offload impossible and forcing a forward pass penalty.
6. Variations & Progressions
- The Tip Pass: Instead of taking the contact, the middle forward (2) catches the ball and immediately plays a short, flat 'tip' pass to the outside forward (3) before the defensive line can close the space.
- The Pull-Back: The middle forward runs the hard decoy line, but the Scrum-half bypasses them entirely, playing a deeper pass behind the pod directly to the Fly-half (10) to attack the wider channels.
7. Age Adaptations
- Under 10s to Under 12s: Focus purely on the shape of the pod and running straight. Remove the offload pressure entirely. Reward the players for staying connected and winning the ruck.
- Under 14s to Under 16s: Introduce the offload decision using touch or grab Rugby. Allow the carrier to pop the ball if they are touched below the waist, but require them to go to ground if wrapped up high.
- Open / Senior: Run the play at full match intensity against live, padded defenders. Emphasize the speed of the recycle (under 3 seconds) if the offload is correctly refused.
