Rugby
Four-Man Front Lift & Launch: Lineout Set-Piece Drill
Build a reliable front-channel lineout win and turn it into a rapid first-phase launch through 9 and 10.

What you need
6 rugby balls, 12 flat cones or field markers, 4 tackle shields for the contested progression, Bibs for defenders, Stopwatch or phone timer
Overview
This is a 20-minute intermediate lineout session that teaches a four-man front lift and a fast release to the scrum-half. The outcome is not merely winning the throw: it is producing clean, usable ball for 9 in under two seconds, then launching 10 before the defensive lineout can reload. Use it during pre-season to establish common language, before a match when you want one dependable attacking call, or mid-season when your lineout ball is secure but your first-phase tempo is too slow.
The drill is built for a standard 100m x 70m pitch. Your working area is a 25m-long strip along the touchline, extending 20m into the field. The relevant boundaries are the mark of touch, the 5m line, and the 15m line; a legal lineout sits between the 5m and 15m lines, with each team’s line parallel to and 0.5m from the mark of touch.1 The front target here is just beyond the 5m line, allowing the hooker to throw a short, fast ball and giving 9 a compact, protected pocket.
Setup
Set two cone gates along one touchline: one on the 5m line and another on the 15m line. Mark a 2m x 2m front target box 1m inside the 5m line. Put a flat cone 5m behind the attacking lineout for 9’s starting point and another 10m infield of that cone for 10. Work with six attackers: 2 Hooker, 4 Second Row/front lifter, 5 Second Row/rear lifter, 6 Blindside Flanker/jumper, 9 Scrum-half, and 10 Fly-half. Add four defenders for the final progression, initially as passive mirrors with tackle shields.
| Element | Exact requirement | Coach’s purpose |
|---|---|---|
| Throwing lane | 5m to 15m from touch | Gives players a clear legal corridor. |
| Front target | 2m x 2m, 1m inside 5m line | Standardises the catch point. |
| 9’s pocket | 5m behind the lifting pod | Creates a safe, repeatable transfer line. |
| 10’s launch line | 10m infield of 9’s pocket | Forces depth before acceleration. |
| Work-to-rest | 4 reps, then rotate; 45 seconds between waves | Preserves lift quality and allows precise feedback. |
Give each pod one ball, 12 flat cones, four coloured bibs and, for the contested phase, four tackle shields. Start with two minutes of low-level landing preparation: lifters rehearse their foot placement, the jumper rehearses a rigid body line, and 9 practices arriving into the pocket without crossing the front of the pod.
Safety and legality checkpoint: Lifters may pre-grip, but no player may jump, be lifted or be supported before the ball has left the thrower’s hands. Once possession is won, supporters must lower the jumper safely.1 Stop immediately for unstable catches, uncontrolled descents, or any player who does not feel confident lifting or being lifted.
Step-by-Step Instructions
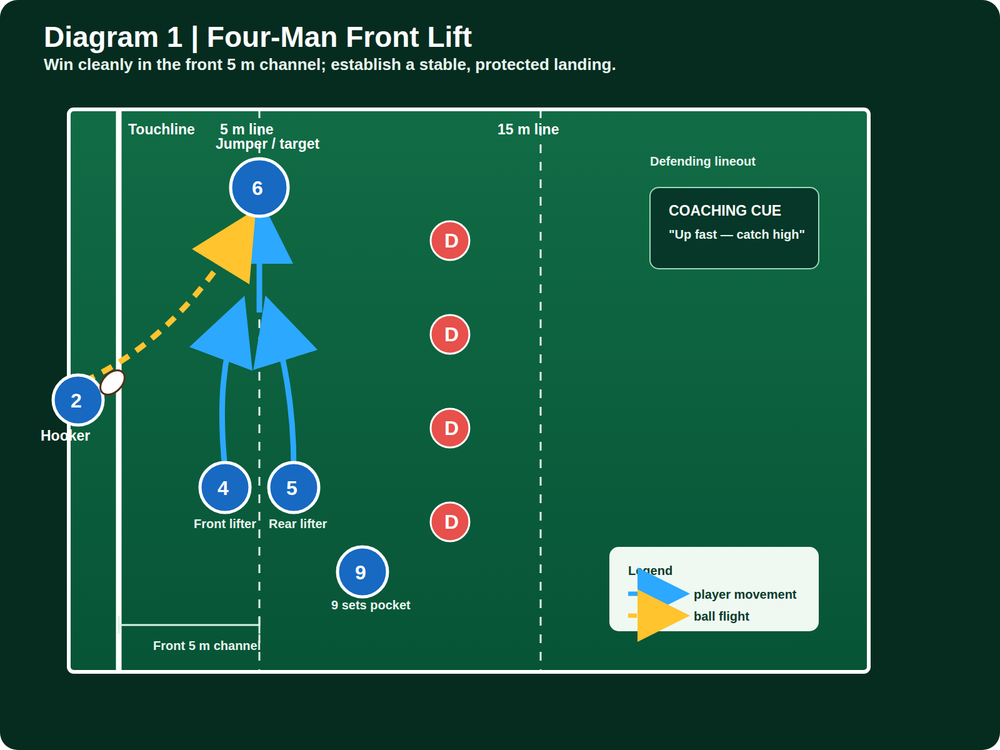
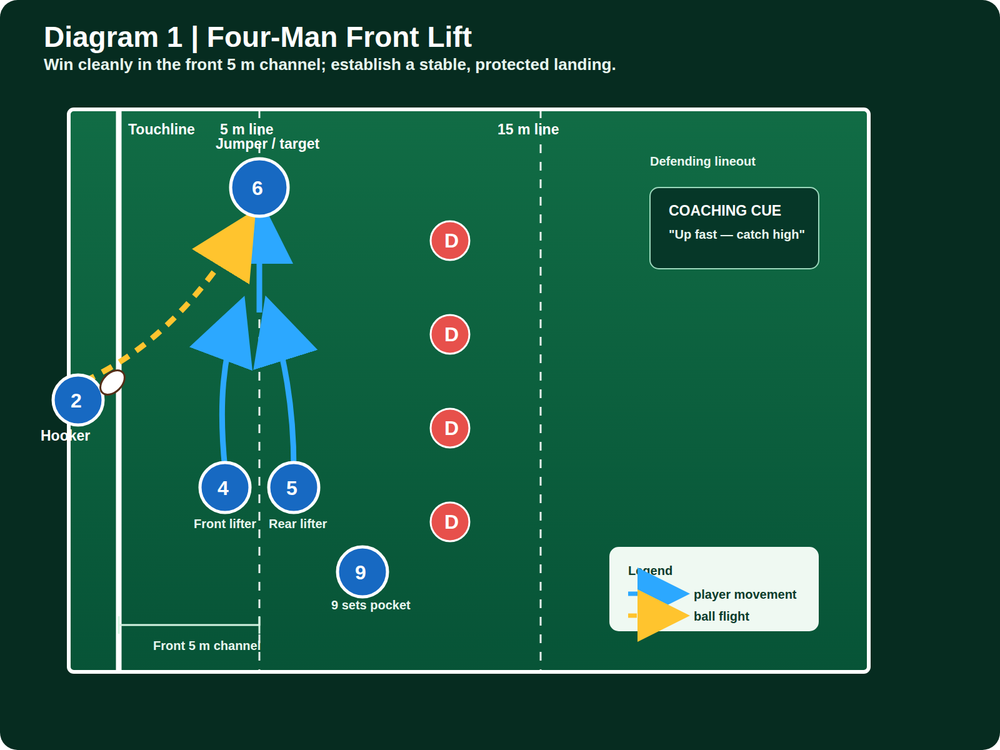
Phase 1 — Build the front lift

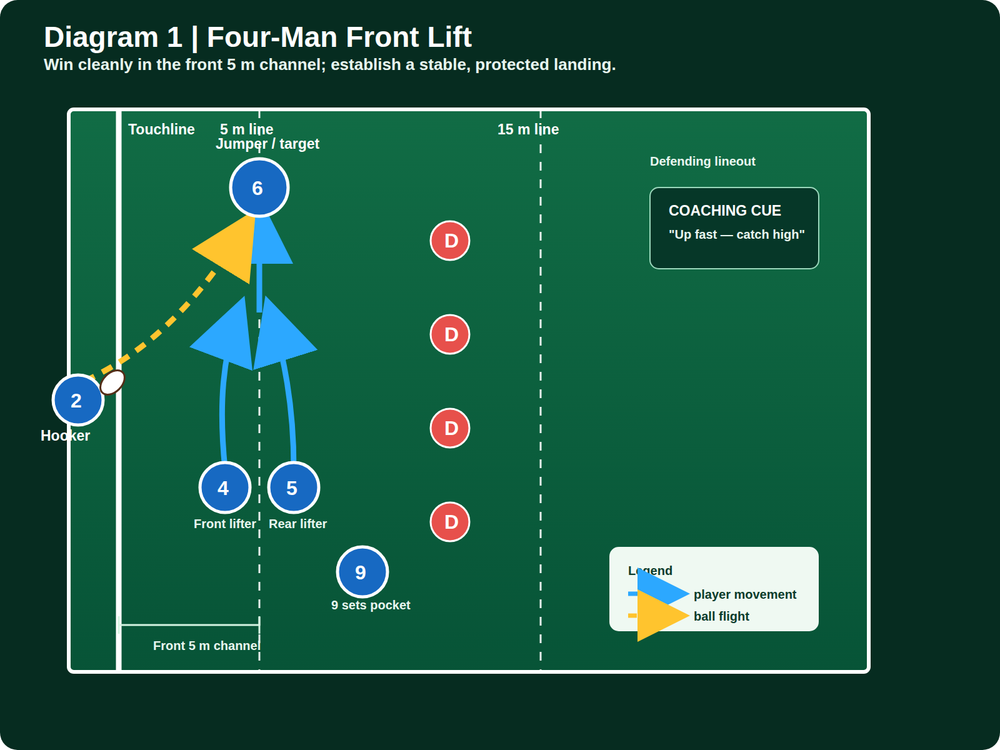
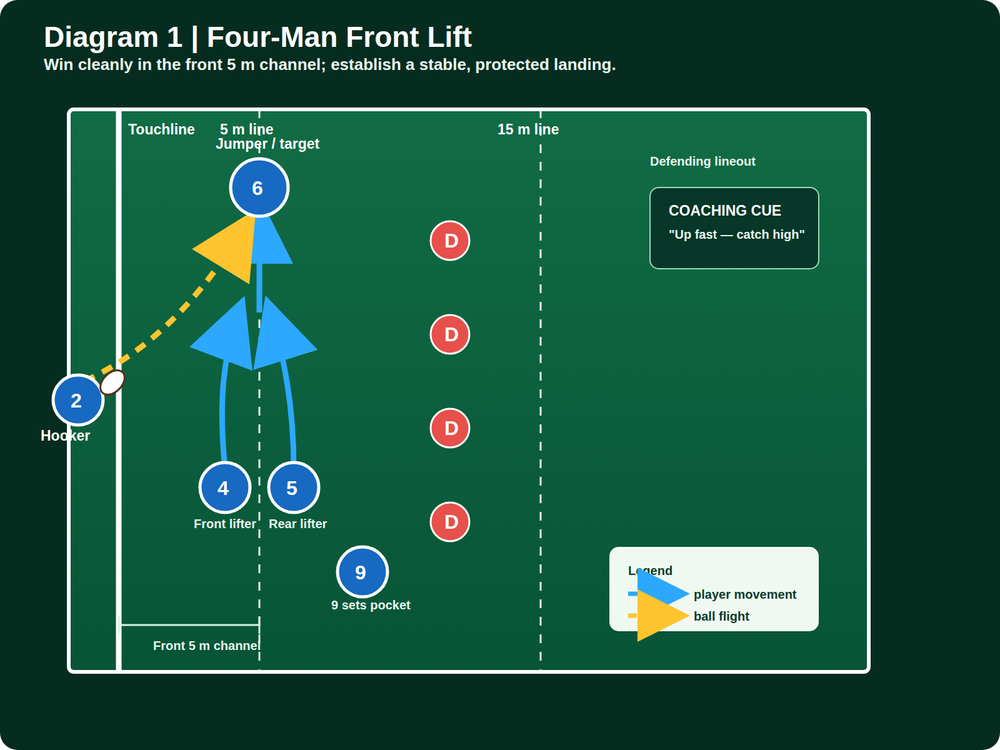
Call and picture. Bring the pod into position with 4 as front lifter, 6 as jumper and 5 as rear lifter. The caller gives one short call—such as “Front”—then all players freeze for one second. The coach checks that the pod is inside the 5m-to-15m corridor and 2 is on or behind the touchline.
Pre-grip and load. 4 and 5 set their feet shoulder-width apart, knees bent, chests tall and eyes on 6’s hips. They pre-grip legally: 4 on the thighs from the front and 5 on the shorts/upper thighs from behind. 6 loads through the legs, keeps both hands free and shows a clear target above their forehead.
Release, step, lift. On 2’s release, 6 steps sharply into the front box and jumps. At the same instant, 4 and 5 drive upward through legs and hips. The coaching phrase is “low load, tall finish.” Do not allow an early lift.
Throw to the window. 2 throws a flat, straight ball to the apex of 6’s reach—not a floating lob. The throw must pass the 5m line and reach 6 at maximum extension. Score the rep only if 6 catches with two secure hands and the pod controls the descent.
Repeat with feedback. Run four throws, then rotate 2, 4, 5 and 6. Give one correction only between reps. For example: “Rear lifter: finish your hips through,” rather than delivering a list of faults.
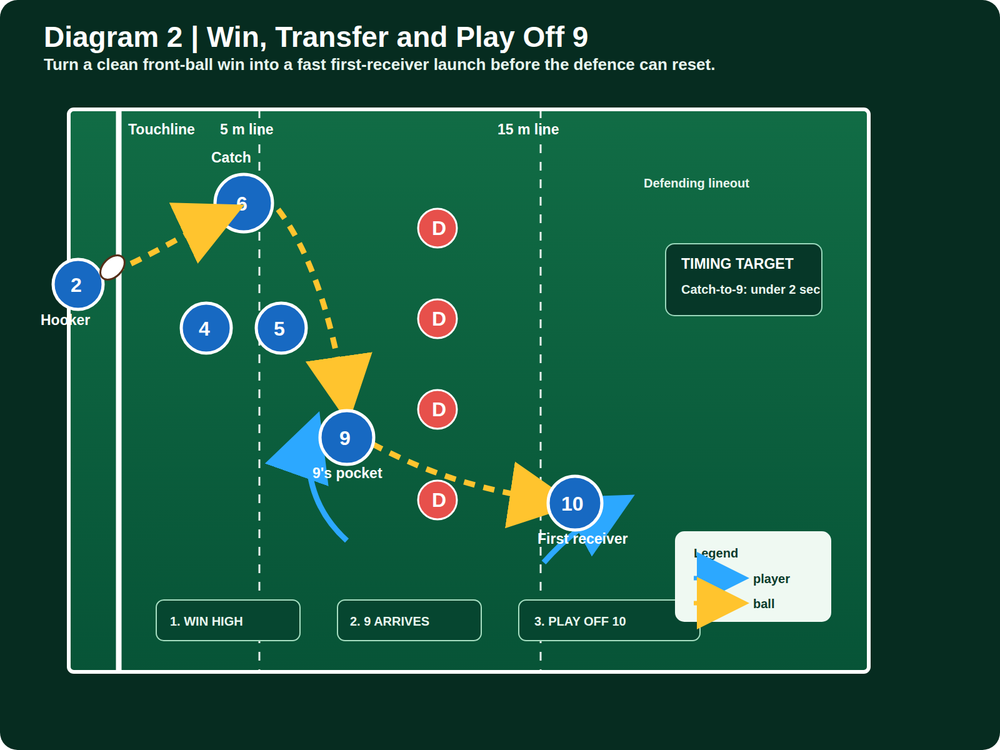
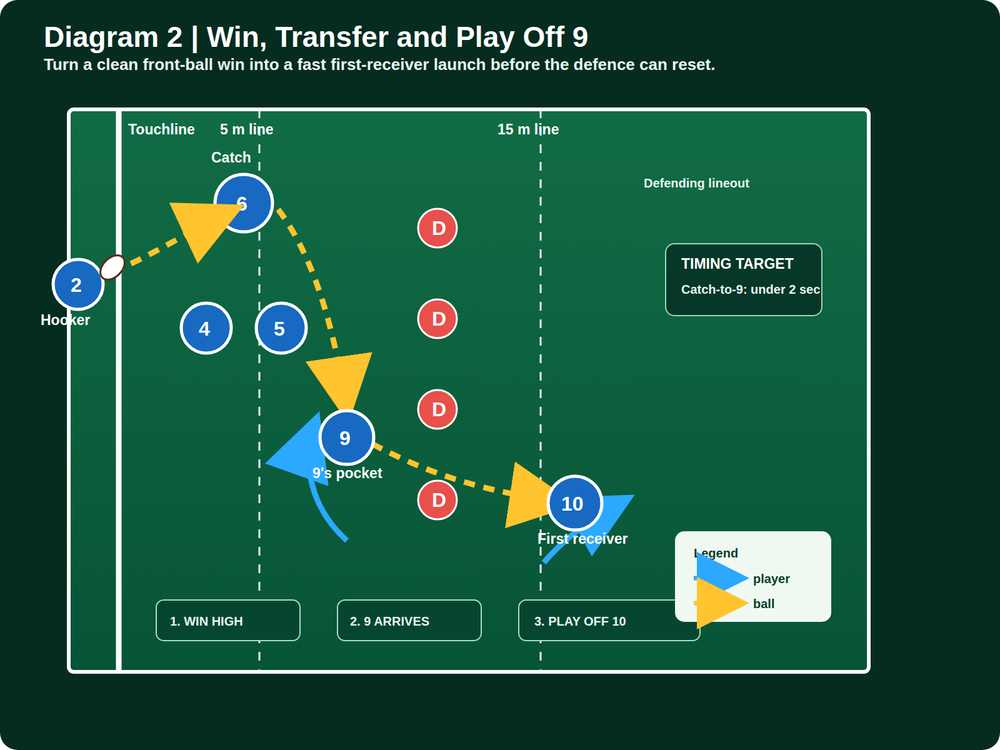
Phase 2 — Transfer and launch
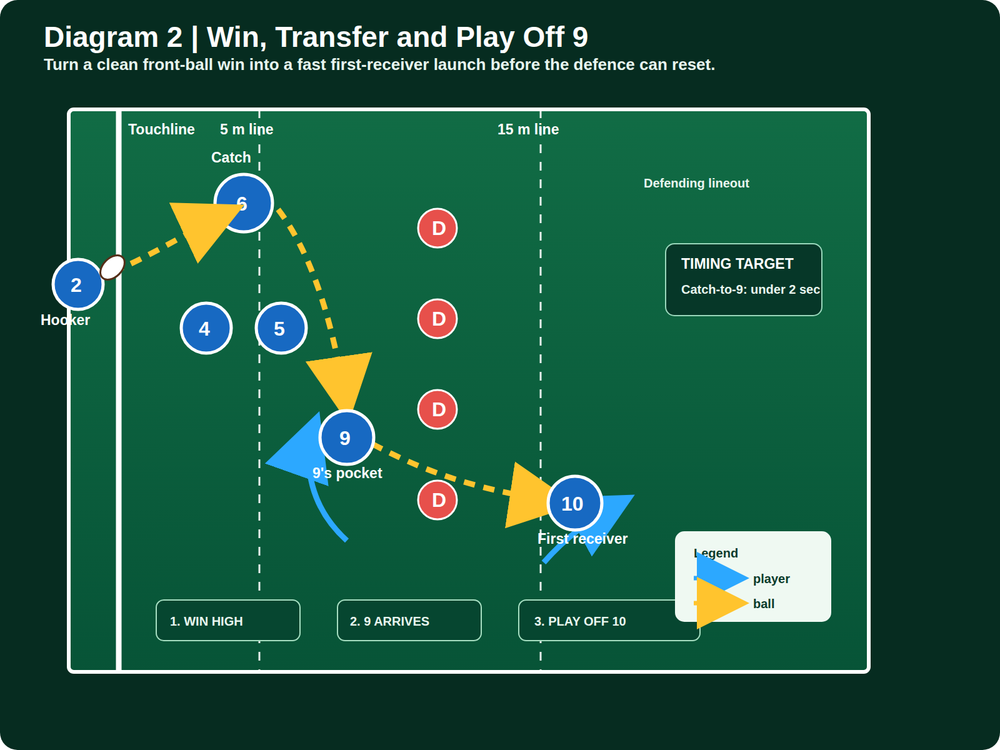
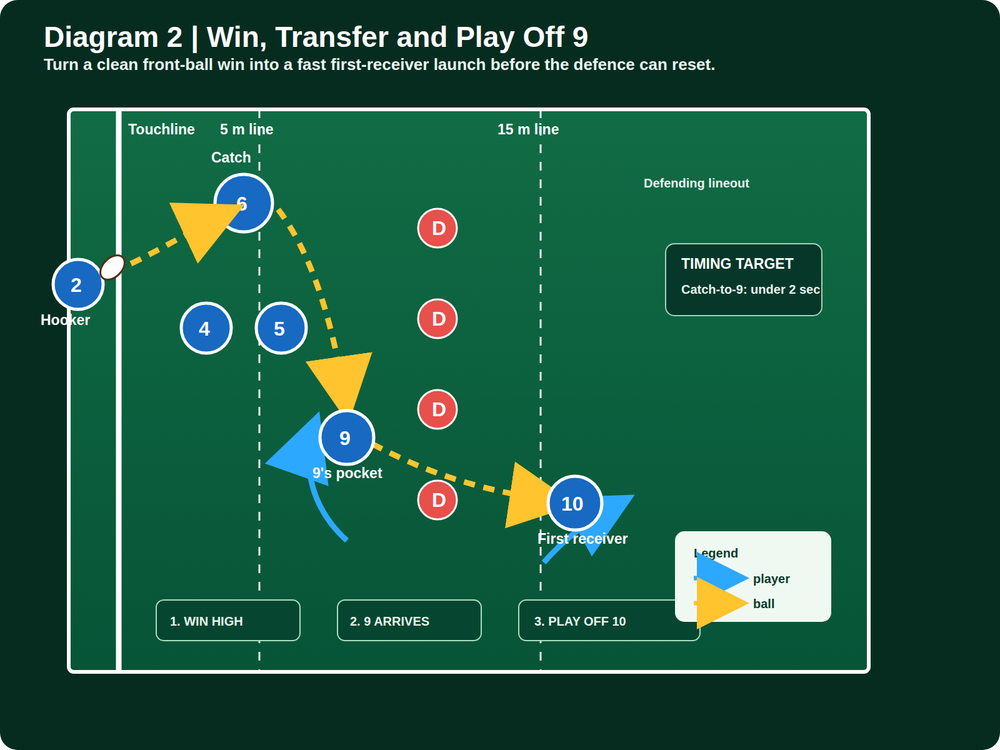
Add 9’s sweep. Start 9 on the back cone, 5m behind the pod. On the thrower’s first movement, 9 arcs behind the rear lifter and arrives square, balanced and communicating “here.” The target is to be in the pocket as 6 begins to descend—not before.
Transfer at chest height. 6 brings the ball down through the middle of the body and presents it immediately to 9. 4 and 5 keep 6 stable; they do not step away or allow the jumper to fall backward. The target time is catch-to-9 in under two seconds.
Launch 10. 9 passes to 10 from two hands, with 10 arriving from depth onto the ball. 10 must be moving forward at catch, not waiting flat-footed. Finish every rep with 10 running through a cone gate 8m beyond the launch line, which gives the group a visible finish point.
Set a performance standard. Award one point for a clean lineout catch, one point for a safe landing, one point for a transfer under two seconds, and one point when 10 crosses the finish gate at pace. A pod needs three out of four before it progresses.
Key Coaching Points
| Focus | Head-coach language | What good looks like |
|---|---|---|
| Lift timing | “Ball leaves, then we go.” | The jumper is not supported before release. |
| Lift shape | “Low load, tall finish.” | Lifters use leg drive, extend together and keep 6 vertical. |
| Catch | “Hands high, eyes through the ball.” | 6 catches at the apex with a firm core and elbows soft. |
| Throw | “Flat to the window.” | 2 delivers a straight, fast ball that arrives on 6’s upward line. |
| 9’s timing | “Arrive on the way down.” | 9 sweeps in behind, balanced and vocal, without obstructing. |
| First phase | “Depth, then accelerate.” | 10 catches while moving forward and attacks beyond the gain line. |
Common Mistakes
The most frequent error is an early lift. If 4 and 5 start lifting before the ball leaves 2’s hands, reset the rep rather than coaching around an illegal picture. Secondly, lifters often try to raise 6 with their arms alone. Make them pause at the load position and rehearse a simultaneous leg drive. Thirdly, a floating throw encourages the defence to compete; challenge 2 to hit a hanging target suspended at the jumper’s apex, not merely to complete the pass.
Watch also for a static 9. A scrum-half standing in the pocket early invites traffic and leaves no rhythm for 10. Demand a late, curved sweep. Finally, correct an unsafe descent immediately: lifters must stay connected and lower 6 under control, while 6 remains tight through the core and lands with soft knees.
Variations & Progressions
Begin with a shadow progression: no defenders, no pass to 10, and a soft catch/land only. This version is ideal when introducing a new unit or resetting technique after errors. Progress to a timed competition between two pods; each gets four attempts, and the winner is the team with the highest quality score rather than simply the fastest throw.
For the final progression, add four active defenders who can jump and contest only after the ball leaves 2’s hands. Tell them to show a realistic front-pod threat but not to disrupt the landing. Then vary the call: front ball on the first rep, middle ball on the second, and front ball plus immediate maul setup on the third. This forces 9 and 10 to read the call, not run on autopilot.
Age Adaptations
For Under 8 and Under 10, remove lifting and contesting altogether. Use 2, a receiver and 9; prioritise throwing, catching, passing and communication in the 5m-to-15m corridor. For Under 12, use a grounded receiver or limited jump only, and keep the objective as a safe pass from the catch to 9. No player should be lifted unless it is expressly permitted by the local competition and the players have been taught the required technique.
For Under 14, progress only under the relevant union’s age-grade regulations and with coaches able to supervise every lift. Keep defenders passive until lift, catch and descent are consistently safe. For Under 16 and open age, use full legal lifting, live competition and a decision after the catch: play off 9, set a maul, or move the ball to a second receiver. At every age, rotate players through jumper, lifter, hooker and scrum-half roles so that the unit understands the whole call rather than memorising one movement.
References