Opposition Throw Lineout Steal: Middle Pod, Secure Landing and Fast Exit
Coach a legal, repeatable middle-pod lineout steal that turns an opposition throw into clean possession and an immediate attacking exit.

Equipment Needed
Overview
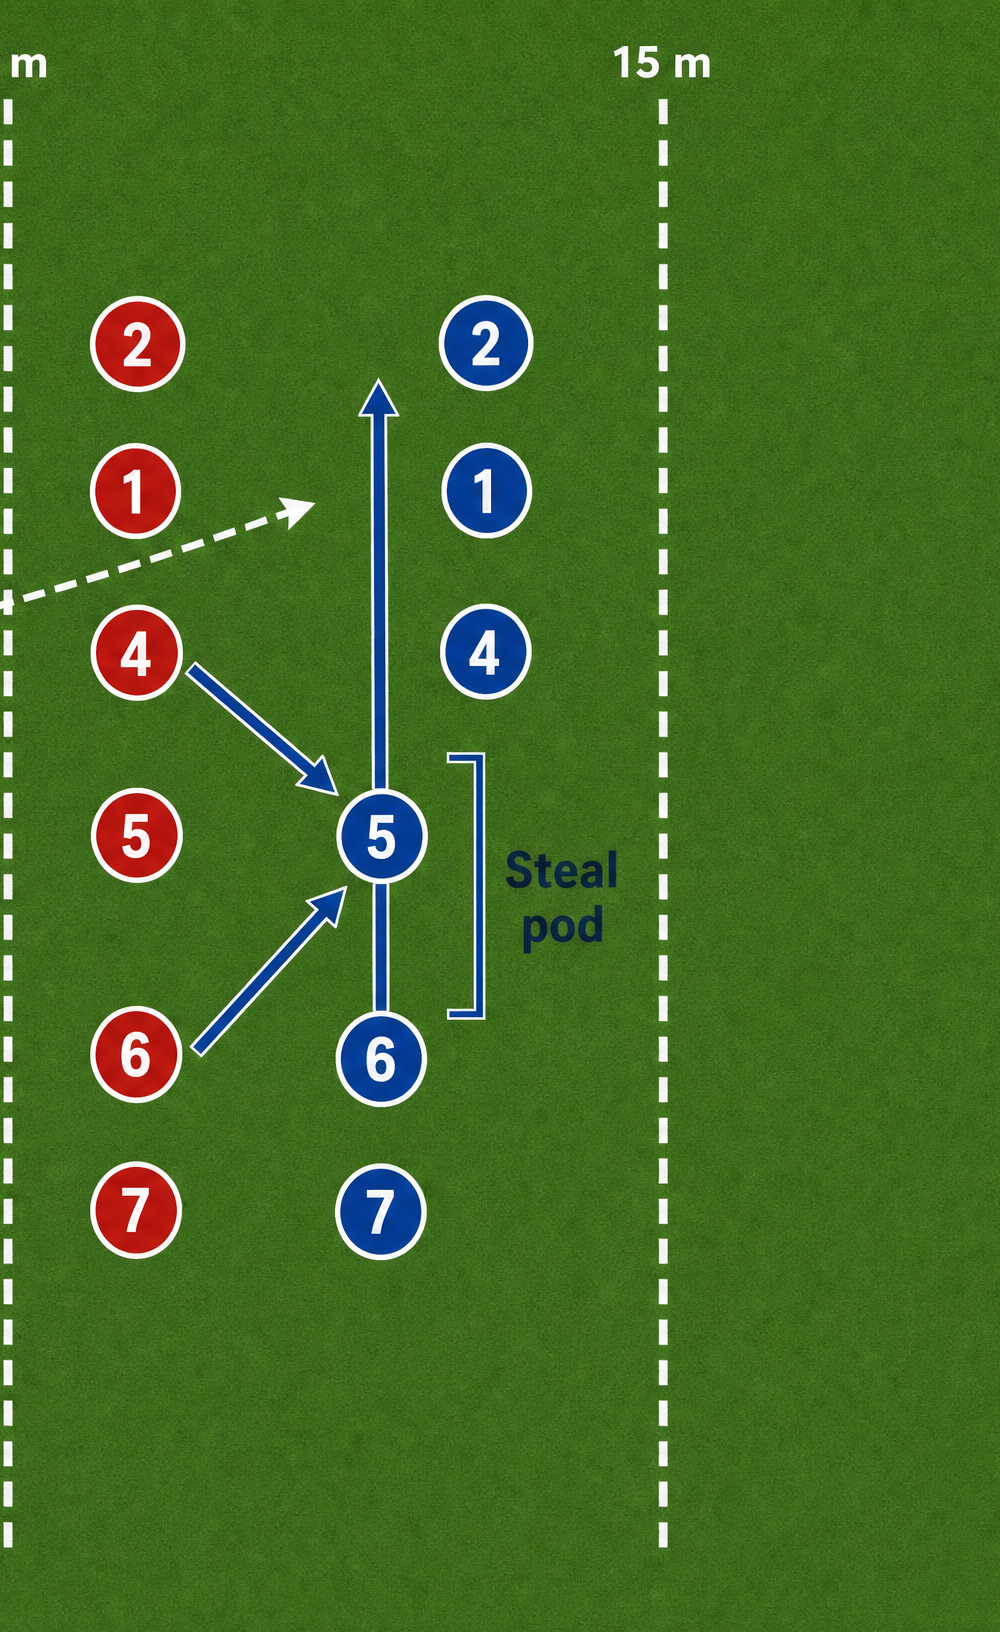
This is a middle-pod lineout steal for use when your analysis identifies a predictable opposition throw into the 7–10 m channel. The purpose is not simply to touch the ball. Your jumper, No. 5, must win it cleanly, land under control and give No. 9 a fast, protected platform to play from. A successful steal catches the opposition while they are still arranged to attack.
Use it between your 22 m line and halfway when you can afford to challenge, or in the opposition 22 when a steal can create an immediate scoring chance. Do not call it against an unreliable throw unless you can first ensure your team will stay legal and safe. A standard senior field is up to 100 m x 70 m; the working corridor here is the 10 m-wide band between the 5 m and 15 m lines. 1
Coach’s outcome: steal the ball at full extension, lower the jumper safely, then either form a one-metre protection pod or move the ball to No. 9 within two seconds.

Setup
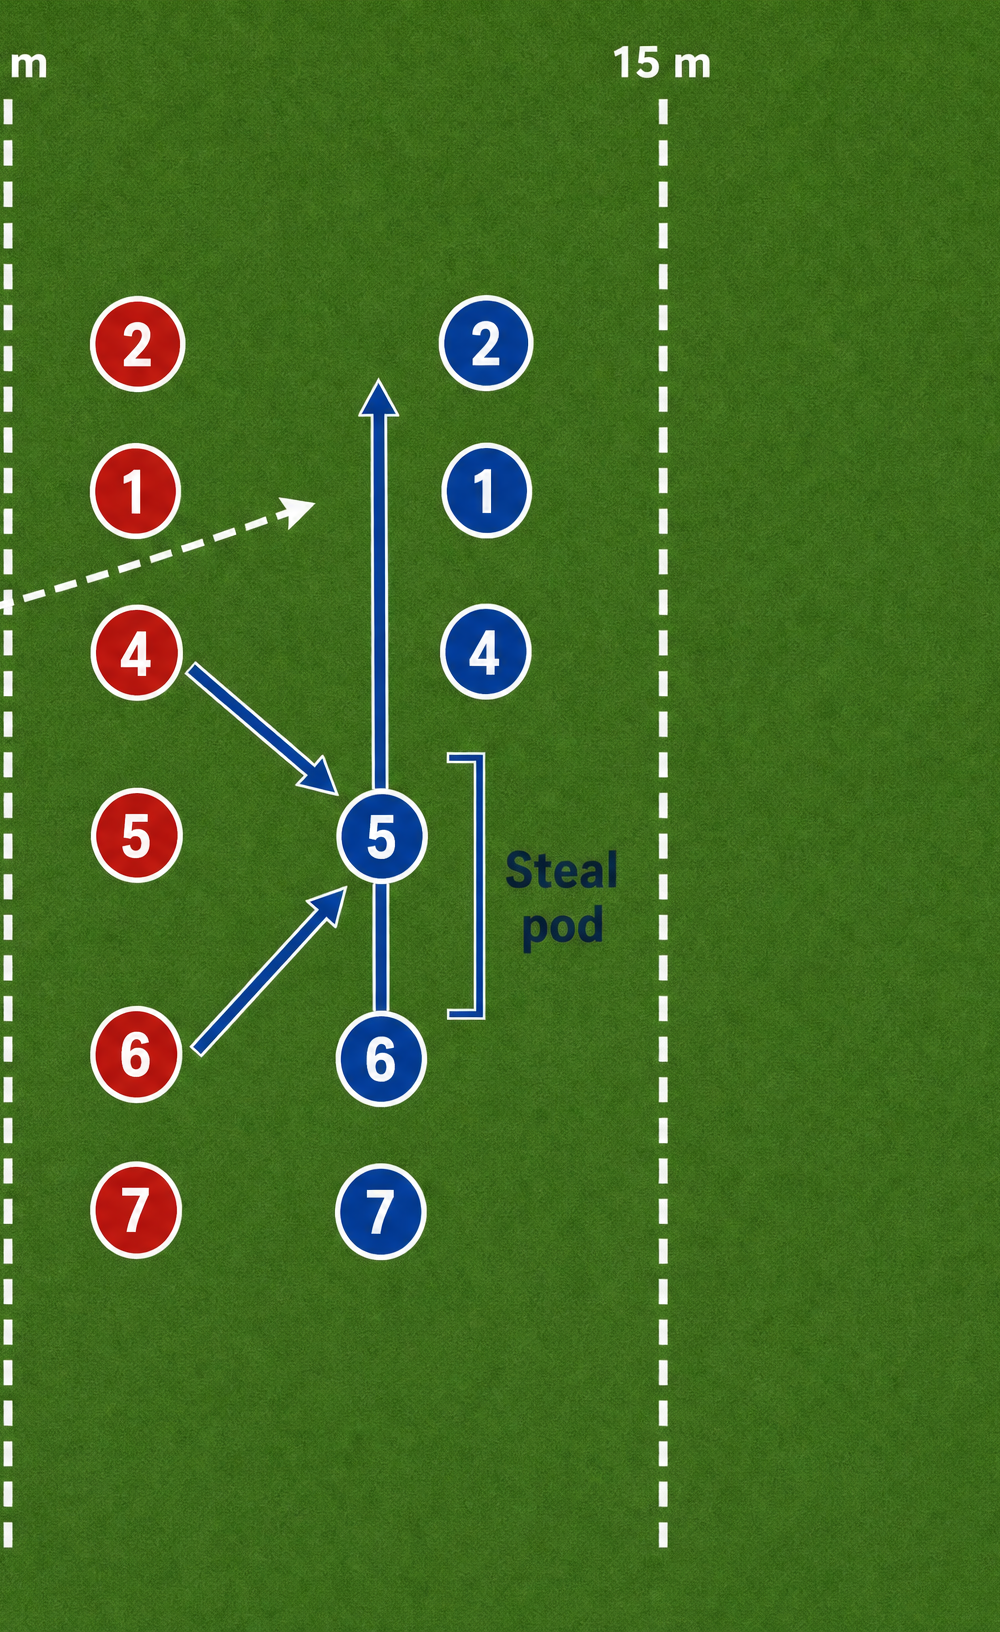
Mark a 25 m x 20 m training area along one touchline, with cones on the 5 m and 15 m lines and a cone line representing the 22 m line. Place the two lineout files parallel to the touchline, with each file half a metre from the mark of touch and the lawful gap held until the ball is thrown. The lineout must be between the 5 m and 15 m lines; the non-throwing side also needs a player in the 5 m channel. 2
| Item | Detail |
|---|---|
| Players | 16–20; 7 blue defenders, 6 red lineout players, plus blue Nos. 9 and 10 and red defensive backs |
| Blue steal pod | No. 5 is jumper; No. 4 is the front lifter; No. 6 is the rear lifter; No. 7 protects the tail |
| Exit group | No. 9 starts 3 m behind the pod; No. 10 is 8 m behind and 5 m infield; Nos. 12 and 13 hold depth |
| Red picture | Red No. 2 throws to a nominated middle target; red lifters and defenders present realistic pressure without early contact |
| Equipment | 2 rugby balls, 16–20 bibs, 12 cones, 2 tackle shields, whistle, and a stopwatch |
Call the play “Blue Five”. The call tells the blue line that No. 5 is the only aerial target and that No. 4 and No. 6 lift on the release of the ball. No. 7 owns the tail and protects a catch that drifts behind the pod.
Step-by-Step Instructions
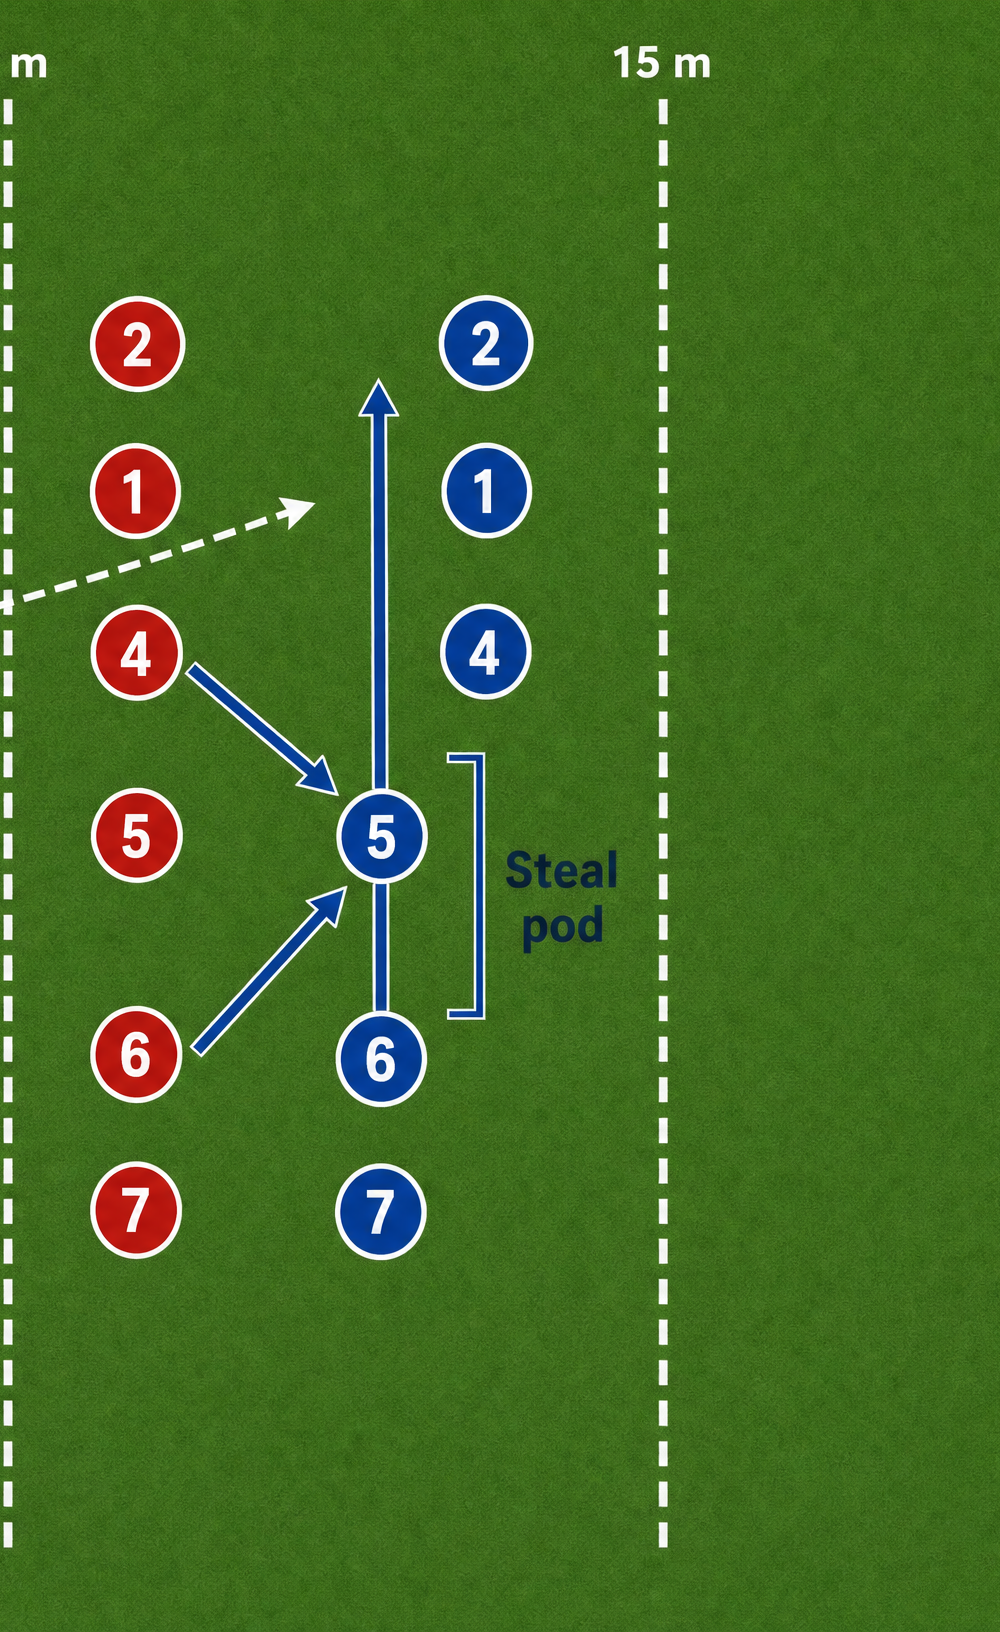
Build the picture. Red No. 2 stands on the mark with both feet on or behind touch. Set red to throw into the middle at 8–10 m. Blue match numbers and hold a square, calm line. The blue forwards must not lean into or make contact with opponents before the throw.
Give the late trigger. Blue No. 5 watches the thrower’s hands, not the ball in the air. No. 4 and No. 6 establish a legal pre-grip on the jumper, then stay loaded through ankles, knees and hips. The lineout begins when the ball leaves No. 2’s hands; do not lift early. 2
Lift on release. On the call of “up”, No. 4 drives vertically through the front of No. 5’s thighs and No. 6 controls the rear lift. Both lifters keep their feet under their hips and raise together. No. 5 rises straight, eyes level, presents two hands above the head and attacks the ball’s near point rather than drifting across the channel.
Win and own the ball. No. 5 catches at maximum extension, brings the ball immediately to the chest and calls “mine”. If a clean catch is not available, use only a lawful deflection: both hands must be above the head and the outside arm makes the touch. Do not swing an arm through traffic.
Land safely. No. 4 and No. 6 lower No. 5 vertically and under control as soon as possession is won. The jumper’s hips should return between the lifters; no player is driven forward while airborne. The law requires a supported jumper to be lowered safely once the ball is won. 2
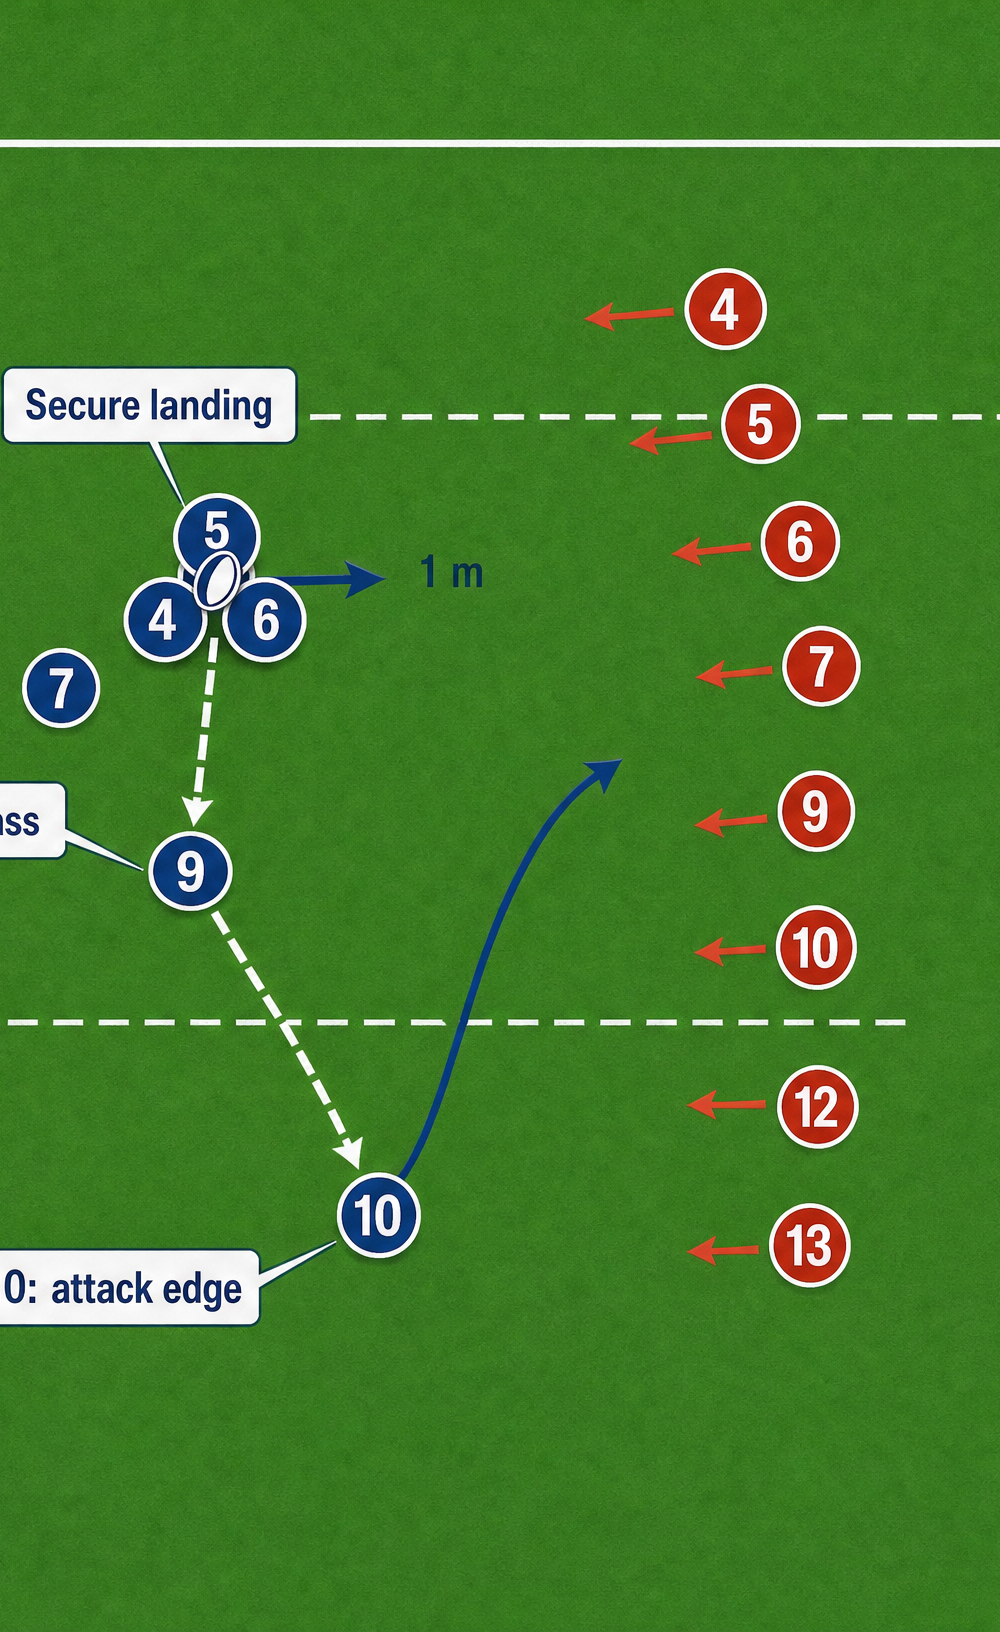
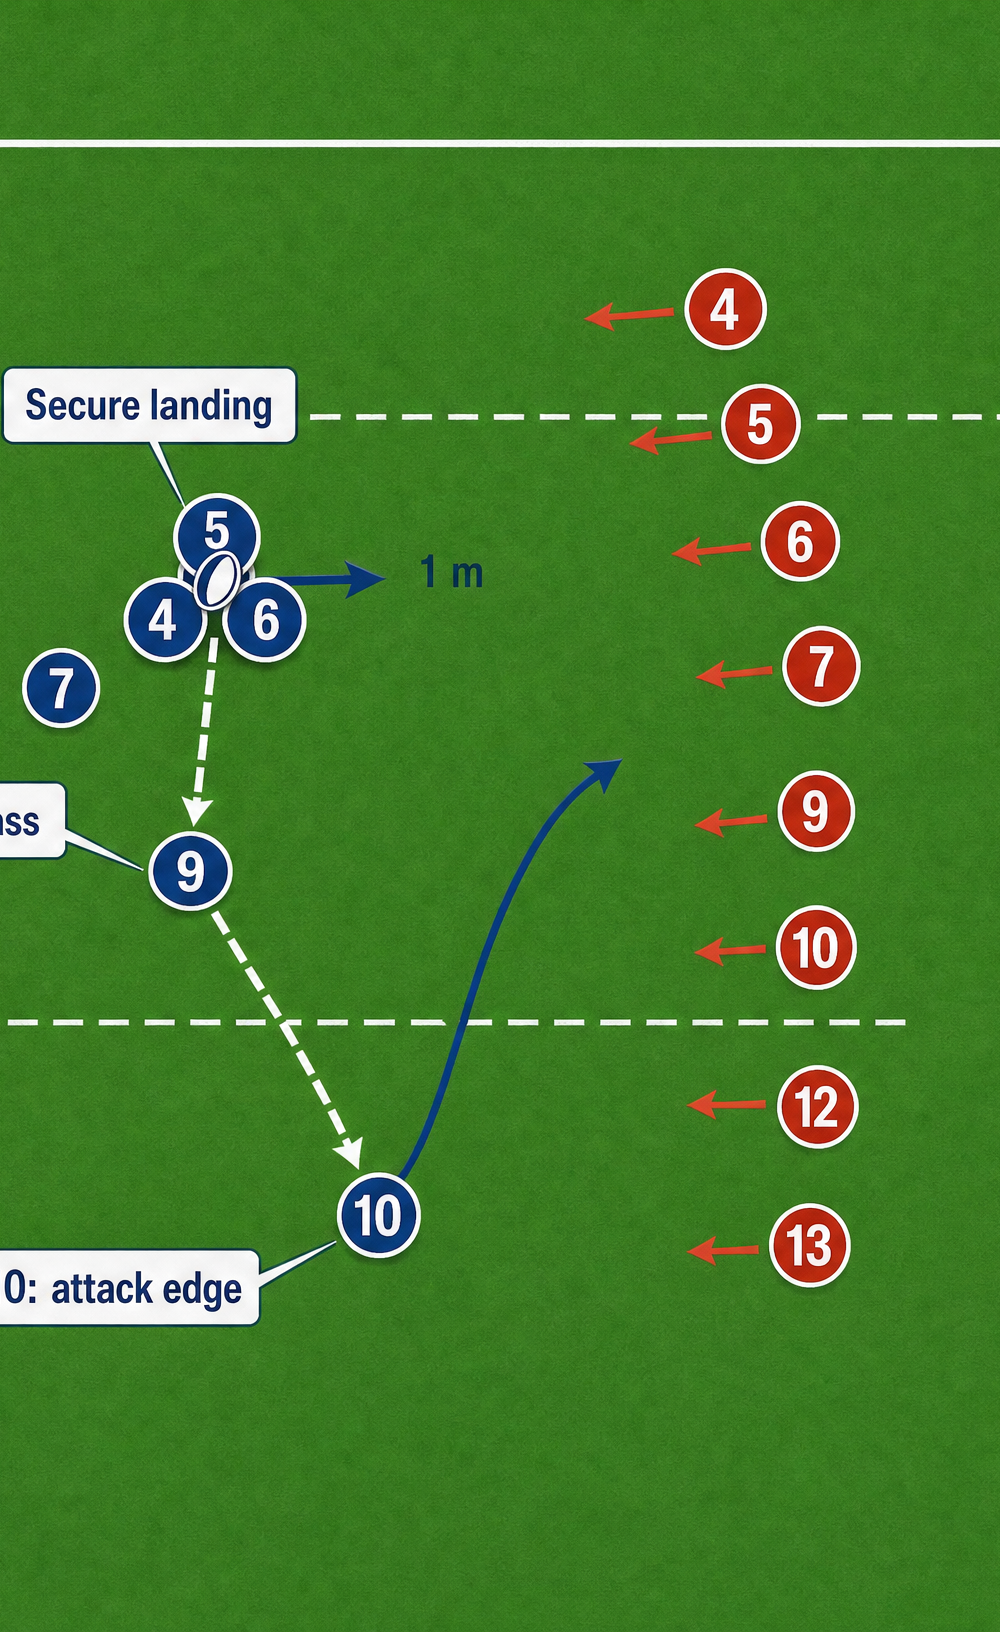
Create the exit. On landing, Nos. 4 and 6 bind tightly around No. 5 and take one short step infield. No. 9 tracks to the back of the pod, scans the red guard and calls either “nine” for a direct transfer or “hold” for a one-metre maul. Blue No. 7 seals the tail without detaching early.
Attack the space. For the fast exit, No. 5 transfers to No. 9 within two seconds. No. 9 passes off the base to No. 10, who squares up 8 m deep and attacks the soft edge. Nos. 12 and 13 stay connected outside No. 10; they are not spectators waiting for a miracle pass.
Key Coaching Points
- One trigger, one picture. The whole pod moves only when the ball leaves the thrower’s hands. This protects legality and gives the lift a common rhythm.
- Lift height is worthless without a straight line. Demand a vertical lift and a jumper who attacks up, not sideways into an opponent.
- Catch first, plan second. The jumper secures the ball to the sternum before deciding whether to transfer, maul or set a ruck.
- Own the descent. Lifters lower with soft knees, close hands and constant communication; the safe landing is non-negotiable.
- No. 9 is part of the steal. Place the scrum-half before the throw and coach the exit call in every repetition.
- Show the same shape before different outcomes. A compact blue middle pod can steal, contest-and-tap, or hold a maul, making the opposition thrower hesitate.
Common Mistakes
| Error | Coach correction |
|---|---|
| Lifters rise before release | Freeze the picture and restart. Rehearse “hands leave, then feet drive” until the timing is automatic. |
| No. 5 chases across the gap | Put a cone directly above the blue pod and require the jumper to finish under it. |
| Ball is tapped but not secured | Ban the tap in early progressions; reward only clean catches to chest. |
| Lifters drift apart on landing | Mark a 1 m landing box and insist both lifters finish square and bound. |
| No. 9 arrives late or stands flat | Set a 3 m cone behind the pod; use a two-second timer from catch to first pass. |
Variations & Progressions
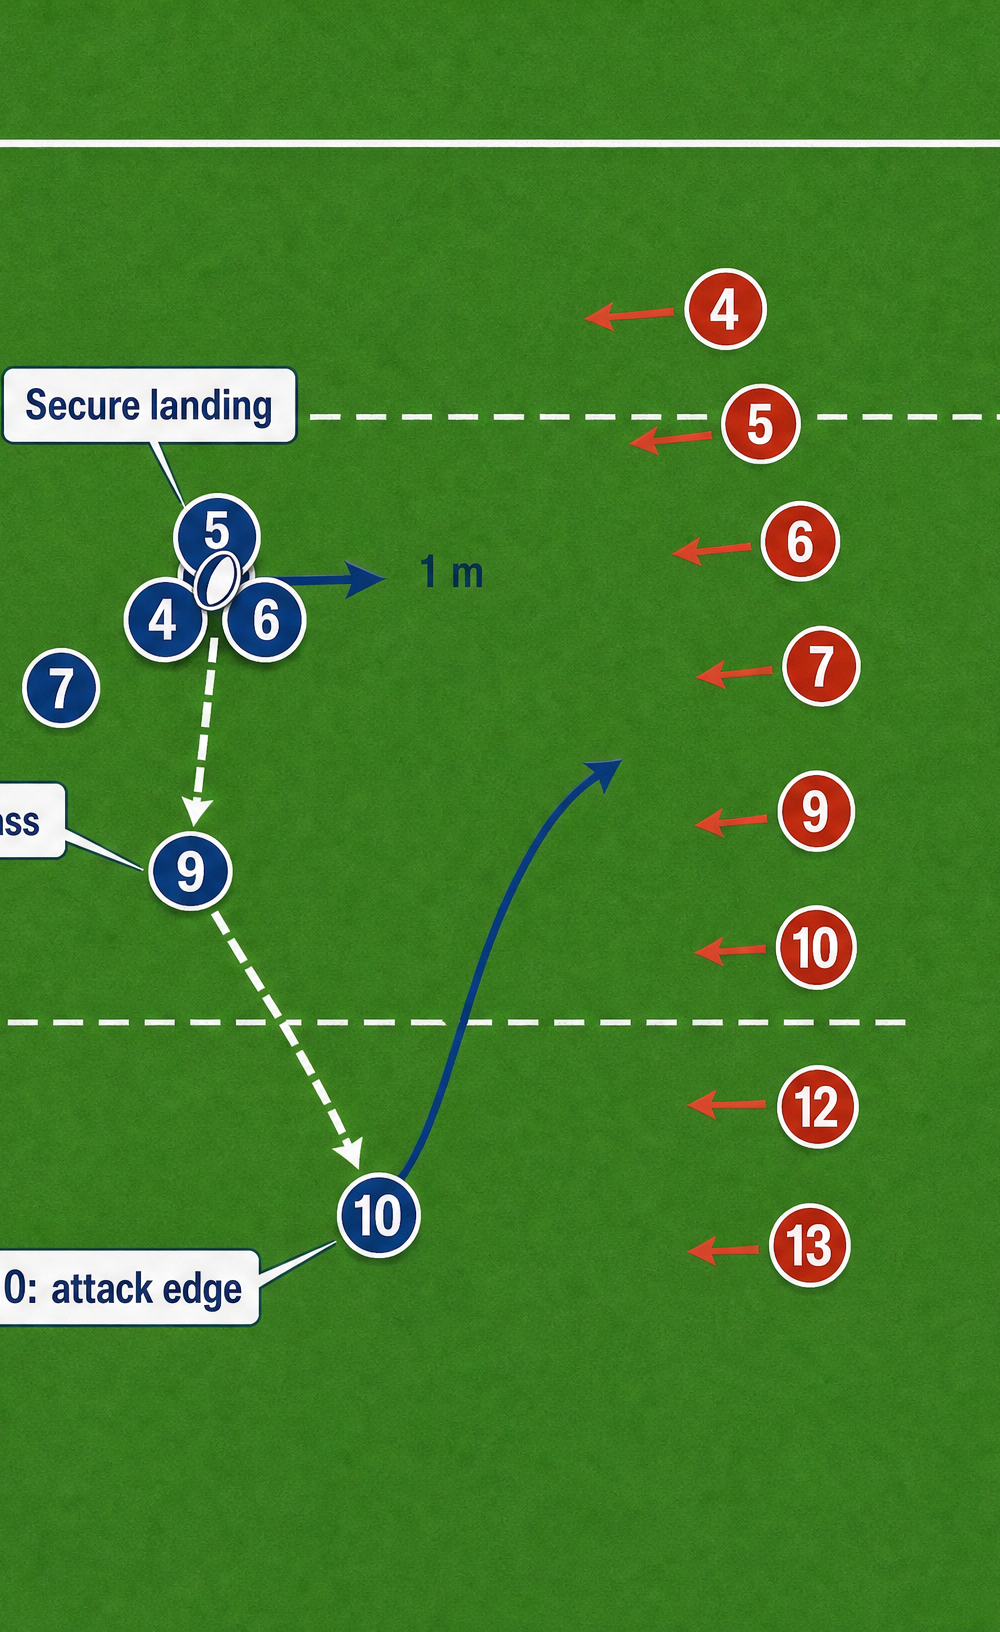
Start with a static, uncontested lift: the red throw is consistent, blue wins unopposed, and No. 9 makes a pass to No. 10. Next, introduce a red middle jumper and lifters who contest the same channel but do not make aerial contact. Finally, run a live six-versus-six lineout with red free to throw front, middle or tail; blue must call “Blue Five” only when No. 5 reads the trigger and the steal is genuinely on.
For a tactical variation, use the same initial blue shape but send No. 5 to the tail while No. 4 and No. 6 initially sell the middle lift; this tests opposition scouting. A second variation is a steal-to-maul: after the catch, blue bind immediately and drive 3 m infield before No. 9 exits. A third is a tap-back steal to No. 7 at tail when the opposition over-protects the middle. Only add tap-backs once your group consistently catches and lands safely.
Age Adaptations
For Under 8 and Under 10, do not lift. Teach spacing, ball tracking, catching and the No. 9 exit using a pass from shoulder height. For Under 12 and Under 14, follow your union’s age-grade rules: use coached non-lifting contests or permitted lifting only where the competition regulations and qualified supervision allow it. Keep the red side passive and use a low, safe receiving target.
For Under 16, introduce controlled lifting only after each player can demonstrate legal hand placement, stable body positions and a safe descent. Use one aerial target, one speed of throw and a coach beside the pod. At open age, add live opposition, late movement, disguise and the full exit decision, but stop the drill immediately if lifting or landing mechanics deteriorate. Laws and local age-grade regulations always override the exercise design.
Coach’s Review Questions
After every three repetitions, ask: Did we lift only after release? Did No. 5 catch at full extension and land safely? Was No. 9 playable within two seconds? If the answer is no, fix the earliest broken link rather than adding another variation. This play becomes valuable when it is accurate, lawful and repeatable under pressure—not when it looks clever on the whiteboard.

