

Rugby
Offloading in Contact: Win the Collision, Keep the Ball Alive
A progressive 2v1-to-3v2 continuity drill that teaches ball carriers to win the contact, free the hands, and connect an accurate offload with a supporting runner.

What you need
8 cones, 2 rugby balls, coloured bibs, 2 tackle shields optional
Overview
This is a continuity-and-decision-making drill for teaching players to turn a manageable contact into a line-break opportunity. The purpose is not to produce a speculative miracle pass; it is to build a reliable picture: the ball carrier wins a positive collision, the support player arrives on an effective line, and the ball stays alive only when the offload is on. Run it in the main skill block after your contact-preparation work, or use it as an 8-minute attacking primer before opposed units. It transfers particularly well to middle-third attack, where an offload can beat the first tackler and prevent the defensive line from setting.
Set the drill across the pitch, not down it, when you want to practice touchline awareness; use the central channel when you want repeated high-quality reps. A full Rugby pitch is 100m x 70m, but the working area here is deliberately compressed so players meet contact with the same urgency they would around the ruck. The core activity takes 15 minutes, with a short technical build-up first.
Setup
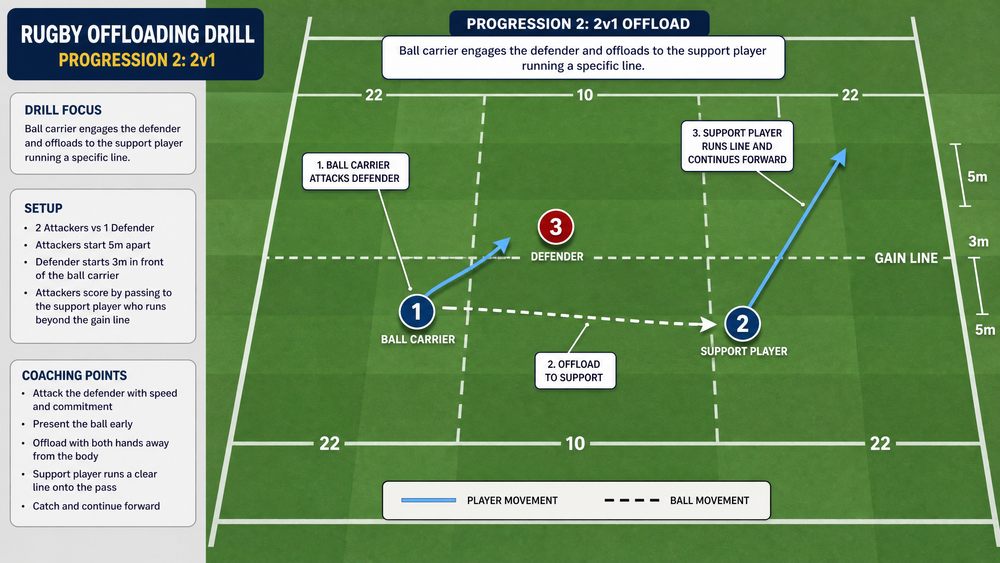
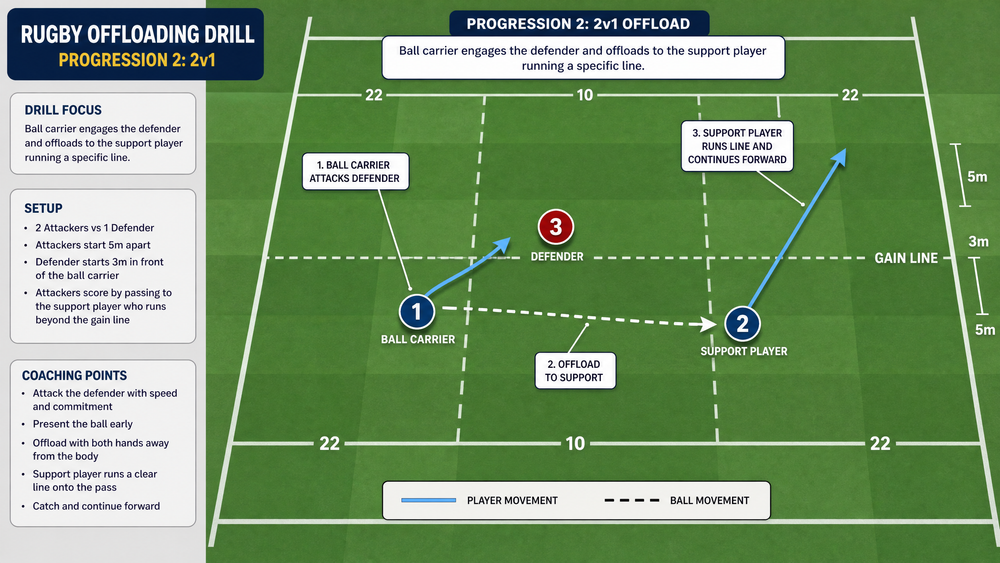
Mark a 15m wide x 18m long grid with cones, split into a 6m entry lane, a 4m contact zone, and an 8m exit/scoring zone. Set the grid 10m in from touch on a 100m x 70m pitch if you want a touchline-side picture. Place one defender in the contact zone and a cover defender 5m behind the gain line. Start the ball carrier, ideally a No. 12 inside centre, 6m from the entry gate. The support runner, ideally a No. 13 outside centre or No. 11/14 wing, begins 2m behind and 4m outside the carrier. A second support option, such as No. 9 scrum-half, can stand on the inside shoulder for later progressions.
| Item | Requirement | Coaching use |
|---|---|---|
| Players | 6 minimum; 8-12 ideal | Two attackers, two defenders, and a rotating queue at each end |
| Equipment | 8 cones, 2 balls, bibs, 2 tackle shields optional | Cones define the decision picture; shields reduce contact load in the teaching phase |
| Work area | 15m x 18m | Tight enough to demand connected support, large enough to finish at pace |
| Work:rest | 20 seconds on, 40 seconds off | Maintain contact quality and decision speed |
| Block | 3 sets of 4 reps per side | Rotate carrier, support, primary defender and cover defender |
Step-by-Step Instructions
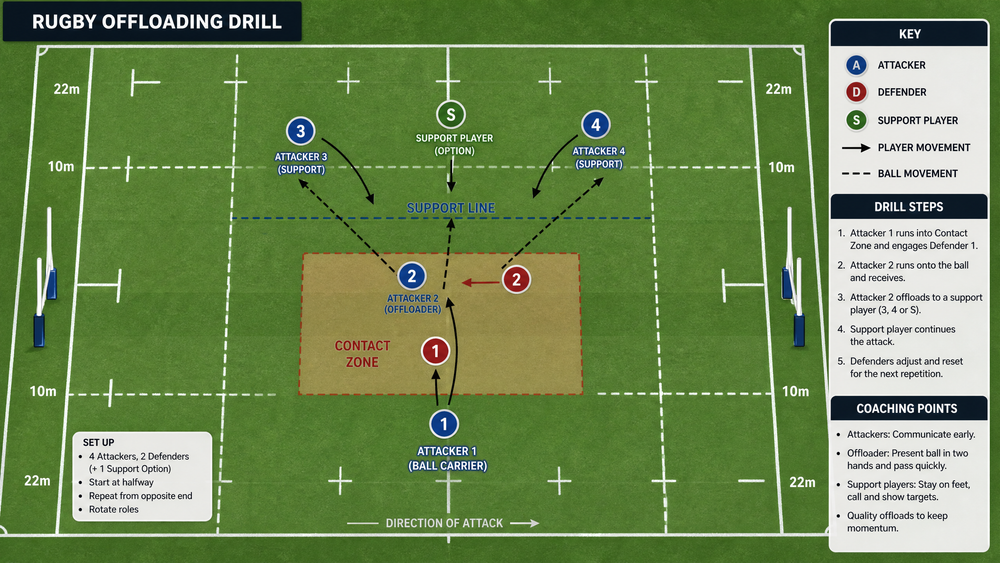
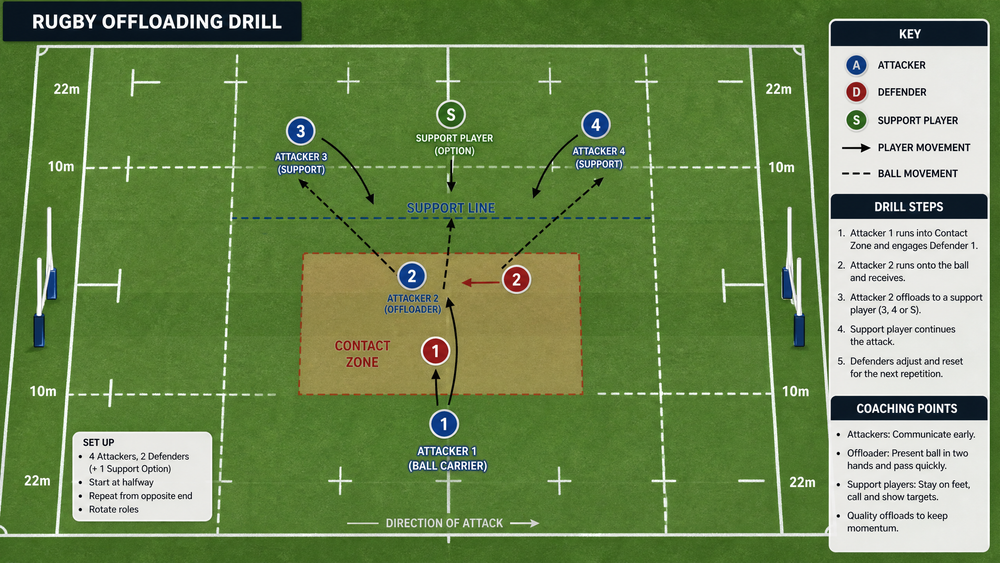
Brief the picture. Explain that the carrier’s first job is to earn front-foot ball, and the support player’s first job is to arrive late enough to see the ball but early enough to threaten beyond contact. Set the scoring rule: an attack scores one point only if the receiver catches the offload and crosses the final cone gate at pace. A knock-on, forward pass, or forced offload scores zero.
Start from a live pass. A coach or No. 9 feeds No. 12 while standing 6m from the contact zone. The carrier catches with two hands, scans the defender’s shoulder, and uses a late step to attack half a defender rather than running square into their chest. The carrier’s target is to cross the gain line by at least 1m.
Create a positive contact. Defender 1 closes at controlled live intensity and makes a safe wrap tackle around the body. The ball carrier drops body height, keeps a strong spine, drives three short steps through contact, and keeps the ball hidden on the far hip until the arms are genuinely available. If the defender wins the collision or wraps both arms, the carrier goes to ground and presents the ball—this is a successful decision, not a failure.
Run the support line. No. 13 or the wing holds depth, calls loudly—“here,” “late,” or the team’s call—and runs from behind the ball into the space just outside the carrier’s hip. Their line must be slightly arcing, not flat. This lets them catch a backward pass while accelerating into the exit zone.

Deliver the offload. When the defender’s grip is below the ball and the carrier is stable, the carrier transfers the ball away from the contact: a two-handed pop, a one-handed tip, or a short backhand only if that skill is already secure. Coach the carrier to release to the receiver’s near hand at chest height, with the pass travelling backwards relative to the carrier. The receiver catches early, tucks the ball immediately, and attacks the cover defender’s outside shoulder.
Finish and transition. The receiver runs through the exit gate, then turns and recovers the ball to the next group. Defender 2 may tag or complete a controlled tackle after the offload, depending on the contact level. Rotate roles every rep: No. 12 becomes the support runner, the support runner becomes a defender, and defenders join the back of the attacking queue.
Coach in short stoppages. Allow two or three live repetitions, stop for no more than 30 seconds, and correct one theme only—body height, timing, or pass accuracy. Return immediately to live execution so players connect the technical cue with the game picture.
Key Coaching Points
- Win the right to offload. Front-foot leg drive and a strong ball-carrying shape come before the pass. Do not reward an offload that is made while losing the collision.
- Keep the ball alive, not loose. The carrier protects the ball through the first instant of contact, then exposes it only when the tackle picture creates a clear release window.
- Support from depth. The support runner should see the carrier’s chest and arrive on a curved line; a flat runner creates a forward-pass risk and becomes easy to tackle.
- Communicate early, receive late. The receiver calls before contact but does not overrun the carrier. Their hands are presented only as the ball becomes available.
- Pass to space, not at a stationary teammate. The ball should lead the support runner through the exit gate and allow an immediate second action.
- Decision quality matters. A clean carry-and-presentation is the correct outcome when both arms are trapped, a jackal threat appears, or the support line is absent.
Common Mistakes
| Mistake | What you will see | Immediate correction |
|---|---|---|
| Forcing a low-percentage offload | Ball is thrown while falling or with both arms wrapped | Call “floor” and require the carrier to present the ball instead |
| Carrier runs upright | Defender wins chest height and stops momentum | Rehearse a late foot plant, bent knees, and eyes through the tackle |
| Support runner is flat | Forward pass risk or receiver runs into the same tackle | Move their start cone 1m deeper and demand an arcing line |
| Pass is hard or behind the runner | Receiver must stop, juggle, or turn back | Ask the carrier to show the ball earlier after stability and pop to the near hand |
| Players offload without a call | Carrier throws to empty space | Make a loud named call compulsory before every receiving action |
Variations & Progressions
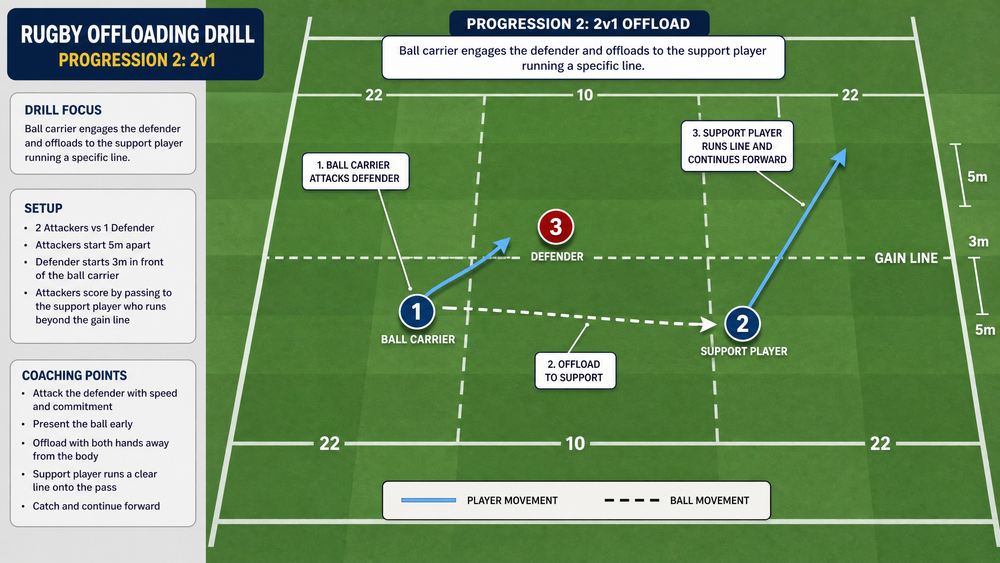
Begin with a 2v1 controlled-contact progression. Replace the tackler with a shield holder or a defender who can only wrap below the waist. The ball carrier works on three strong steps, a two-handed pop, and a receiver who runs through the gate. Keep this for 3-4 reps per player before turning the defender live.
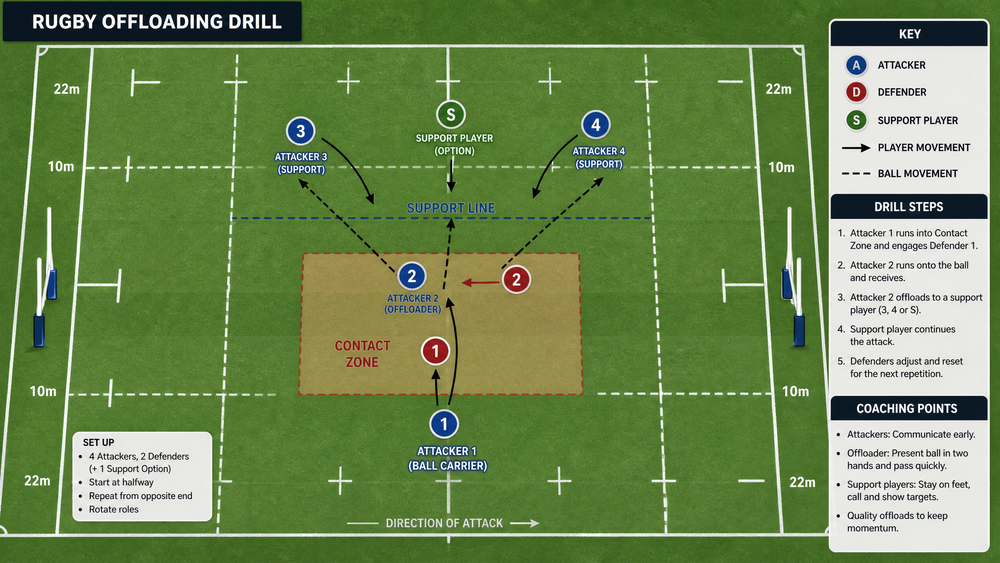
Progress to 2v1 live with cover, adding Defender 2 five metres beyond the gain line. The receiver must catch, square up the cover defender, and either finish themselves or take contact correctly. This makes the offload the start of the next attacking action rather than the end of the drill.
For an advanced 3v2 read, add No. 9 on the inside. Start with two live defenders: one may contest the carrier and the second may drift to cover either support option. The carrier must identify the free shoulder, while both supports run distinct lines—one short/inside and one deeper/outside. Use a 20-second attack clock and award two points only when the choice creates a clear line break.
Age Adaptations
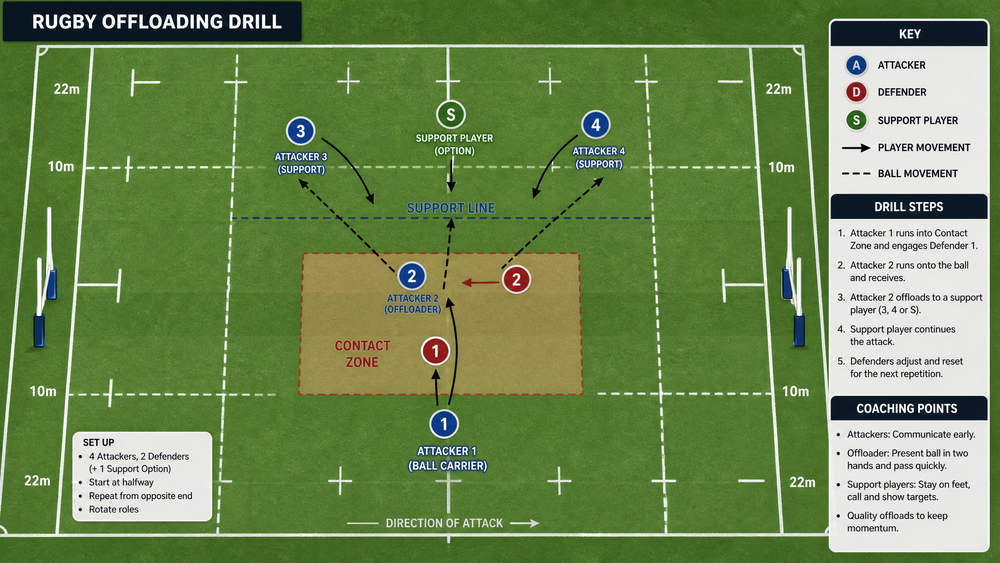
For Under 8 and Under 10, remove live tackling. Use a tackle shield or two-hand touch, a 10m x 12m grid, and insist on a two-handed pop pass. Let players stop their feet on contact initially; the outcome is safe ball transfer and accurate catching.
For Under 12 and Under 14, use controlled wrap tackling at 60-70% intensity. Keep the 15m x 18m grid, introduce the decision to go to ground, and reward safe tackle technique as much as the offload. Coaches should set clear contact limits and monitor each player’s readiness.
For Under 16, school, and adult players, use full live contact with agreed session intensity. Add the cover defender and second support option, narrow the grid to 12m when you want pressure, and finish with a small-sided conditioned game: a try after a legal offload scores double, but a turnover from a forced offload gives the defence two points. This gives the skill its proper tactical context: continuity is valuable only when it is controlled.
