

Rugby
Dynamic Ruck Clear-Out & Clean-Out: Win Fast Ball Through the Gate
A progressive, contact-ready breakdown drill that teaches Nos. 6, 7 and 8 to present, clear and play fast ball legally under realistic pressure.

What you need
3 rugby balls, 2 contact shields or tackle bags, 12 flat cones, 2 sets of coloured bibs, 1 whistle, 1 stopwatch
Overview
A good ruck is a fast-ball platform, not a pile of bodies. This 20-minute drill gives the No. 8, blindside flanker (6), openside flanker (7), scrum-half (9) and first receiver (10) a repeatable breakdown sequence: win the carry, present the ball back, enter through the legal gate, remove the immediate threat, and play before the defence resets.
Use it after individual tackle-entry and body-height preparation, early in the contact part of your session. Begin with controlled shields and progress to a live contest only when players demonstrate safe, legal technique and your age-grade policy permits it.
| Session outcome | Coach's non-negotiable | Success measure |
|---|---|---|
| Fast, legal possession | Enter from the own side and stay on feet | No. 9 receives clean ball within three seconds of the tackle |
| Dominant clear-out | First arriver wins space with low body height | Defender is moved beyond the ball |
| Sustainable phase play | Second arriver secures, then both reload | Nos. 6 and 7 are ready for the next phase |
Setup
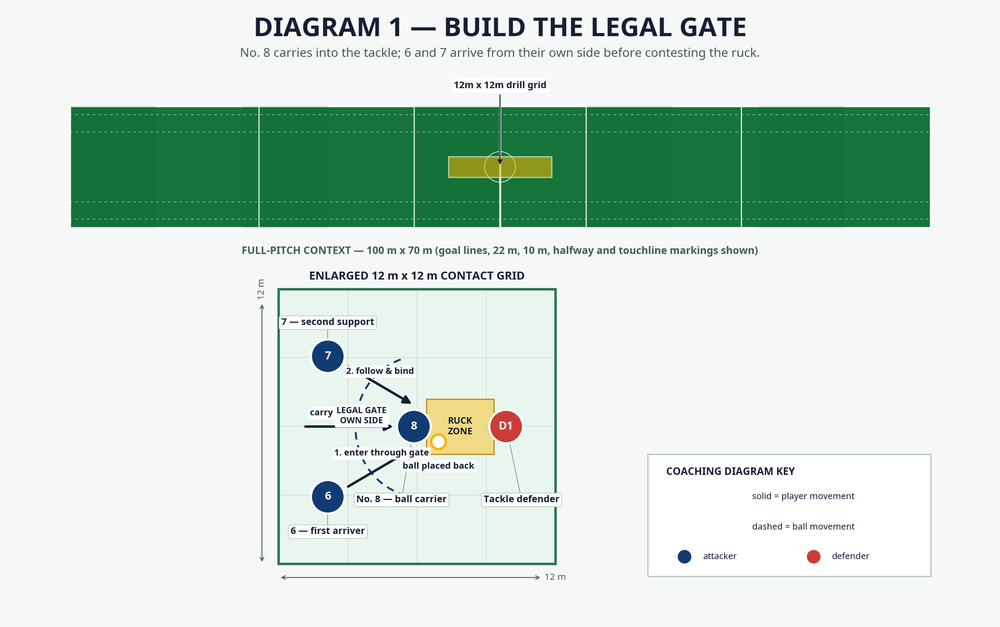
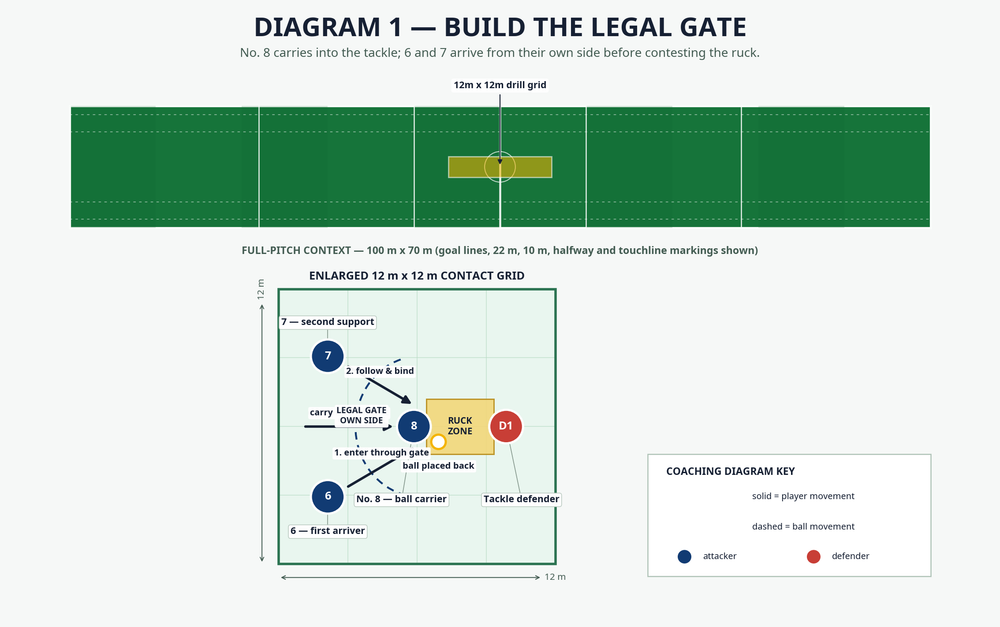
Use a 100 m x 70 m pitch as the session context, but work inside a marked 12 m x 12 m contact grid near halfway. Give No. 8 a 4 m run-up lane, place the tackle point in the centre, and mark two 3 m support channels behind the carrier. No. 9 starts 4 m behind the ruck line; No. 10 starts 7 m outside No. 9 for the exit pass.
Use No. 8 as ball carrier, No. 6 as first clearer, No. 7 as second cleaner, No. 9 as scrum-half, No. 10 as first receiver, D1 as tackle defender and D2 as the potential jackal. A 10–12-player group permits fast rotation; use two grids for larger squads.
| Equipment | Quantity per grid | Purpose |
|---|---|---|
| Rugby balls | 3 | One in play and two for rapid resets |
| Contact shields or tackle bags | 2 | Controlled collision and early clear-out work |
| Flat cones | 12 | Mark grid, lanes and ruck line |
| Coloured bibs | 2 sets | Separate attack and defence |
| Whistle and stopwatch | 1 each | Start repetitions and measure release speed |
Use a concise role call before every rep: “8 carry, 6 clear, 7 secure, 9 play.” It removes hesitation and makes players accountable for their next job.
Step-by-Step Instructions
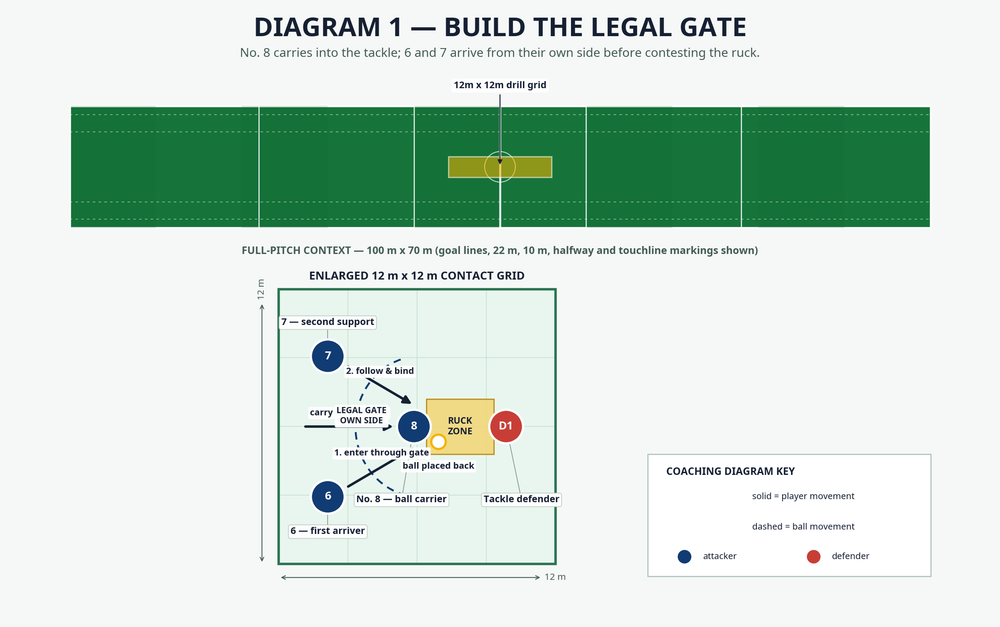
Build the picture. Put D1 on the tackle point with a shield and D2 one metre beyond the ball side of the future ruck. No. 8 begins four metres from contact; No. 6 and No. 7 begin three metres behind and inside/outside respectively. No. 9 calls the exit side.
Carry with purpose. On the whistle, No. 8 accelerates through the lane, keeps two hands on the ball, hits the shield with eyes up and drives the legs. The objective is a stable, accessible ball, not a spectacular collision.
Present the ball. After the tackle, No. 8 immediately turns or places the ball back toward their own try line. Demand a quick release and a long, visible presentation. If No. 9 cannot see the ball cleanly, the repetition has failed.
Arrive through the gate. No. 6 tracks the carrier's inside hip and approaches directly from the own side. They shorten the final two steps, square the shoulders and lower the hips before contact. Stop and replay any side-entry shortcut.
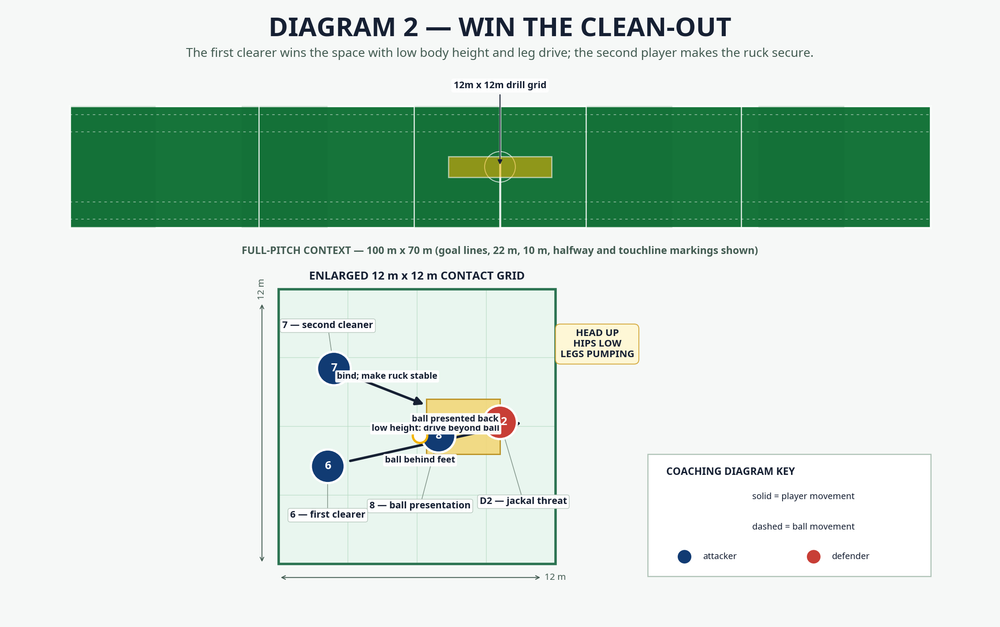
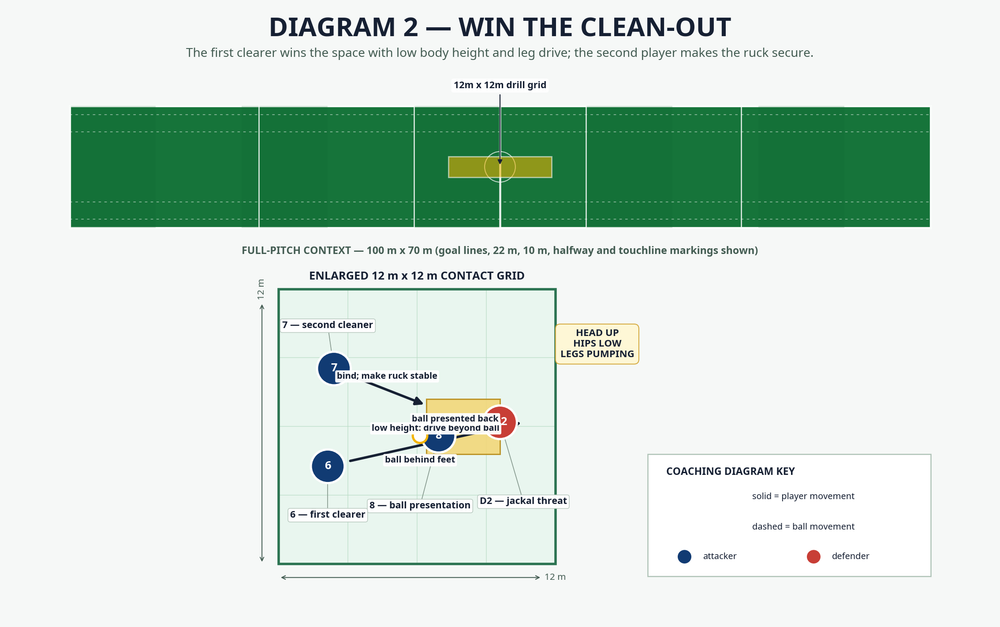
Clear the threat. No. 6 targets the legal body area on D2, keeps the head safely to one side, connects and drives with short, live feet. The finish is past the ball, not down on it. The player remains bound and balanced rather than diving.
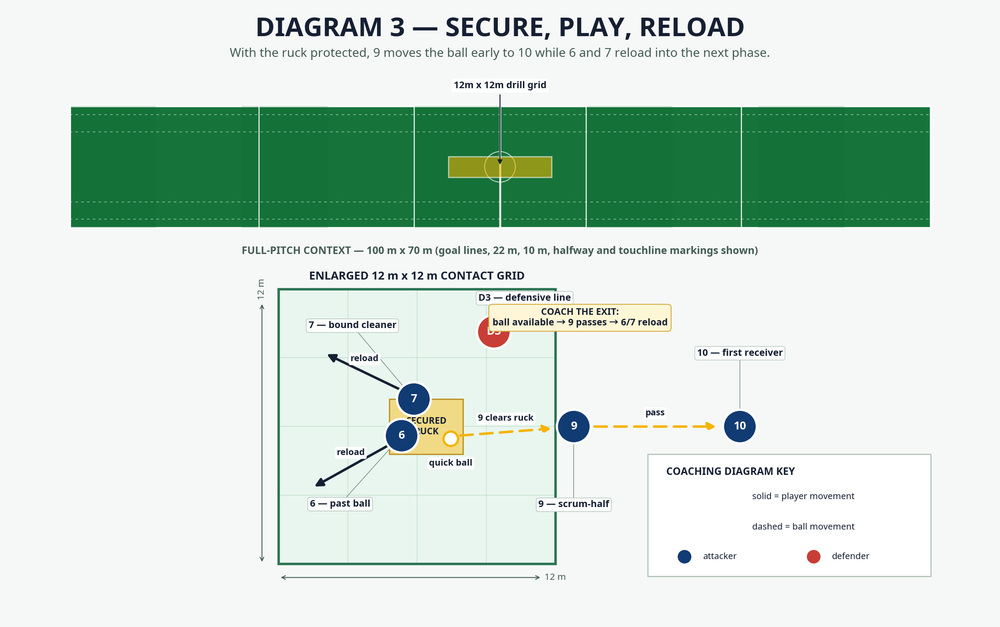
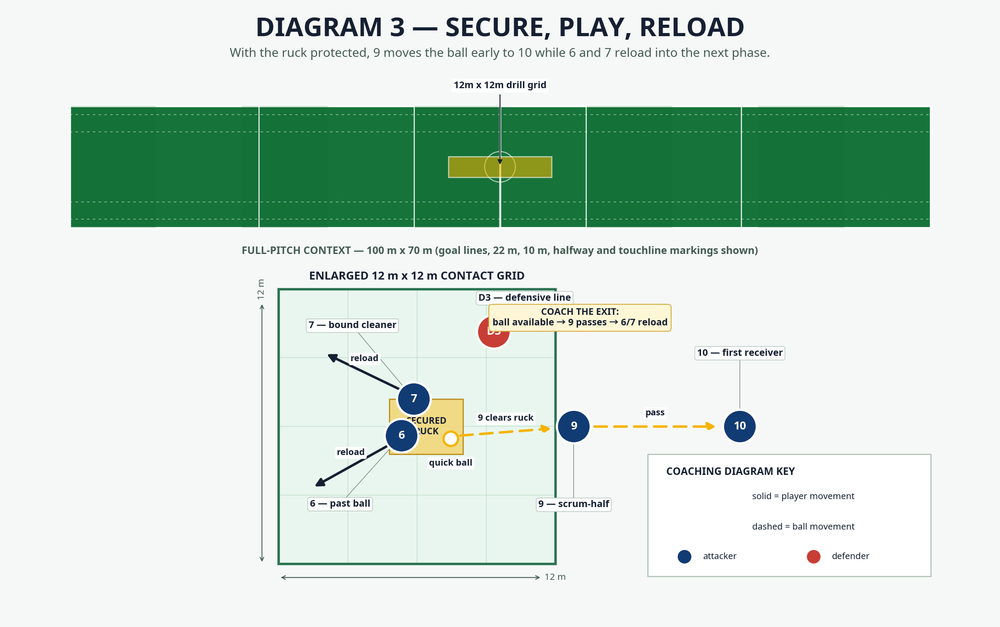
Secure what was won. No. 7 arrives one beat later and reads No. 6's outcome. If the threat is cleared, No. 7 binds and makes the platform square; if D2 remains connected, No. 7 assists without collapsing the ruck.
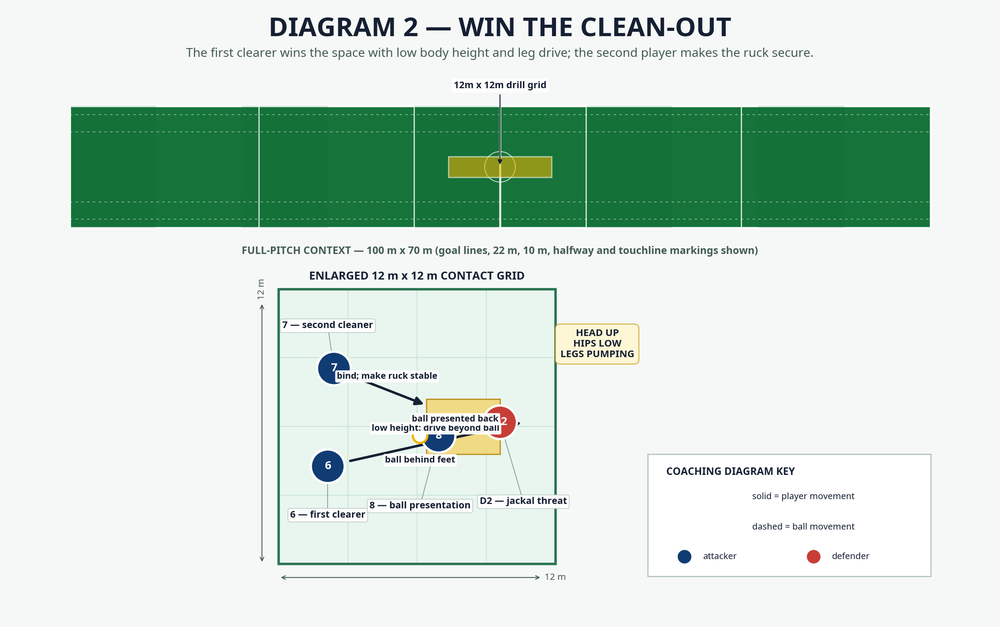
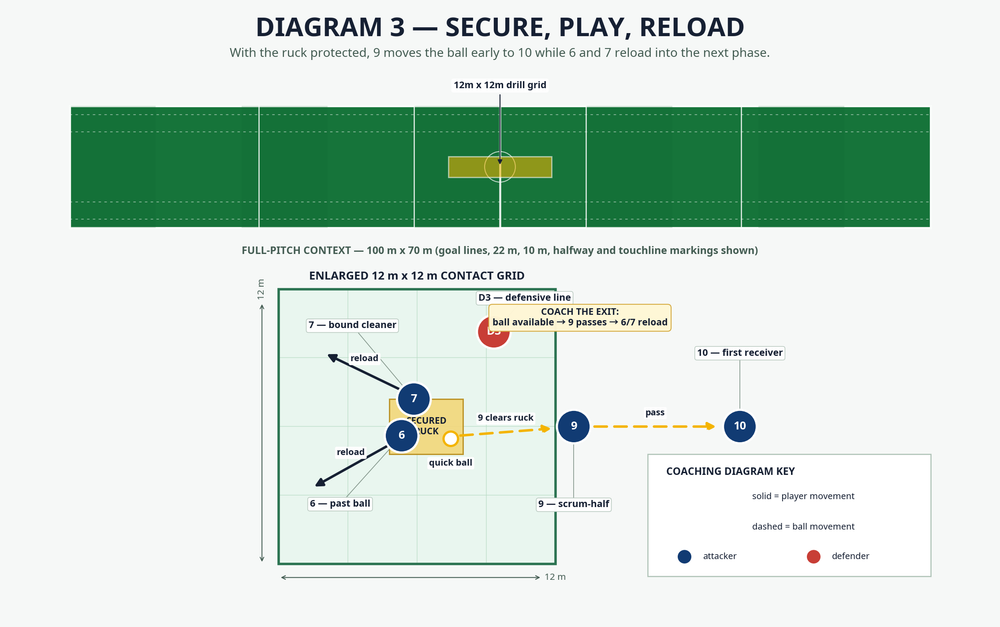
Play the exit. When the ruck is legal and stable, call “use.” No. 9 lifts the ball from behind the hindmost foot and passes to No. 10. Begin with a three-second tackle-to-release target; add speed only after technique is reliable.
Reload. When No. 9 plays away, Nos. 6 and 7 exit under control and move to their designated reload cones. Make it clear that the clean-out is the start of the next attack, not the finish of the rep.
Run in blocks. Complete six quality repetitions, give 30 seconds of direct feedback, and repeat for three four-minute blocks with a one-minute reset between blocks. Rotate one role clockwise after every repetition.
Score discipline. Award one point each for legal entry, clean ball and a three-second release. Any unsafe contact, side entry or player going off feet scores zero for that rep.
Key Coaching Points
| Coaching point | Coach's cue | What good looks like |
|---|---|---|
| Body height | “Hips below shoulders; eyes up.” | No. 6 arrives balanced and drives upward through the legal target. |
| Gate discipline | “Own side first.” | The clearer's route stays behind No. 8, never across the side of the ruck. |
| Connection | “Bind, squeeze, drive.” | The player stays on feet and finishes beyond the ball. |
| Ball presentation | “Long and visible.” | The ball sits behind No. 8's body for a clean No. 9 pickup. |
| Second-arriver decision | “Secure what 6 creates.” | No. 7 stabilises rather than duplicating the same clear-out. |
| Exit urgency | “Fast ball, then reload.” | No. 9 plays early; the forwards regain attacking shape. |
Common Mistakes
Side entry is the most common error. Stop the action, walk the player back to their own side and rehearse the final two tracking steps before restarting.
High or disconnected contact loses power and creates an unstable collision. Reduce the run-up to two metres, demand hips down before the final step, and return to a shield until posture is dependable.
Clearing and falling over the ball is another poor habit. Coach a balanced finish: connect, drive two steps, release the threat and stay on feet. Also watch No. 7 spectating and No. 9 waiting for a perfect picture; both should act once the ball is legally available.
Variations & Progressions
Begin with a foundation variation: remove D2 and use a static shield. Run it at 60 percent speed so players rehearse presentation, gate entry and binding without pressure. This is ideal for new groups and return-to-contact phases.
Progress to a live jackal picture by allowing D2 to step over the ball only after No. 8 is down. D2 must contest legally and under control; No. 6 has to identify the threat and choose the correct line, not chase a pre-set target. Limit each defender to two live contests before rotation.
For the highest progression, add a late defensive-line call. D3 calls “tight” or “fold” as No. 9 approaches the ball. No. 9 then passes to No. 10, plays a short tip option, or resets the forward pod according to your team system. Maintain the three-second release target and require Nos. 6 and 7 to reload.
Age Adaptations
| Age group | Adaptation | Contact expectation |
|---|---|---|
| Under 8–Under 10 | Use a 6 m x 6 m grid and a non-contested “tower” over the ball. | No live clear-outs or contested rucks. |
| Under 12–Under 14 | Use shields and walk-through-to-jog-speed entry; reward legal routes. | Controlled, coach-supervised contact only. |
| Under 16 | Introduce D2 as a constrained jackal, then add No. 9's exit pass. | Moderate live competition with strict stop criteria. |
| Open / adult | Use the full three-defender picture, three-second clock and reload demand. | Full live work only when players are prepared and supervised. |
For every age group, reduce speed or remove the contest before body position breaks down. Quality repetitions build a reliable breakdown identity; tired, unsafe repetitions simply rehearse poor habits.
