

Rugby
Support Running and Angles: Square-to-Scan 3v3
A practical Rugby attack drill that teaches players to run square, fix defenders and deliver late support options at pace.

What you need
4–6 Rugby balls, 16–20 flat cones, 6 bibs, 2 tackle shields (optional), whistle, stopwatch
Support Running and Angles: Square-to-Scan 3v3
Overview
This 25-minute attacking drill teaches players to create a real second attacking picture after the first catch. The ball carrier runs square enough to hold the near defender, then makes a late decision. Support players learn to run useful lines rather than simply stand available. The non-negotiable habit is that the pass is not the end of a player’s job: every attacker accelerates into the next picture with depth, timing and a clear call.
Use it early in a midweek attack session, after catch-pass work and before a conditioned game. The base pattern is No. 10, No. 12 and No. 13 versus three defenders; the progression adds No. 9 as the inside trail runner. On a regulation 100 m × 70 m Rugby pitch, the working area occupies only a 30 m × 24 m section, allowing two groups to train at once.
Coach’s outcome: players can identify the defender they are fixing, name their support option before receiving, and arrive through the line at pace after the pass.
Setup
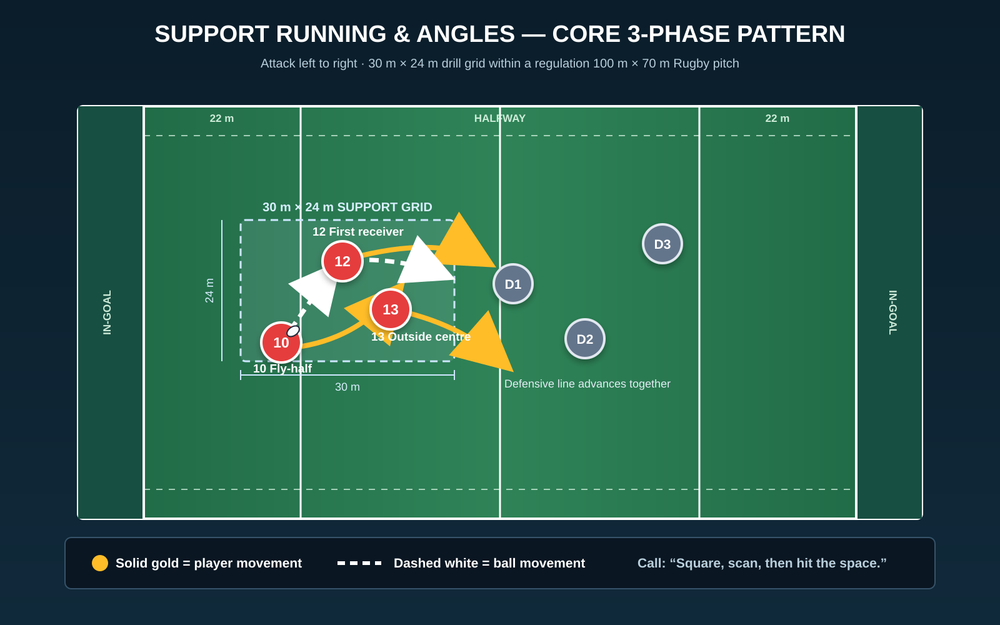
Mark a 30 m long × 24 m wide channel with four corner cones. Put a start cone 5 m behind the left side and a score line 5 m beyond the right side. No. 10 starts with a ball; No. 12 is 6 m in front and 4 m outside; No. 13 is 10 m in front and 5 m inside No. 12. Set D1, D2 and D3 across the far third, initially 4 m apart. Defenders begin at walk pace, then progress to a live launch.
| Item | Quantity | Coaching purpose |
|---|---|---|
| Rugby balls | 4–6 | Keeps repetitions fast and reduces waiting. |
| Flat cones | 16–20 | Marks the channel, start, score line and rotations. |
| Bibs | 6 | Separates three attackers from three defenders. |
| Tackle shields | 2 | Optional safe contact picture for older groups. |
| Whistle and stopwatch | 1 each | Controls 40-second work periods. |
Aim for 12 players. Six operate in the channel while the other six feed balls, observe lines and rotate every two repetitions. With fewer players, alternate attack and defence after each set of three. Use standard roles: No. 9 scrum-half, No. 10 fly-half, No. 12 inside centre and No. 13 outside centre. D1 is nearest the ball; D3 is furthest out.
Tactical Picture: Base Pattern
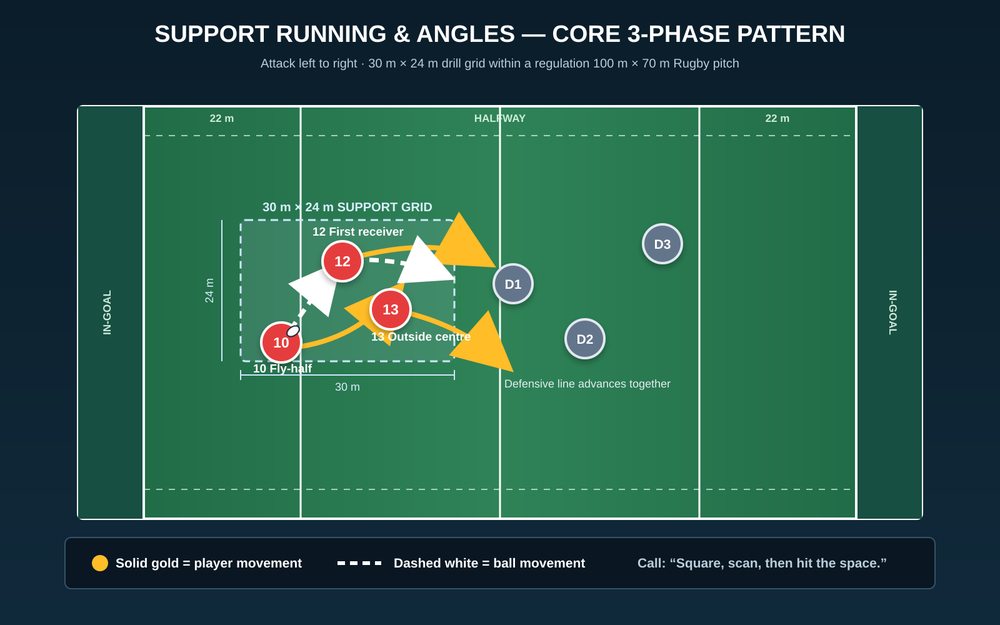
No. 10 triggers the drill. Their first three steps are forward and square, not a drift toward touch. No. 12 holds enough depth to catch while moving, then runs an outside line to draw D1 and D2. No. 13 starts underneath No. 12 and tracks an unders line so a defender who turns out exposes a short, late pass. Initially instruct the defenders to advance together but not tackle; this gives the attack time to recognise the picture and rehearse the footwork.
Step-by-Step Instructions
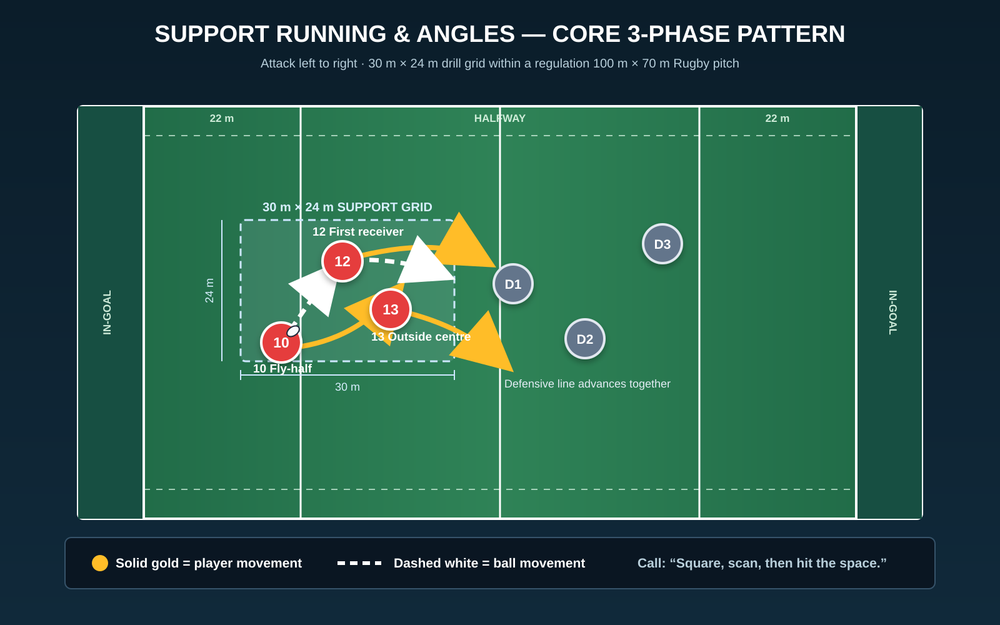
Brief the picture for 60 seconds. The target is to cross the score line with a support player ready for a late pass, not merely to complete three passes. Ask No. 10 to name D1 and ask No. 12 and No. 13 to call ‘out’ or ‘under’ before they move.
Walk through for two minutes. No. 10 runs square into the channel. No. 12 starts the outside line only after No. 10 has taken two forward steps. No. 13 waits until the ball has travelled, then accelerates underneath No. 12. Stop once to check spacing: attackers need 3–5 m between them at the catch, rather than a flat, crowded line.
Introduce guided defence for three minutes. D1, D2 and D3 advance at 60 percent. On your call, D1 either drifts or steps in. No. 10 stays square, shows D1 the ball and passes only when D1 has committed. The support runner calls early, but the pass arrives 1–2 m in front of their running shoulder.
Run the core 3v3 block for eight minutes. Play four 40-second work periods with 35 seconds to reset and coach. Run three or four repetitions in each period. Award one point for crossing the score line, one bonus point for a pass after a defender commits, and one bonus point if the receiver arrives at full pace. Rotate positions after every work period.
Add a finish for four minutes. In the final 5 m, the ball carrier scores or makes a two-handed touch on a shield and presents a long ball. This prevents the group from slowing once the line has broken.
Review for 90 seconds. Ask: ‘Which defender did we fix? Which runner was the late option? What changed when D1 stepped in?’ Let players answer, then give one technical focus for the next block.
Key Coaching Points
| Coaching point | What to look for | Cue |
|---|---|---|
| Run square first | Hips and shoulders face the gain line for 3–4 m. | ‘Win the defender, then move the ball.’ |
| Create depth | The receiver catches 2–3 m behind the ball carrier. | ‘Depth buys decision time.’ |
| Reload after passing | The passer becomes an inside or trail option. | ‘Pass and go again.’ |
| Change pace | The runner bursts through space rather than jogging flat. | ‘Arrive late, arrive fast.’ |
| Communicate line | Use one early call: ‘out’, ‘under’ or ‘inside’. | ‘Call it before you need it.’ |
| Lead the runner | Pass 1–2 m ahead of the running shoulder. | ‘Put it in front.’ |
Common Mistakes
The most frequent error is No. 10 drifting sideways before engaging D1. Put a flat cone 4 m in front of the start point and require No. 10 to run over it before passing. The second is support runners leaving too early, which creates a flat line and allows the defence to drift together. Make the receiver wait for the ball carrier’s second forward step, then demand a sharp acceleration.
A third error is passing before D1 has made a decision. Freeze the picture and ask the ball carrier where D1’s feet and shoulders were pointing. Finally, players may run a good line without calling for the ball. Make an audible, specific call a condition of the bonus point; quiet attackers do not earn it.
Variations & Progressions
Make it easier: remove D3 and play 3v2 in a 24 m × 20 m channel. Pre-call D1’s decision and allow two touches before the defence completes the tackle. This gives younger players a clean view of the space created by a drifting or biting defender.
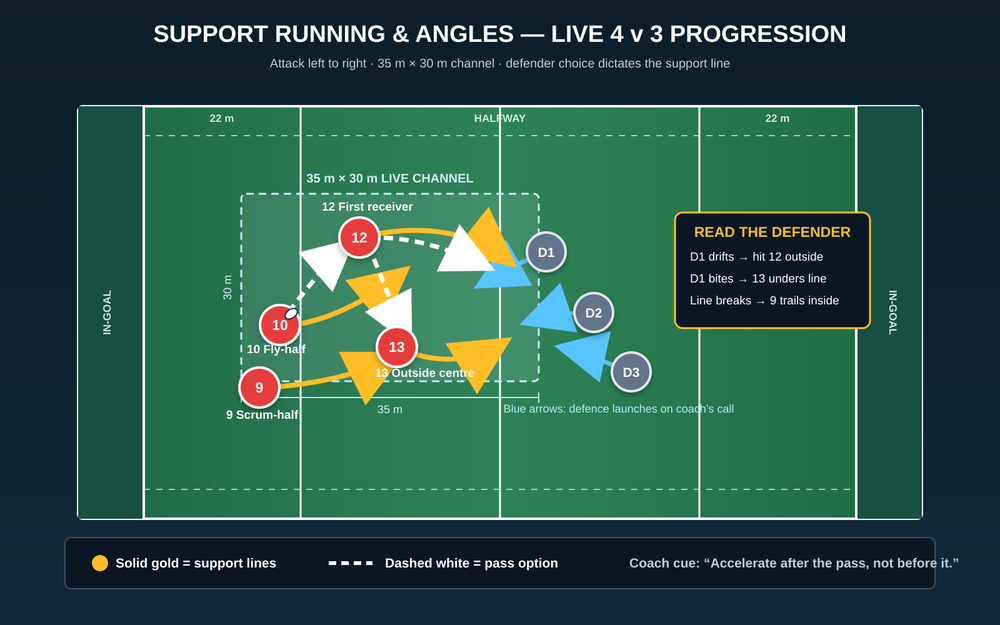
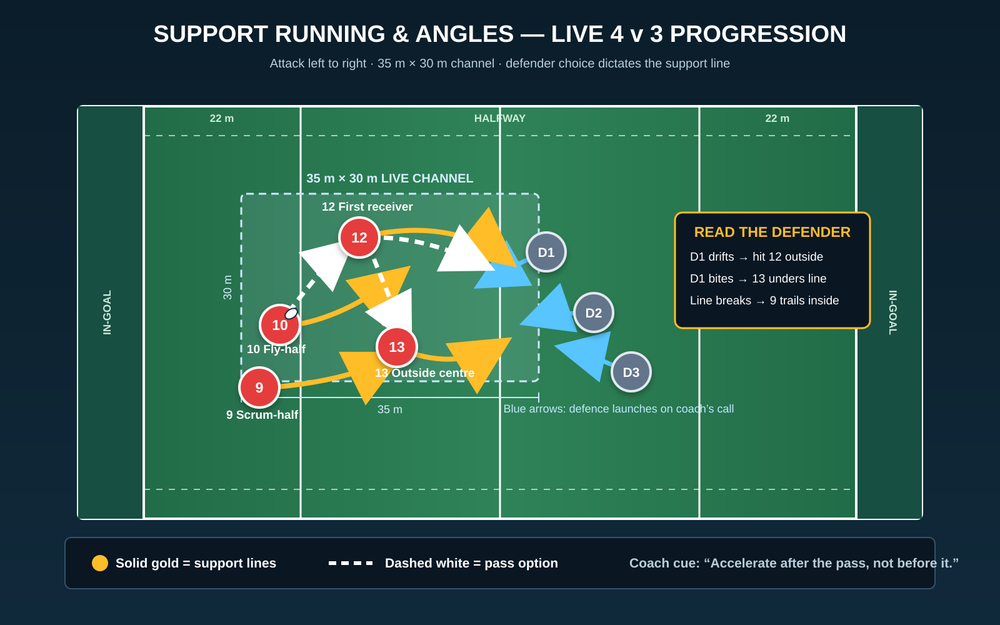
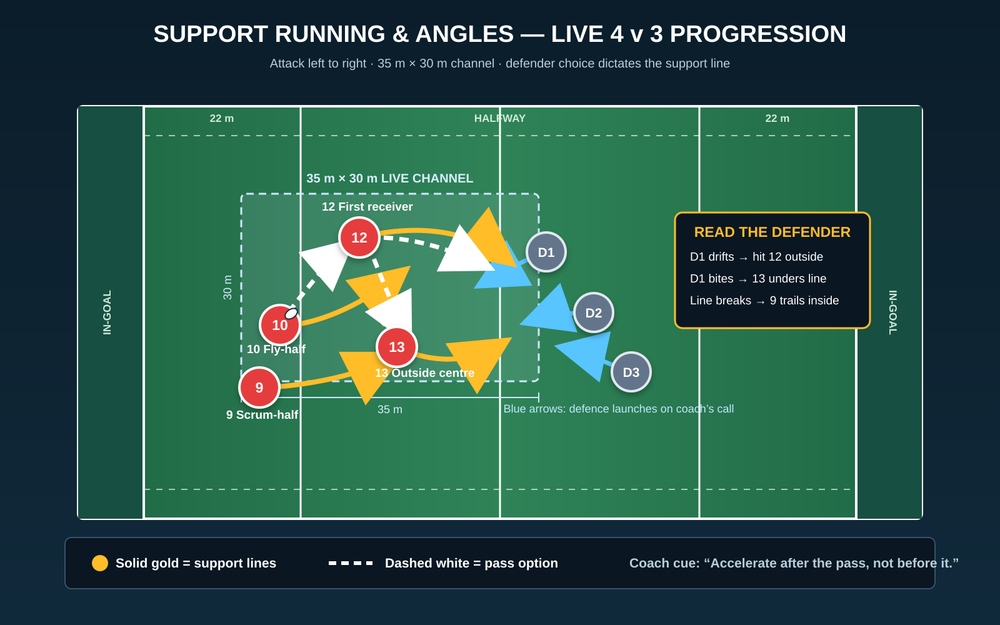
Make it harder: use the live 4v3 progression. Add No. 9 trailing inside No. 10, widen to 35 m × 30 m, and release defenders from 8 m on the whistle. If D1 drifts, No. 12 takes the outside ball; if D1 bites, No. 13 strikes the unders line; if the line breaks, No. 9 trails inside for a second-phase pass. Allow only one pass after the initial catch.
Game-transfer: play 5v4 from a ruck cone. No. 9 clears to No. 10, who calls a two-word shape before receiving. Allow a tackle and one fast ruck, then give the attack 10 seconds to score. This tests whether support runners reload after contact.
Age Adaptations
| Group | Adaptation | Coach emphasis |
|---|---|---|
| Under 8–Under 10 | 3v1 or 3v2, touch only, 20 m × 15 m; no fixed numbers. | Catch, pass and run into space. |
| Under 12 | Guided 3v3 in 24 m × 20 m; introduce No. 10, 12 and 13 labels. | Stay square and call the line. |
| Under 14–Under 16 | Full 3v3 and live 4v3; add shield finish and tempo targets. | Fix a defender and reload. |
| Open age | Start from a ruck and use live contact with match-specific calls. | Read the system and make the late decision. |
For every group, keep the principle constant: support is not standing beside the ball carrier. It is arriving on a line that changes the defender’s decision at the moment the ball carrier needs it.
