Rugby
Wide-Overlap Lineout: Fix-and-Release to the Open-Side Wing
A coach-ready lineout launch that turns a clean five-man catch into a fast, connected wide overlap and a clear finish for the open-side wing.

What you need
6 flat cones, 2 sets of contrasting bibs, 3 rugby balls, whistle, lineout lifting pad or tackle shield, finish-gate cones
Overview
This is a five-man lineout launch to the open side designed to move the defensive line before it can set its drift. The aim is not simply to throw the ball wide; it is to use the first two receivers to fix inside defenders, create a clean pass picture for the outside centre, and release the wing with genuine width and a support line inside. Use it when their edge defender steps in from the wing or the backfield compresses after the lineout.
The play has one non-negotiable principle: win the lineout before you chase the overlap. A rushed throw, a scrum-half standing square to the touchline, or a fly-half catching flat removes the space you are trying to create. Coach the launch as a connected sequence: secure, square, fix, transfer, finish. The full pitch is 100m x 70m; for training, the critical attack happens in a 35m-long by 45m-wide working area that starts at the lineout touchline and opens toward the far channel.1

Setup
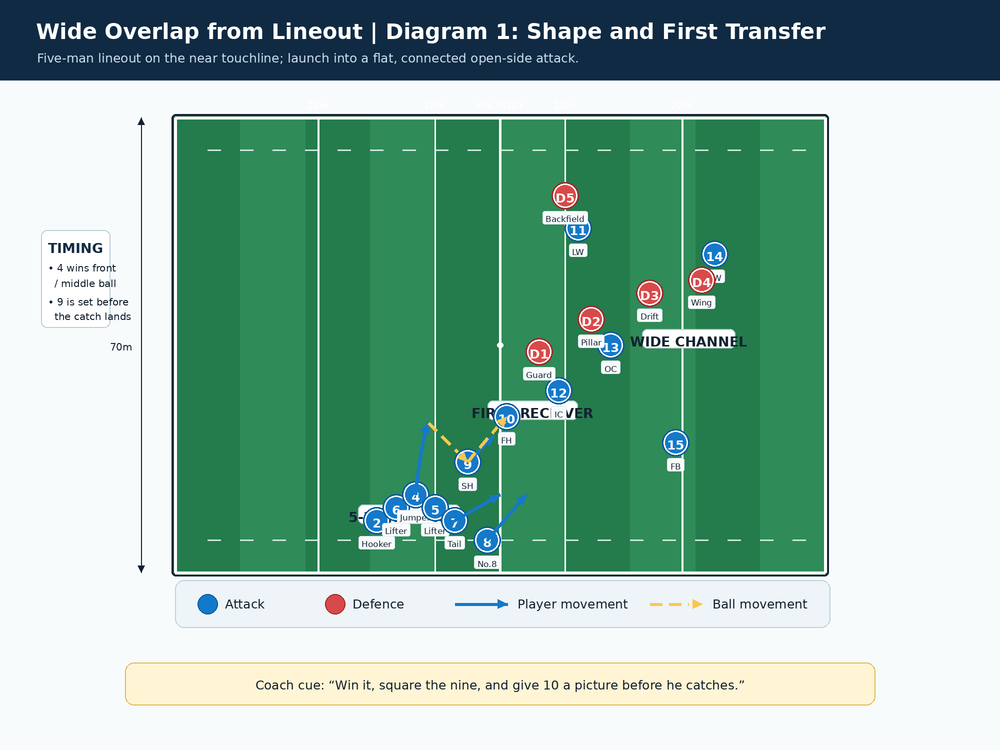
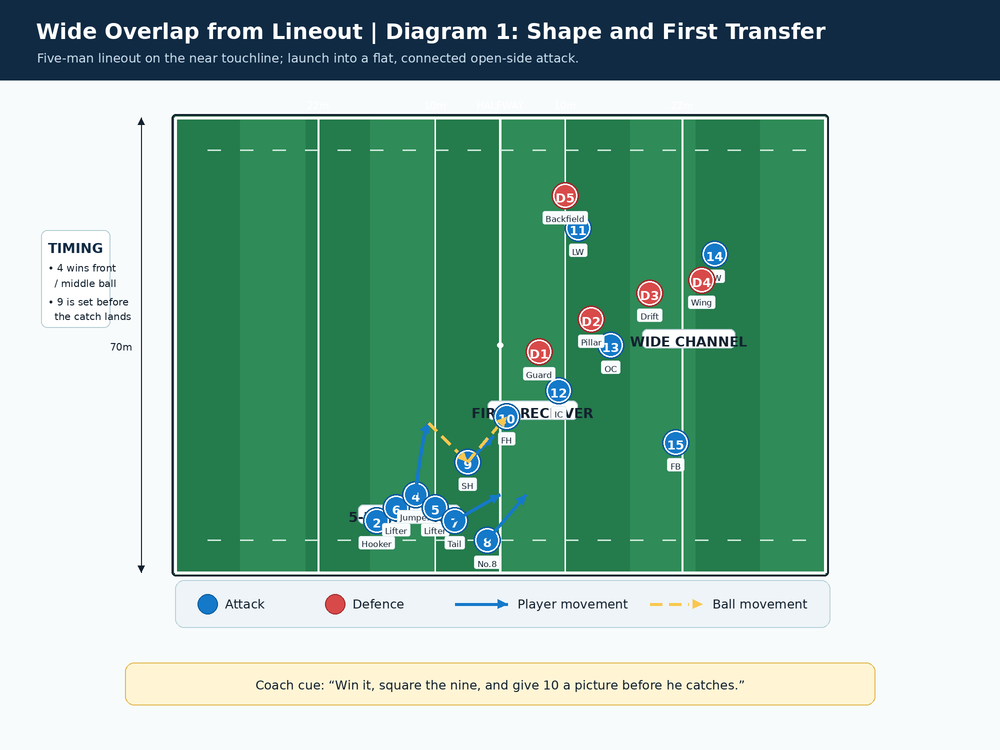
Use 21 players where possible: 15 attackers and six defenders. Put the throw-in on the near touchline, 10m inside the opposition 22-metre line. Mark a 45m-wide attack box from that touchline toward the far side, then mark a finish gate 5m in from the far touchline and 8m before the goal line. This gives the wing a real touchline decision rather than an artificial run-in. If space is tight, retain the 45m width but shorten the length to 30m.
| Area | Exact setup | Coaching purpose |
|---|---|---|
| Lineout | Five-man unit on the near touchline; 2 throws, 6 and 5 lift, 4 jumps, 7 is tail support | Produces a fast, repeatable front-to-middle ball |
| Launch depth | 9 starts 5m behind the tail; 10 is 8m outside 9; 12 and 13 are 6m apart with 13 one metre deeper | Gives each receiver time to fix and pass |
| Width | 14 begins 3m inside the far touchline; 11 holds the far-side backfield width; 15 is 12m behind 13 | Keeps the overlap honest and supplies cover support |
| Defence | Three defenders opposite 10, 12 and 13; edge defender opposite 14; two backfield cover players | Creates a realistic drift-and-cover picture |
You need six cones, two sets of contrasting bibs, three rugby balls, a lineout lifting pad or shield if appropriate, and a whistle. Begin with defenders at 70 percent line speed.
Step-by-Step Instructions
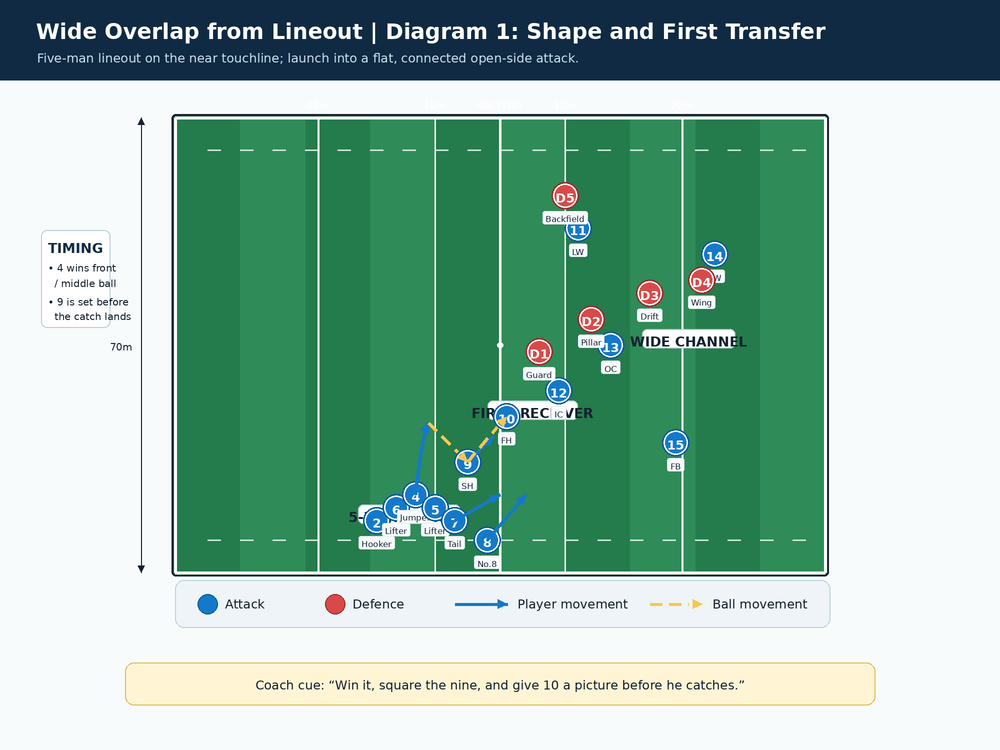
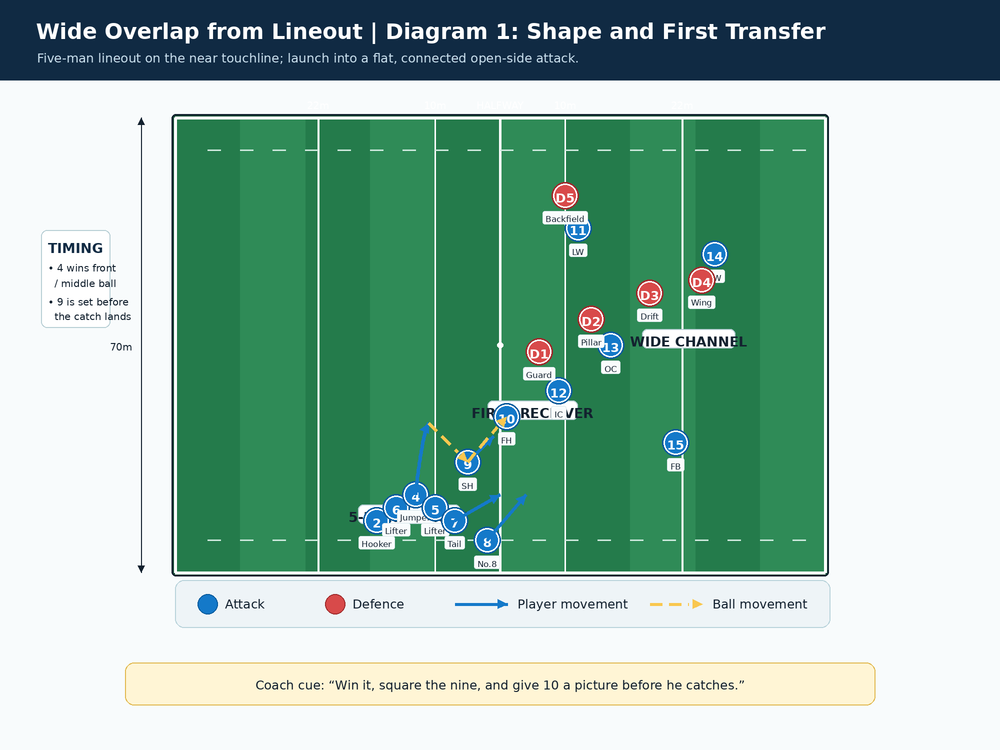
Call and set the lineout. The caller gives the simple call, for example “Four, out.” Number 4 is the target; 6 and 5 set their lift early, while 7 is ready to fold inside after the catch. Number 2 identifies the target with eye contact, then throws a firm ball to the front-middle space. Do not add dummy movement until the basic timing is clean.
Secure and present. At T+0.5 seconds, 4 catches at full reach, lands under control and turns his shoulders toward 9. The ball must be presented at chest height on the open side. Number 9 is already balanced, five metres from the tail, with hips facing 10 rather than the touchline. He receives the transfer at T+0.8 seconds.
Square the first receiver. Number 9 takes no more than two steps before passing. He delivers a chest-height spiral 8m to 10 at T+1.3 seconds. Number 10 catches with hands up, stays square, and takes a short three-metre carry line directly at the inside defender. His job is to hold that defender, not to beat him.
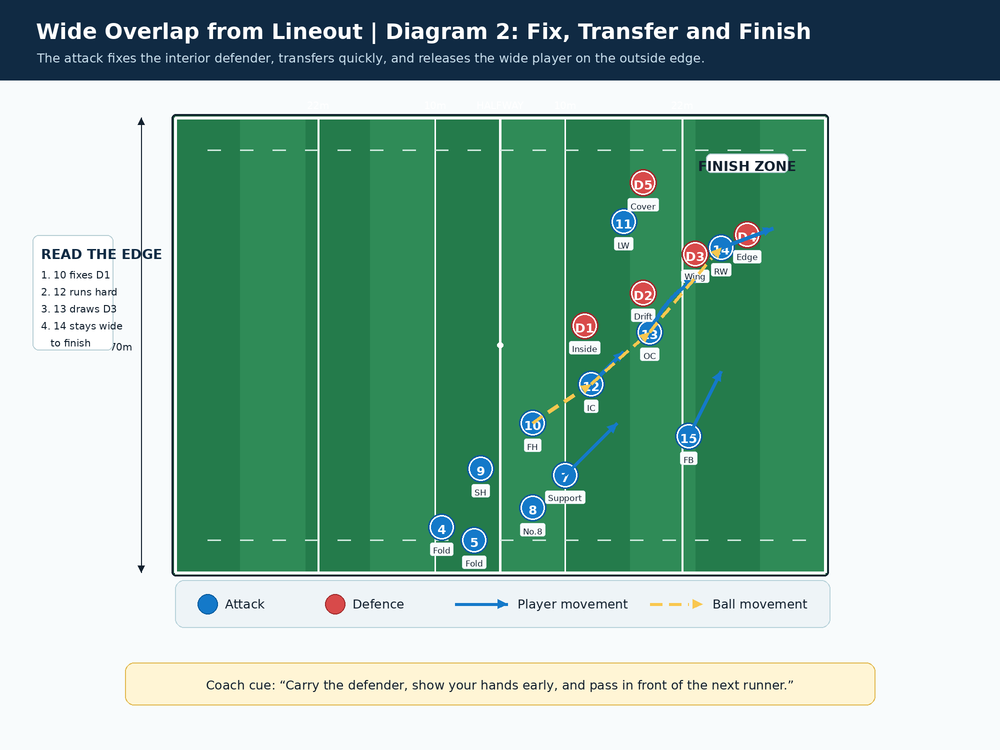
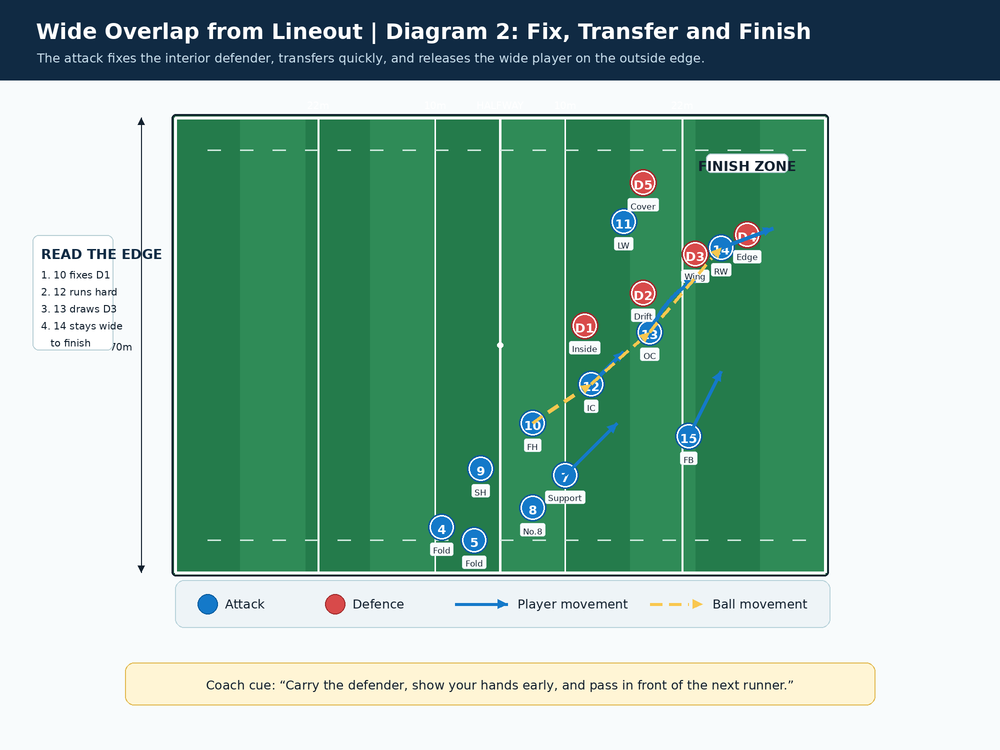
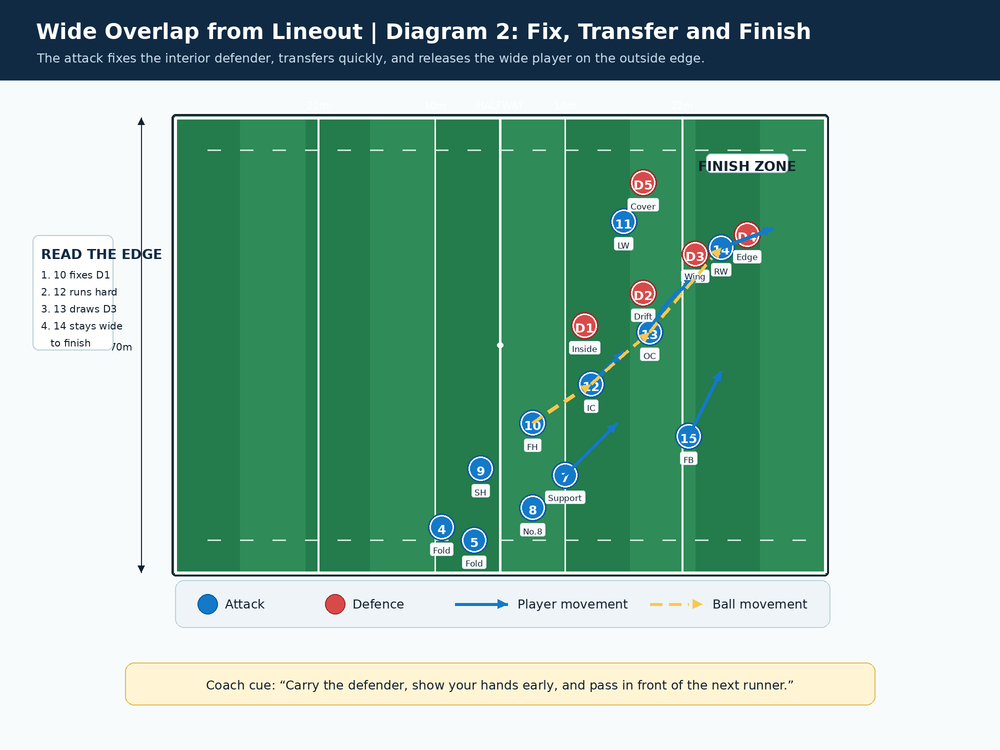
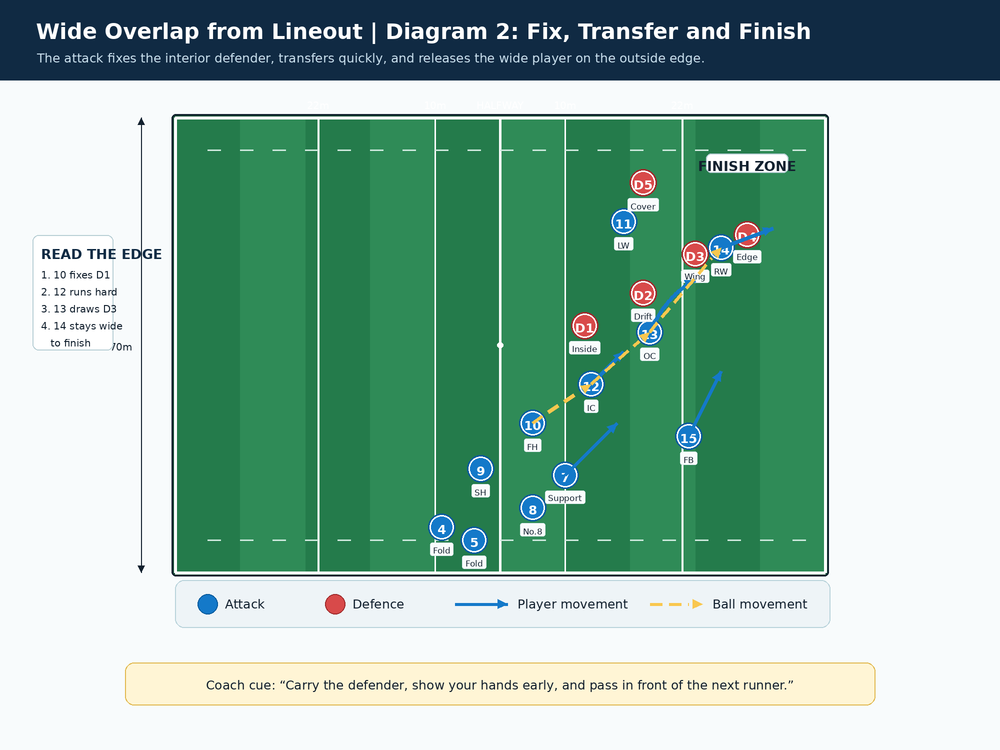
Fix through 12. Number 12 runs a hard, slightly unders line from 6m outside 10, aiming at the inside shoulder of the next defender. Number 10 passes in front of 12 at the last safe moment. If the defender bites on 12, 12 can receive and carry; if he holds, 12 gives a quick two-handed transfer to 13. The ball must travel before the tackle picture closes.
Create the outside decision. Number 13 starts one metre deeper than 12, accelerates onto the pass, and runs at the outside shoulder of the drift defender. He stays connected to 14; the target spacing is 7-9m. Number 14 holds his width until 13 has drawn the edge. He calls “now” only when he is outside the defender and can catch moving forward.
Release and finish. Number 13 throws a flat, catchable pass to 14 in front of his chest. Number 14 attacks the finish gate at full pace and scans inside for 15, who trails 8-10m behind and inside. If the edge defender turns out, 14 finishes in the corner; if cover arrives, he gives the late inside pass to 15. The rep ends only when the ball crosses the finish gate with a support option present.
Key Coaching Points
| Coaching focus | What to demand | Live cue |
|---|---|---|
| Lineout speed | Clean win and immediate open-side presentation | “Catch, land, show.” |
| 9’s alignment | Hips and shoulders face 10 before the ball arrives | “Square the nine.” |
| 10’s role | Carry the defender for two steps before passing | “Fix, do not flee.” |
| 12 and 13 connection | 12 runs hard; 13 stays one metre deeper with 7-9m spacing | “Hard line, soft hands.” |
| Wing discipline | 14 stays wide until 13 has fixed the edge | “Own the touchline.” |
| Finish support | 15 tracks inside and behind the wing’s line | “Finish in two.” |
Coach the ball carrier’s eyes as carefully as their feet. Number 10 must show the defender a credible carry line. Number 13 must look at the edge defender, not at the wing, until the final moment. On every successful rep, freeze the group for five seconds at the release point and ask: “Which defender did we fix, and where is the spare attacker?” That question develops decision-makers rather than pattern-runners.
Common Mistakes
The first common error is a flat fly-half. When 10 stands on the same line as 9, the pass arrives late and the inside defender can rush both 10 and 12. Reset 10 8m outside 9 and insist on a one-metre depth advantage for 13 over 12.
The second is an early wing. If 14 chases the ball before 13 has drawn the edge, the edge defender can cover both players. Put a cone 3m inside the far touchline and make 14 start outside it; he cannot cross the cone until the 13 has the ball.
Third, coaches will see sideways passing. The ball travels behind the next runner, forcing a stop and allowing drift defence to recover. Demand passes that arrive 0.5-1m in front of the receiver’s lead foot. Fourth, teams often forget the finish: 15 watches rather than trails. Add a scoring rule that a try counts double only when 15 is inside the ball carrier at the finish gate.
Variations & Progressions
Begin with a 5v0 walk-through from the catch to the wing, with a coach feeding 9 after each lineout catch. Progress to 8v4: add 10, 12, 13, 14, 15, and three drifting defenders, but keep the lineout passive. Then run the full 15v6 picture with live defensive line speed and a 12-second clock from throw to finish. The clock rewards early organisation without rewarding rushed passing.
For variation one, have 12 run the same hard line but hold a short pass from 10 when the inside defender turns in. This turns the pattern into a direct gain-line option. For variation two, let 13 play out the back to 15 when the edge defender shoots early. For variation three, launch on the blind side: swap 14 for 11, shorten the width to 18m, and use 7 as the extra close support runner. Keep the original call language so the players recognise the shared shape.
Age Adaptations
For under-8 and under-10 groups, remove lifting and contested lineouts. Start with a coach feed to 9, use 5-7m passing gaps, place passive defenders, and reward three completed passes into space. Teach “wide, catch, pass, support” rather than a full lineout code. For under-12 and under-14, introduce an uncontested or age-appropriate lineout, use a four-player attacking chain from 9 to wing, and allow defenders to drift at controlled speed. Keep contact optional until safe body height and catch-pass competence are consistent.
For under-16 and open-age groups, use the complete five-man unit, live lifting only where competition rules and coaching competence permit it, and make the defence read-and-react. Add a backfield player who can counter-attack any dropped or intercepted ball. At every age, scale complexity before you scale speed: a clean overlap at 70 percent is more valuable than a fast pattern that players cannot explain.
Reference