

Rugby
Rugby Own-22 Exit 1: Screen, Clear and Chase
A session-ready Rugby Union exit strategy that teaches your team to turn stable own-22 ruck ball into territory, pressure, and a connected chase.

What you need
10–12 Rugby balls, 20 cones, 4 tackle shields, two sets of bibs, whistle, full 100 m x 70 m pitch or marked training area
Overview — Own-22 Exit 1: Screen, Clear, Chase
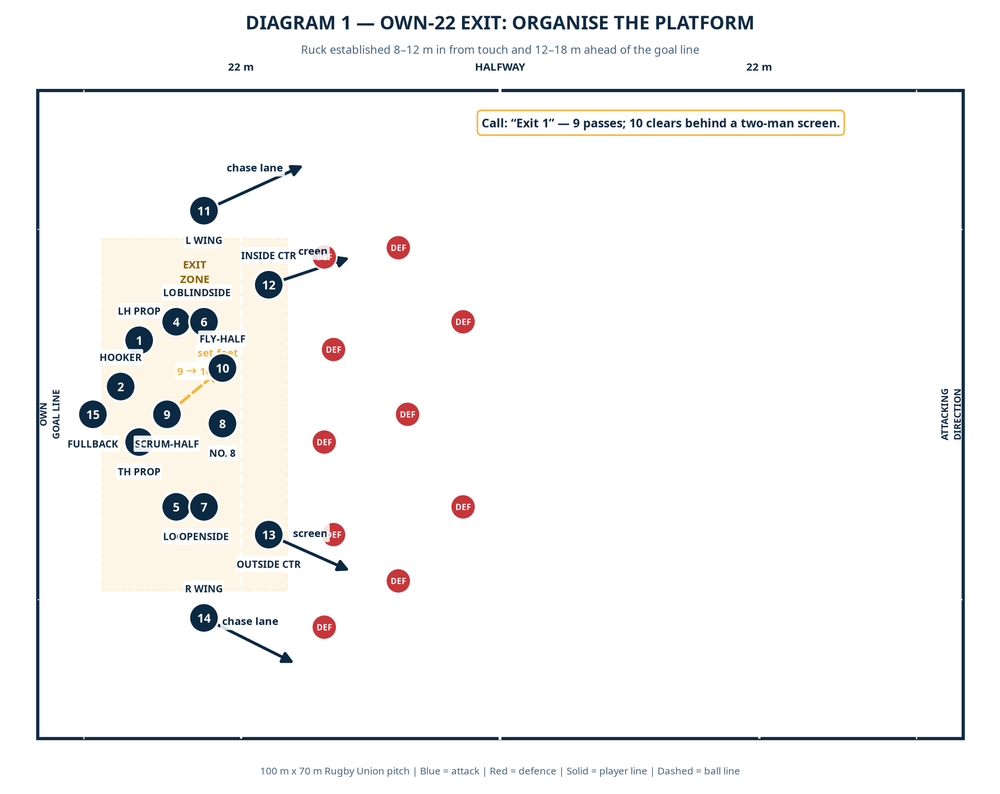
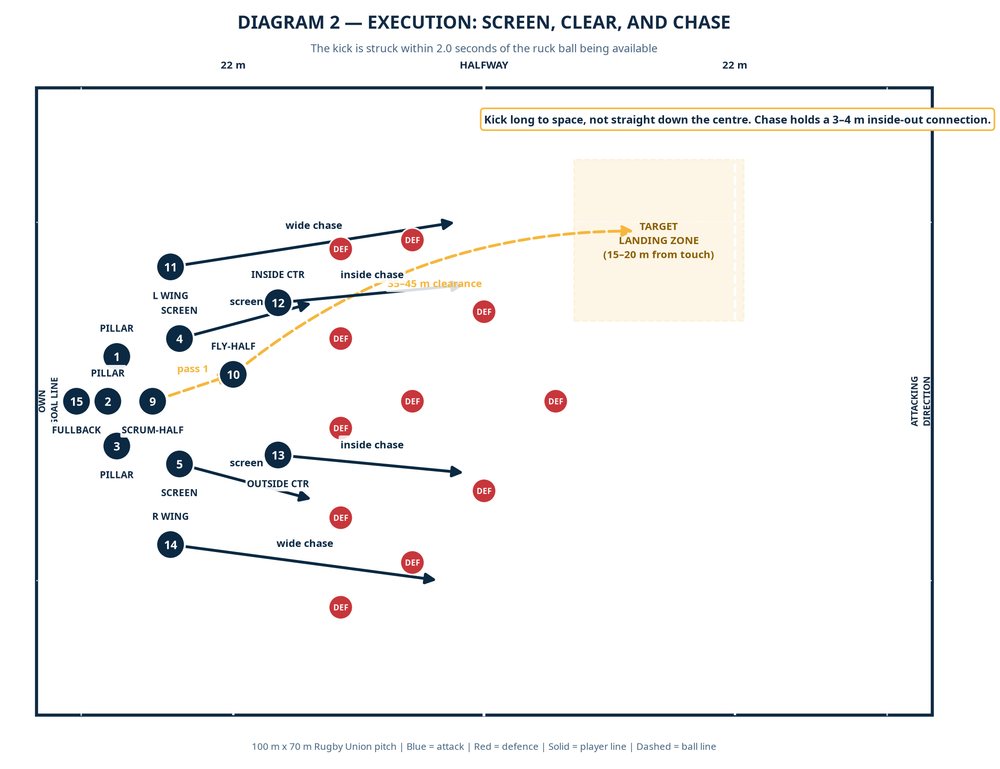
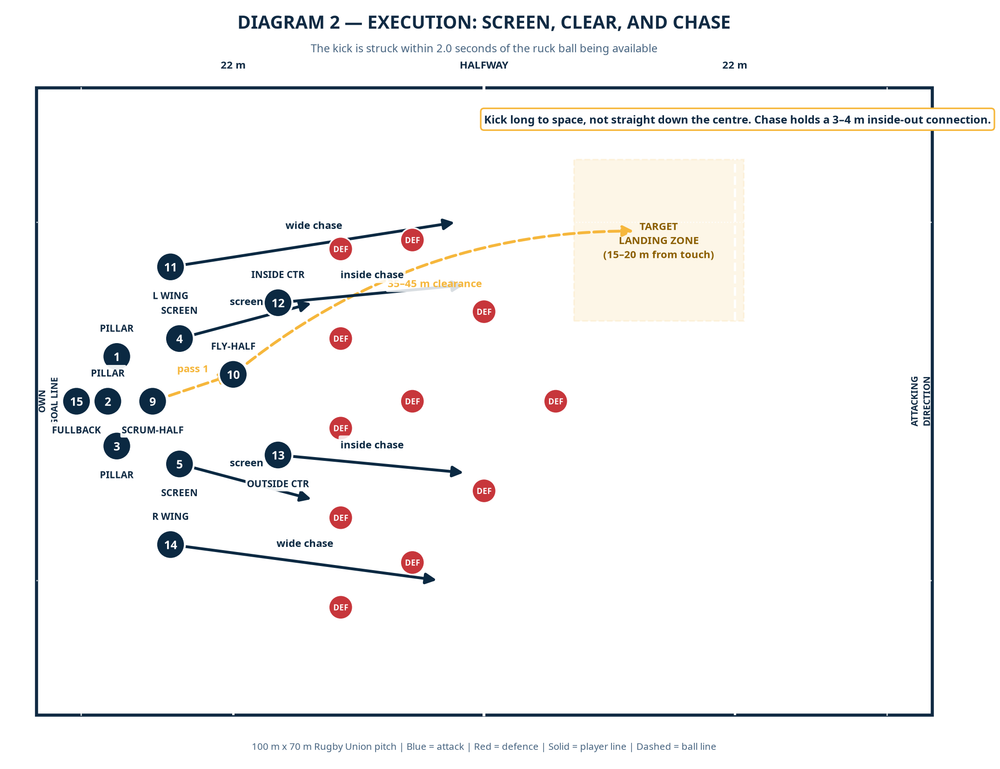
This is a repeatable territory-first exit for a ruck formed in your own 22. Its job is not to manufacture a miracle from deep; it is to get the side out cleanly, deny a counterattack, and give the chase a genuine chance to win the next contest. Use it when the ball is stable, the ruck is 8–12 m in from touch, and the backfield picture says that a 35–45 m clearance into space is available. The call is “Exit 1.” It gives the scrum-half a simple pass, puts the fly-half behind two clear screens, and sends four connected chasers after the kick.
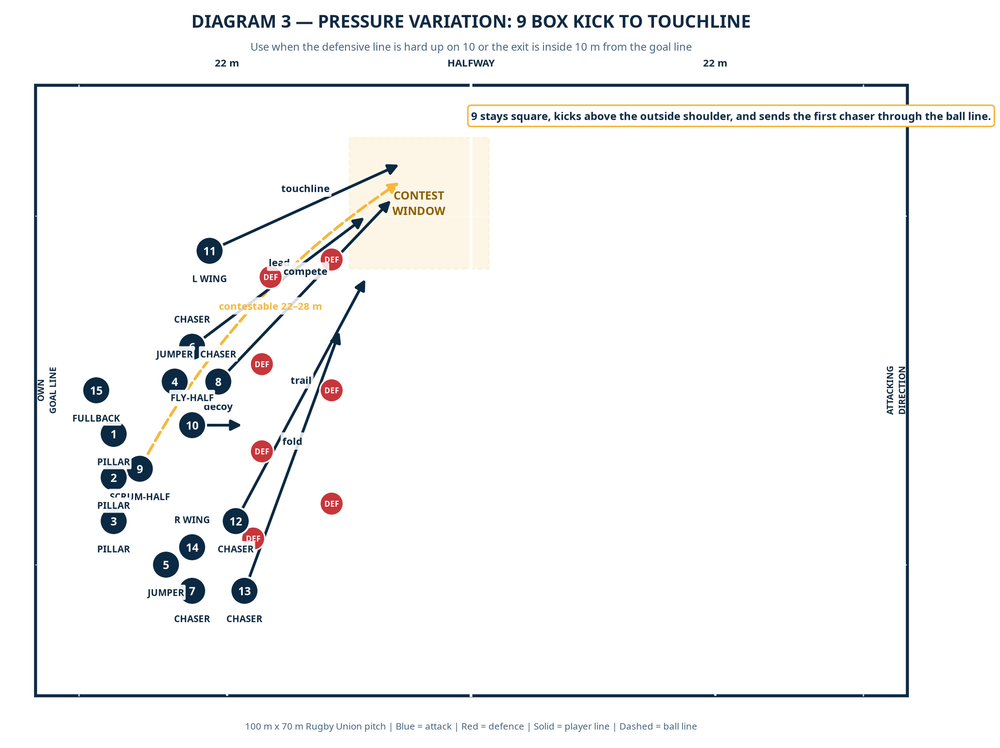
The priority order is simple: secure the ball, clear beyond the 22, then win the next collision. Avoid slow, fractured rucks. If the defence has landed on 10, use the box-kick variation in Diagram 3.

Setup
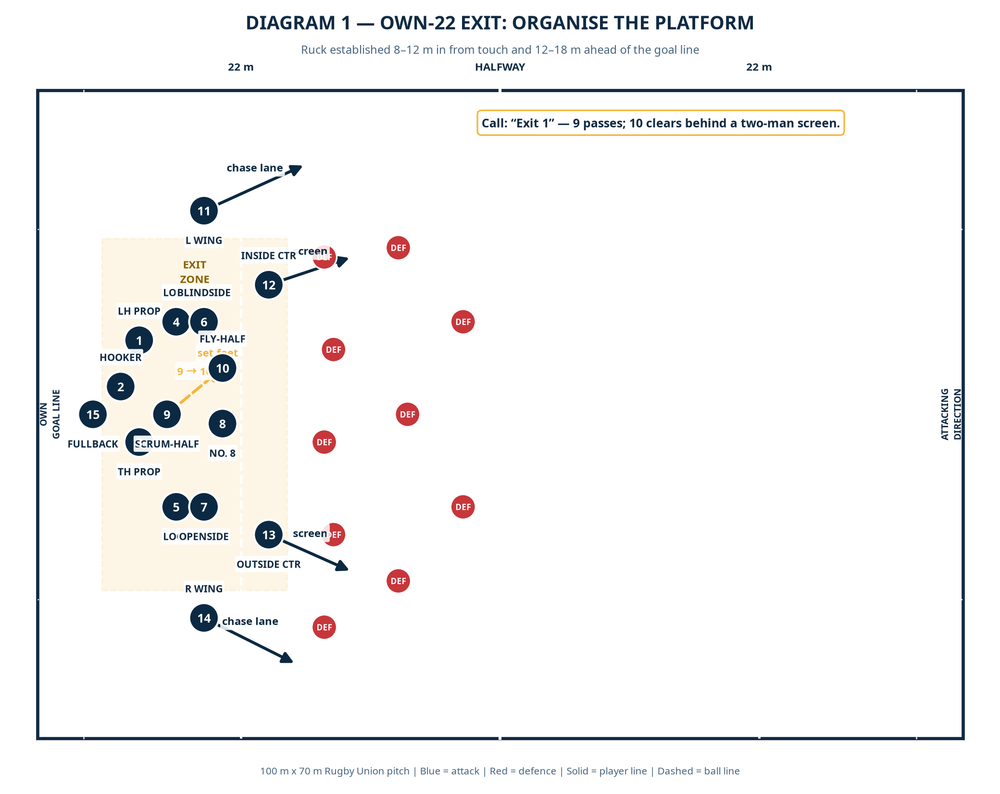
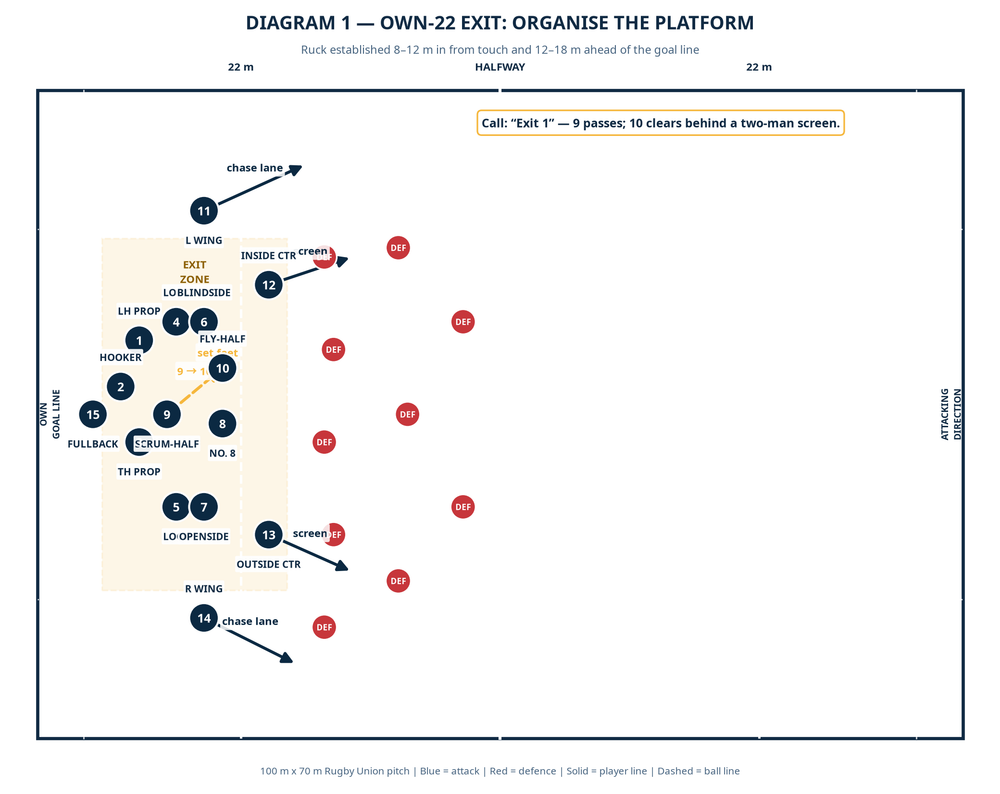
Mark a full 100 m x 70 m pitch, then cone the defending 22, both 15 m tram lines, and a landing box 15–20 m in from the far touchline. Set the launch ruck 12–18 m ahead of your own goal line and 8–12 m in from touch. You need 15 players, 10–12 balls, 20 cones, four tackle shields, and bibs for the defensive line.
| Unit | Starting detail | Non-negotiable job |
|---|---|---|
| 9 Scrum-half | At the base, with feet clear of the ruck | Scan, call “Exit 1,” and pass early to 10. |
| 1–3, 4–8 Forwards | Tight ruck platform; 4 and 5 become the screen | Protect the ball first, then fold into chase support. |
| 10 Fly-half | 6–8 m behind the ruck and 2 m outside its far shoulder | Catch square, set feet, and clear to the nominated space. |
| 12 and 13 Centres | One each side of 10, 4–6 m wider | Hold the rush, then become inside chasers. |
| 11 and 14 Wings | High and wide, 12–15 m from 10 | Chase through outside lanes and close the receiver. |
| 15 Fullback | 6–10 m behind the ruck on the short-side scan | Cover a broken ball or become the second distributor. |
Before the rep, insist that the entire unit can repeat the three calls: “Exit 1” for the long clearance, “Box” if 10 is smothered, and “Play” if the defence has dropped early and the carry is genuinely on.
Step-by-Step Instructions
Build a fast, legal platform. The carrier presents long; the first three cleaners arrive through the gate and make the ruck secure. Coach the ball to be available in under 2 seconds. The ruck does not need to be pretty; it needs to be clean enough for 9 to pass without stepping around bodies.
Make the call and show the picture. As 9 arrives, they call “Exit 1” loud enough for 10, 12, 13, and both wings. 9 points to the kicking side. 10 checks the backfield while moving into a balanced catch position 6–8 m from the base. If two defenders are already on 10’s shoulder, 9 changes the call to “Box.”
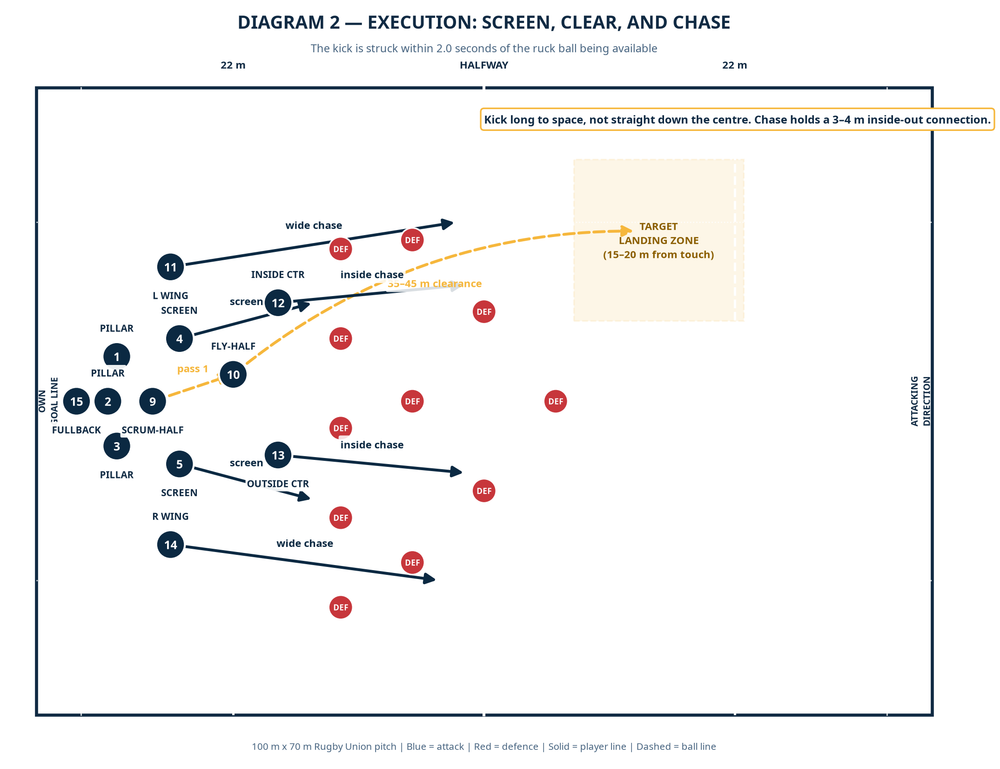
Create the screen without obstructing. Locks 4 and 5 move through the line of the pass, not into defenders. Their line is hard enough to freeze the rush but they must not block a defender’s path. 12 and 13 hold their depth, run as believable pass options, and do not overrun 10. It must look like a genuine threat, not obstruction.
Pass and set. 9 fires a firm, chest-height pass to 10. The pass should travel 6–8 m and arrive before the defensive line can fold. 10 catches with hands away from the chest, scans once, squares up, and takes no more than two adjustment steps. The kick should leave the boot within 2.0 seconds of the ball becoming available.
Clear to space. 10 kicks diagonally toward the far touchline, aiming for the landing box. The target is 15–20 m in from touch: far enough from touch to avoid gifting the lineout, close enough to squeeze the returner’s options. In normal conditions, demand a 35–45 m territorial clearance. Against a shallow backfield, a lower driven kick may be appropriate; against a deep, organised backfield, keep it higher and longer.
Connect the chase. The nearest centre takes the inside lane; the far centre and wing form the outer layers. The first four chasers leave on the kick, not on the pass, and maintain 3–4 m of inside-out spacing. The first arrival tackles or competes for the ball; the second player wins the ball presentation; the third and fourth close the far-side exit. No one may sprint past the ball carrier and create a dog-leg.
Finish the phase. Once the receiver is tackled, the next forward folds behind the chase to secure the next ruck. If the ball is won in the air, call “green” and play quickly before the opposition can reset. If the kick has missed the target, do not chase a miracle: reload the defensive line and make the next tackle dominant.
Key Coaching Points
- Speed of service decides the exit. A three-second ruck turns a kicking play into a pressure play; coach 9 to identify the ball early and move it decisively.
- 10 must catch square. A fly-half drifting before the catch shortens the kick and exposes the outside edge of the chase.
- The screen sells time, not obstruction. Keep screen runners in live lines and ensure they never change course into a defender.
- Kick to a named window. “Long” is not a target. Give 10 a box, a side, and a distance before every rep.
- Chase in layers. The first chaser attacks the ball, the second attacks the tackle, and the next two remove the receiver’s escape lanes.
- The fullback is insurance. 15 must stay connected to the short-side picture until the ball is clearly away; do not send every back into the chase blindly.
Common Mistakes and Corrections
| Common mistake | What it causes | Coach’s correction |
|---|---|---|
| 9 waits for a perfect ruck | Defence loads on 10 | Use a 2-second release clock in training. |
| 10 catches while drifting | Short kick or chargedown | Start 10 one step deeper and demand a square catch. |
| 4 or 5 blocks a defender | Penalty for obstruction | Rehearse screen lines through cones with hands down and eyes forward. |
| Wings chase flat or cross-field | Open seams for the returner | Paint three chase lanes and freeze the picture after the kick. |
| Kick lands in the middle third | Returner has both sides available | Move the landing-box cones and make the kicker call the box before striking. |
Variations & Progressions
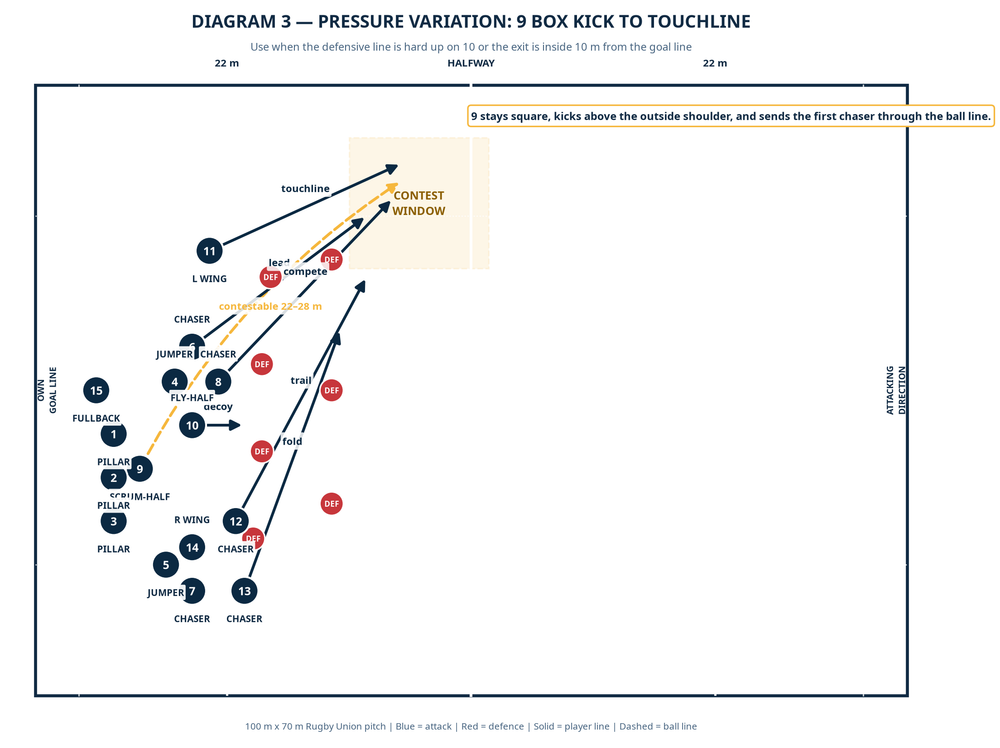
Variation 1 — “Box” pressure exit. When the ruck is inside 10 m from the goal line or the defence is up on 10, 9 box-kicks to the touchline contest window. 11 or 14 becomes the first aerial competitor, with 4, 6, and 12 chasing in order. This saves the pass and protects the fly-half.
Variation 2 — “Play” release. If the opposition backfield holds three deep and the front line does not press, 10 tips to 12 or 13 on the same screen shape. The first objective is still to leave the 22, but now the exit comes through a low-risk carry before the next kick.
Progression — Live returner and counter-ruck. Start with a passive returner, then add a live 15, two escort runners, and a three-player counter-ruck. Score the attacking group for a kick into the box plus a tackle inside 5 seconds; score the defence for a clean return beyond halfway.
Age Adaptations
| Group | Adaptation | Coaching emphasis |
|---|---|---|
| Under 8–10 | Use 7–9 players, a 30 m channel, and a pass-to-space or grubber rather than a long tactical kick. | Safe catch-pass, running support, and understanding “exit” as moving away from danger. |
| Under 12–14 | Use 10–12 players and a 50–60 m pitch. Add the screen and two chase lanes but begin from uncontested ruck ball. | Square catch, kick selection, and staying onside. |
| Under 16 and open age | Use the full 15, a live defensive line, aerial contest, and a live counter-ruck. | Two-second speed, accurate landing window, legal screen, and chase connection. |
Run the first six reps at walking pace so every player owns the picture. Then move to game speed, add the clock, and finally make the opposition choose whether to rush 10 or hold the backfield. The play is successful when the squad can call, execute, and chase it under fatigue without a coach prompting the next action.
