The Hawk: Lineout Steal on Opposition Throw
Disrupt the opposition's primary attacking platform and launch a devastating counter-attack from stolen lineout ball.

Equipment Needed
1. Overview
The lineout steal is one of the most psychologically damaging plays in rugby. When you steal the opposition's throw, you don't just win possession; you shatter their attacking rhythm and instantly transition against an unstructured defense. "The Hawk" is designed to contest the opposition's ball aggressively in the middle of the lineout, secure possession, and immediately launch a wide counter-attack before the defensive line can reset.
This play is best utilized when you have read the opposition's throwing patterns, identified a weak or slow jumper, or when you are defending between your own 22-metre and 10-metre lines, where a quick transition can lead to significant territory gain or a clean line break.
2. Setup
Pitch Setup:
- Standard 100m x 70m pitch.
- Set up near the touchline, preferably between your own 22m and 10m lines.
- 5-metre and 15-metre lines must be clearly marked.
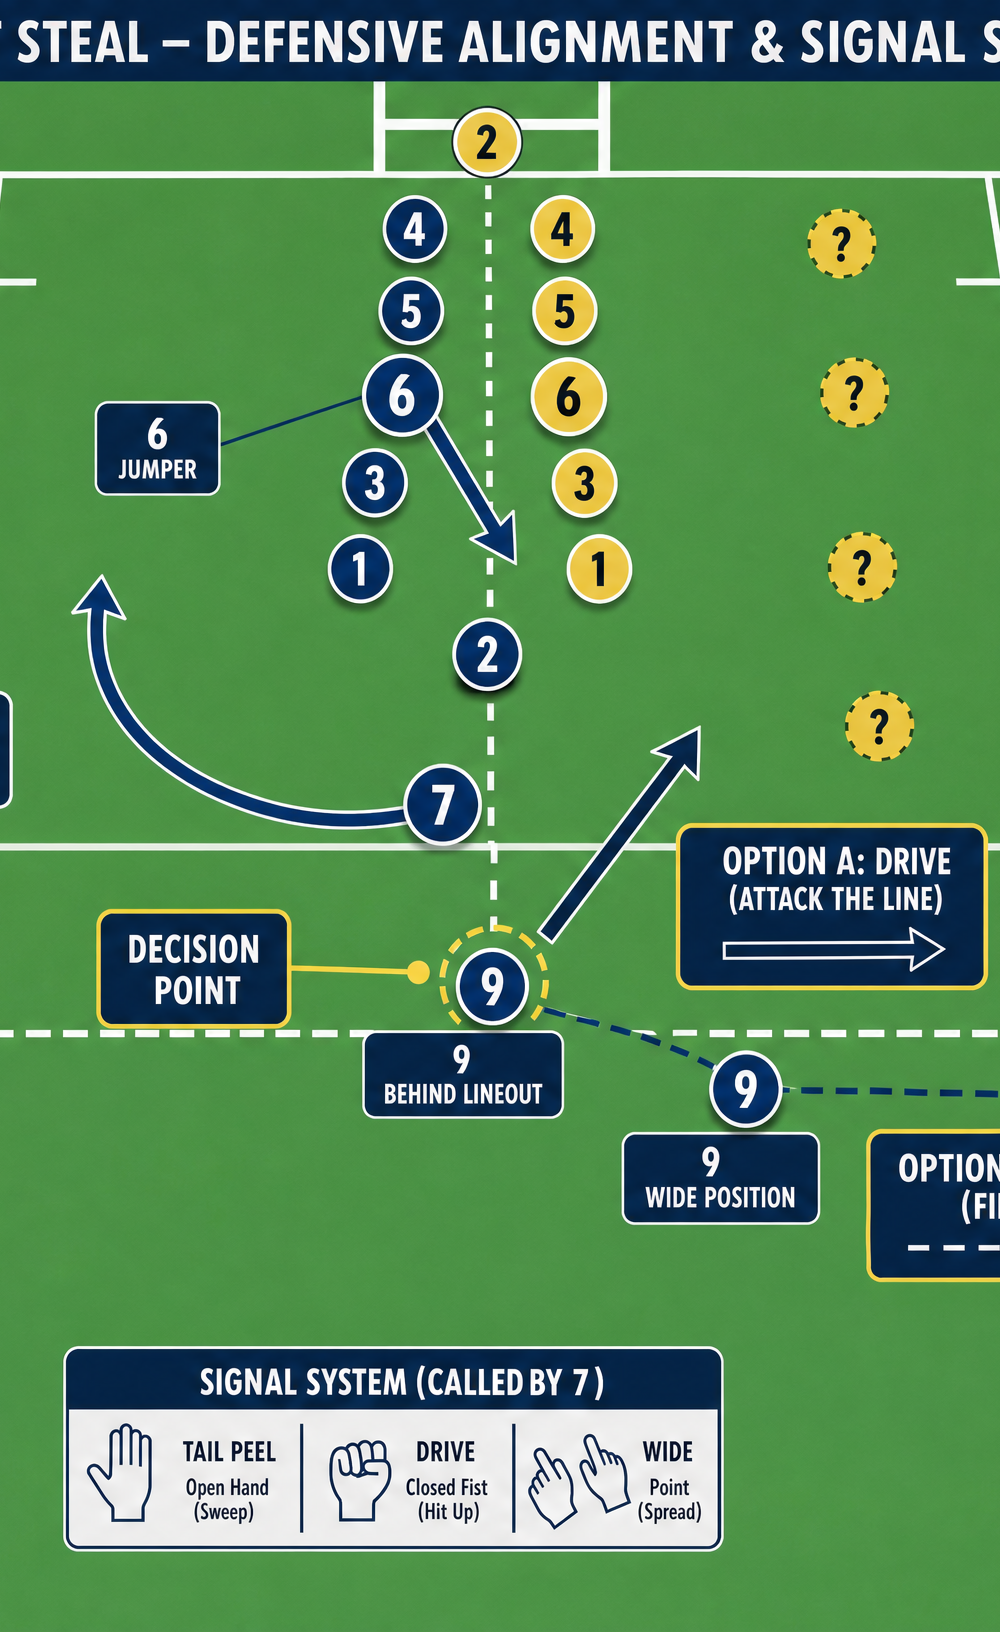
Player Positions (Defending/Stealing Team - Blue):
- No. 2 (Hooker): Positioned in the 5-metre channel, mirroring the opposition thrower.
- No. 4 (Lock): Primary front lifter, positioned at slot 2.
- No. 6 (Blindside Flanker): Primary jumper (The "Hawk"), positioned at slot 3.
- No. 8 (Number Eight): Primary rear lifter, positioned at slot 4.
- No. 7 (Openside Flanker): Tail gunner, positioned at the back of the lineout (slot 7) ready to peel or secure loose ball.
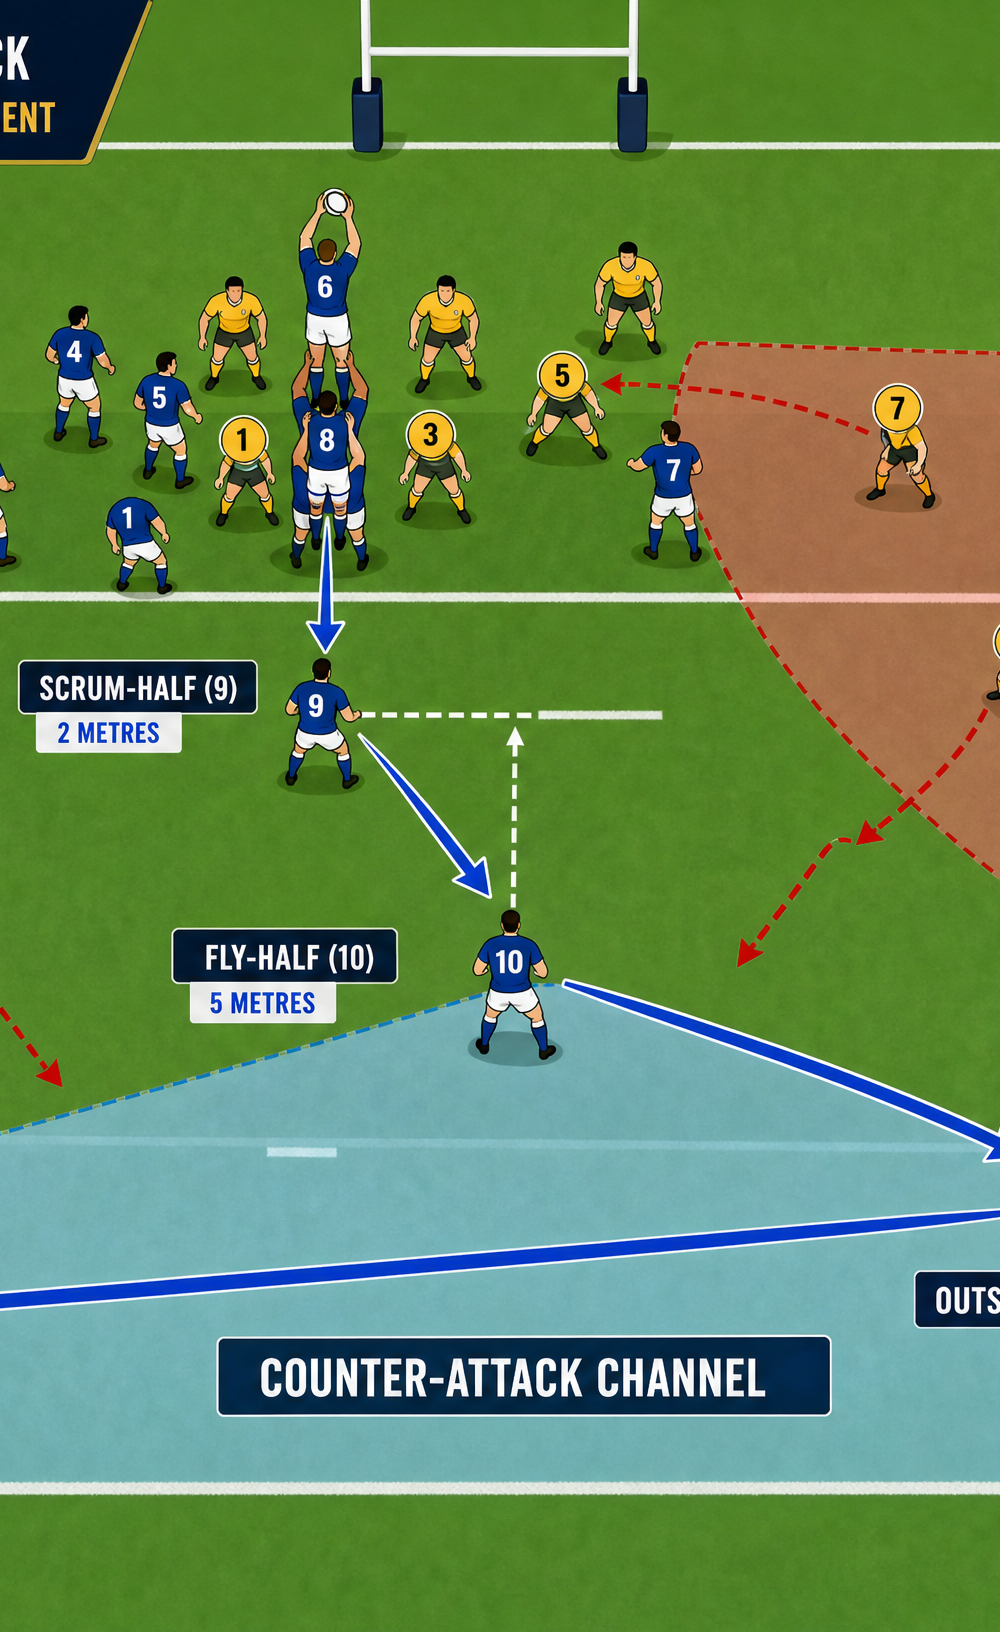
- No. 9 (Scrum-half): Positioned 2 metres behind the lineout, ready to receive the stolen ball.
- No. 10, 12, 13, 11, 14, 15 (Backline): Aligned flat and deep, ready to attack the space created by the unstructured defense.
3. Step-by-Step Instructions

Step 1: The Read and Trigger
- The defensive lineout caller (usually No. 4 or No. 5) reads the opposition's movement and calls the defensive system.
- The trigger for "The Hawk" is the opposition hooker's ball presentation. As the ball is brought back to throw, the lifters (4 and 8) brace.
Step 2: The Explosive Lift
- No. 6 (Jumper) takes a sharp, half-step decoy forward, then explosively drives straight up.
- No. 4 (Front Lifter) drives under the jumper's front thigh, keeping a straight back and extending fully through the legs.
- No. 8 (Rear Lifter) drives under the jumper's buttocks, locking arms and propelling the jumper to maximum height.
Step 3: The Steal (The Catch or Deflect)
- The Jumper (6) must keep their eyes entirely on the ball, not the opposition jumper.
- Primary Option (Catch): Two hands aggressively snatching the ball at the highest point, ripping it down into the chest to secure it from the opposition.
- Secondary Option (Deflect): If a clean catch is impossible, a strong one-handed tap back to the scrum-half (9) or tail gunner (7).

Step 4: The Delivery
- Upon landing, the Jumper (6) immediately presents the ball to the Scrum-half (9).
- The Lifters (4 and 8) instantly transition into blockers/cleaners to protect the ball carrier and the scrum-half from opposition counter-rucking.
Step 5: The Counter-Attack
- The Scrum-half (9) clears the ball rapidly with a long, sweeping pass to the Fly-half (10).
- The Fly-half (10) attacks the line aggressively to commit the scrambling opposition forwards.
- The ball is moved swiftly through the hands (10 to 12 to 13) to exploit the disorganized defensive line, targeting the wide channels before the opposition wingers can drop back into position.
4. Key Coaching Points
- Speed of Lift: The lift must be explosive and synchronized. A slow lift allows the opposition to adjust. The lifters dictate the success of the steal.
- Jumper's Core: The jumper must remain completely rigid in the air. A loose core will cause the jumper to hinge, losing height and balance.
- Eyes on the Prize: The jumper must track the ball from the hooker's hands. Do not watch the opposition jumper; play the ball.
- Instant Transition: The moment the ball is secured, the mindset must shift instantly from defense to attack. Hesitation allows the opposition to reset their defensive line.
- Protect the 9: The lifters must become immediate protectors upon landing. The opposition will try to disrupt the scrum-half; the lifters must clear the space.
5. Common Mistakes
- Telegraphing the Jump: The jumper giving away the intention by crouching too early or looking at the target zone instead of the hooker.
- Lifters Stepping Away: Lifters stepping backward or away from the jumper during the lift, causing the jumper to fall forward or lose height.
- Slow Ball Clearance: The scrum-half taking too long to clear the ball, allowing the opposition forwards to smother the counter-attack.
- Jumper Reaching Across: The jumper trying to reach across the opposition player rather than jumping straight up and attacking the ball at its peak.
6. Variations & Progressions
- The Front Peel (Variation): If the opposition throws to the front, the No. 4 lock becomes the jumper, lifted by 2 and 6, with a quick pop pass to the hooker wrapping around.
- The Deflection to 7 (Variation): Instead of catching, the jumper intentionally taps the ball long over the lineout to the No. 7 who is sweeping around the tail.
- Live Opposition (Progression): Start with uncontested steals to perfect the lift timing, then progress to fully contested lineouts with a live opposition throwing varying calls.
7. Age Adaptations
- Under 8 - Under 12: No lifting is permitted. Focus on the jumper's timing and vertical leap. Emphasize the scrum-half's quick clearance and the backline's alignment.
- Under 14 - Under 16: Introduce basic, safe lifting techniques. Focus heavily on the lifters' body position (straight back, driving through legs) and the jumper's core stability. Use tackle bags for lifters to practice driving under.
- Open (Adult): Full explosive lifting, complex defensive reads, and high-speed counter-attacking patterns.