

Basketball
1–3–1 Zone Offense vs. a 2–3: High-Post and Baseline-Runner Set
A coach-ready 1–3–1 zone-offense package that creates high-post, low-block, and short-corner scoring decisions through disciplined spacing and ball reversal.

What you need
1 basketball, FIBA half-court (14 m x 15 m) or full court (28 m x 15 m), 6–8 flat discs or cones, Practice pinnies for the zone-defense unit, Basketball hoop
1. Overview
The 1–3–1 zone offense is a five-player alignment built to stress a 2–3 zone from the inside out. The objective is not to stand in a shape; it is to place a decision-maker at the nail, run a player behind the bottom line of the zone, and keep two perimeter threats wide enough to make the defense travel. On a top-to-wing entry, the zone must choose between protecting the low block, closing the wing, guarding the nail, or covering the opposite short corner. That is the advantage we want to teach.
Use this set after a timeout, on a dead-ball possession, or whenever your group is settling for contested perimeter shots against a compact zone. It works best with a mobile 4 who can catch and pass at the high post and a 5 who will sprint the baseline and finish through contact. The reads below are designed against a 2–3 shell, but the spacing translates to other compact zones.
2. Setup
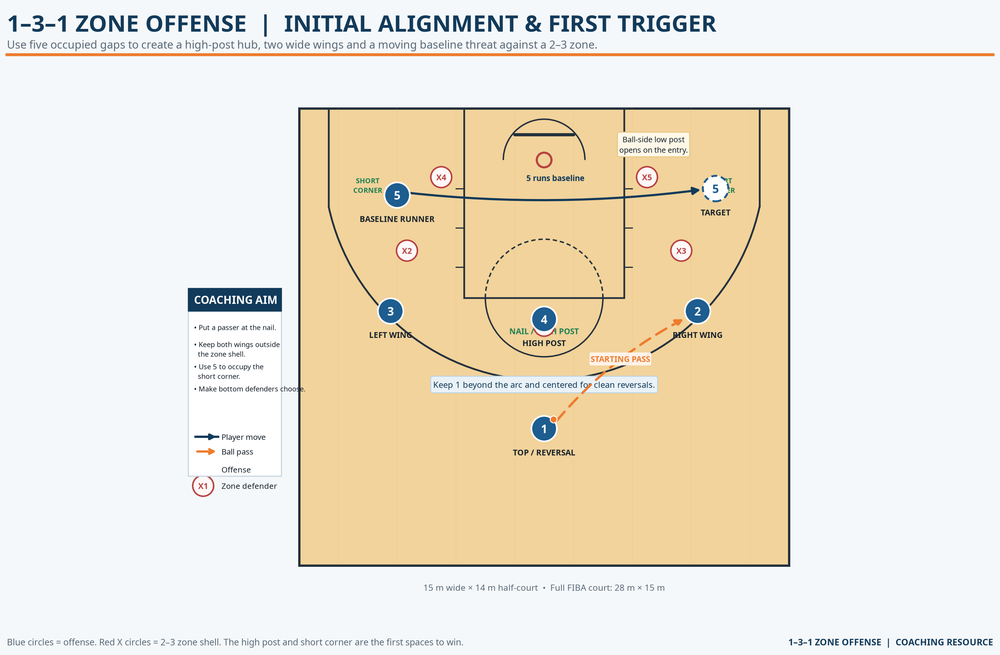
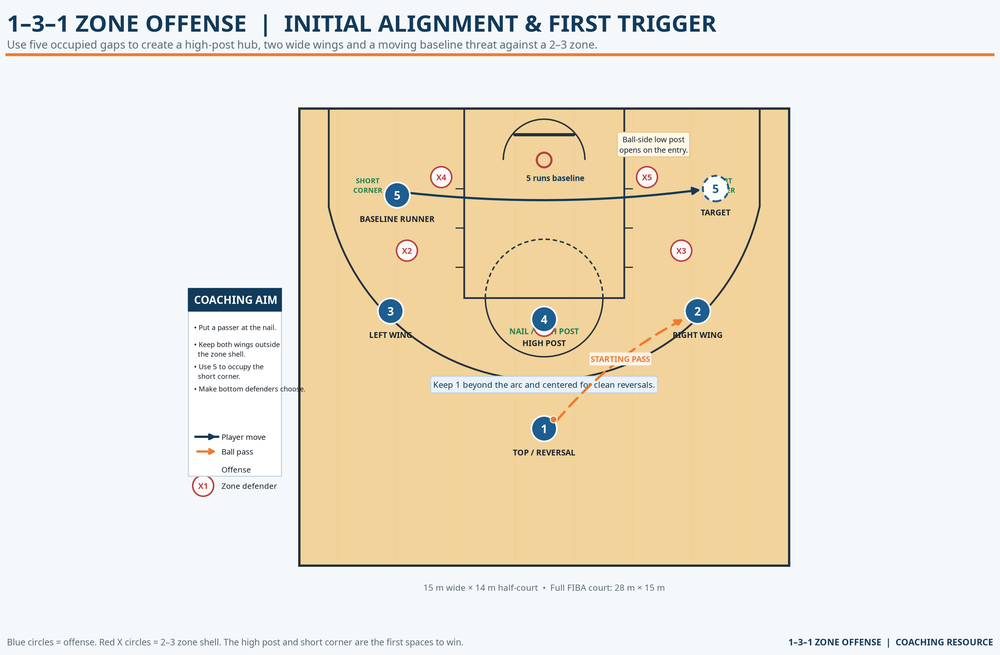
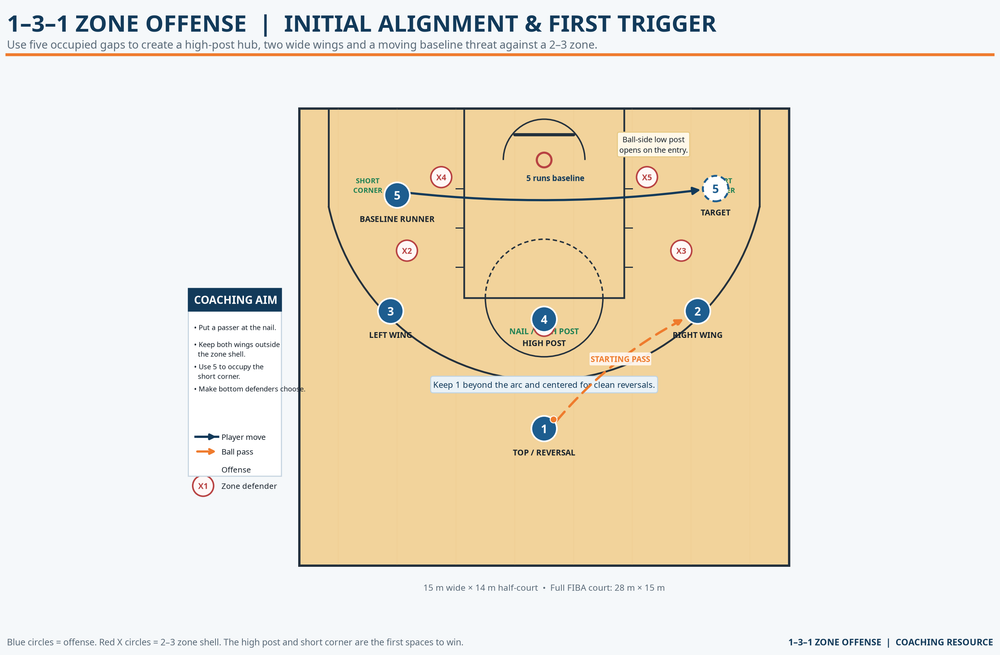
Install the action on a FIBA half-court. The full playing court is 28 m long by 15 m wide; use the 14 m attacking half and keep the wings outside the 6.75 m arc.1 Start with five offensive players, then add five defenders when the timing is sharp. A 25-minute block works well: five minutes walk-through, eight minutes guided execution, eight minutes live zone offense, and four minutes of competitive scoring.
| Number | Standard position | Starting spot | First-entry job |
|---|---|---|---|
| 1 | Point Guard | Top, 0.5–1 m beyond the arc | Initiates, passes, then becomes the reversal outlet. |
| 2 | Shooting Guard | Ball-side wing, outside the arc | Receives the entry and makes the first read. |
| 3 | Small Forward | Weak-side wing, outside the arc | Fills the nail when 4 vacates it. |
| 4 | Power Forward | Nail/high post | Ducks into the ball-side low block and seals. |
| 5 | Center | Weak-side short corner | Sprints behind the zone to the opposite short corner. |
Place discs at both wing spots, the nail, and the two short corners on your first install. Demand at least 3 m between the nearest wing and interior player. That width prevents one defender from guarding two threats.
3. Step-by-Step Instructions
Action 1 — Enter the wing and move on the flight of the ball
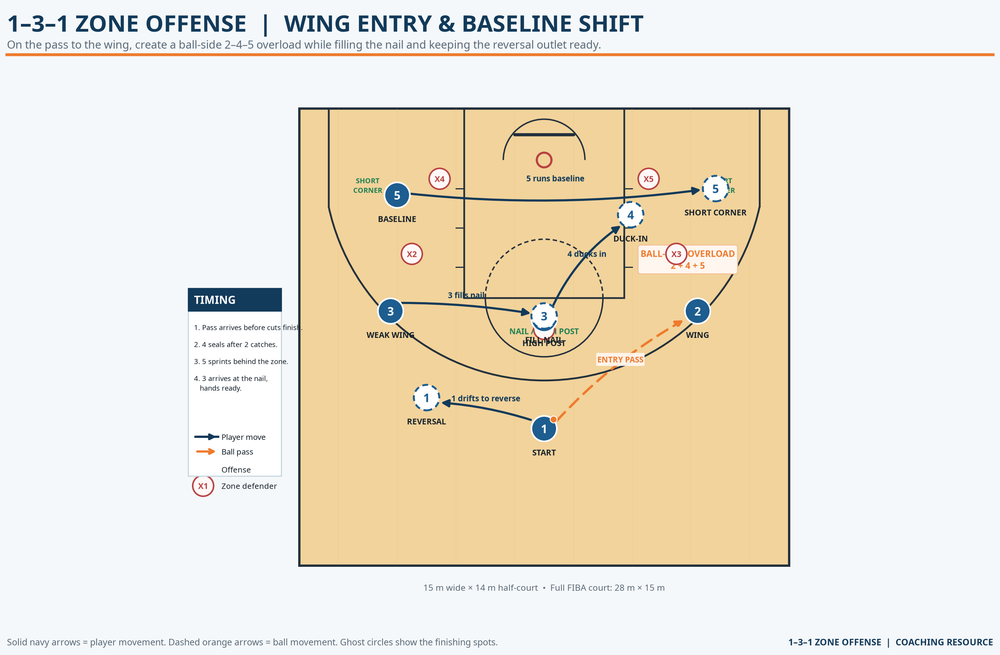
1 brings the ball down the middle third and calls the set. From the top spot, 1 passes to 2 on the right wing. The ball should arrive within roughly one second; do not let the zone settle.
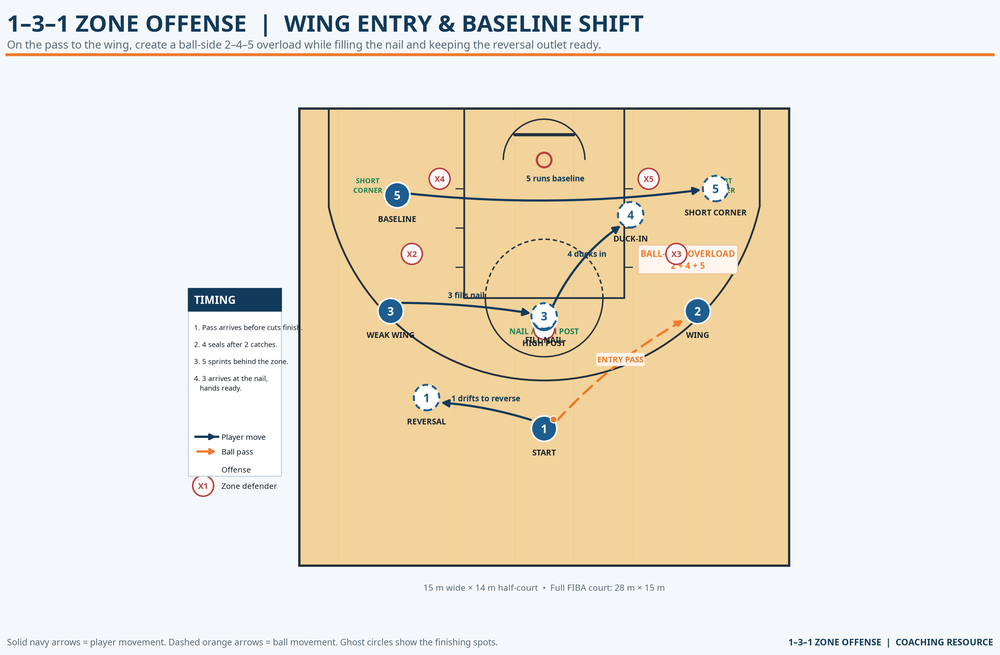
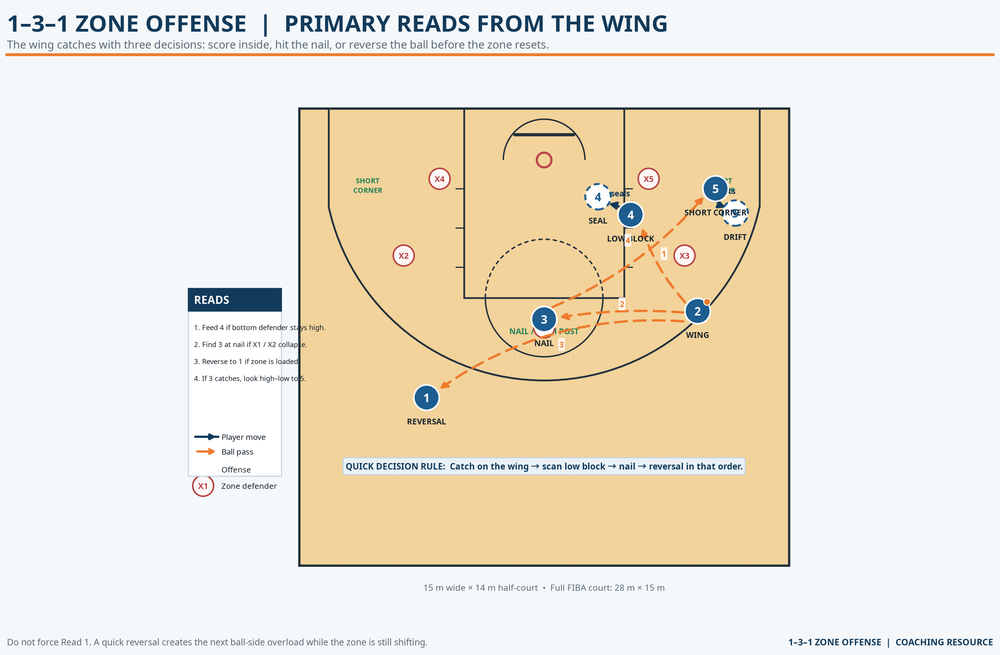
As the ball leaves 1’s hands, 4 sprints diagonally from the nail to the ball-side low block. Coach 4 to arrive shoulder-to-shoulder with the bottom defender, show a target hand, and reverse seal. This is a hard duck-in, not a slow walk into traffic.
At the same time, 5 runs the baseline behind the two bottom defenders to the opposite short corner. The sprint should take about 1.5 seconds. 5 arrives outside the lane line, with a passing angle, rather than drifting under the backboard.
3 replaces 4 at the nail. 3 arrives balanced, square to the ball, hands above the waist. 1 drifts one or two strides toward the opposite top slot, remains beyond the arc, and stays available for a reversal. Every player moves while the ball is in the air.
Action 2 — Teach the wing’s three-read sequence
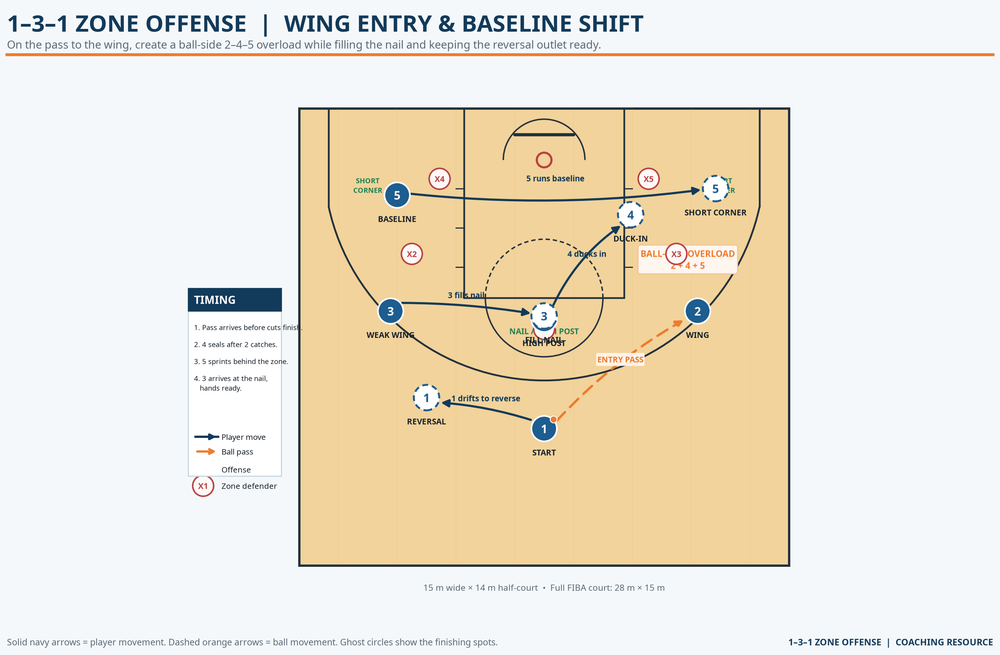
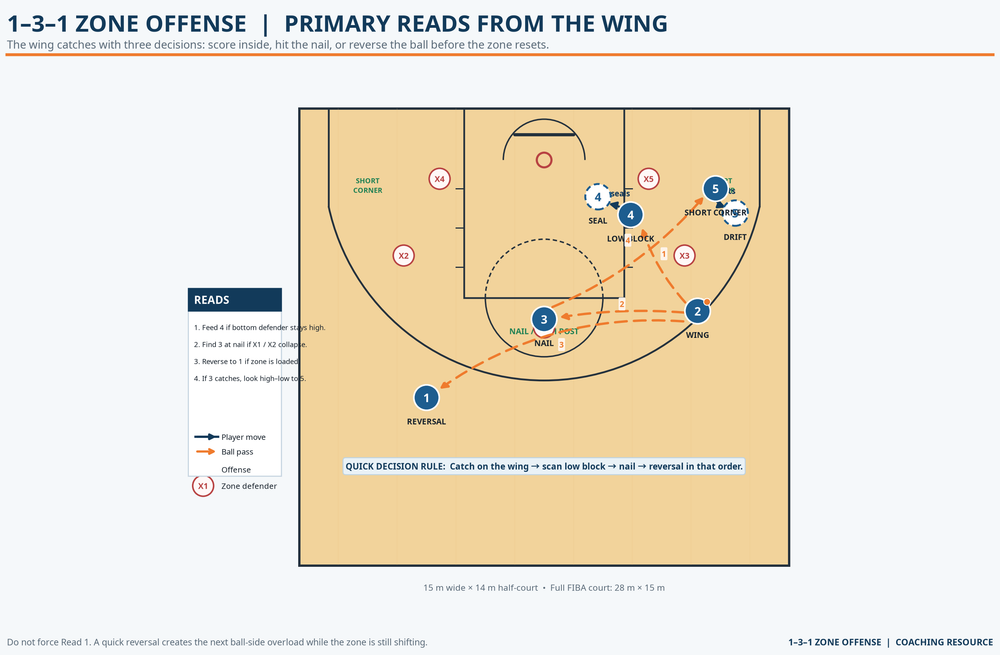
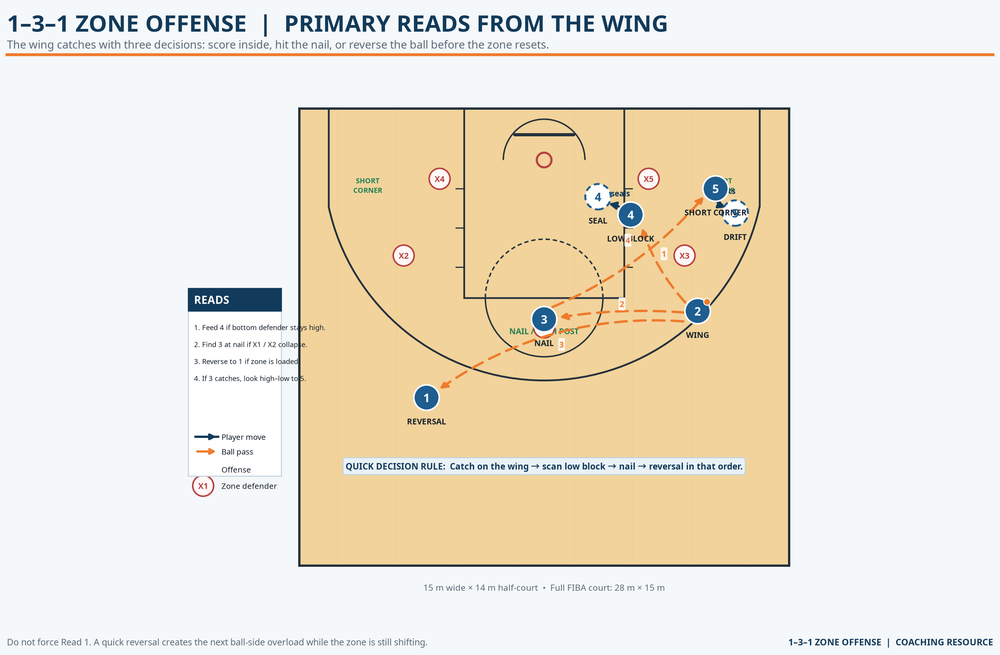
2 catches on a jump stop, turns square, and reads in this order: low block, nail, reversal. Give 2 a half-second to scan. If the low defender is late or trapped high, 2 feeds 4 on the low block with a direct chest pass or controlled bounce pass into 4’s outside hand.
If the post entry is closed, 2 hits 3 at the nail. 3 jump-stops, faces the rim, and reads the short jumper or two-foot finish. When the middle defender collapses, 3 looks high-low to 5 in the weak-side short corner.
If the zone has loaded the ball side, 2 reverses to 1. 1 catches ready to swing the ball immediately. As the ball reverses, mirror the baseline run and nail fill. The offense earns open shots by making the zone move twice, not by forcing the first available pass.
4. Key Coaching Points
- Move on the pass. Use the phrase, “Ball in the air, feet in motion.” The duck-in, nail fill, and baseline sprint begin on 1’s release.
- Occupy the nail. A vacant high post makes the zone comfortable. The nail player catches in triple threat and sees both blocks before dribbling.
- Create the passing window. 4 makes contact first, then shows a target. Do not throw until the defender is sealed on the high side.
- Stay wide. Both wings remain outside the arc until cutting. Crowding the lane allows one defender to cover two players.
- Reverse before forcing. A contested post pass is not a good shot. One extra pass often makes the next closeout late.
- Finish the possession. On a shot, the two closest interior players crash while the top player provides balance.
5. Common Mistakes
The first error is static spacing: players admire their pass and the shape becomes a 1–2–2. Stop the rep at 1’s release and reset it. The second is a slow baseline runner who arrives under the rim or after the zone has recovered. Set a target: 5 reaches the opposite short corner by the time 2 finishes the catch-and-scan.
Also correct 4 posting too early. If 4 camps on the block, the defender sits behind the body and denies the pass; start at the nail, cut late, and seal hard. Do not accept a one-handed, drifting wing catch from 2, and never reward the forced high-low pass through a crowded lane. Reverse the ball and trust the next rotation.
6. Variations & Progressions
Begin with a no-defense walk-through and have each player call their number and destination. For a simple progression, add three passive defenders who may shift but cannot steal. The offense then learns timing and spacing without panic. Next, play 5-on-5 against a 2–3 and award two points for a paint touch, three points for a score after a reversal, and normal scoring for every other basket. This rewards patience.
For a tougher version, allow a wing trap after the entry. Now 2 must find the nail or reversal without dribbling into pressure. A useful skip-pass variation sends 2’s pass to 3’s original wing when the zone over-shifts. A screen-the-bottom-defender variation has 4 screen the defender’s outside shoulder to free 5 in the short corner. In every version, maintain the same read order: block, nail, reversal.
7. Age Adaptations
For Under 8 and Under 10, remove the high-low read and teach only three destinations: wide wing, middle, and baseline. Use cones, walk the players through the movement, and allow one extra dribble after each catch. For Under 12, run the full alignment but set the goal at three clean passes and one paint touch before a shot. Teach jump stops, pivots, target hands, and the difference between a seal and a screen.
At Under 14 and Under 16, demand the complete three-read sequence and add a live wing trap. Track whether the offense reaches the nail or short corner within six seconds of the entry. At open/advanced level, use opponent-specific counters: skip passes against an aggressive top line and high-low actions against a compact low zone. The non-negotiable at every level is unchanged: create the first advantage with spacing, then make the defense guard a second action before shooting.
