

Basketball
Hit, Turn & Wedge: 3-on-3 Box-Out and Defensive Rebounding Drill
Use this 3-on-3 competitive rebounding drill to teach players how to make first contact, seal their matchup, secure the ball, and trigger a safe outlet pass.
What you need
1–2 basketballs, 6 pinnies in two contrasting colours, 2 cones for the outlet target window, Whistle and scoring board, One FIBA half-court
Overview
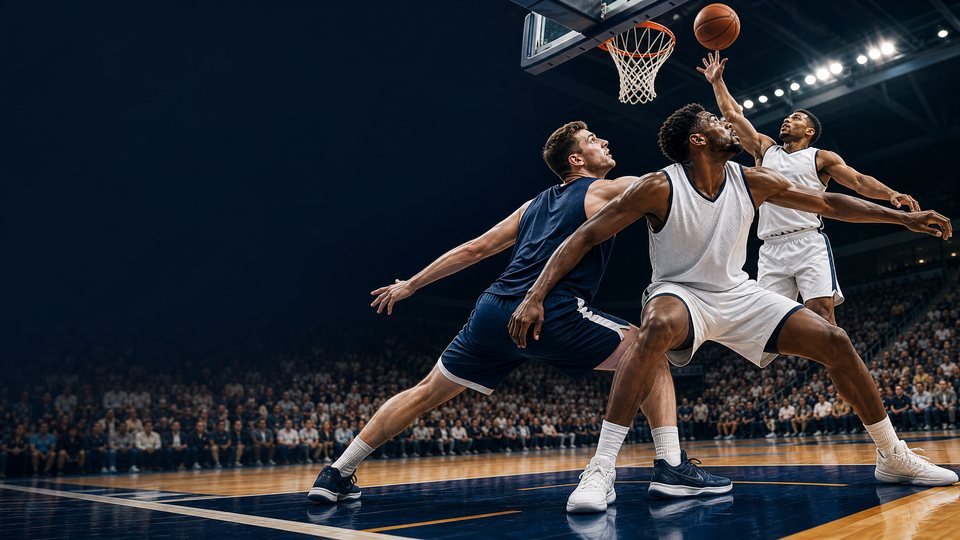
Hit, Turn & Wedge is a 3-on-3 defensive rebounding drill that makes the hidden work of rebounding visible and coachable. Rather than allowing players to chase a loose ball from a standing start, it teaches the complete sequence: establish the inside line, make legal first contact, turn to find the ball, create a wide wedge, pursue the carom, chin the ball, and outlet safely. The drill is especially useful after film shows second-chance points, long offensive rebounds, or guards leaking out before the ball is secured.
Run it as a focused 14- to 16-minute block after your defensive shell work and before transition drills. Use one defending half of the standard 28m × 15m FIBA court: a 15m × 14m half-court provides enough space for realistic lane positioning, perimeter caroms, and the first outlet action.1
Setup
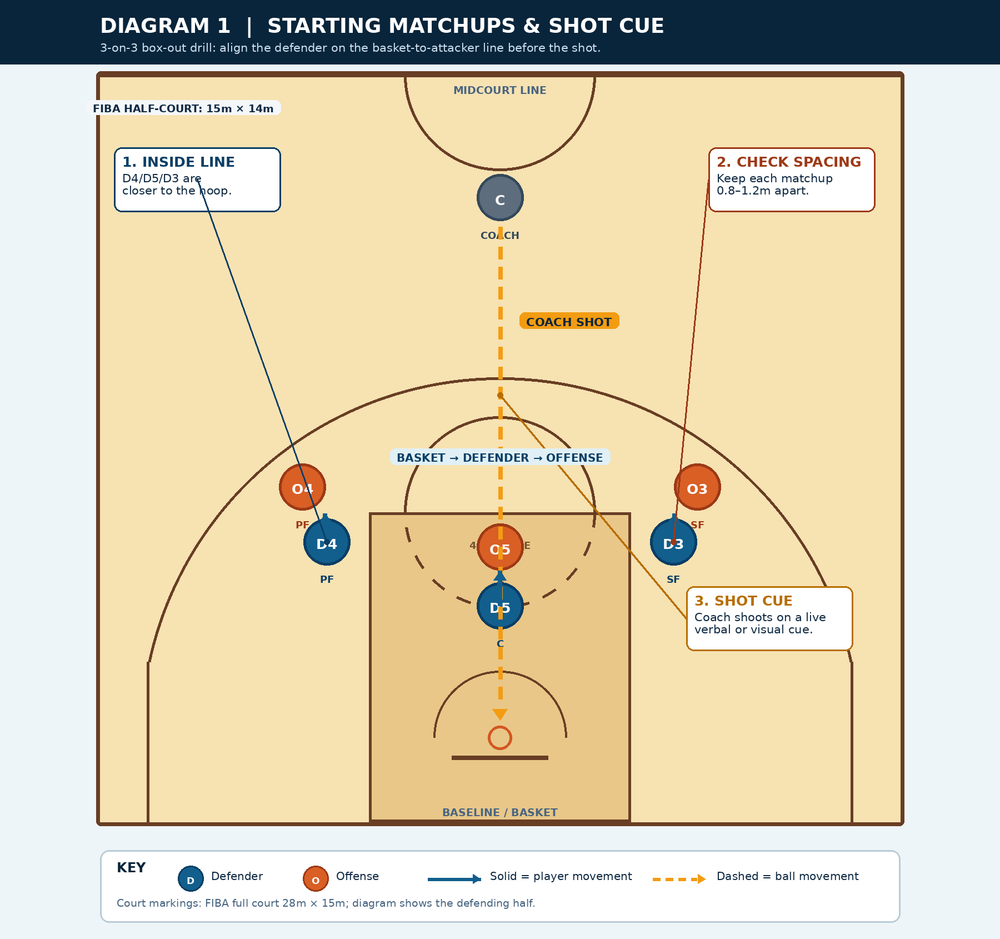
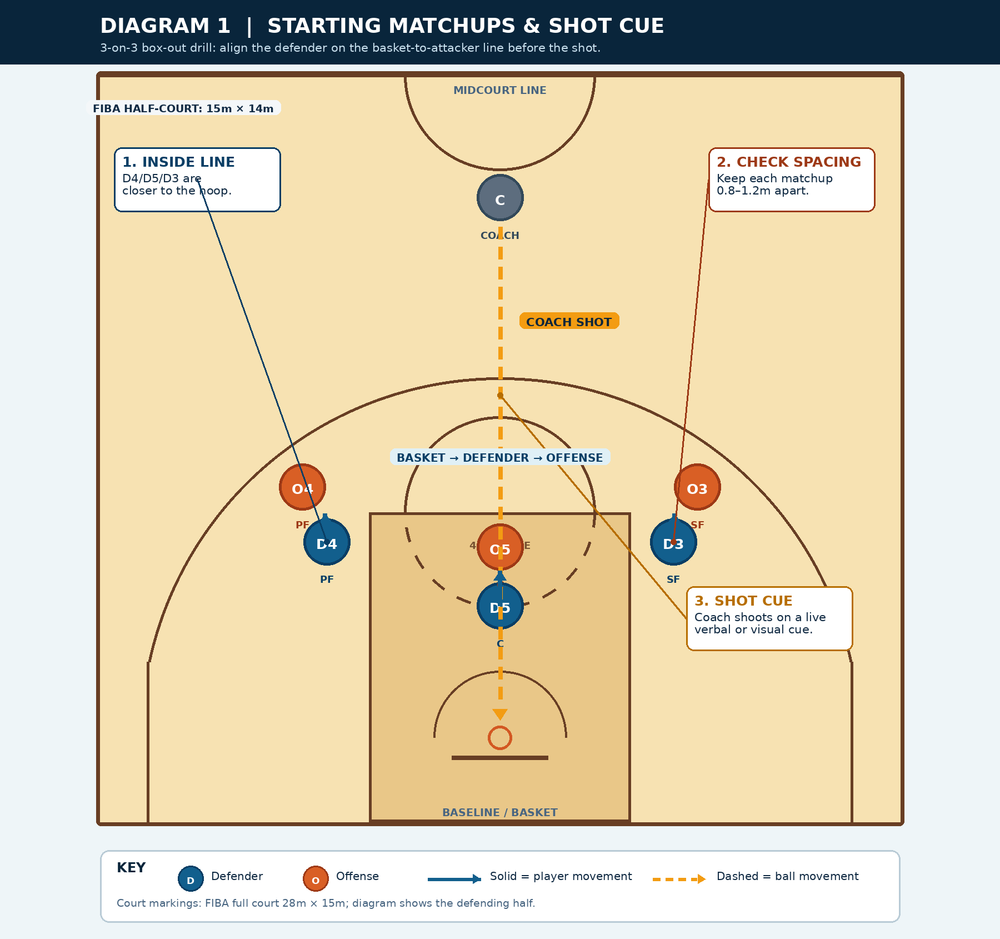
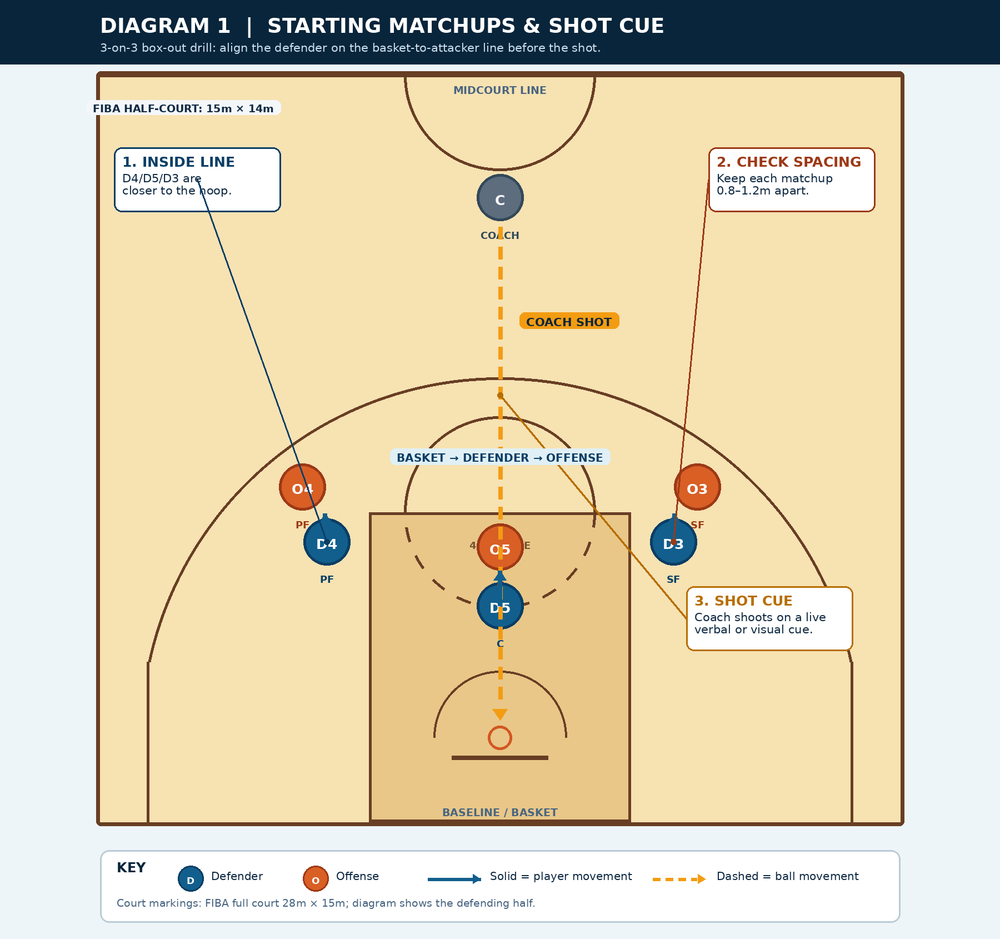
Use six players at a basket: three defenders (D3/SF, D4/PF, and D5/C) against three offensive players (O3/SF, O4/PF, and O5/C). One coach is the shooter and an optional point guard, 1/PG, becomes the outlet receiver. Put two cones 3–5m from the rebounder on the ball-side outlet line. Have the next group ready at midcourt so that rotations take less than 10 seconds.
| Element | Exact placement | Coaching purpose |
|---|---|---|
| D5 and O5 | D5 starts 1.0–1.5m above the restricted arc; O5 starts 0.8–1.2m behind D5. | Teaches the centre to protect the direct rim line. |
| D4/O4 and D3/O3 | Place each pair on opposite lane-line or elbow areas, with the defender closest to the basket. | Creates three distinct rebounding lanes and realistic help-side angles. |
| Coach | Stand in the high slot, 8–10m from the baseline. Vary shots from straight on, right slot, and left slot. | Produces both direct and long caroms. |
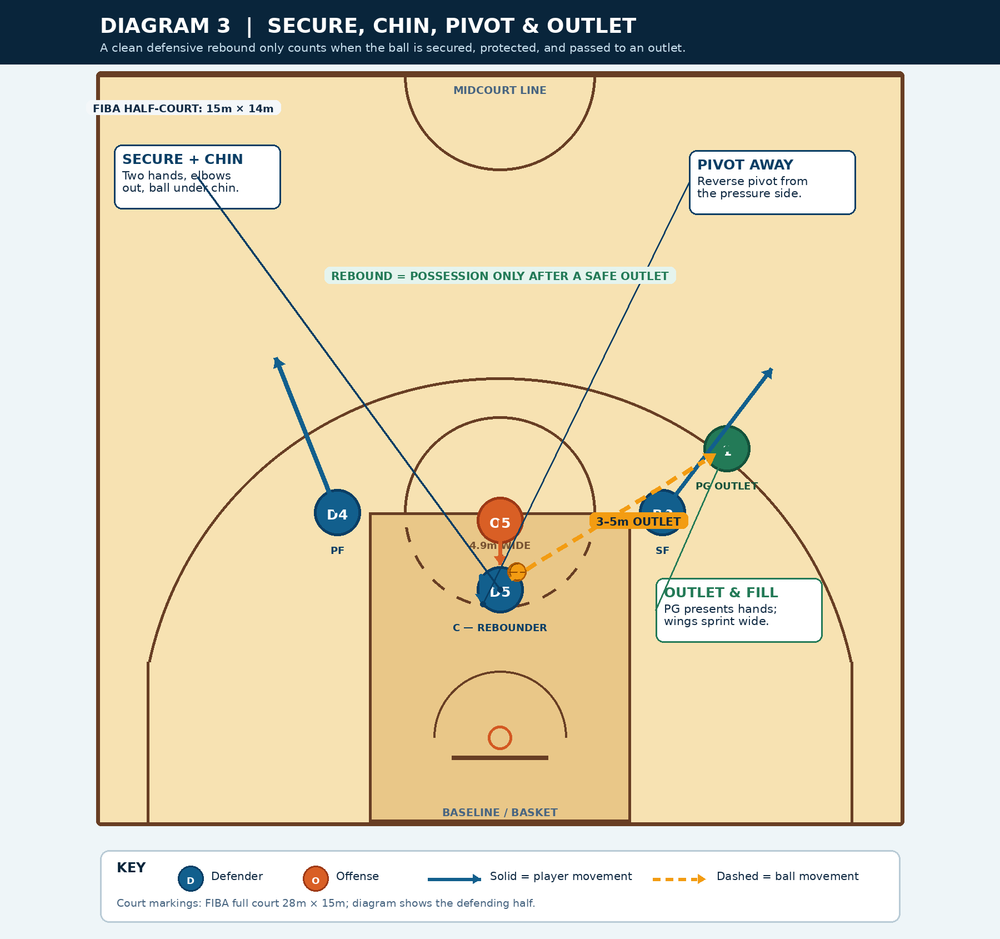
| Outlet | Place 1/PG in a 3m × 3m target window, 3–5m from the rebounder. | Forces the rebounder to finish the possession with a secure pass. |
Step-by-Step Instructions
1. Build the inside line
Before every rep, the coach checks the picture: basket, defender, then offense. D3, D4, and D5 should be inside their assigned attacker, not parallel with them. Defenders call the matchup number—"I have 3," "I have 4," or "I have 5"—then drop into an athletic stance. The offensive group is live as soon as the shot is released, but they do not pre-run into the defender.
2. Trigger the shot
On the coach's verbal cue, "Shot," the coach takes a live jumper or deliberately uses the rim/backboard to create a carom. Keep the shot cue unpredictable. Deliver six to eight consecutive reps from one spot, then change the shot angle so players learn to read different rebound paths. A rep should last no more than 8 seconds from the shot to the outlet.
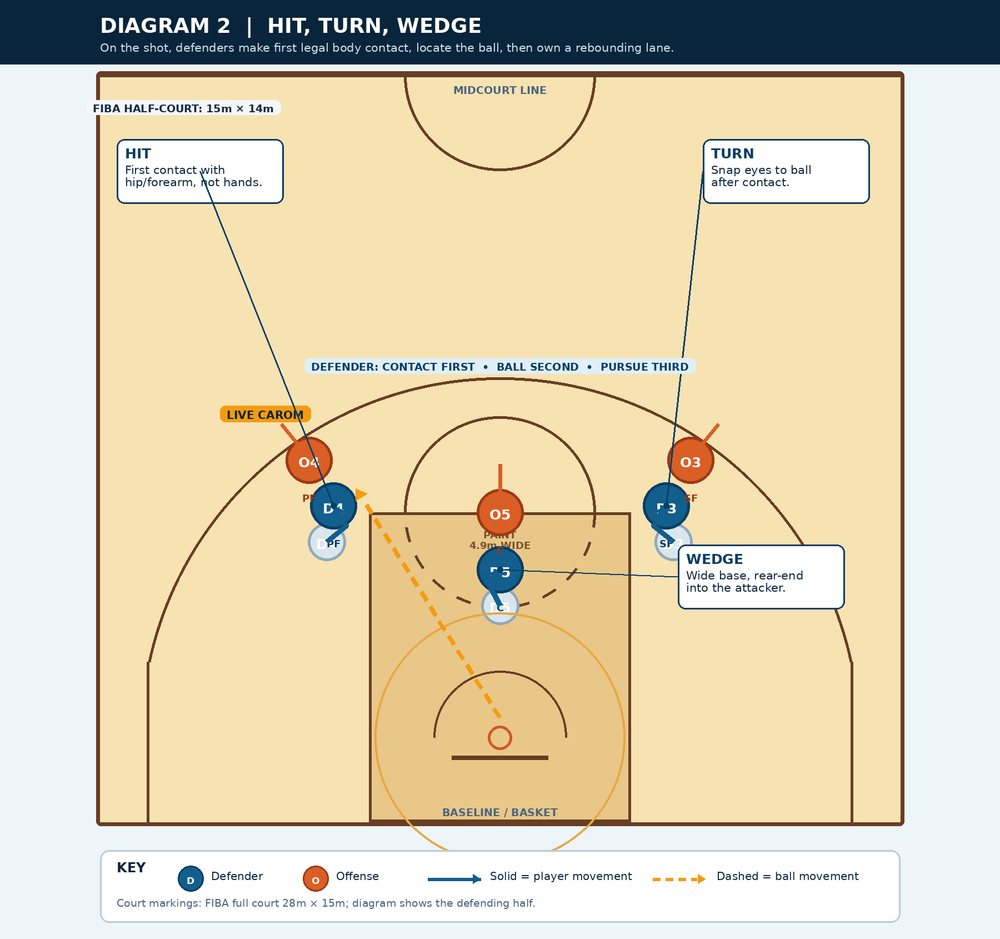
3. Hit first, then turn
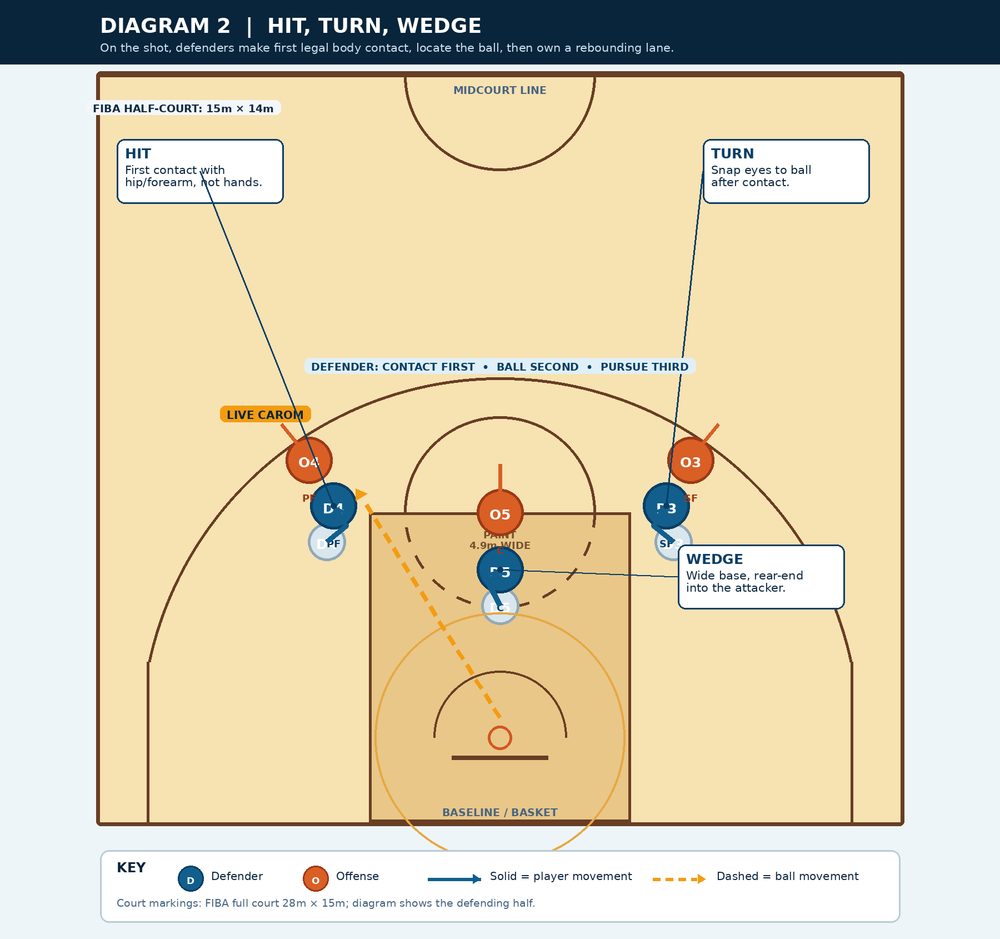
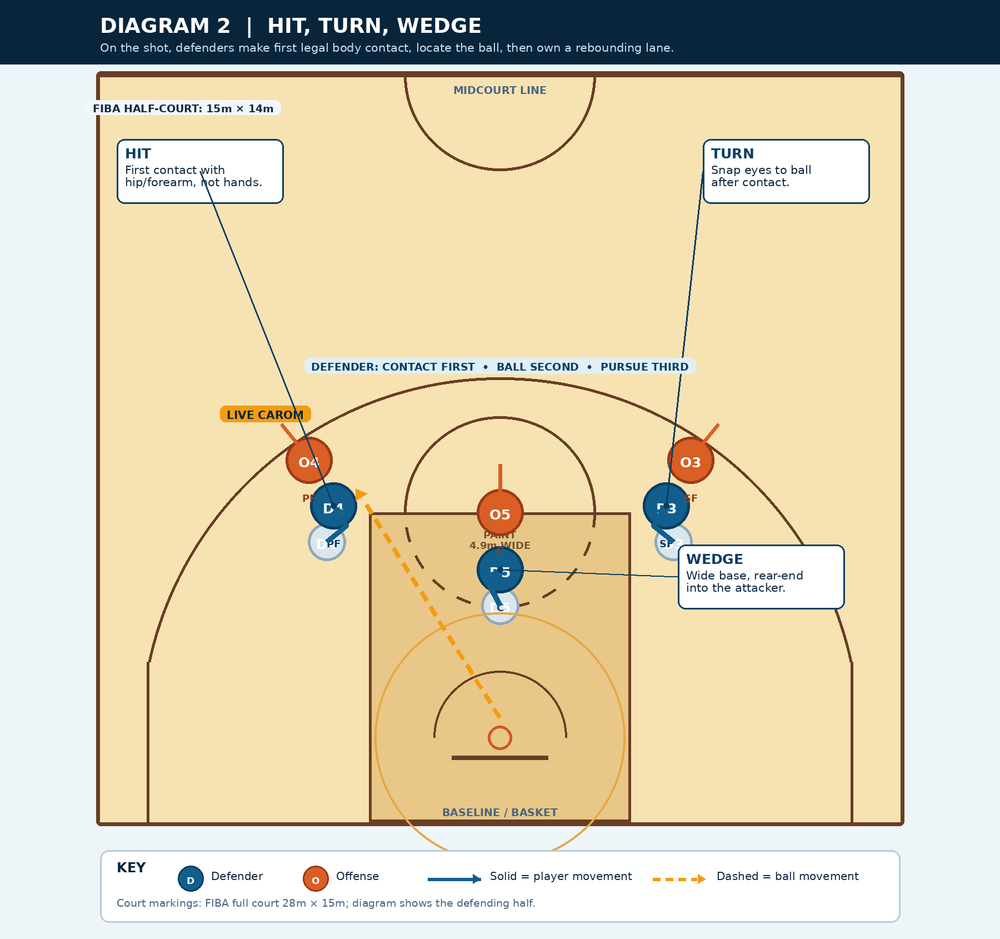
In the first half-second after the shot, every defender must make legal body contact. Coach the forearm bar and hip contact, never an extended two-hand shove. The defender should absorb the offensive player's momentum, then pivot their head and shoulders toward the rim without surrendering contact. If an attacker gets an unobstructed run at the ball, stop the rep immediately: the defender has skipped the first job.
4. Create the wedge and pursue
After the turn, defenders widen their base, sit their hips, and keep their rear end between the attacker and the anticipated ball path. Their hands stay active but legal; they do not reach backward to hold. Once the ball hits the rim or backboard, the nearest defender releases the seal and attacks the ball with two hands at its highest safe point. The other two defenders still finish their seals until the rebound is clearly owned.
5. Secure, chin, pivot, and outlet
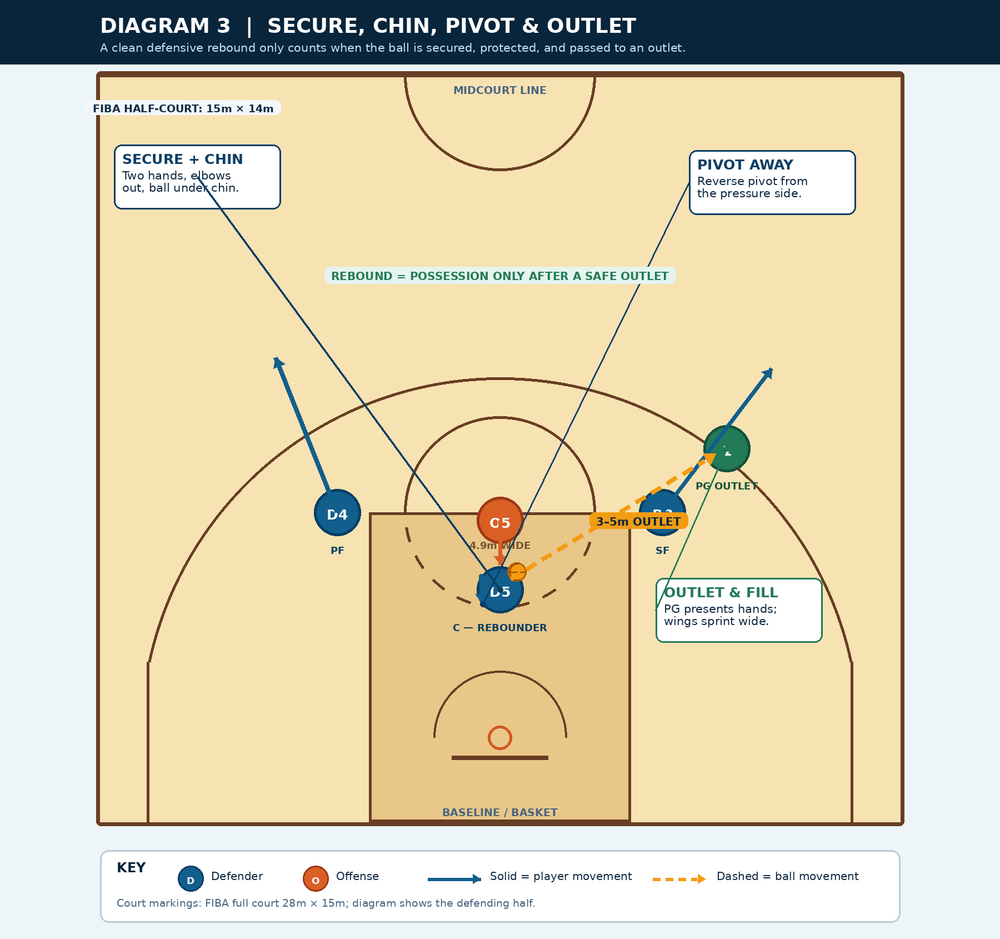
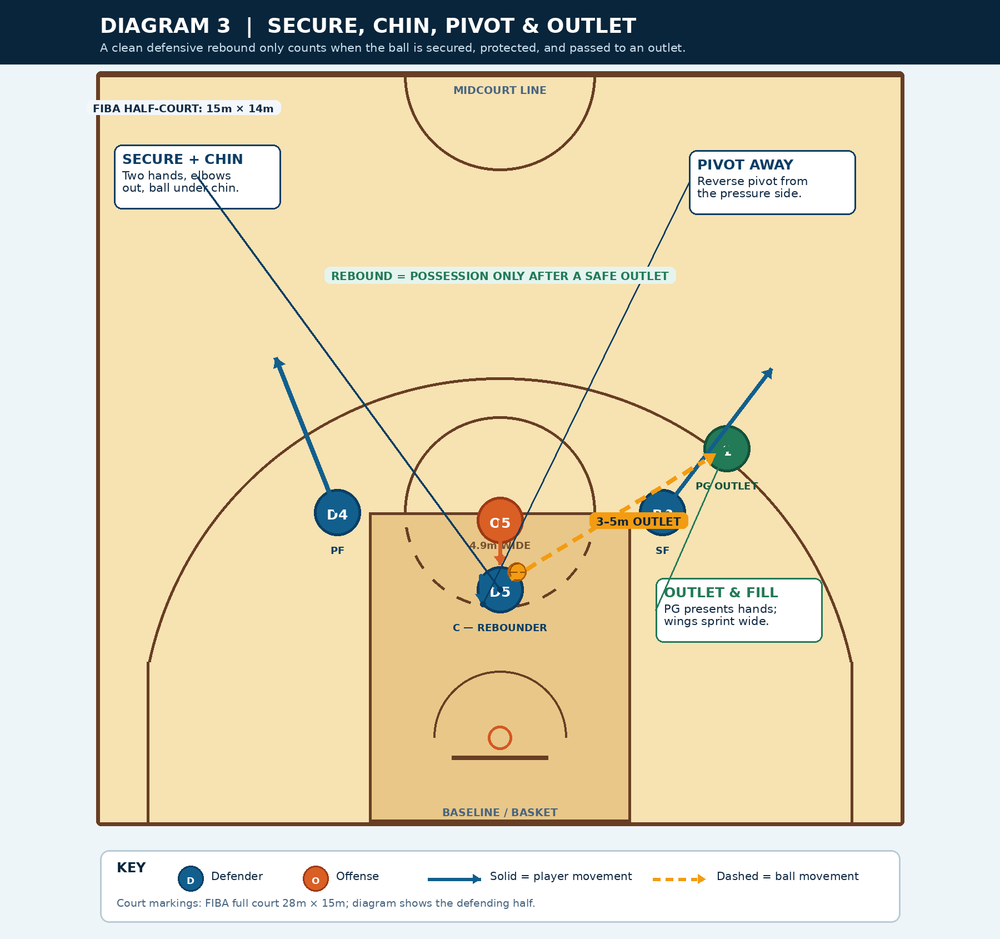
The rebounder rips the ball from the air to the chin, elbows out and feet under the body. Count a defensive stop only after a two-foot landing and a strong reverse pivot away from the nearest pressure. The outlet shows both hands in the cone window; the rebounder delivers a firm two-hand chest pass or overhead pass. Wings sprint wide only after the ball is secure, which prevents the familiar mistake of leaking out before possession is complete.
6. Score the rep and rotate with urgency
Award the defense one point only for a clean rebound plus completed outlet. Award the offense one point for an offensive rebound, a tip-out to a teammate, or a forced turnover before the outlet. Play to five, rotate offense to defense, and keep the winning group on for one extra possession. This scoring makes technique accountable without turning the drill into a collision contest.
Key Coaching Points
1. Contact first, ball second
The ball can wait for a fraction of a second; the attacker cannot. Demand that every defender finds a body before looking up. The cue is simple: "Hit—turn—go."
2. Win the line, not the jump ball
The defender's objective is to own the basket-to-attacker line. A smaller defender who has leverage and a low base will beat a taller player who is standing upright behind the action.
3. Make the wedge wide and legal
Feet should be at least shoulder-width apart, knees bent, and hips loaded. Players may establish space with the body and forearm bar, but never displace an opponent with extended arms. Blow the whistle early on pushing; players will play the standard you permit.
4. Finish the rebound as a possession
A waist-level rebound is an invitation to guards. Teach "two hands, chin, pivot, outlet" as one phrase. The point of the box-out is not to touch the ball; it is to start your transition offense with control.
5. Coach the non-rebounders
D3 and D4 must still seal when D5 gets the rebound. They protect against strips, tips, and loose-ball chaos, then become the first wide running lanes after the outlet is complete.
Common Mistakes
| Mistake | What the coach sees | Immediate correction |
|---|---|---|
| Spectating | Eyes follow the flight while the attacker runs past. | Replay the rep; require a loud "hit" before anyone may pursue. |
| Drifting under the rim | Defender backs into the restricted area and the ball rebounds over the head. | Reset the defender one step higher; protect the lane line rather than standing under the basket. |
| Reaching or pushing | Arms extend behind the body or a player displaces the opponent. | Freeze the picture, show legal hip/forearm contact, then restart. |
| Loose finish | Ball drops to the waist or the outlet is floated one-handed. | Require a chin, reverse pivot, and two-hand pass before a defensive point counts. |
Variations & Progressions
| Variation | How to run it | Training effect |
|---|---|---|
| Guided turn-and-wedge | Start with the coach tossing a predictable ball; offense provides controlled pressure. | A lower-contact teaching version for installing the footwork. |
| 4-on-3 disadvantage | Add a fourth offensive rebounder at the opposite elbow; keep only three defenders. | Forces communication, gang rebounding, and weak-side responsibility. |
| Outlet-to-transition | After a successful outlet, play live 3-on-3 to the far basket for 8 seconds. | Connects defensive rebounding to fast-break decision-making. |
Age Adaptations
| Group | Adaptation | Standard to insist on |
|---|---|---|
| Under 8 / Under 10 | Use no-contact shadow positioning and a foam or lighter ball; coach tosses rather than shoots. | Turn to the ball, use two hands, and land balanced. |
| Under 12 / Under 14 | Introduce controlled forearm contact and the 3–5m outlet target. | Inside line, legal wedge, and chin the ball before passing. |
| Under 16 / Open | Use live caroms, 4-on-3 disadvantage reps, and immediate transition. | Physical but legal contact, communication, and a fast secure outlet. |
