

Football
Defensive Heading & Clearing: 4v3 Box-Dominance Drill
Build confident, coordinated aerial defending by coaching players to attack the first ball, clear it away from danger, and win the second contact under game-realistic pressure.

What you need
1 full-size goal, 14-18 footballs, 30-36 flat cones or disc markers, 8 bibs in two colours, 2 mini-goals or 1 cone gate, 1 stopwatch, whistle
Defensive Heading & Clearing: 4v3 Box-Dominance Drill
Overview
This progressive practice coaches the response to a cross: read the flight, claim first contact, clear with purpose and protect the second ball. The outcome is an organised exit rather than a loose ball in the central danger zone.
Use it after activation, in a defensive-unit session, or ahead of opponents who cross early or attack the far post. The main practice sits in a 44 m x 40 m area with a regulation goal. On a 105 m x 68 m full-size reference pitch—within the 100–110 m x 64–75 m senior range—this recreates the area from the edge of the penalty area into the first recovery zone. Begin with clean technical repetitions, then demand contact, communication and recovery under pressure.
| Phase | Organisation | Time | Outcome |
|---|---|---|---|
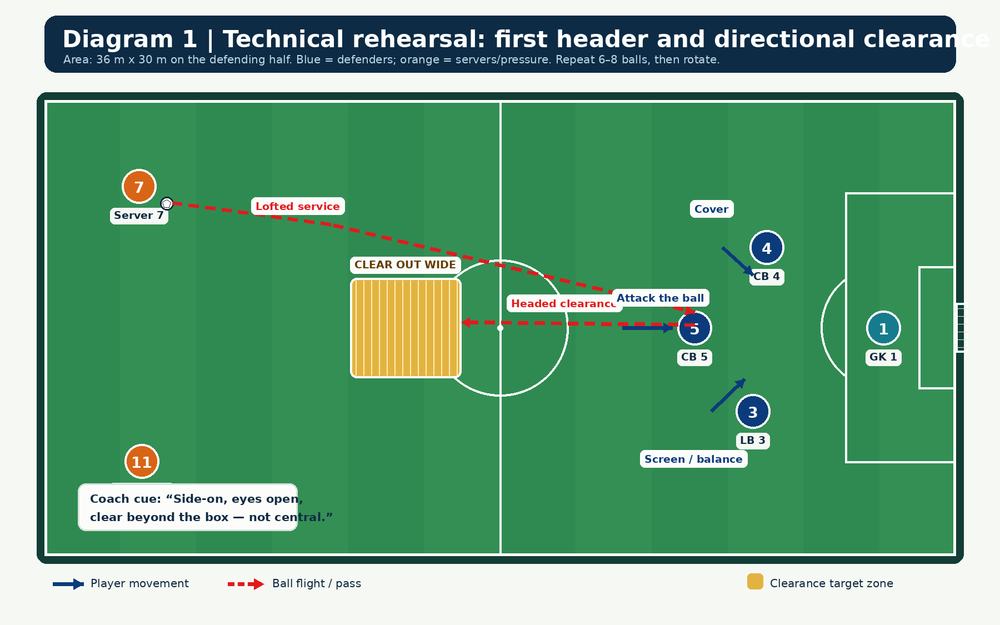
| Technical rehearsal | 3 defenders + GK, 2 servers | 8 min | Directed first header |
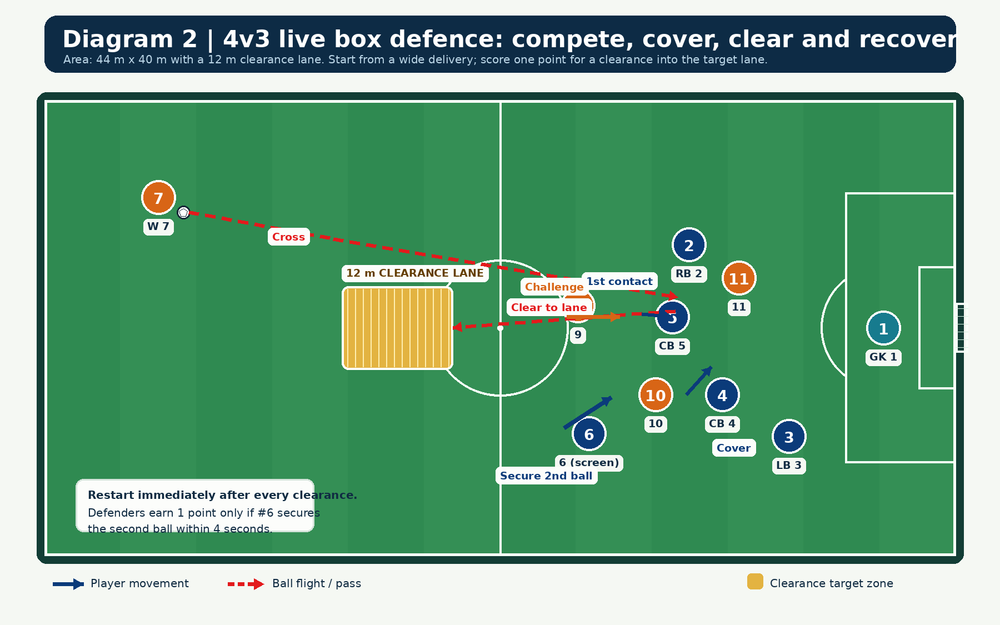
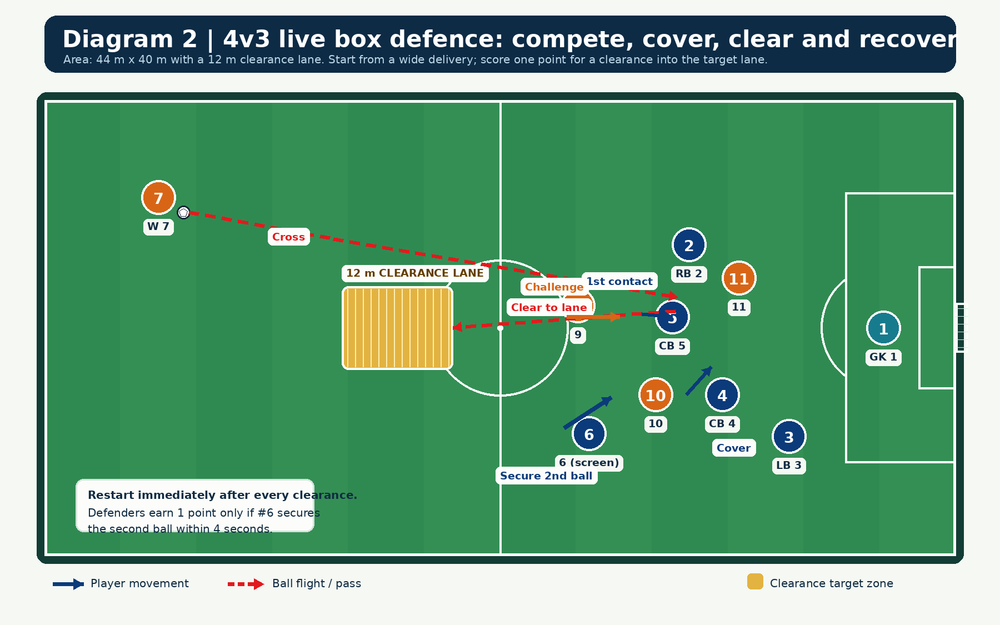
| Live box defence | Back four + GK v 3 attackers; #6 recovers | 3 x 4 min | Win first and second balls |
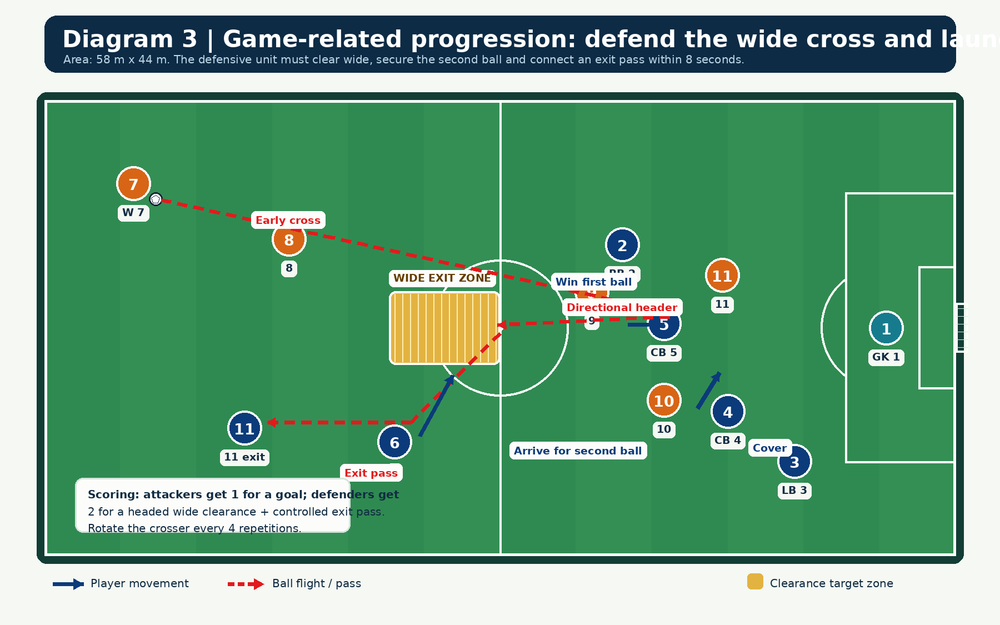
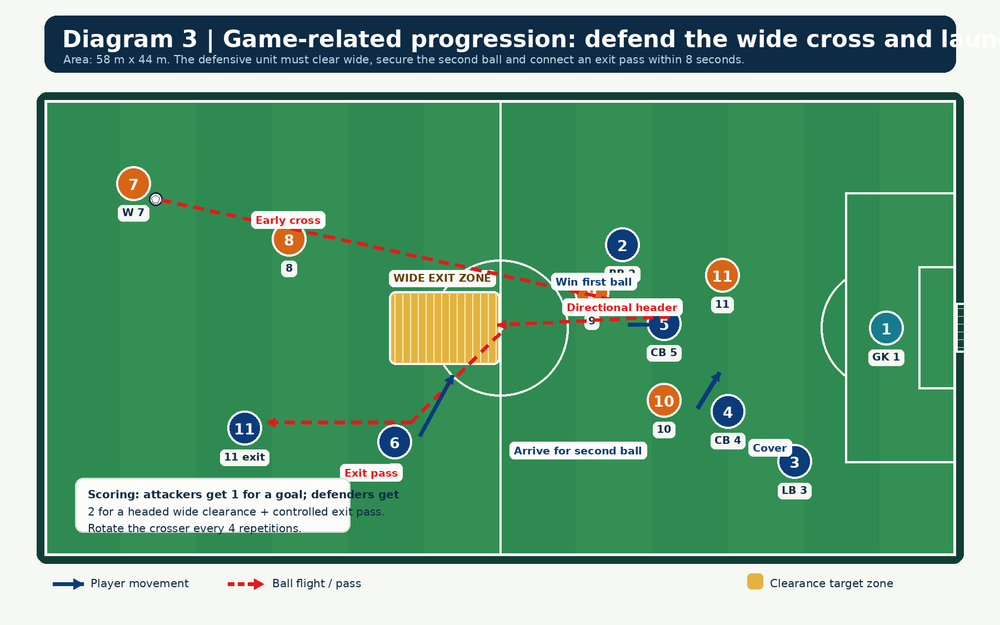
| Game-related progression | 6v5 plus wide server | 2 x 5 min | Clear wide, then exit in possession |
Setup
Mark a 44 m x 40 m rectangle with one full-size goal at the defending end. Keep the penalty area and six-yard box visible if available; otherwise mark them with flat discs. Put a 10 m x 8 m crossing zone on the attacking right, beginning approximately 32 m from goal. Mark a 12 m x 12 m clearance lane 18–30 m from goal toward the opposite side. A clearance into this lane is safer and more useful than a central header. Use a cone gate or mini-goal beyond the lane if you want a clear exit target.
Use 13 players: goalkeeper #1; defenders #2 RB, #4 LCB, #5 RCB and #3 LB; defensive midfielder #6; targets #9, #10 and #11; wide crosser #7; plus four rotating servers or recovery players. Start #5 as the first-contact centre-back, #4 as cover, #3 at the far-post line, #2 protecting near-post/cut-back space and #6 eight to ten metres outside the box. Swap the first-contact role often so every defender practises ownership and cover.
Prepare 14–18 balls, 30–36 flat cones, two bib colours, one full-size goal, two mini-goals or a gate, and a stopwatch. Keep spare balls with the feeder to restart in fewer than ten seconds. Check the surface and follow your local association’s age and heading policy before any aerial contact.

Step-by-Step Instructions
Set the picture. Walk the defensive unit through the starting positions. Ask #5 who owns the first ball, #4 where the cover line is and #6 where the next ball will land. Establish three calls: “Keeper,” “mine,” and “away.” One early, decisive call removes hesitation.
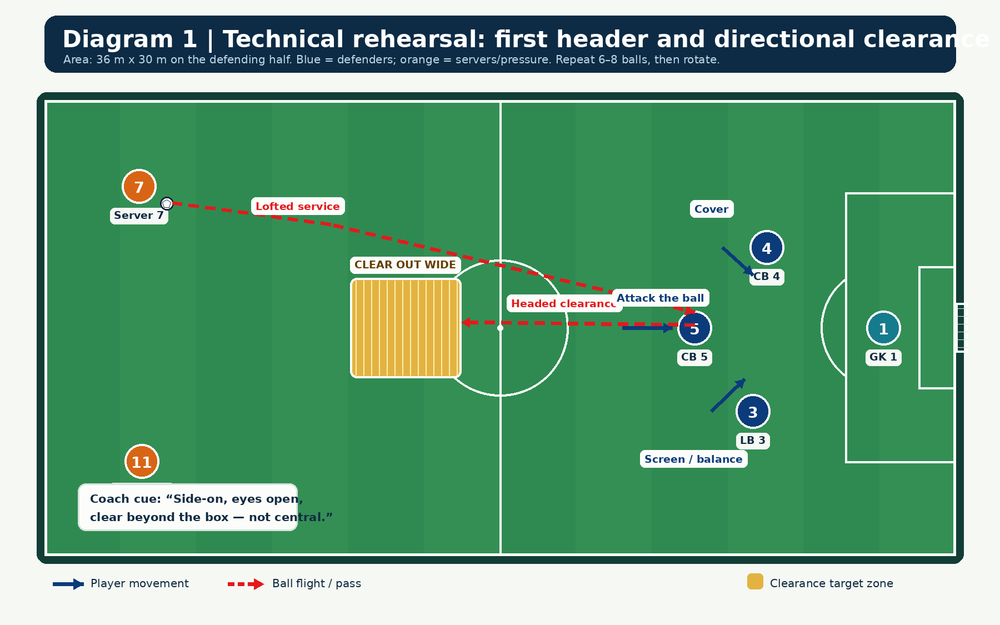
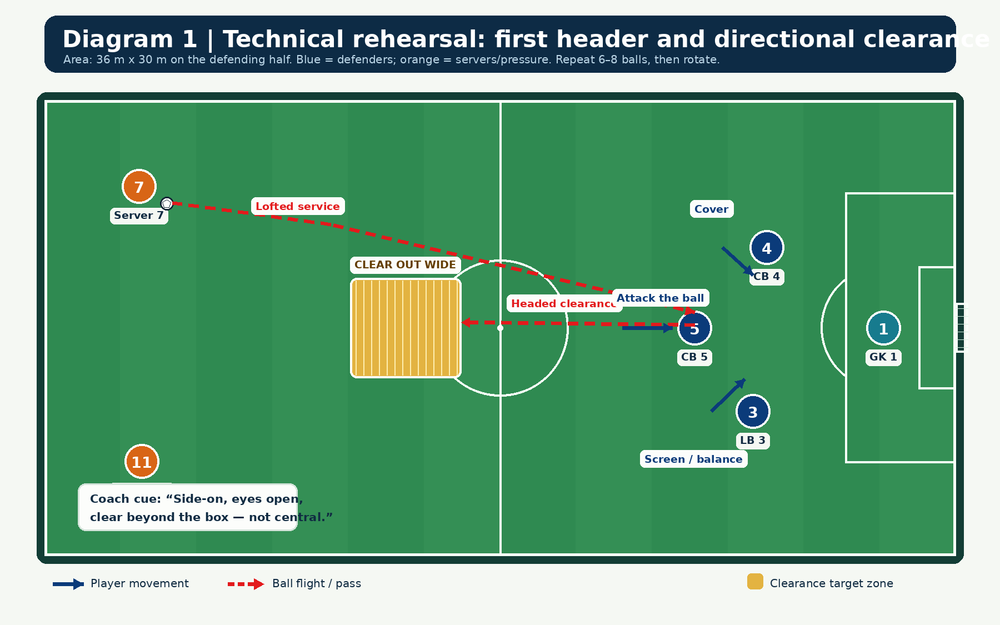
Run the technical rehearsal. Server #7 plays a lofted, manageable service toward #5. Start unopposed for two repetitions. #5 travels from a side-on stance, attacks the ball and heads through it into the wide clearance lane. #4 positions beneath the clearance line, #3 screens the far-post space and #6 anticipates the next ball. Give each defender 6–8 balls, then rotate.
Coach contact, not just courage. #5 scans the flight, plants from a balanced base, uses the arms to establish legal space and strikes through the centre of the ball with the forehead. The head travels through the ball; it does not flick away from it. The target is wide and beyond the immediate danger, not simply high.
Introduce pressure. Place #9 one metre behind #5 as a passive challenger. The defender must now decide whether to head forward, upward-and-wide, or communicate for #1. Freeze only when the relationship between first contact, cover and goalkeeper has clearly broken down.
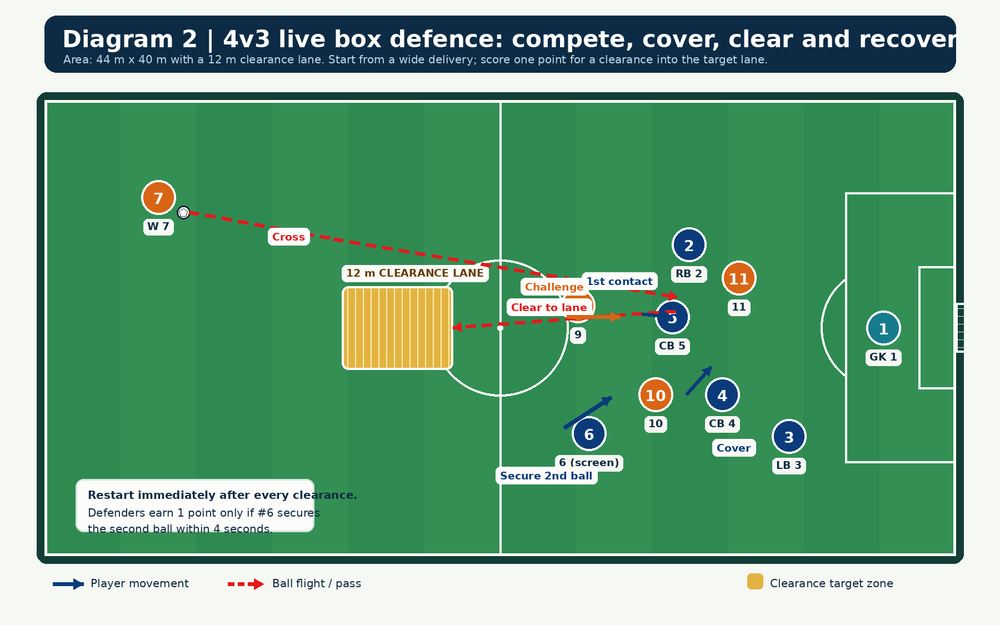
Move into 4v3 live box defence. Position #7 in the crossing zone, #9 central, #10 for the second ball and #11 at the far-post line. The back four and #1 defend. On the signal, #7 has a maximum of 4 seconds to cross. Play continues until a goal, a controlled exit or the ball leaves the area.
Score the complete action. Attackers earn one point for a goal. Defenders earn one point only when the first clearance reaches the wide lane and #6 or another defender secures the second ball within 4 seconds. Award two points if they then play through the exit gate. A desperate header that returns possession is not a defensive win.
Coach the unit as the ball travels. When #5 jumps, #4 drops beneath the likely clearance line. #3 protects the far post, #2 protects near-post/cut-back space and #1 adjusts along the goal line, ready to claim. #6 moves on the server’s first touch, not after the header.
Use 3 x 4-minute live blocks with 60–75 seconds’ rest. Progress from predictable inswinging service to flatter driven balls and far-post deliveries. In the last block, let #7 combine with a feeder before crossing; the back line must then manage a delayed service and realistic runs.
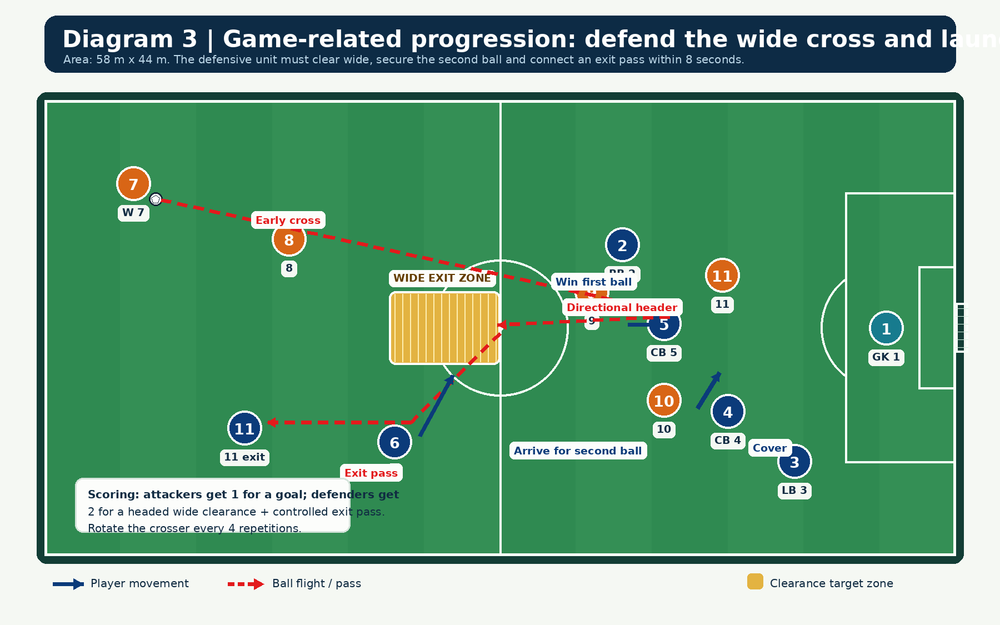
Finish with the game-related challenge. In two five-minute games, defenders score only if they clear wide, secure the second ball and make a purposeful exit pass. Rotate the crosser every four deliveries and rotate centre-back ownership every two attacks.
Key Coaching Points
| Priority | What to coach | Coach prompt |
|---|---|---|
| Early ownership | Nearest defender calls and attacks the flight line. | “Who owns the first contact?” |
| Body shape | Start side-on; scan ball and opponent before moving. | “Arrive balanced, not flat-footed.” |
| Contact | Strike with the forehead and drive through the ball. | “Head through it.” |
| Direction | Clear wide and beyond the box, never into central traffic. | “Wide and away.” |
| Cover | If one defender attacks, another protects underneath. | “Your partner jumps; you protect.” |
| Second ball | #6 moves before contact and scans the exit pass. | “The clearance starts our exit.” |
Common Mistakes
| Error | Why it hurts | Immediate correction |
|---|---|---|
| Waiting under the ball | Attackers gain momentum; contact happens while backpedalling. | Rehearse a two-step forward attack into the flight. |
| Clearing vertically or centrally | The ball stays in the highest-risk zone. | Keep the wide target lane visible and score it. |
| #4 and #6 ball-watch | Attackers collect the loose ball freely. | Trigger recovery movement on the server’s first touch. |
| Goalkeeper stays rooted | #1 cannot help across the six-yard space. | Coach small adjustment steps and an early claim call. |
| Too many maximal contacts | Technique and decision-making deteriorate. | Protect work-to-rest ratios and use controlled service. |
Variations & Progressions
Make it easier. Remove the aerial challenger and use hand-served or bounced deliveries. Give #5 a marked starting channel and ask #4 only to cover, then add the far-post player. The unit learns reference positions before the ball becomes chaotic.
Make it harder. Let #7 choose near-post, central or far-post service and allow #9, #10 and #11 to make crossing runs. Deduct a point for every central clearance. Limit the defensive exit to 8 seconds after the first header.
Make it game-related. Add a second winger and play 6v5 plus #1. The attack may switch play before crossing; the defence earns two points only for a headed wide clearance followed by a controlled pass through the exit gate. Reward the full sequence, not the isolated header.
Age Adaptations
| Age group | Adaptation | Coaching emphasis |
|---|---|---|
| Under 8 | Do not use deliberate contested heading; use catching, chest control and clear-out decisions. | Naming danger and protecting space |
| Under 10 | Use soft hand-served or bounced balls only where permitted; remove contact and use 2v1. | Eyes open, side-on posture, communication |
| Under 12 | Use controlled lofted service, passive pressure and a 30 m x 28 m area. | Directional clearance and cover |
| Under 14 | Use the full 44 m x 40 m area but cap aerial repetitions per block. | First contact, cover and second-ball habit |
| Under 16 and open age | Add unpredictable runs, switch play and timed exits. | Collective ownership and transition quality |
Coach’s End Condition
End when you see the same connected behaviour repeatedly: one player claims the first ball, one covers, one protects the goal, #6 arrives for the next contact and the clearance travels wide with purpose. If the ball repeatedly returns to the danger zone, reduce the speed, rebuild the picture and demand the complete defensive action—not merely a brave header.
