

Football
Defensive Transition Under Pressure: The 3+2 Reset and Escape Play
Teach your team to absorb a high press with a protected 3+2 shape, bounce through the free midfielder, and escape through the weak-side outlet.
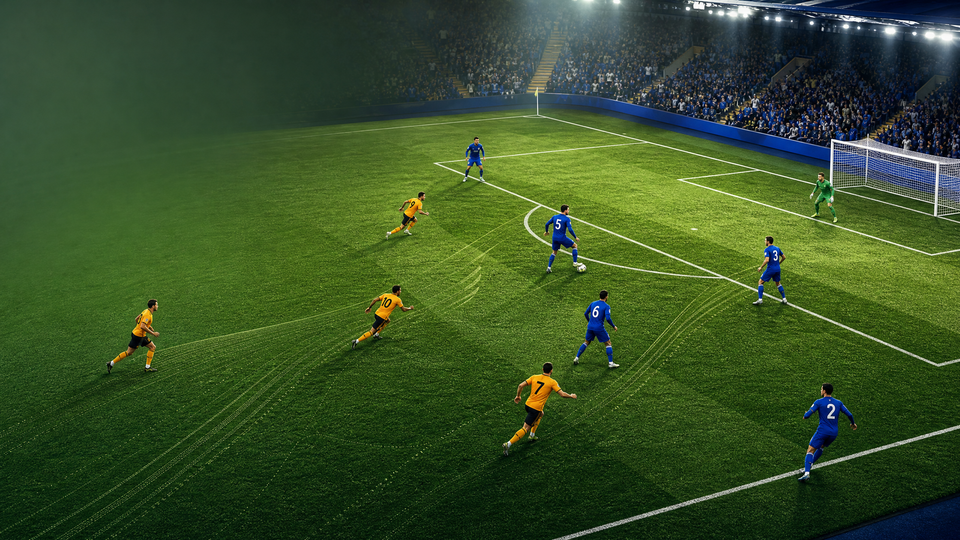
What you need
12 footballs, 36 flat cones, 2 full-size goals, two sets of bibs, 2 mini-goals for optional counter-targets, whistle and stopwatch
Defensive Transition Under Pressure: The 3+2 Reset and Escape Play
Overview
This defensive-to-attacking transition set play is for the moment your team is pressed while building in its own third. It replaces a panic clearance with a repeatable answer: create a protected 3+2 safety net, invite the first line, bounce through the free midfielder, and leave the pressure on the weak side. Use it against a high 4-3-3, 4-4-2, or any aggressive press. The aim is to secure the first action, then use the second action to play through or around the press.
Use a 105 m × 68 m reference pitch, within the senior match range of 100–110 m long and 64–75 m wide. Trigger the play when the goalkeeper receives, when a centre-back is closed from the front, or after a defensive-third regain. The player message is simple: if the press runs toward the ball, the far side opens.
Setup
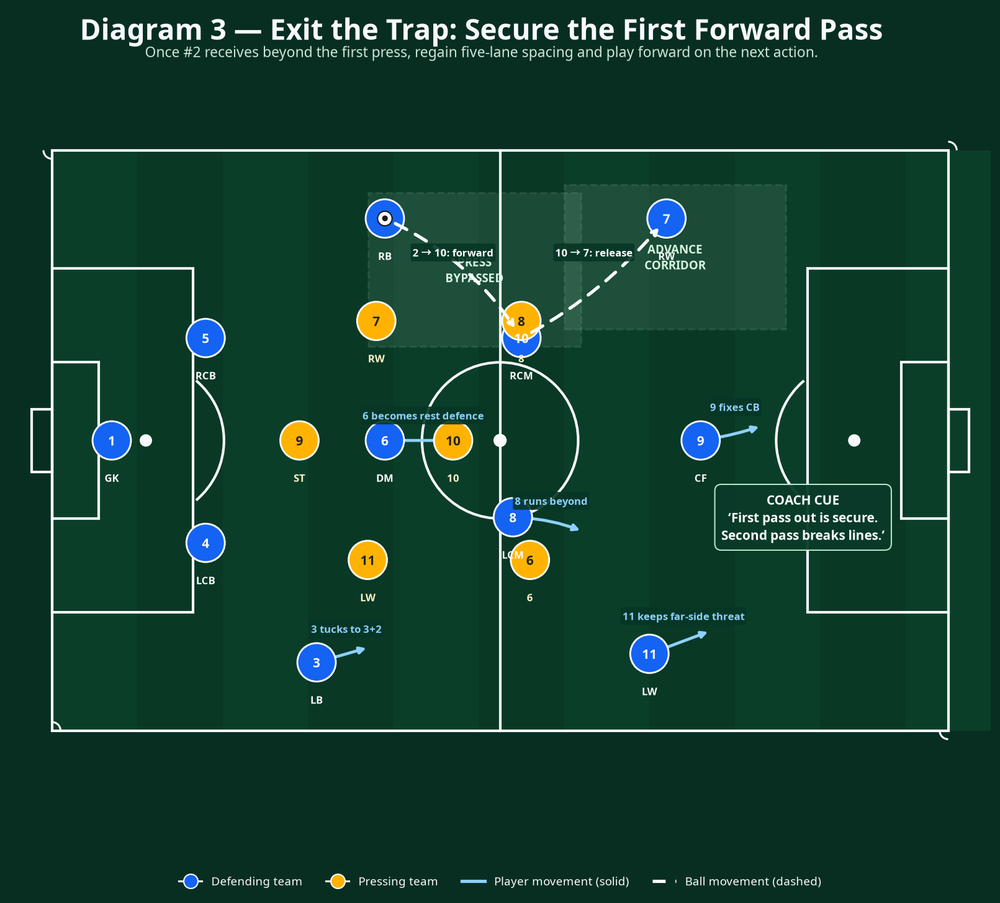
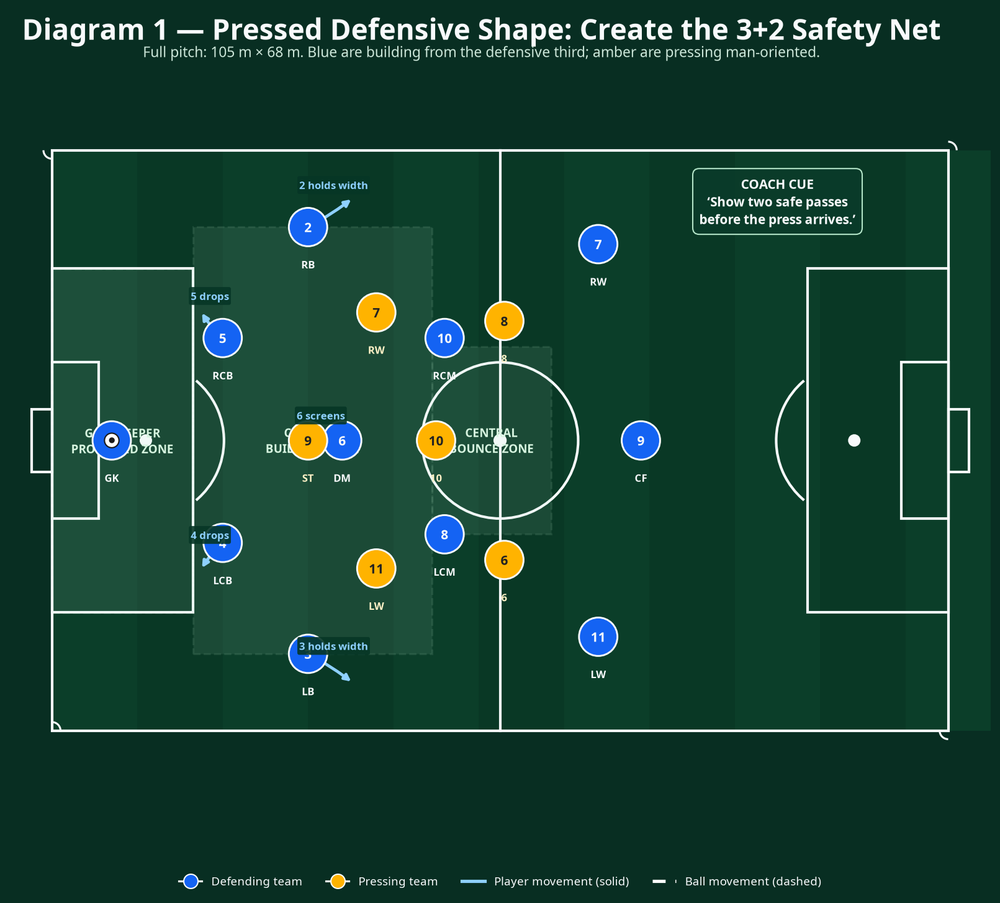
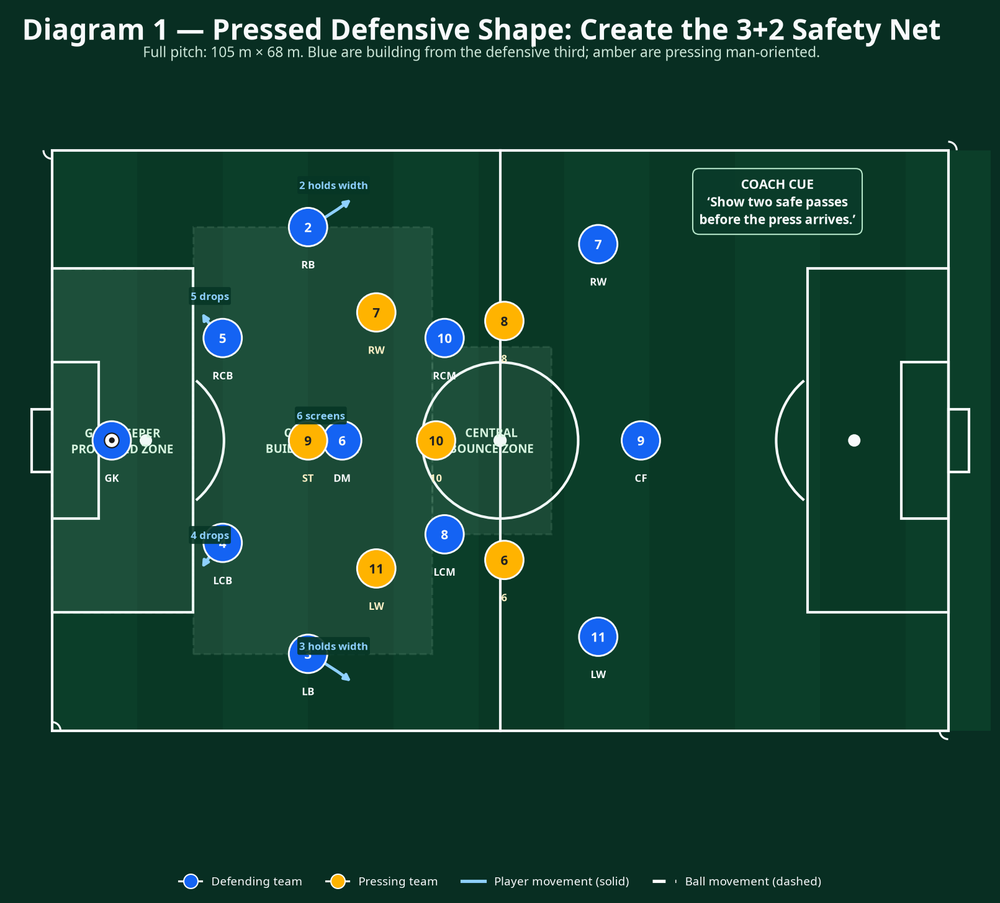
Use 17 players: an 11-player blue build-out team and six amber pressers. Place two full-size goals on a 105 m × 68 m pitch, or use the defensive two-thirds. Mark a 28 m × 50 m build-out box and a 14 m × 22 m central bounce zone. Blue begin 4-3-3: #1 goalkeeper; #2 right-back; #3 left-back; #4 left centre-back; #5 right centre-back; #6 defensive midfielder; #8 left central midfielder; #10 right central midfielder; #7 right winger; #11 left winger; #9 centre-forward.
| Element | Detail | Coaching purpose |
|---|---|---|
| Initial rest-defence | #4, #5, and #3 form the back three; #6 protects ahead of them | Keeps cover against a turnover while one full-back releases |
| Build-out width | #2 and #3 begin 10–12 m outside the centre-backs; #7 and #11 hold the outside lanes | Stretches the first and second lines of pressure |
| Central distances | #6 stays 8–10 m ahead of the centre-backs; #8 and #10 work 10–14 m beyond #6 | Creates clear bounce angles, not flat passing lines |
| Pressing unit | Amber #9 presses #4/#5; amber #7/#11 close full-backs; amber #10, #8, and #6 screen central options | Gives the blue team a realistic, directed press |
Start each repetition with #1 in possession. Serve a new ball straight away after a goal, turnover, or ball out. Run two blocks of six reps from each side, then allow blue to choose the exit.
Step-by-Step Instructions
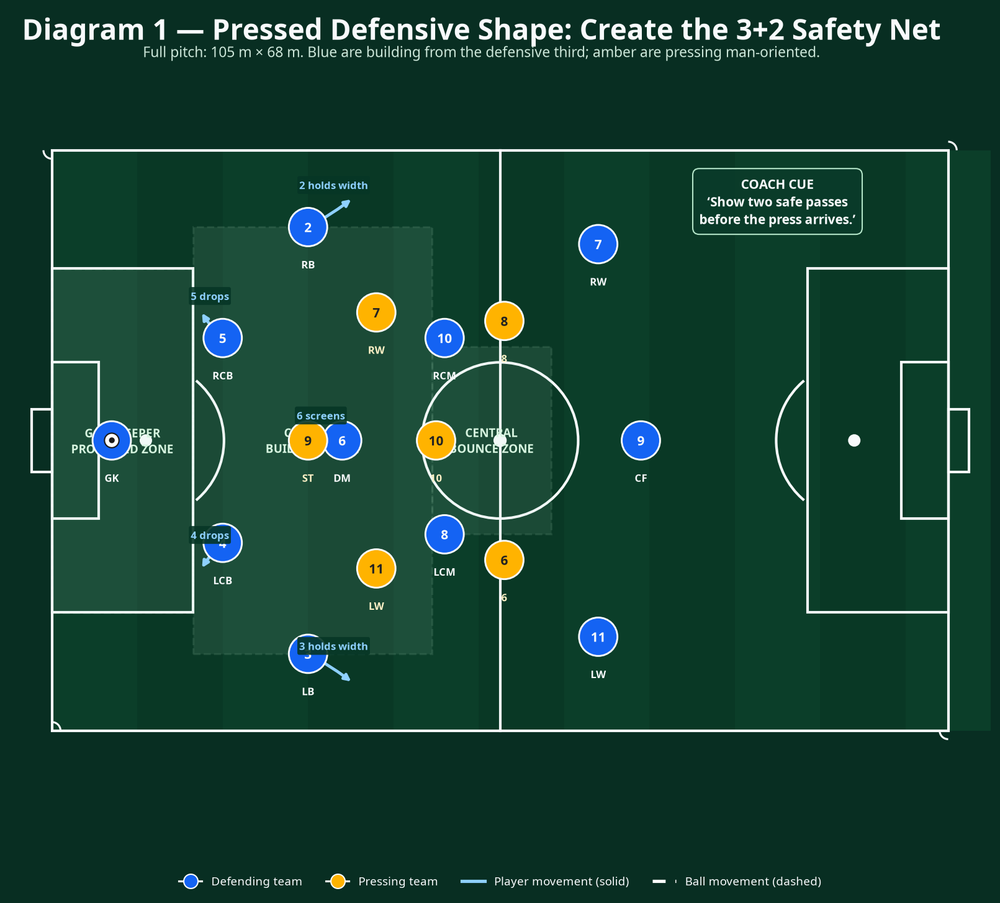
Build the picture before the ball moves. As #1 receives, #4 and #5 split to the penalty-area corners. #3 tucks in as the third defender; #6 stays 8–10 m ahead, side-on to see #1 and the press. #2 pushes high and wide on the right touchline. Keep #6 out of the same vertical lane as an amber midfielder.
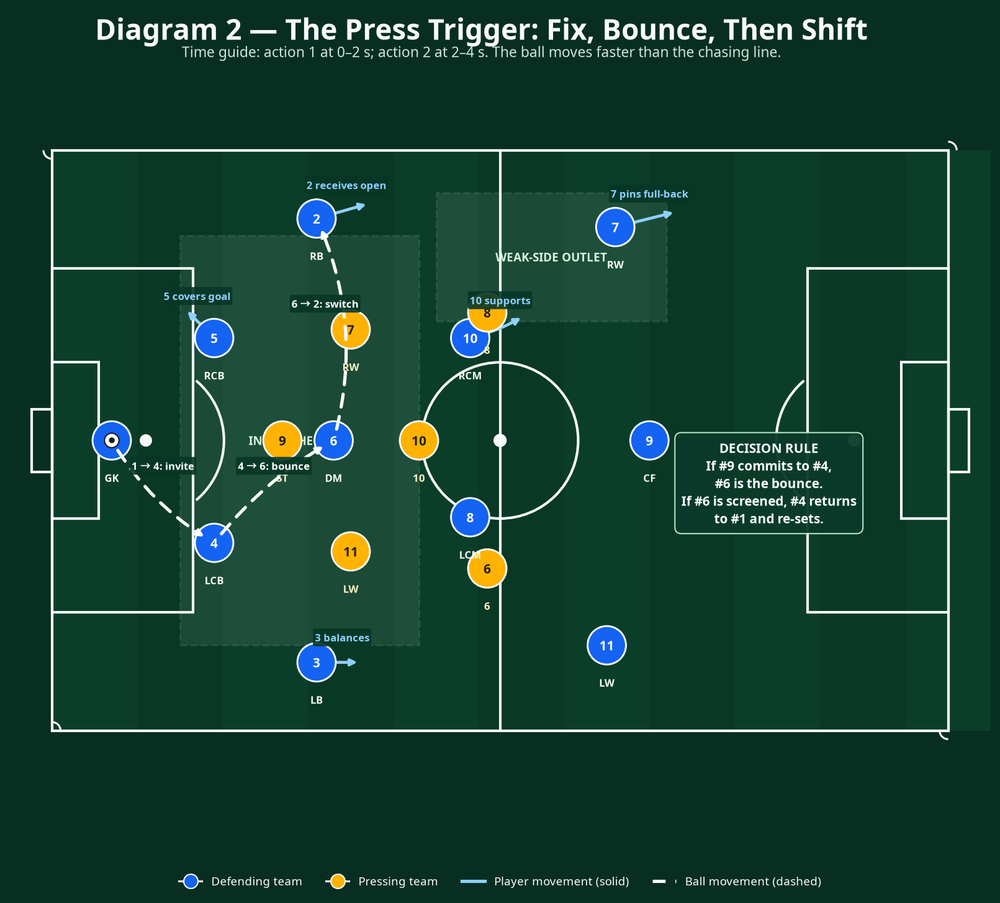
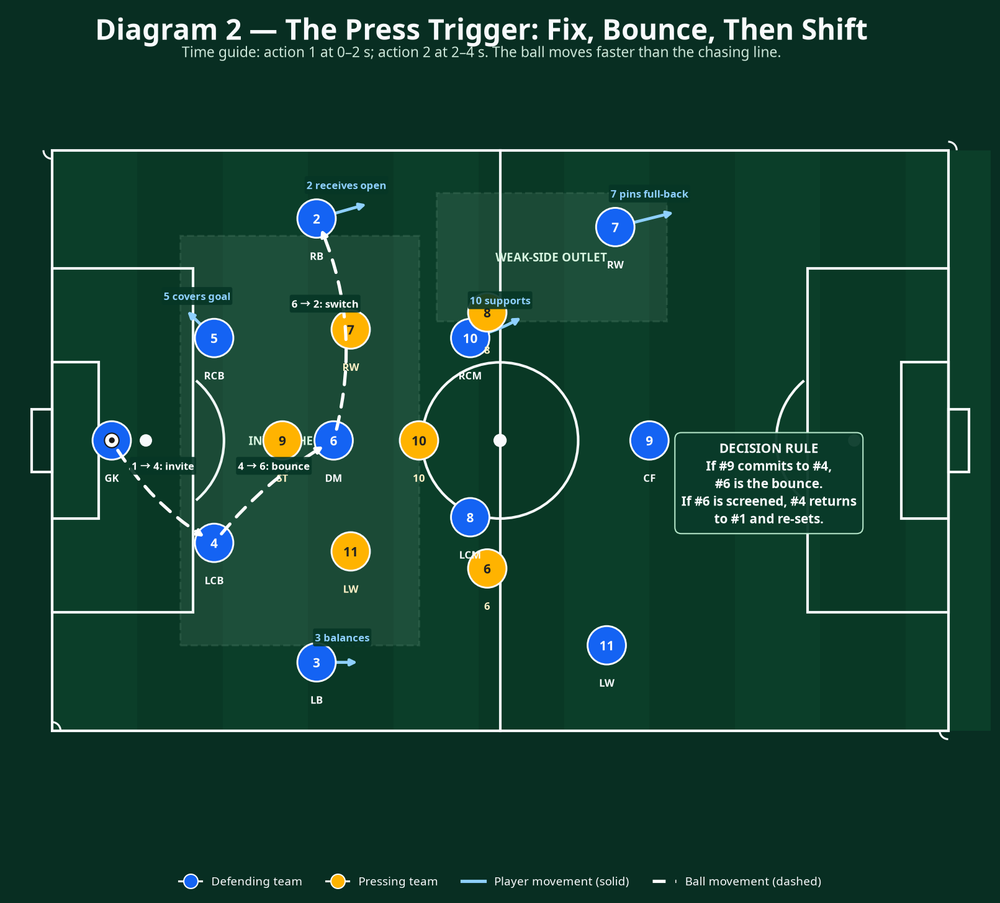
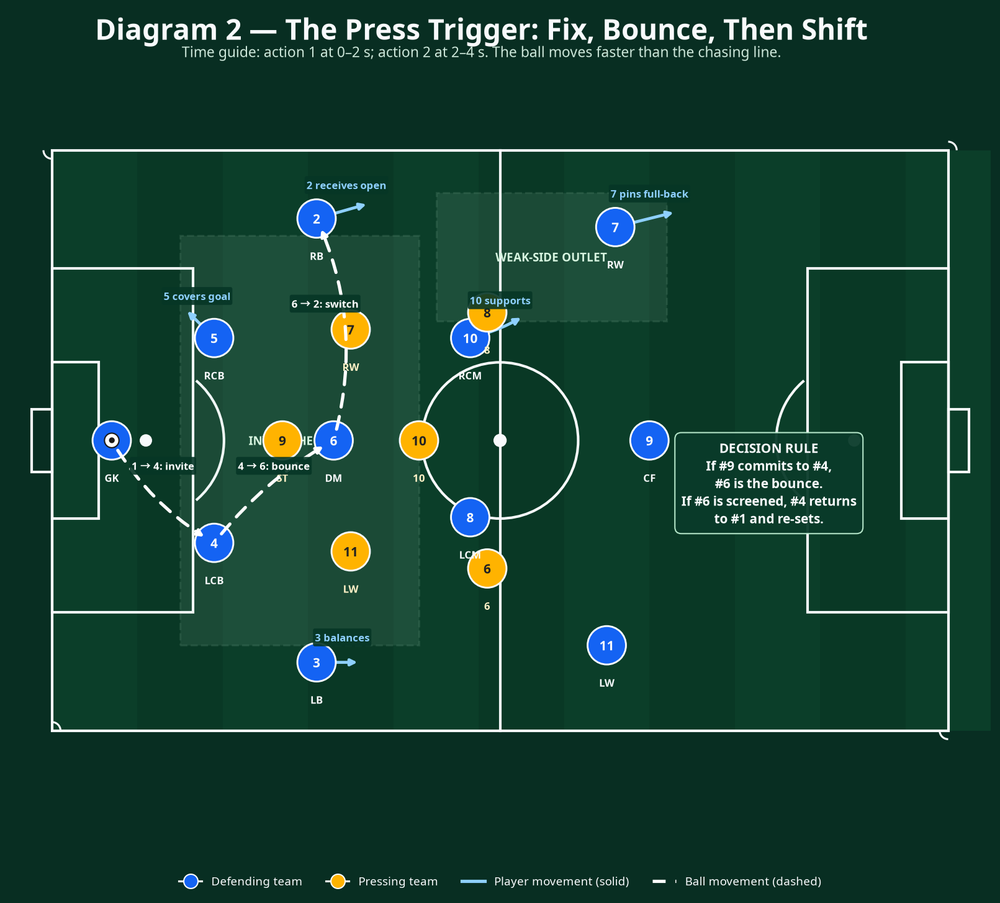
Invite, do not rush. #1 carries one or two metres to draw amber #9, then plays diagonally to #4. #4’s first touch goes forward and across the line to tempt #9 and the near winger, never into a blind alley. Demand a scan and an early call for the next action.
Use the bounce player. If amber #9 steps to #4 and #2 is screened, #4 plays firmly into #6. #6 receives on the half-turn or returns it first time. #5 drops slightly to preserve cover, while #3 stays connected to #4 and #5.
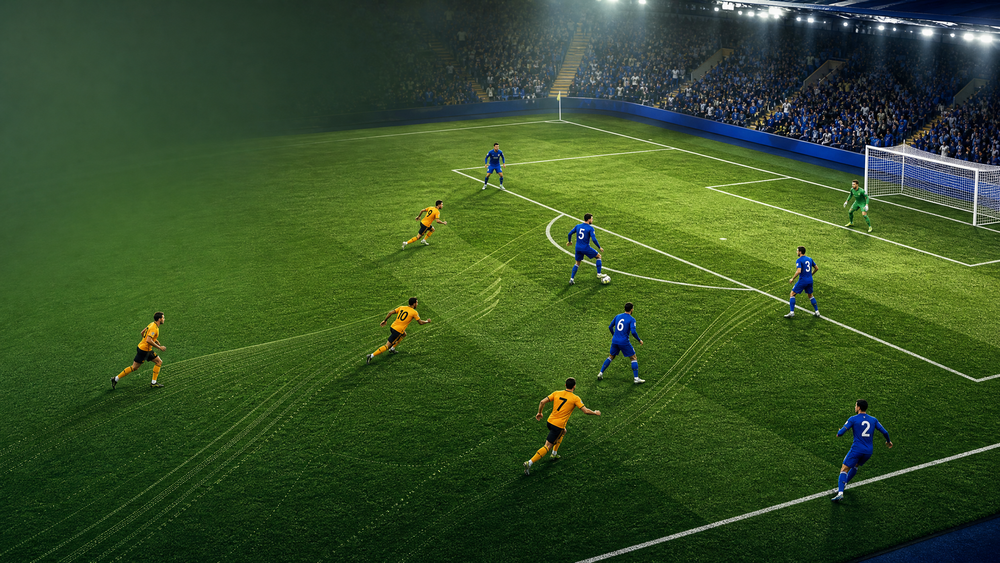
Shift the press, then play beyond it. #6 switches 20–30 m to #2’s front foot before amber #11 recovers. #2’s first touch goes up the line. As the ball travels, #10 shows at a 45-degree angle, #7 pins the full-back, and #9 occupies the centre-back.
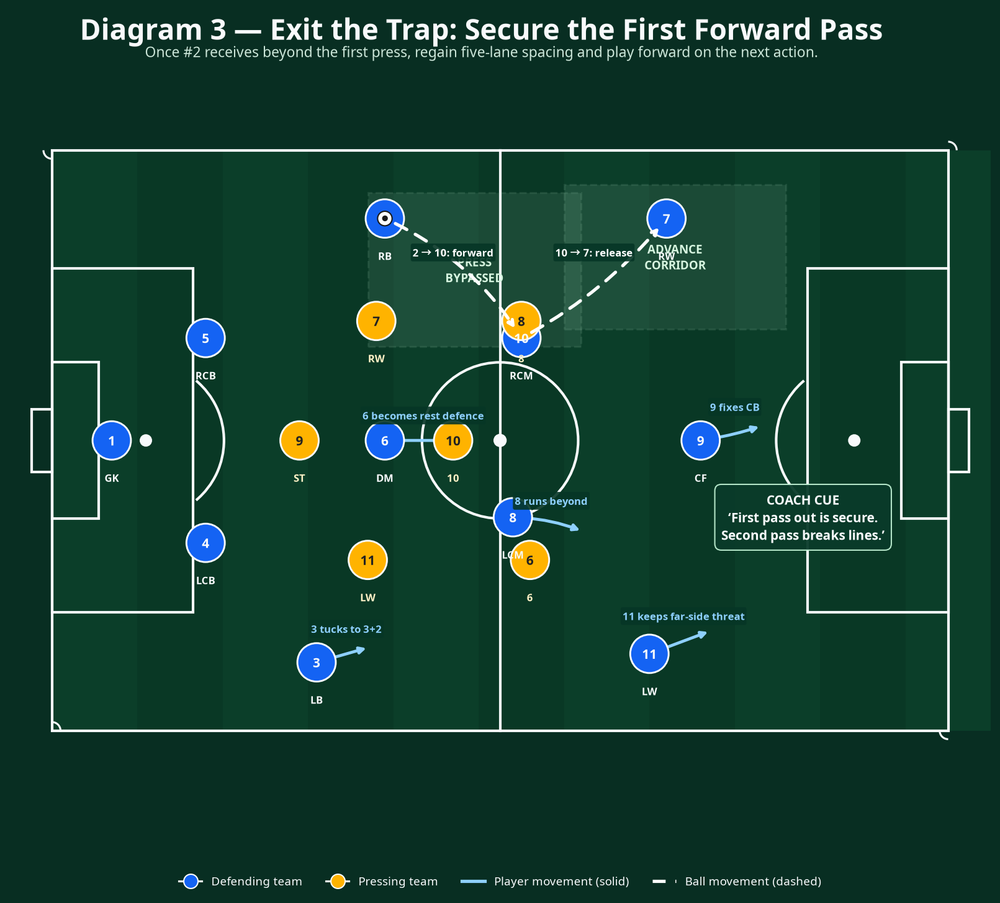
Make the first forward action secure. Once #2 escapes the first wave, find #10 inside or #7 outside. #10 receives facing forward where possible; if the central route is blocked, release #7 down the line. The next pass breaks a line or sets up a player who can.
Reset immediately if the exit is not clean. If #2 cannot receive open, #4 returns to #1 and the whole structure re-forms in three seconds. #1 switches to #5 and the pattern runs on the opposite side. This is success: blue have protected the ball and moved the opponents twice.
Finish with transition discipline. Award one point if blue find #7, #10, or #9 beyond the first line and cross halfway within eight seconds. If amber win it, they have six seconds to score. Blue #3, #4, #5, and #6 recover instantly into a compact 3+2.
Key Coaching Points
| Coaching point | What the coach should demand |
|---|---|
| Distances create time | Keep the first support triangle at 8–12 m. Too close invites one defender to press two players; too far slows the bounce. |
| Receive side-on | #4, #5, #6, and #10 must open their body before the ball arrives so the first touch can beat pressure, not merely survive it. |
| Use the goalkeeper as a free player | #1 stays active and 4–6 m from the goal line, offering the reset pass and calling the switch. |
| Fix the press before switching | Make at least one amber player travel toward the ball before changing the point of attack. A switch without attraction is merely a long pass. |
| Protect the centre on loss | #3, #4, #5, and #6 remain connected at 6–12 m. The team must be able to defend the first counter-pass. |
| Play the next action with purpose | Once #2 is free, the next pass goes forward to #10, #7, or #9. Escape is only valuable if the team can progress. |
Common Mistakes
The usual error is #6 hiding behind the opponent’s attacking midfielder. Move #6 two or three metres off the screen and demand a visible lane from the ball-side centre-back. A second error is the centre-back receiving square; insist on a front-foot touch that attracts pressure and opens the opposite lane.
Another problem is the far full-back moving early and arriving flat. #2 holds width until the ball reaches #6, then adjusts two or three metres forward to receive upfield. Finally, freeze #2’s receipt: #3 must already be tucked in, #5 must cover the far channel, and #6 must stop the first counter-pass.
Variations & Progressions
For an easier version, remove amber #8 and #6, use a 7v4 build-out, and allow #6 two touches. This gives younger players time to see the bounce pass. For a more demanding progression, add an amber defender behind the first press and limit #4, #5, and #6 to two touches; blue now score only when the first forward pass reaches #7, #11, or #9.
For the game-realistic version, begin from a coach-served turnover 5–10 m outside the penalty area. Blue must first regain a compact 3+2 shape, then execute the pattern under a live six-second scoring threat from amber. Rotate the side of the press and occasionally instruct amber to lock the switch; this tests whether #1 and the centre-backs can recognise the return-to-goalkeeper reset.
Age Adaptations
| Age band | Adaptation | Non-negotiable learning outcome |
|---|---|---|
| Under-8 to Under-10 | Use 5v3 or 6v4 in a 35 m × 25 m area; replace positional numbers with goalkeeper, defenders, and wide player. | Players spread out, show sideways, and use the goalkeeper safely. |
| Under-11 to Under-13 | Use 8v5 on a 55 m × 42 m area; introduce #1, #4, #5, #6, and one wide outlet. | Players recognise the bounce pass and switch after attracting pressure. |
| Under-14 to Under-16 | Use the full 11v6 framework on two-thirds to full pitch; add touch limits and live counter-goals. | Players protect the centre while playing the second action forward. |
| Open age | Train against the opponent’s actual press, including their trigger and marking scheme. | Players solve the press with clear role ownership and game-speed communication. |
End with three uninterrupted two-minute games. At the break, ask: “Who made the press travel, where was our free player, and were we protected if the pass failed?”
