

Football
Football Free Kick Wall & Delivery Play: Disguise, Lift and Far-Post Finish
Teach a repeatable 22–25 m free-kick routine that disguises the direct strike, manipulates the wall, and adds a short-release far-post delivery when the central lane is blocked.

What you need
1 full-size goal, 12-16 footballs, 30 flat discs or cones, 2 mannequins or poles, bibs, stopwatch, tactical board
Football Free Kick Wall & Delivery Play: Disguise, Lift and Far-Post Finish
Overview
This two-picture attacking free-kick package gives a coach a direct route over the wall and a short-release route around it. The starting picture remains the same: #10 stands over the ball, #7 looks like a second taker, and three runners wait on the edge of the box. The direct option makes the wall and goalkeeper react to #7 before #10 strikes above the outside shoulder. The variation uses the same disguise, then releases #7 wide for a delivery into near, central and far-post zones.
Use it when the ball is 22–25 m from goal, central or up to 5 m off-centre, and the opposition has time to construct a wall. Rehearse in the final 35 m of a full pitch; international-match reference dimensions are 100–110 m x 64–75 m.2 Opponents must remain at least 9.15 m from the ball, and attackers must remain at least 1 m from a defending wall of three or more players until the ball is in play.1
Setup
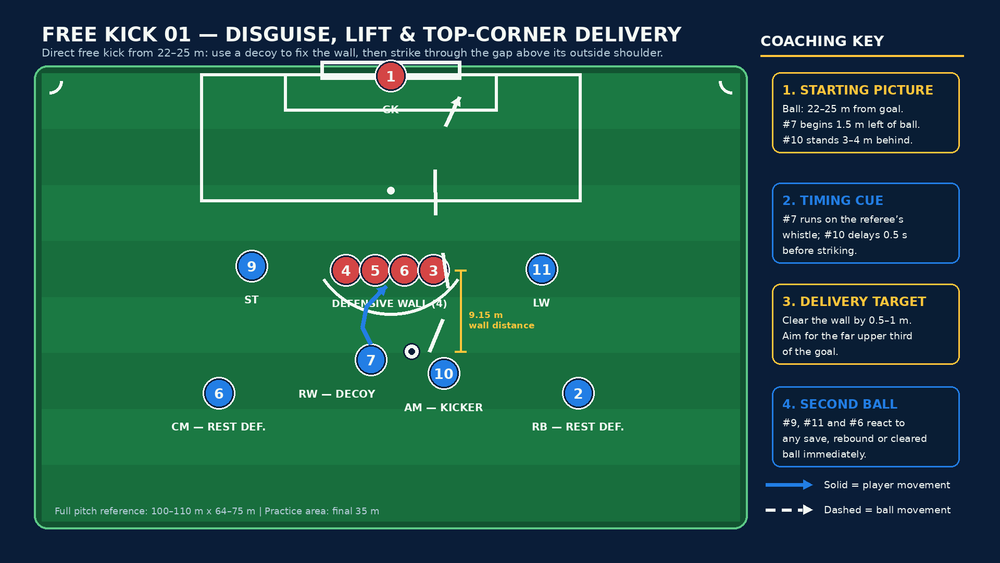
Use 16 players: eight attackers, seven defenders including a goalkeeper, and one feeder or ball-recovery player. You need a full-size goal, 12–16 balls, flat discs, bibs, a stopwatch, and two mannequins or poles if a full wall is unavailable. Mark the ball spot 22–25 m from the centre of goal. For a right-footed direct taker, place it 3–5 m left of centre so the ball can curl to the far upper corner; reverse the picture for a left-footer.
Set a four-player wall at 9.15 m. Put #10 (AM) 3–4 m behind the ball and #7 (RW) 1.5 m to its side as the decoy. Place #9 (ST) at the near lane, #8 (CM) centrally, and #11 (LW) in the far lane. Keep #6 (holding midfielder) and #2 (right back) in a staggered rest-defence line 8–12 m behind the ball to secure the first clearance.
| Element | Exact set-up | Coach check |
|---|---|---|
| Ball | 22–25 m from goal, 0–5 m off-centre | Can #10 see the far upper third? |
| Wall | Four defenders, 9.15 m from ball | Is the outside shoulder exposed? |
| Takers | #7 1.5 m aside; #10 3–4 m behind | Is #10's approach 35–45 degrees? |
| Runners | #9 near, #8 central, #11 far | Are they ready to run in sequence? |
Step-by-Step Instructions

Direct option: disguise, lift and top-corner delivery

Show the same picture. #10 adopts a calm, open stance behind the ball. #7 stands close enough to look dangerous, but does not creep toward the wall. #9, #8 and #11 hold their runs; early movement tells the goalkeeper what is coming.
Set the target. #10 identifies the wall's outside shoulder and the far upper third. The intended flight clears the wall by 0.5–1 m, then drops beneath the crossbar inside the far post.
Trigger the decoy. On the whistle, #7 makes a curved 4–5 m run across the ball. Coach a genuine shooting action: chest over the ball, arms set, and a final long stride. #7 does not touch the ball.
Delay the strike. #10 waits about 0.5 seconds after #7 passes the ball, then approaches at 35–45 degrees. This half-beat is the key detail: it makes the wall jump and makes the goalkeeper reset.
Deliver with intent. #10 plants beside the ball, locks the ankle, and strikes the lower outside quadrant with the instep. The cue is: "Through the ball first, shape it second." A right-footer from the left curls toward the top-right corner; reverse the mechanics from the other side.
Own the second phase. #9 attacks the near rebound lane, #8 arrives around the penalty spot, and #11 runs late toward the far-post lane. #6 and #2 stay connected until the clearance is controlled. Train three seconds of reaction after every strike.
Variation: short release and far-post delivery
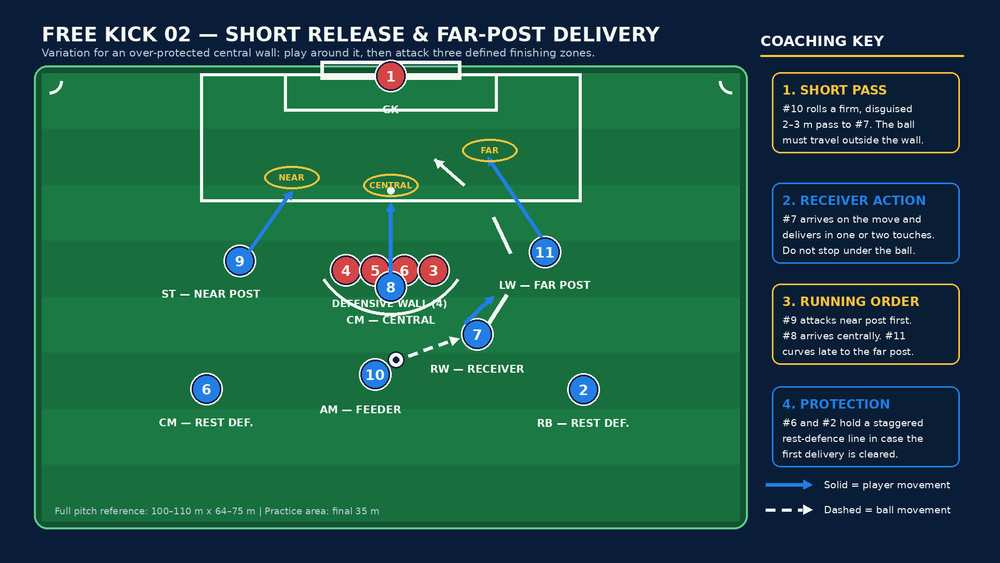
Keep the identical direct-kick picture so the wall and goalkeeper prepare for the strike. #7 begins just outside the wall's end player.
#10 rolls a firm, disguised 2–3 m pass to #7, outside the wall. The ball must arrive in front of #7's stride, not behind it.
#7 receives forward and delivers in one or two touches. #9 runs first to the near-post lane, #8 follows to the central zone around the penalty spot, and #11 curves late behind the far-side defender.
Name the delivery target before each repetition: near-post flick, central finish, or far-post finish. #6 and #2 keep the counterattack protected while one presses the loose ball and the other guards the central outlet.
Key Coaching Points

| Coaching point | Head-coach cue | Desired picture |
|---|---|---|
| Starting-picture discipline | "Look the same until the signal." | Direct and short options cannot be read early. |
| Decoy quality | "Run to strike, not to decorate." | #7 moves the wall and goalkeeper. |
| Half-beat timing | "Decoy—wait—strike." | #10 strikes after the wall commits. |
| Delivery height | "Clear by a metre, dip under the bar." | A descending ball reaches the far upper third. |
| Run order | "Near, central, far." | The box is attacked on three separate lines. |
| Rest defence | "Two behind the ball, connected." | The first counterattack is delayed or stopped. |
Common Mistakes

| Error | Why it fails | Immediate correction |
|---|---|---|
| #7 runs early or without shooting body shape | The wall has time to reset. | Restart from the cue: "Whistle, then go." |
| #10 follows the decoy immediately | The wall blocks a predictable shot. | Count the delay aloud: "Decoy—wait—strike." |
| The ball is aimed through the wall | It is low-percentage and easy to see. | Place a cone above the outside shoulder as a flight guide. |
| All runners arrive together | The delivery zone becomes crowded. | Rehearse #9, then #8, then #11 without a ball. |
| #6 and #2 chase the shot | A blocked ball becomes a counterattack. | Freeze and reset the rest-defence line. |
Variations & Progressions
Begin unopposed with a fixed target cone above the wall and no box runners. Once #10 can create the required height and curve, add a static wall, goalkeeper and three timed runners. Progress to a live wall and award the defence a point for a clean first clearance; award the attack two points for a goal and one for a strike on target that clears the wall.
For an advanced decision-making progression, let the goalkeeper choose the wall position and add a sixth defender at the top of the box. The attackers have five seconds to call direct or short. Add a third variation only after the first two are reliable: #7 leaves the ball and #10 slips #8 around the wall while #11 maintains the far-post run.
Age Adaptations
| Age group | Adaptation | Priority |
|---|---|---|
| Under 8–10 | Ball 14–18 m out; no jumping wall; one target zone. | Balanced approach and safe striking. |
| Under 11–12 | Ball 18–22 m out; three-player wall; one decoy. | Decoy timing and target-side recognition. |
| Under 13–14 | Full 22–25 m routine with goalkeeper and rebound runners. | Delayed strike, legal spacing and recovery. |
| Under 15–16 and open age | Live defence, tactical call selection and transition scoring. | Disguise, decision-making and rest defence. |
Session Delivery Notes
Run the practice for 32 minutes: 6 minutes of unopposed technique, 10 minutes with wall and goalkeeper, 10 minutes of live decision-making, and 6 minutes of competitive repetition. Keep spare balls at the restart point for 12–16 quality reps. Finish by asking the unit to name its direct trigger, short trigger and first player responsible for the second ball. If the players cannot describe the picture, they will not recognise it under pressure.
