Far-Post Free Kick: Wall, Screen and Curled Delivery
Train a repeatable right-sided free-kick routine that manipulates the defensive wall, protects the second ball and delivers an attacking runner into the far-post corridor.

Equipment Needed
Overview
This is an attacking direct-free-kick routine for a right-sided position, 25–28 m from goal and 8–12 m to the right of the centre line. It gives the taker, #10, a clear far-post target while the run of #9, the legal screens from #4 and #5, and the delayed sprint from #7 disrupt the keeper’s view and the defenders’ reference points. It is especially useful against a four- or five-player wall that protects the near-post side and a goalkeeper who starts aggressively towards the line of the ball.
The intended delivery is a curled, in-swinging ball that drops 1–2 m beyond the far post, where #7 attacks facing goal. #6 secures the second ball and #2 protects the counterattack. Use a full pitch sized 100–110 m × 64–75 m when possible, but train initially on a 70 m × 68 m final-third canvas.
| Role | Starting reference | Primary job |
|---|---|---|
| #10 Attacking midfielder | Ball, 25–28 m from goal | Deliver with pace, curl and height into the far-post corridor. |
| #8 Central midfielder | 2–3 m left of the ball | Sell a strike, then clear the taker’s line with a decoy approach. |
| #9 Centre forward | Level with the penalty spot | Make the first, near-post run to unbalance markers and screen the keeper’s sightline. |
| #4 and #5 Centre backs | 1–2 m in front of the wall | Occupy space side-on; screen without holding, blocking or impeding. |
| #7 Right winger | 3–4 m outside the far-post lane | Delay, accelerate through the target corridor and head/volley on the run. |
| #6 Defensive midfielder / #2 right back | Top of box / 8–10 m deeper | Secure the clearance and prevent the counterattack. |
Setup
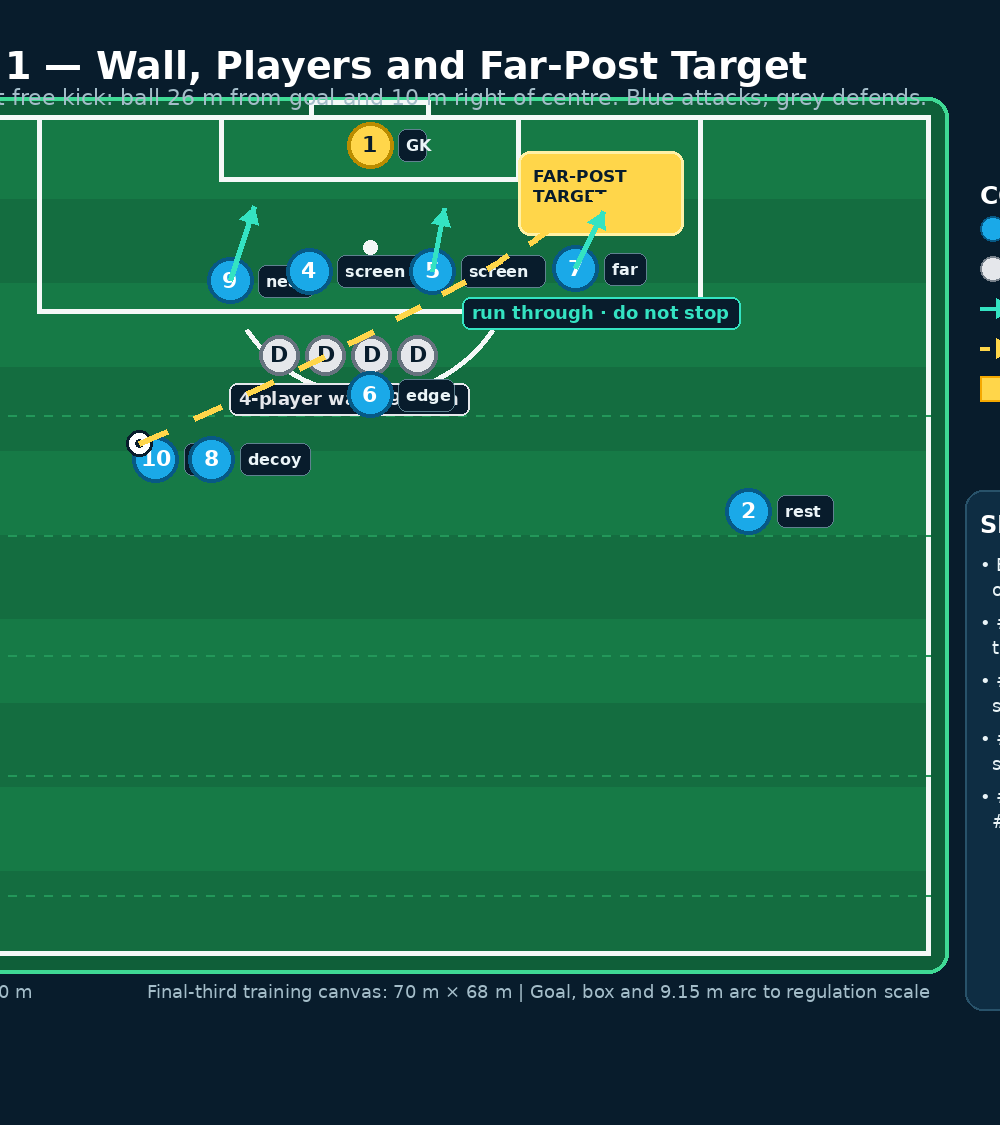
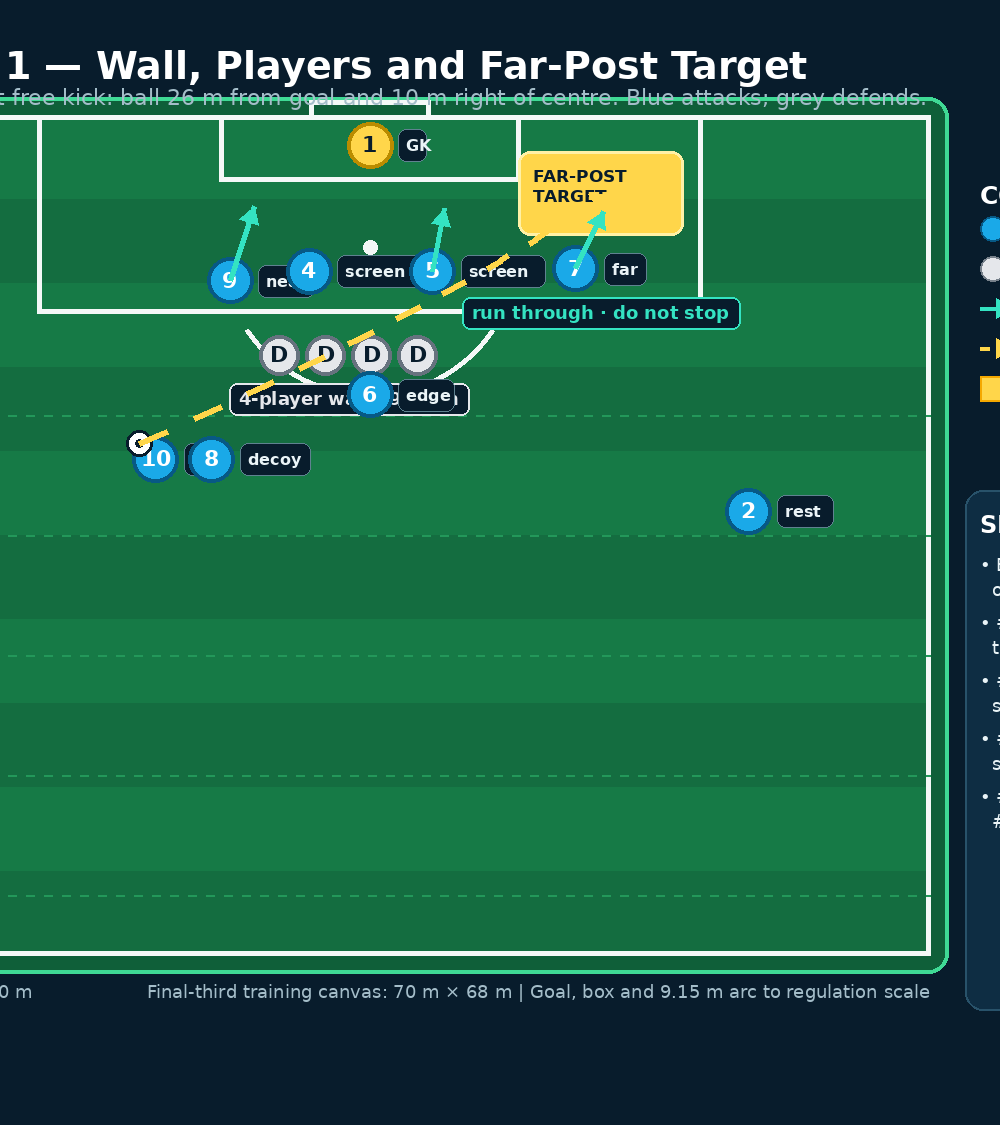
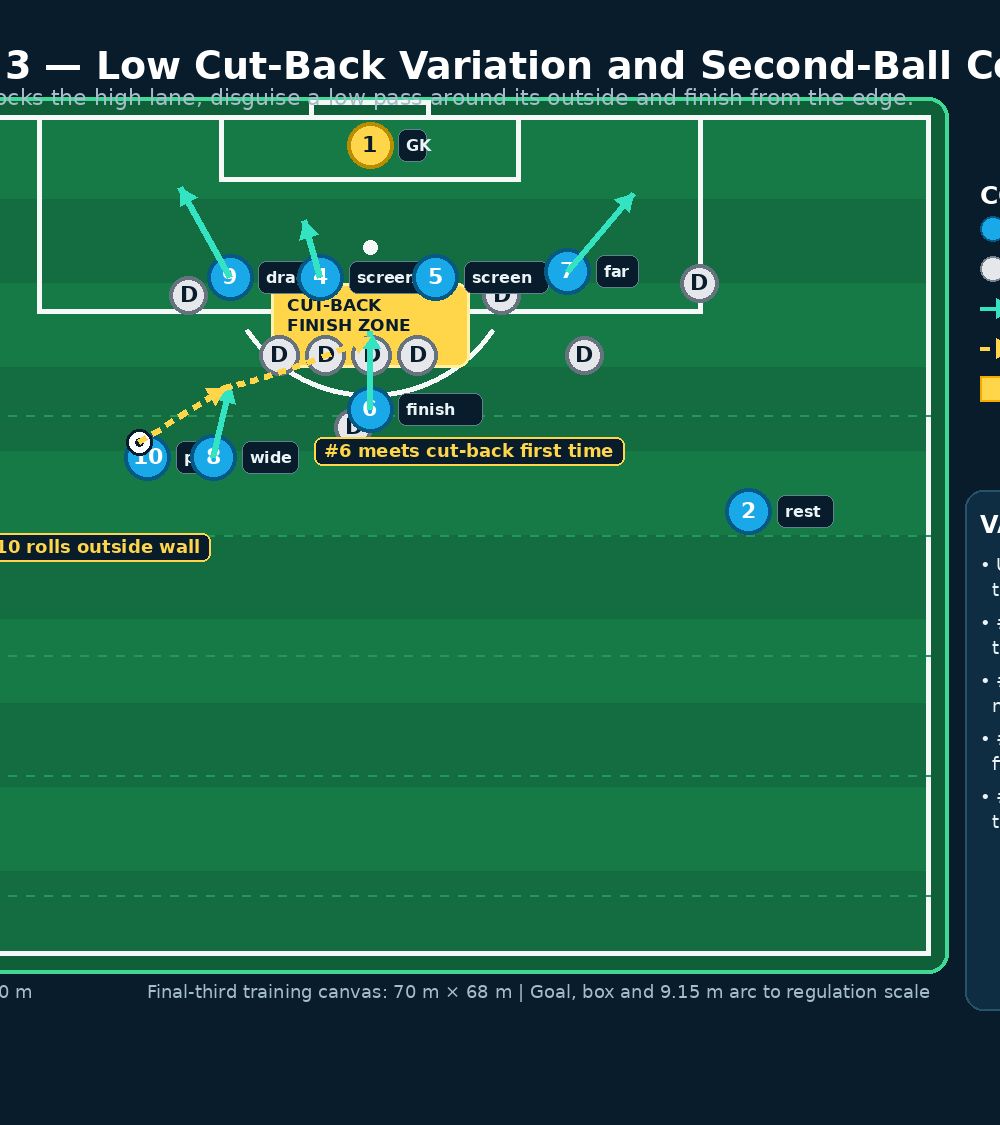
Mark a right-sided free-kick spot 26 m from the goal line and roughly 10 m from the centre of the goal. Use a full-sized goal, a goalkeeper, one ball at the restart point and a flat line of four defenders at least 9.15 m from the ball. Put cones at the far-post target corridor: start it about 1 m outside the far post and make it 6–7 m deep towards the penalty spot. The server should be able to reset balls quickly; eight to ten footballs keeps the block moving.
Use 11 attackers if available and add three passive or live defenders inside the box beyond the wall. Preserve a realistic final-third space: the taker’s approach, ball flight and counter-press distances must resemble the match.
Step-by-Step Instructions
Build the picture before the run-up. #10 places the ball and checks that #7 can see the far-post corridor. #9 begins level with the penalty spot, #4 and #5 stand 1–2 m in front of the wall, and #6 positions himself 18–20 m from goal, central to the likely clearance. #2 stays 8–10 m deeper and slightly inside, ready to stop a direct counter.
Set the starting body shapes. #10 opens his approach at approximately 35–45 degrees to the ball, so he can strike across it with the instep. #8 stands 2–3 m to the left of the ball and shows a convincing body angle for a potential strike. In the box, #4 and #5 should be side-on, mobile and hands-off; they are creating uncertainty, not committing a foul.
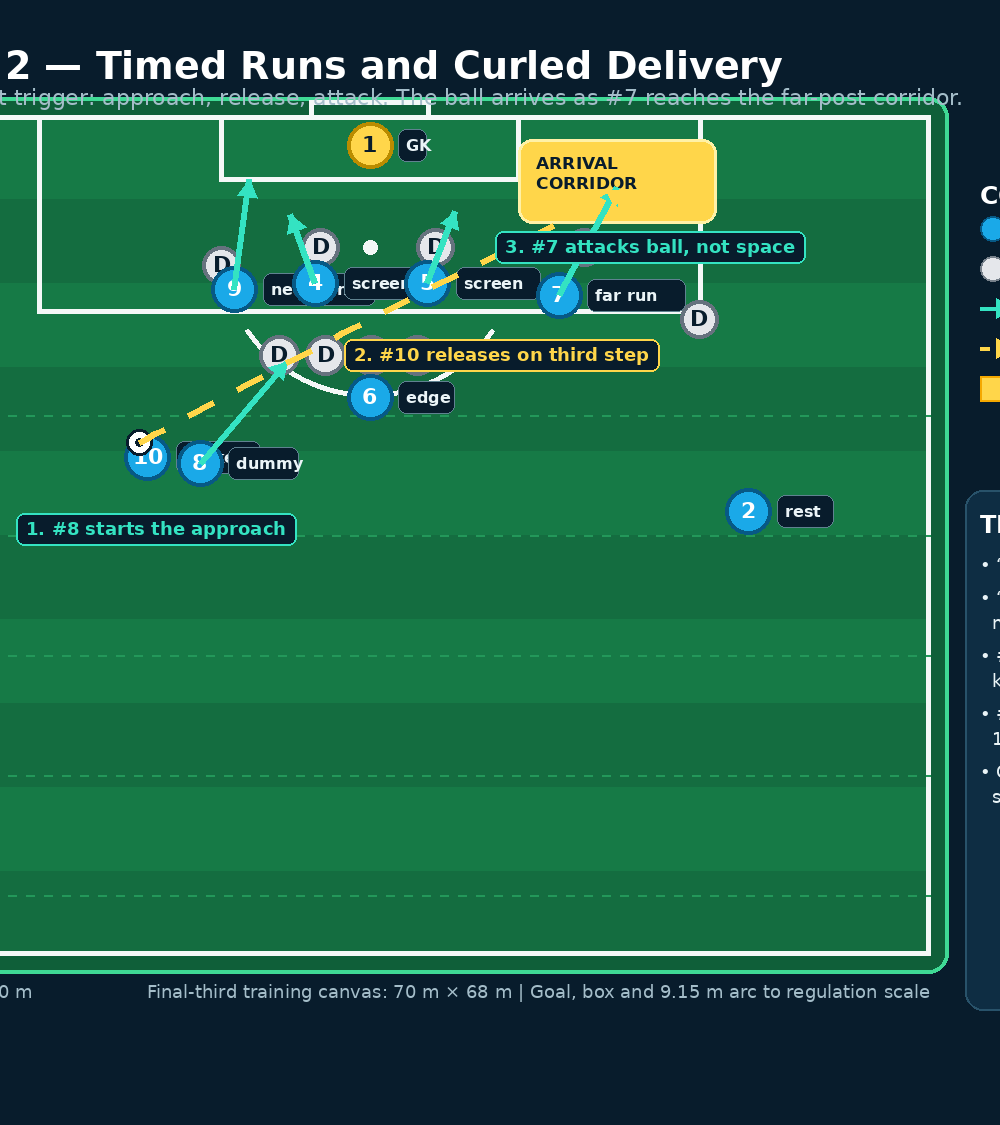
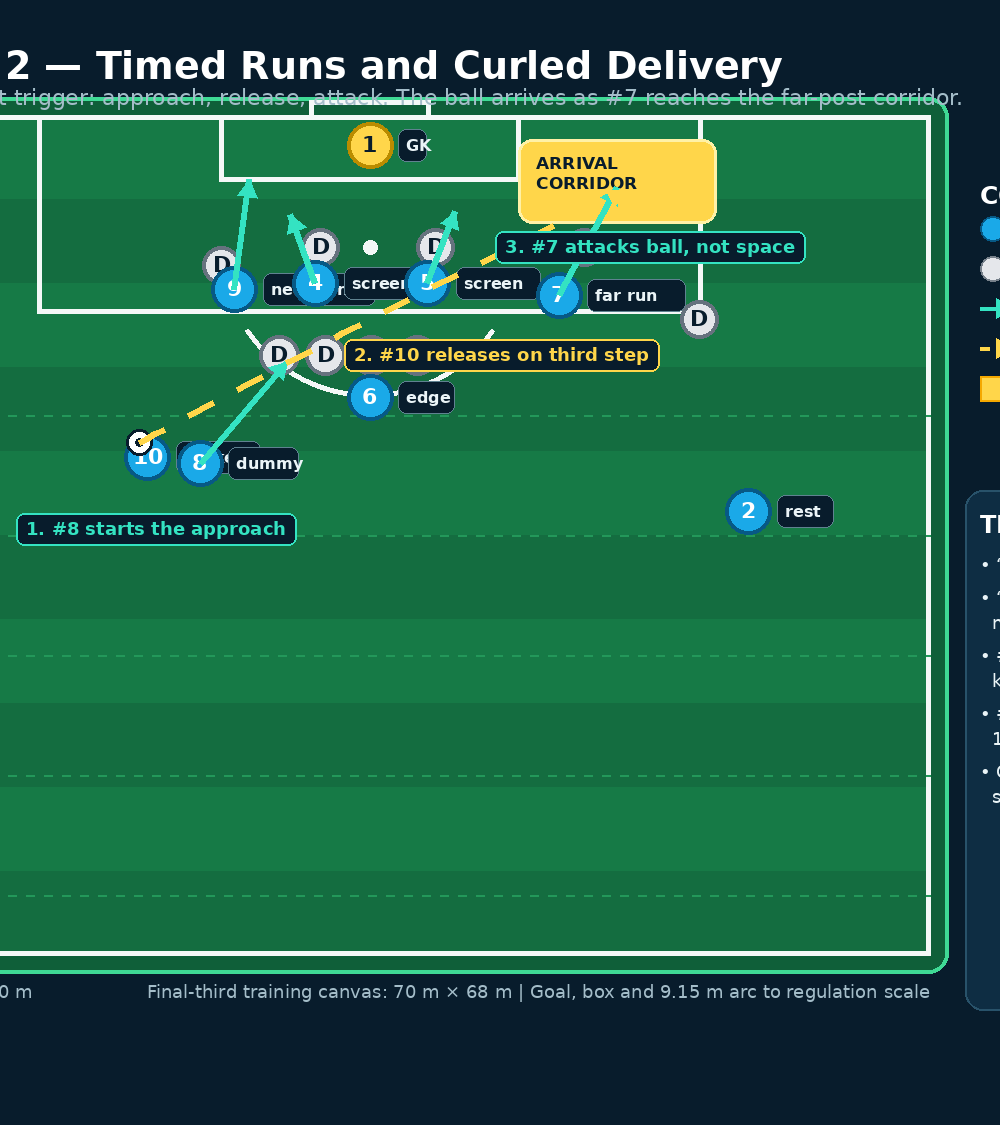
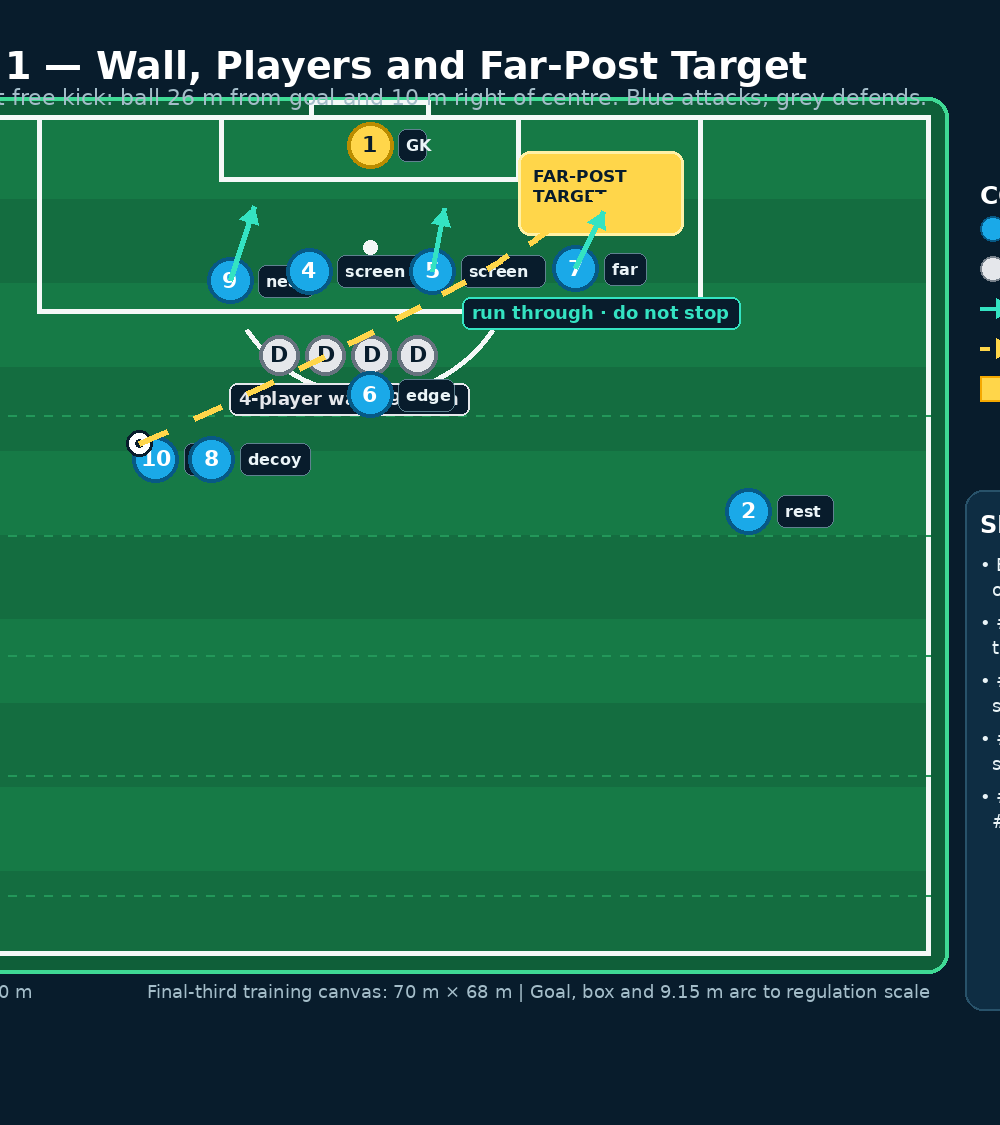
Use the three-count trigger. On the coach’s call of “set”, every runner is still and balanced. On “go”, #8 moves first with a two- or three-step decoy approach. As #8 clears the ball, #9 starts sharply toward the near-post line. This first movement must be purposeful enough to pull a defender and make the goalkeeper make a decision.
Release the delivery at the right moment. #10 takes the final two approach steps as #9 crosses the goalkeeper’s line of sight. He strikes with a firm ankle and wraps the foot around the outside-lower half of the ball. The desired ball travels over or around the outside shoulder of the wall, then bends toward the far-post corridor. Coach the delivery to arrive around chest-to-head height for the runner, rather than hanging above the six-yard box.
Attack the ball, not the painted zone. #7 waits until #10’s striking foot starts forward, then accelerates late. The winger’s final run is diagonally inwards, through the far-post corridor and towards goal. #7 should meet the ball at pace and finish with a controlled header back across the goalkeeper, a guided volley, or a cushioned return into the central six-yard area.
Play the second action immediately. If the defence clears the first ball, #6 arrives onto it rather than waiting underneath it. His first look is a first-time shot or recycled cross; his second is a secure pass back to #2 if the counter is live. Every attacker reacts for five seconds after the delivery. This makes the set play a complete phase, not a single cross.
Key Coaching Points
1. Give the delivery a named address
Use far-post corridor: one metre beyond the post, six metres deep. Precise language lets #10 and #7 judge each repetition together.
2. Synchronise late, not early
#9 initiates the disturbance, but #7 is the late runner. The ball and #7 should arrive in the same second.
3. Screen legally and stay playable
#4 and #5 stay hands-down and side-on. They occupy a line of travel and narrow the keeper’s view; stop the action if a screen becomes a block.
4. Coach the ball flight before the finish
The ball needs pace to beat recovery and enough curl to move away from the keeper. Give #10 three clean technical repetitions before adding pressure.
5. Protect the team when it breaks down
#6 starts half-open at the edge, able to see ball and opponent; #2 stays goal-side. Both positions remain fixed until the delivery has been dealt with.
Common Mistakes
| What coaches see | Why it fails | Immediate correction |
|---|---|---|
| #7 leaves before #10 starts the final stride. | Markers track the run and the target is occupied too soon. | Make #7 freeze until the taker’s kicking leg begins to travel forward. |
| The delivery lands on the goalkeeper’s line. | The keeper sees it early and can claim unchallenged. | Move the target cone one metre wider and demand a longer far-post flight. |
| #4 or #5 makes contact with a marker. | The routine risks a foul and loses its tactical purpose. | Rehearse side-on movement with hands visible and a clear exit route. |
| Everyone chases the first contact. | A clearance creates an unprotected central counterattack. | Lock #6 at the edge and #2 in rest defence for every repetition. |
| #10 tries to beat the wall directly from every ball. | The team becomes predictable and #7 is removed from the play. | Score the practice for far-post arrivals and second balls, not only direct goals. |
Variations & Progressions
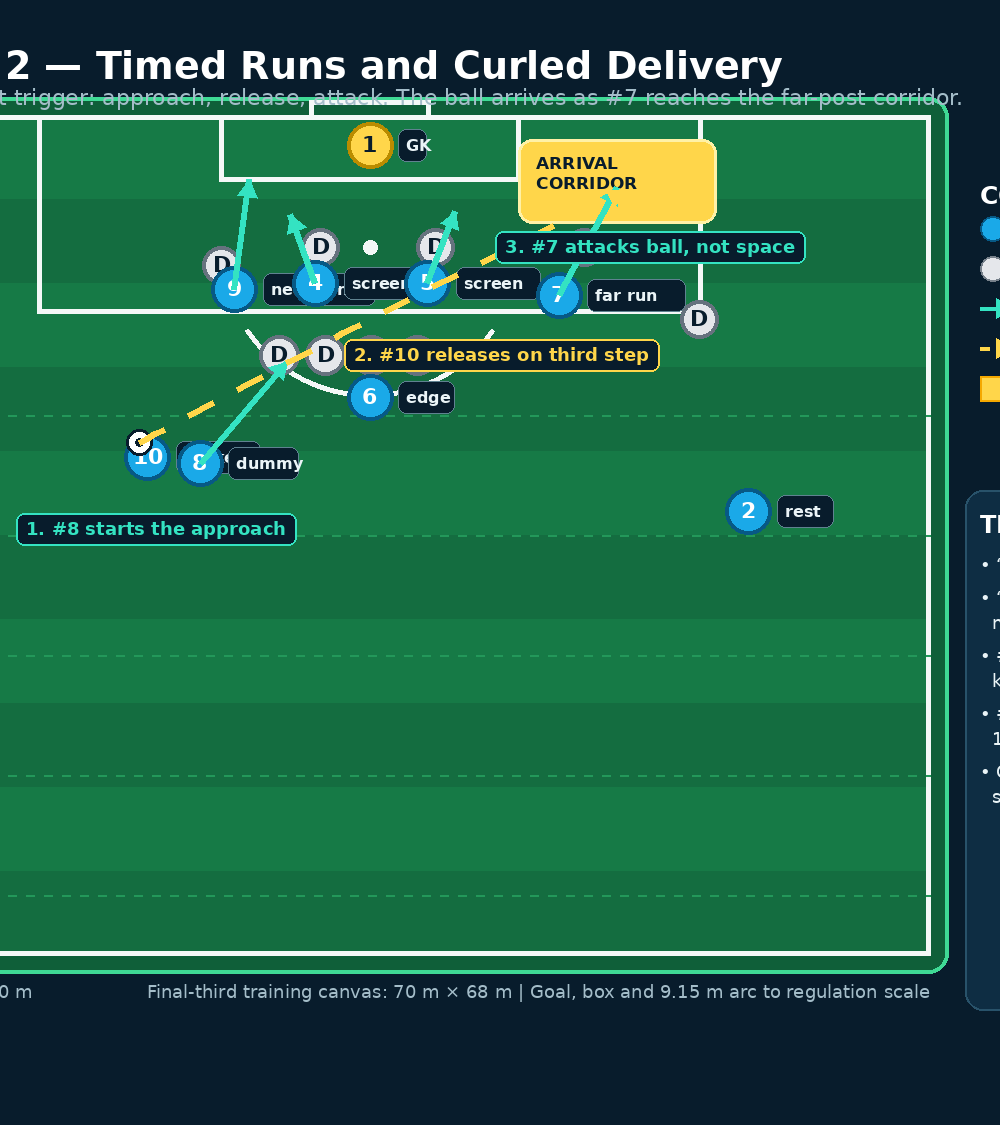
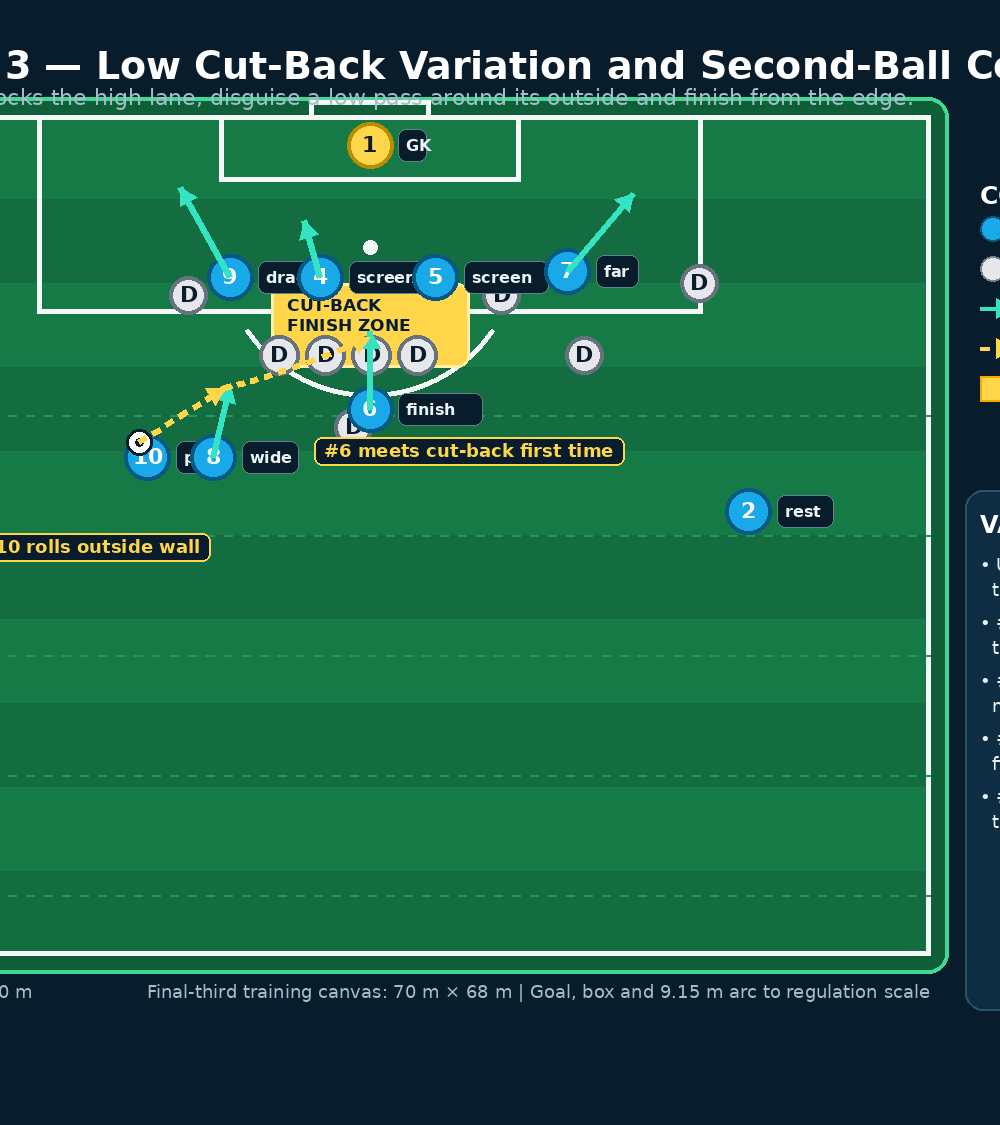
Variation 1: Low cut-back around the wall. Use this when the opponent overprotects the far post or leaves the outside of the wall open. #10 rolls the ball into #8’s path outside the wall. #9 still drags the near-post marker, but #8 drives one touch forward and cuts the ball back to #6 arriving centrally for a first-time finish. The central finish zone is 14–21 m from goal, directly beyond the wall.
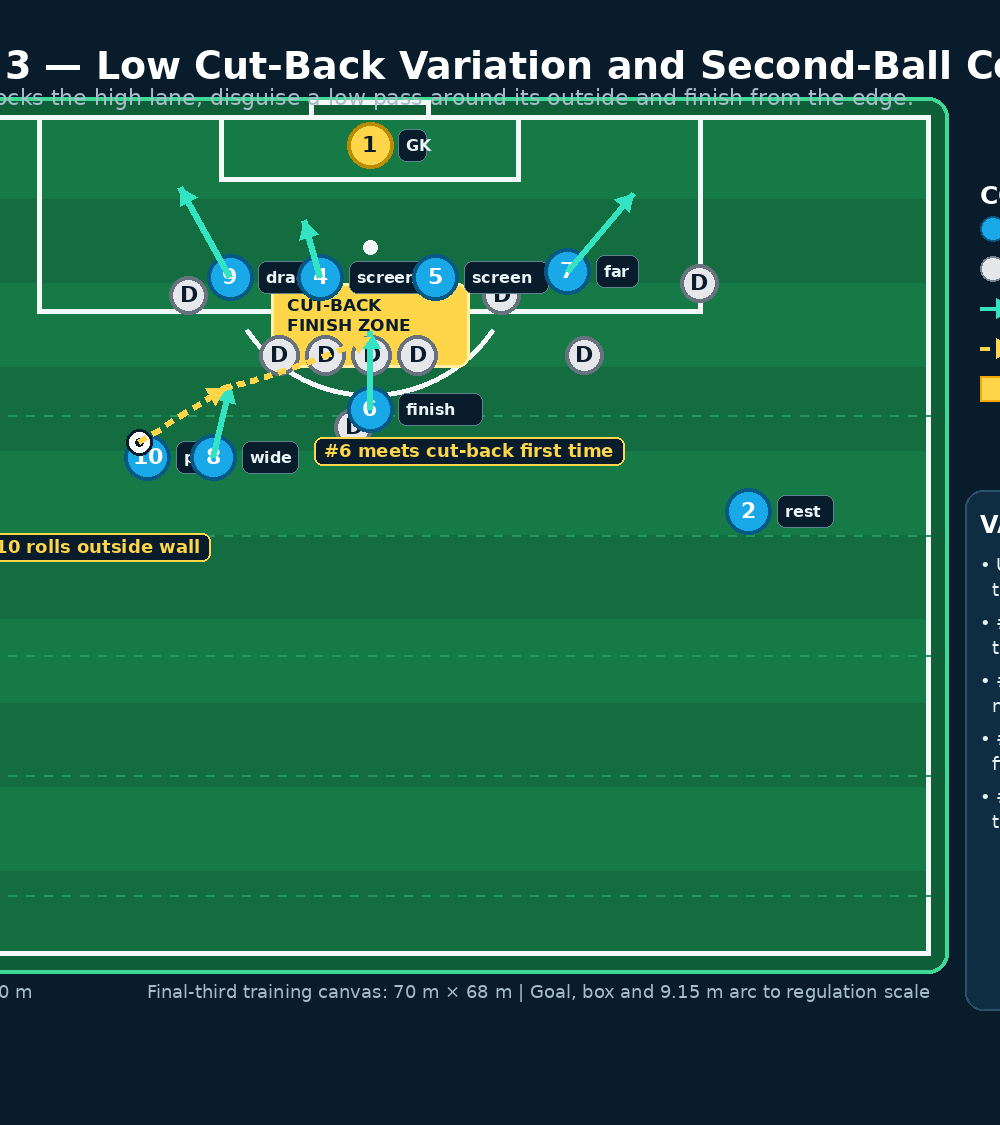
Variation 2: Direct near-post disguise. Keep the same starting picture and ask #7 to make the far-post run. If the goalkeeper shifts early to protect the far lane, #10 can whip a flatter ball between the outside edge of the wall and the near post. The team must only call this after #10 has shown two or three far-post deliveries in the game.
Progression: Live pressure and transition score. Begin with a passive wall and no markers, then introduce live defenders in the box. Finally, give the defending team a small target gate 30 m from goal: if they clear through it, they receive a point. Award the attacking team two points for a first contact in the far-post corridor, one for a controlled second ball, and three for a goal. This keeps the routine honest under transition pressure.
Age Adaptations
For Under-8 and Under-10, remove formal screening, use a 15–20 m free kick and a three-player wall. Give #10, #9 and #7 one action each, enlarge the target and allow one bounce.
For Under-12 and Under-14, use 20–24 m, a four-player wall and the three-count trigger. Add #6 for the second ball and teach that screens are positional, not physical.
For Under-16 and open age, use the full 25–28 m version with a live goalkeeper, markers, offside awareness and a transition consequence. Mirror it from the left side with the suitable striking foot.
Coach’s Session Management
Run three blocks: six unopposed deliveries, six semi-opposed timing repetitions and eight live repetitions with transition. After every two balls, ask #10 and #7: “Where did it arrive?” and “Did you arrive with it?” Use their answer to correct technique or timing, then let players call the variation from the defensive picture.

