Football
Pressing Trigger and Recovery Drill: Square Pass to Wide Trap
Train your team to recognise the square-pass trigger, execute a coordinated wide trap, and rapidly recover their defensive shape if the initial pressure is broken.

What you need
18–22 footballs, 16 flat markers or cones, 2 sets of bibs, 1 full-size goal, 2 mini-goals, stopwatch and whistle
Pressing Trigger and Recovery Drill: Square Pass to Wide Trap
Session message: win the next pass together; if the press is beaten, recover inside the ball together.
1. Overview
This 30-minute intermediate defensive drill teaches players to recognise the square pass as a shared pressing trigger, funnel play into a wide trap, and rebuild a compact block when the opponent escapes. Use it in the main tactical block of the week, especially when preparing to face a team that builds with centre-backs, a No. 6 and advancing full-backs.
The key shift is from “go and press” to “press with a purpose.” The first presser makes the next pass predictable, the second and third players close obvious routes, and the players behind squeeze the pitch. If Blue play through the trap, Red do not chase the mistake: the nearest player delays and the rest recover centrally before re-engaging.
2. Setup
Use a 105 m × 68 m full-pitch reference, which lies inside the 100–110 m by 64–75 m international-match range set out in Law 1.1 Mark a 70 m × 52 m live area, with a 10 m wide trap channel beside each touchline. Blue build from the left-hand goal; Red counter to two mini-goals at the far end.
| Element | Coach’s specification |
|---|---|
| Players | Full version: 22 players and two goalkeepers. Use 9v9 plus GKs by removing a far-side winger and centre-back from each team. |
| Shapes | Blue 4-3-3: Nos. 4/5 at centre-back, No. 6 as pivot. Red 4-2-3-1 or 4-3-3: No. 9 leads, Nos. 7/11 press wide, Nos. 6/8/10 cover inside. |
| Recovery rule | Put a cone line 5 m inside Red’s half. When the press is broken, Red have five seconds to get behind the ball or inside the ball. |
| Equipment | 18–22 balls, 16 flat markers, two bib colours, one full-size goal, two mini-goals, stopwatch and whistle. |
| Work:rest | Run 4 × 4 minutes, with 90 seconds to coach and restart between bouts. |
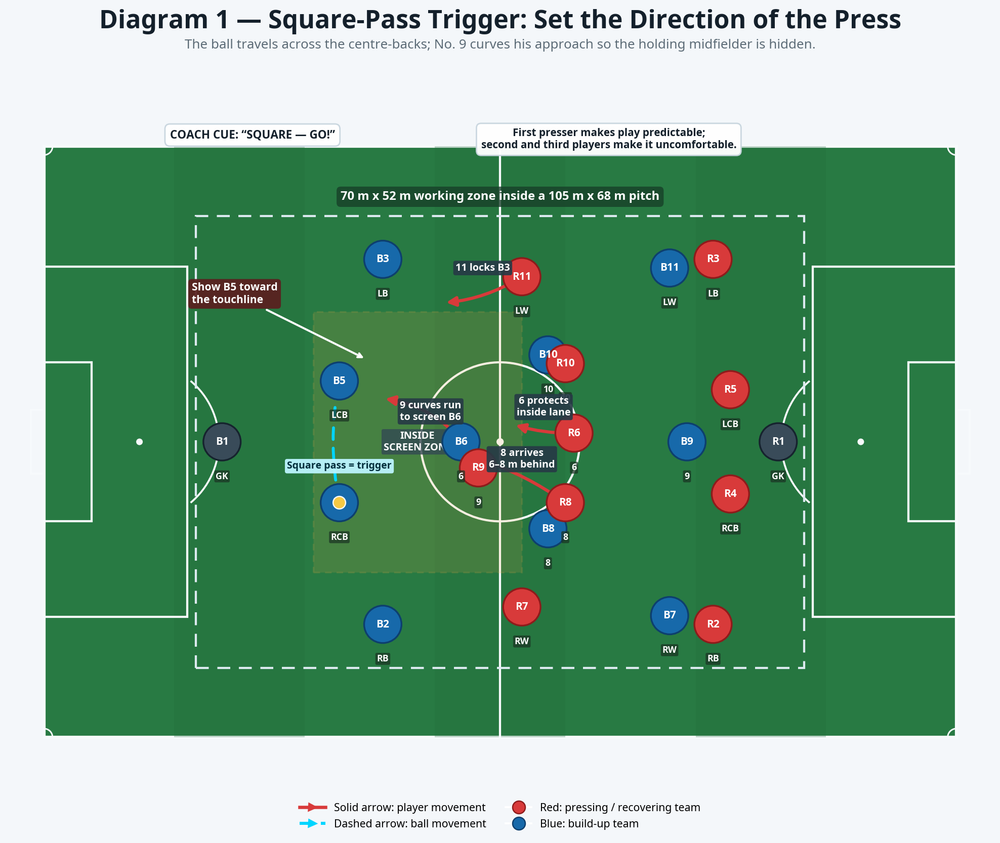
Start Blue with No. 1, both centre-backs, the ball-side full-back, No. 6 and ball-side No. 8 or winger. Red begin in a compact mid-block: No. 9 central, ball-side winger tucked in, No. 8 8–10 m behind the front line, No. 6 screening central space, and the ball-side full-back ready to squeeze.
3. Step-by-Step Instructions

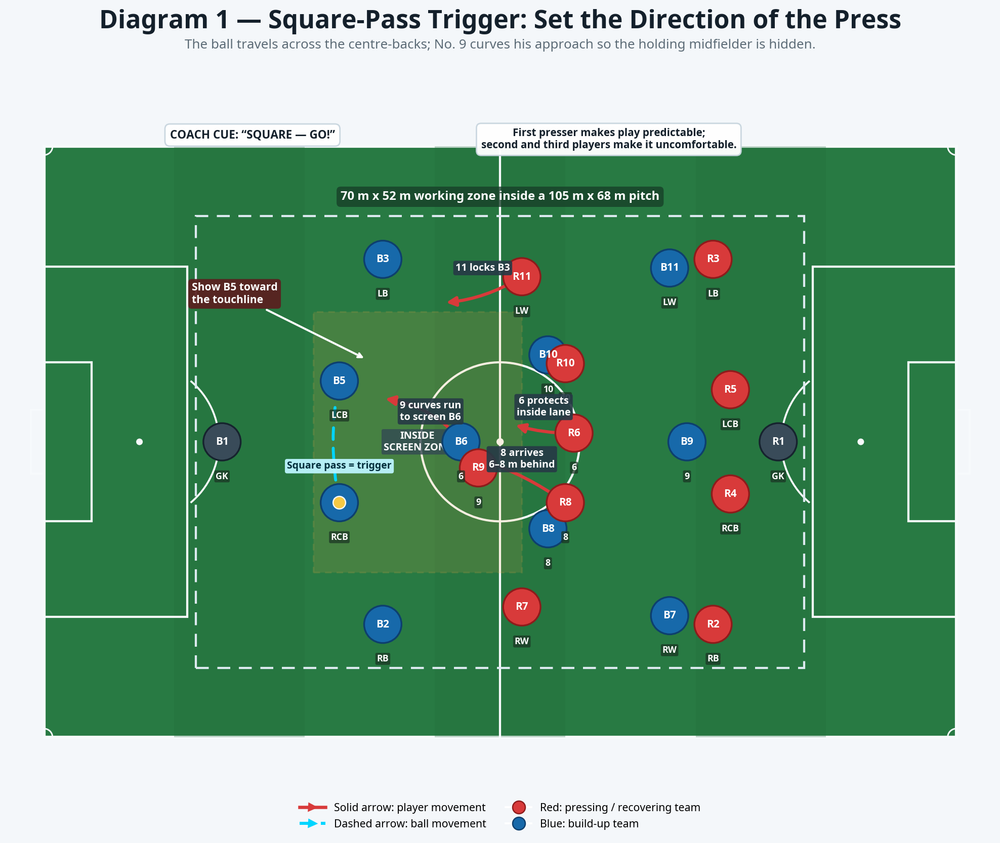
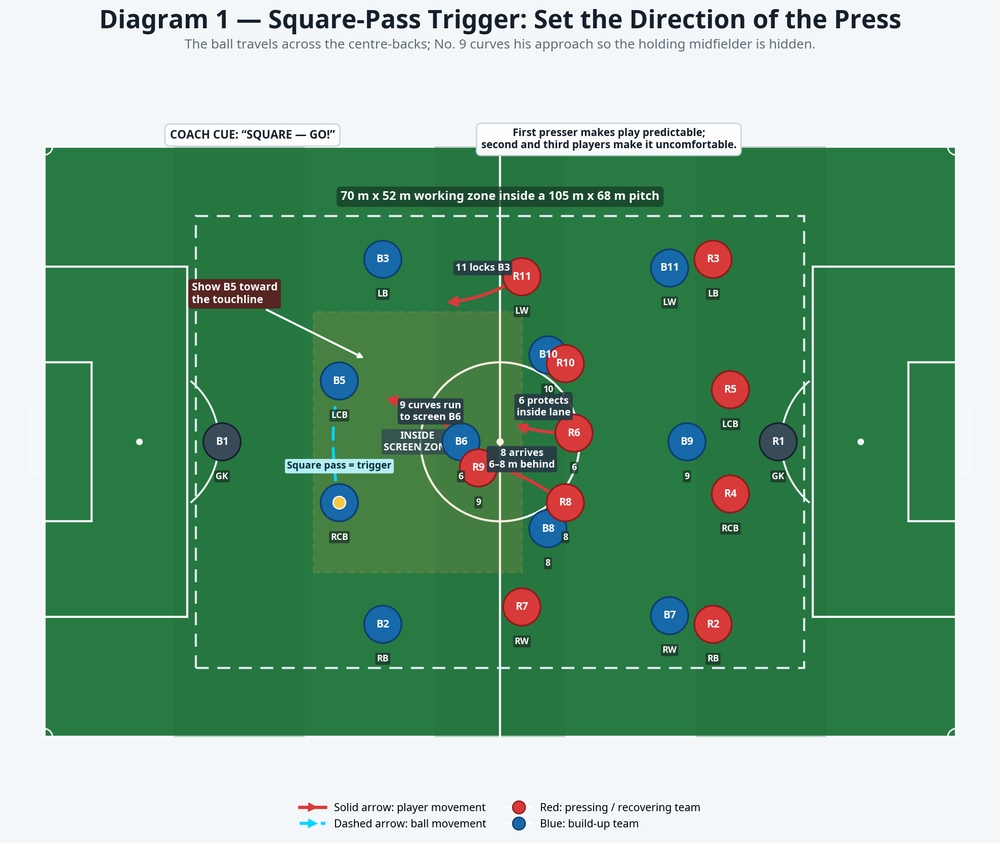
Phase 1 — Recognise the Square-Pass Trigger
- Blue No. 1 serves to No. 4 or No. 5. Blue circulate for two or three passes; Red stay compact rather than chasing every touch.
- Red No. 9 sits between the centre-backs on a line that hides Blue No. 6. Demand a half-turned stance: the striker sees both ball and pivot.
- The cue is a square pass to the other centre-back or full-back. While the ball travels, No. 9 curves the run to pressure the receiver and remove Blue No. 6 with the cover shadow.
- Red No. 8 closes the inside bounce pass; Red No. 6 slides behind No. 8 to protect the forced central pass. Freeze the action if No. 9 runs straight or No. 8 waits for the receiver’s first touch.
Award Red one point for forcing the next pass wide or backwards. Award Blue one point if No. 6 receives facing forward through the centre.
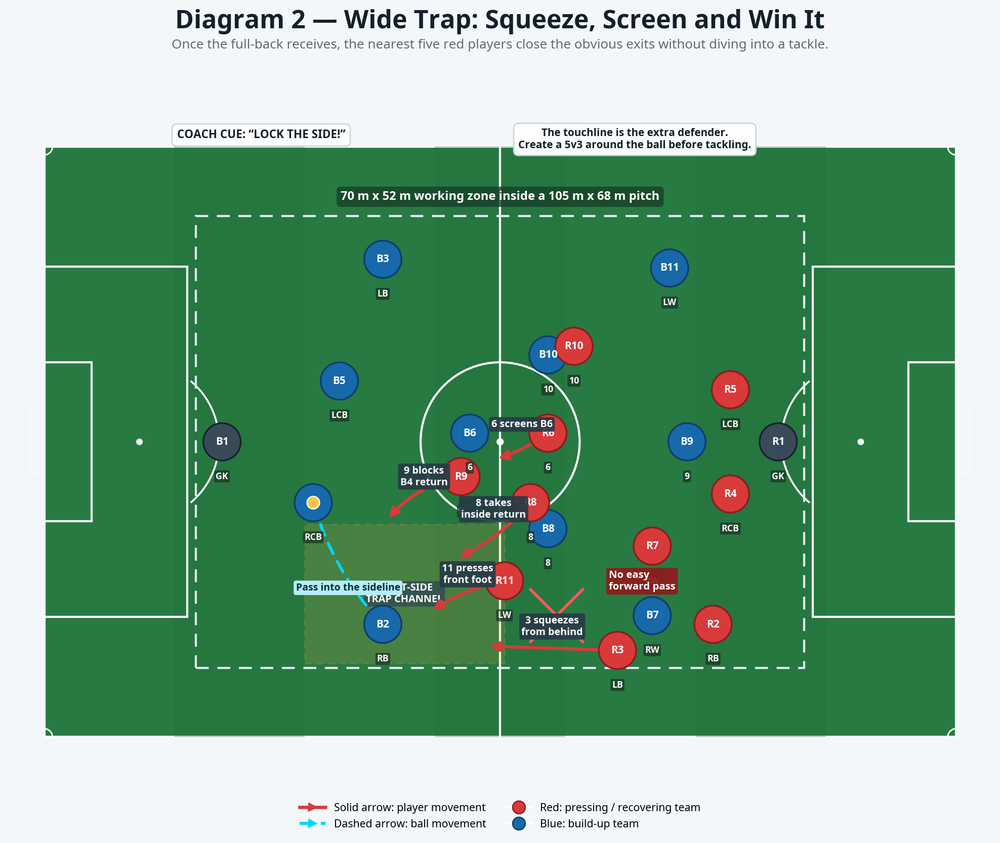
Phase 2 — Lock the Wide Trap
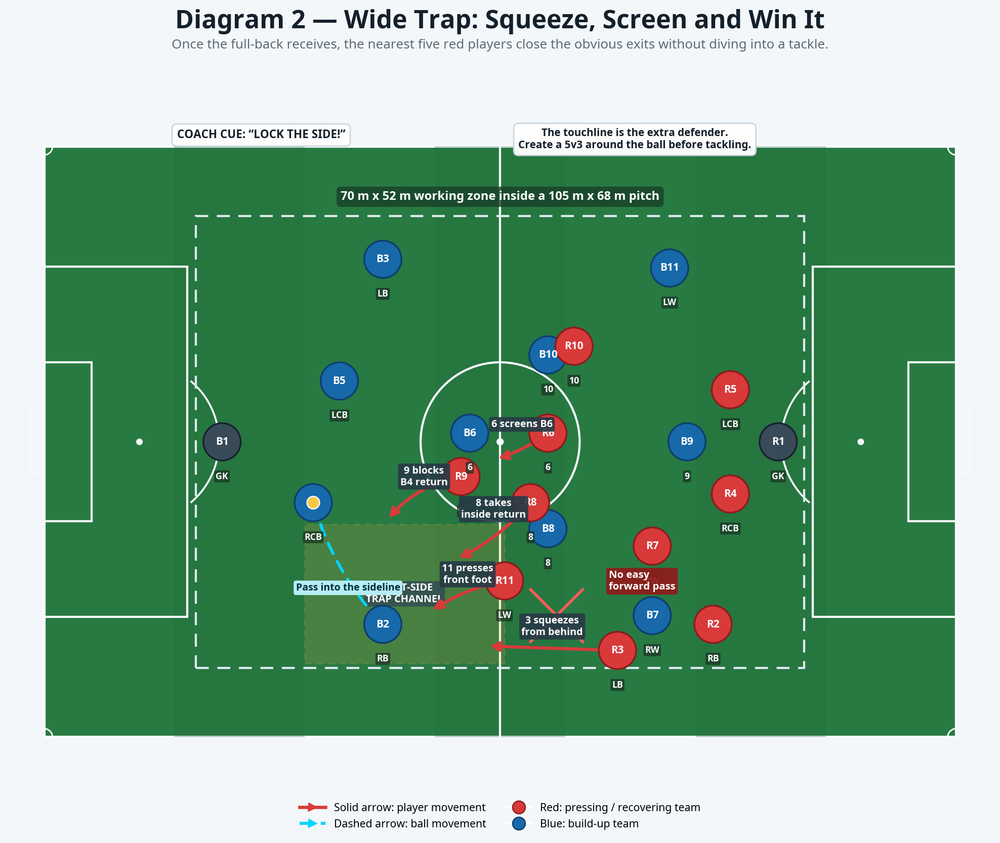
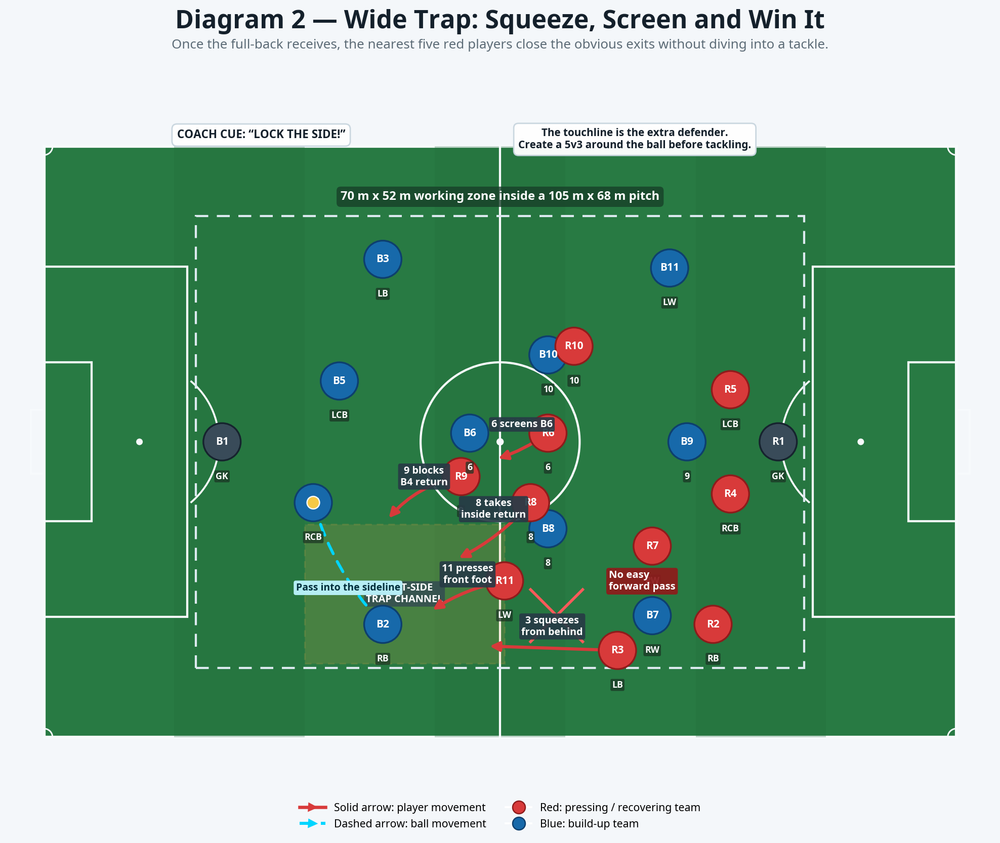
- Blue play from the pressured centre-back to No. 2 or No. 3. The ball moving toward the sideline is the second cue: the trap is live.
- Red No. 11 or No. 7 arrives on the full-back’s touch, with the outside shoulder angled to keep the ball on the line.
- Red No. 8 blocks the inside return, No. 9 blocks the centre-back, No. 6 screens Blue No. 6, and the ball-side full-back squeezes behind the winger.
- Demand a compact 5v3 around the ball. Do not hunt a tackle too early. Make the next action predictable, then intercept, force a bad touch, or trap the receiver against the line.
- After a regain, Red have eight seconds to score in either mini-goal. A clean Blue switch or forward pass beyond the trap starts the recovery phase.
Red earn three points for a wide regain, two for forcing backward play, and one for a delayed regain. Blue earn two points for switching past the press or finding No. 6/8 beyond it.
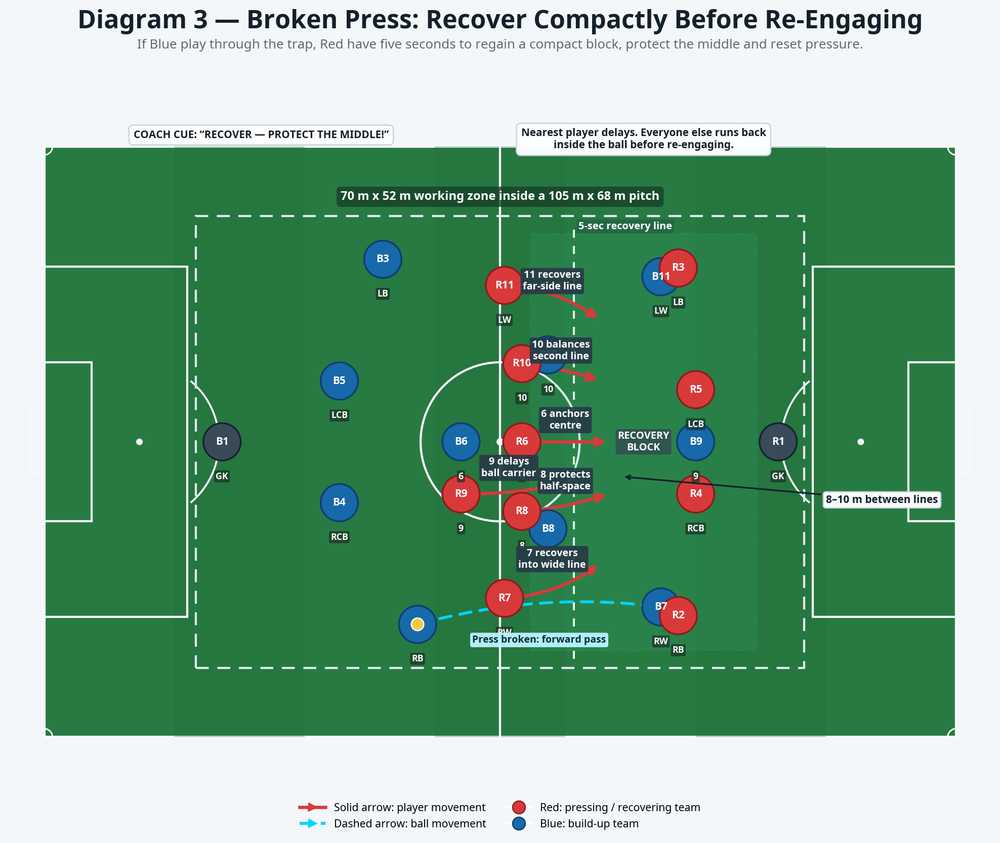
Phase 3 — Recover if the Press Is Broken
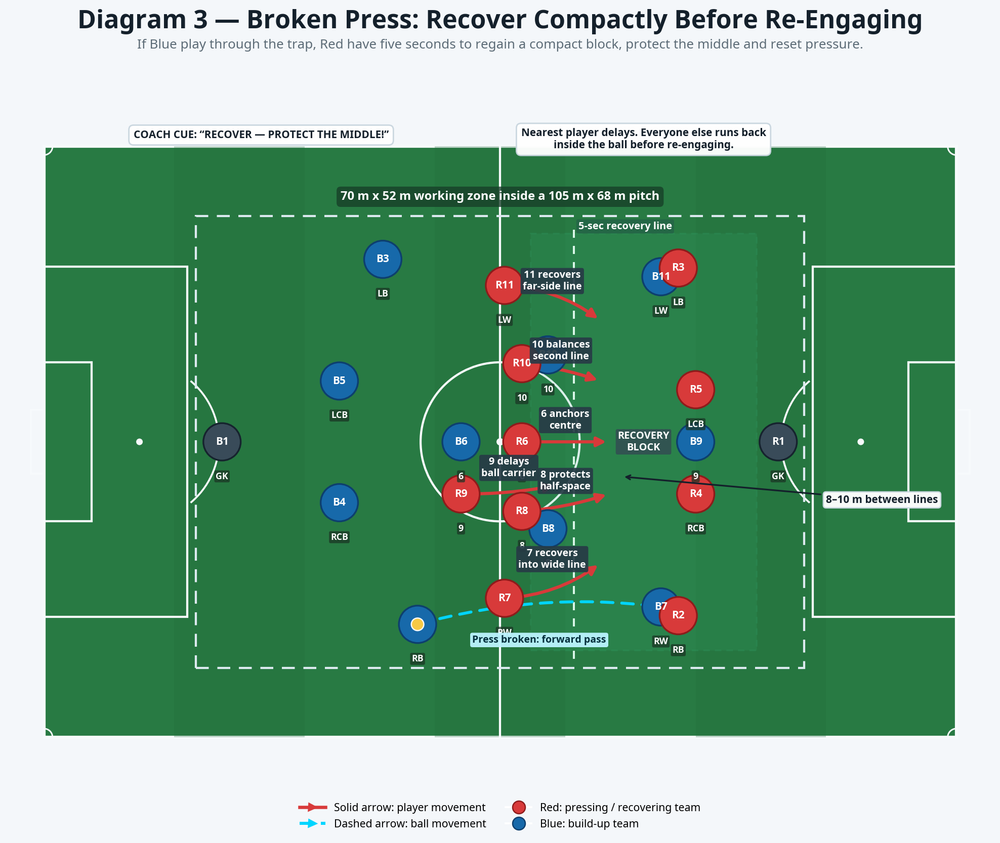
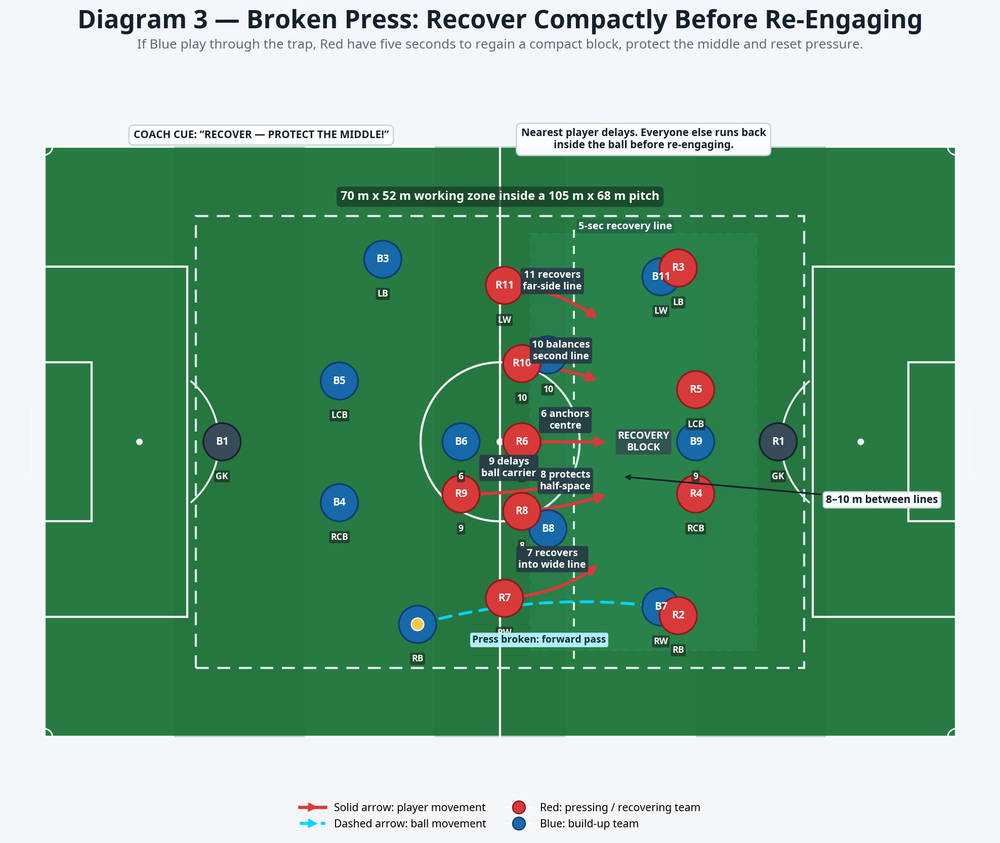
- Allow Blue to find a forward pass, a switch, or a pass around Red’s pressing winger. If needed, serve a new ball that creates a realistic transition.
- The nearest Red player becomes the delayer: slow the carrier, show them away from the centre and deny the immediate forward pass. Do not demand an impossible tackle.
- Everyone else sprints inside the ball first. Players do not run straight back to their original positions if that leaves the central channel unprotected.
- Within five seconds, Red form two compact lines with 8–10 m between midfield and defence. No. 6 anchors the centre, No. 8 protects the nearest half-space and the far-side winger tucks in.
- Once compact, Red communicate the next cue and re-engage. If Blue reach the penalty area before Red have shape, reset the ball and repeat immediately.
4. Key Coaching Points
| Coaching point | What to demand |
|---|---|
| Curve the first press | No. 9 presses on an arc, hiding the pivot. A straight run lets Blue play through midfield. |
| Move on the pass | The winger, No. 8 and full-back travel while the ball moves, not after the first touch. |
| Lock the side | Use the line as an extra defender. Stay on feet and remove routes before tackling. |
| Squeeze behind | The rest of Red narrow and advance with the press; large gaps behind the front line kill the trap. |
| Delay, then recover | One player slows the break while everyone else protects the middle and restores 8–10 m unit distance. |
5. Common Mistakes
| Error | Immediate correction |
|---|---|
| No. 9 presses straight and leaves Blue No. 6 open. | Reset the start point and ask: “Which player are you hiding?” Rehearse the curved run. |
| Winger presses alone. | Show the support triangle: winger presses, No. 8 blocks inside, full-back squeezes behind. |
| Players dive into a channel tackle. | Reward interceptions and backward passes; coach a braking step before a tackle. |
| Red jog or recover wide first. | Count down five seconds aloud and insist that players enter the central corridor before fanning out. |
6. Variations & Progressions
Make it easier with an unopposed walk-through: Blue follow the prescribed square pass while Red rehearse distances, curved runs and recovery lanes. Then give Blue a choice of centre-back or full-back while keeping the square pass as the only pressing cue.
Make it harder by adding a neutral No. 10 for Blue, creating one more central exit. Next, give Red only six seconds to regain after the trigger. For an advanced version, remove the coach’s call and let players recognise the heavy touch, backwards pass or square pass themselves while retaining the eight-second counter-to-score rule.
7. Age Adaptations
| Age group | Adaptation |
|---|---|
| Under-8 to Under-10 | Use 4v4 or 5v5 in 32 m × 25 m. Teach “one presses, one helps, one protects the middle.” |
| Under-11 to Under-13 | Use 7v7 or 8v8 in 50 m × 40 m. Keep the square-pass cue and a three-second recovery target. |
| Under-14 to Under-16 | Use 9v9 or 10v10 in 70 m × 52 m. Demand the No. 9 curve, ball-side squeeze and five-second recovery. |
| Under-17 to senior | Use 11v11. Add the neutral player, live scoring and player-led trigger recognition. |
References