Quick Advantage Throw-In: Set, Spin & Release
Coach a fast, repeatable throw-in pattern that creates a central third-player pass before the opposition can organise.

Equipment Needed
Overview
A quick throw-in is a short transition moment: the opposition may be disorganised, facing their own goal, or still reacting. This repeatable right-touchline pattern creates a receiving triangle, uses the winger’s set to free the central midfielder, and releases the striker into the inside channel. The objective is to play forward within three passes and six seconds, with a reset if the first lane is closed.
Use it on the right side between halfway and the attacking third, especially when the near-side midfielder presses or the full-back has stepped up. The pattern uses a 105 m × 68 m pitch, within the normal 100–110 m × 64–75 m range. The thrower must restart legally from the correct place, with both feet on or outside the line and both hands delivering from behind and over the head.1
The default attacking unit is 2 (right-back/thrower), 7 (right winger), 8 (central midfielder), 9 (centre-forward), 10 (attacking midfielder), and 6 (defensive midfielder). Mirror the same principle on the left by using 3, 11, 8, 9, 10, and 6.
Setup
Mark a 36 m × 28 m area on the right touchline, 8 m inside the opponents’ half. The touchline is the outside boundary. Place a mini-goal or 6 m end zone 26–30 m ahead, use six attackers against four defenders, and have a coach serve the ball over the line. Keep a ball at every starting point so the restart tempo is not lost.
| Detail | Coach instruction |
|---|---|
| Throw-in point | Right touchline, 8–15 m inside the opponents’ half; 2 starts with both feet outside or on the line. |
| 7 — first receiver | Begin 5–7 m inside the pitch and 2–3 m ahead of 2. Check sharply towards the ball only when 2 reaches the line. |
| 8 — supporting midfielder | Start 8–10 m inside from 7 and 5–7 m higher. Arrive on a diagonal; never stand in the same passing lane as 7. |
| 9 — depth runner | Start 12–15 m higher and inside. Pin the nearest centre-back before making the diagonal run into the inside channel. |
| 10 — bounce option | Start 10–12 m inside the ball, level with or slightly ahead of 8. Occupy the next pocket, not the touchline. |
| 6 — security | Hold 10–14 m behind 8, central enough to receive the reset and protect a turnover. |
The attacking spacing is deliberate. Keep 7 and 8 at a 45-degree support angle, with at least 5 m between them; this makes one defender choose rather than allowing one defender to screen both. Keep 9 high enough to threaten the next line, and keep 6 connected, rather than hiding behind the first press. If you add a goalkeeper and larger goal, let the final pass to 9 become a live finish.
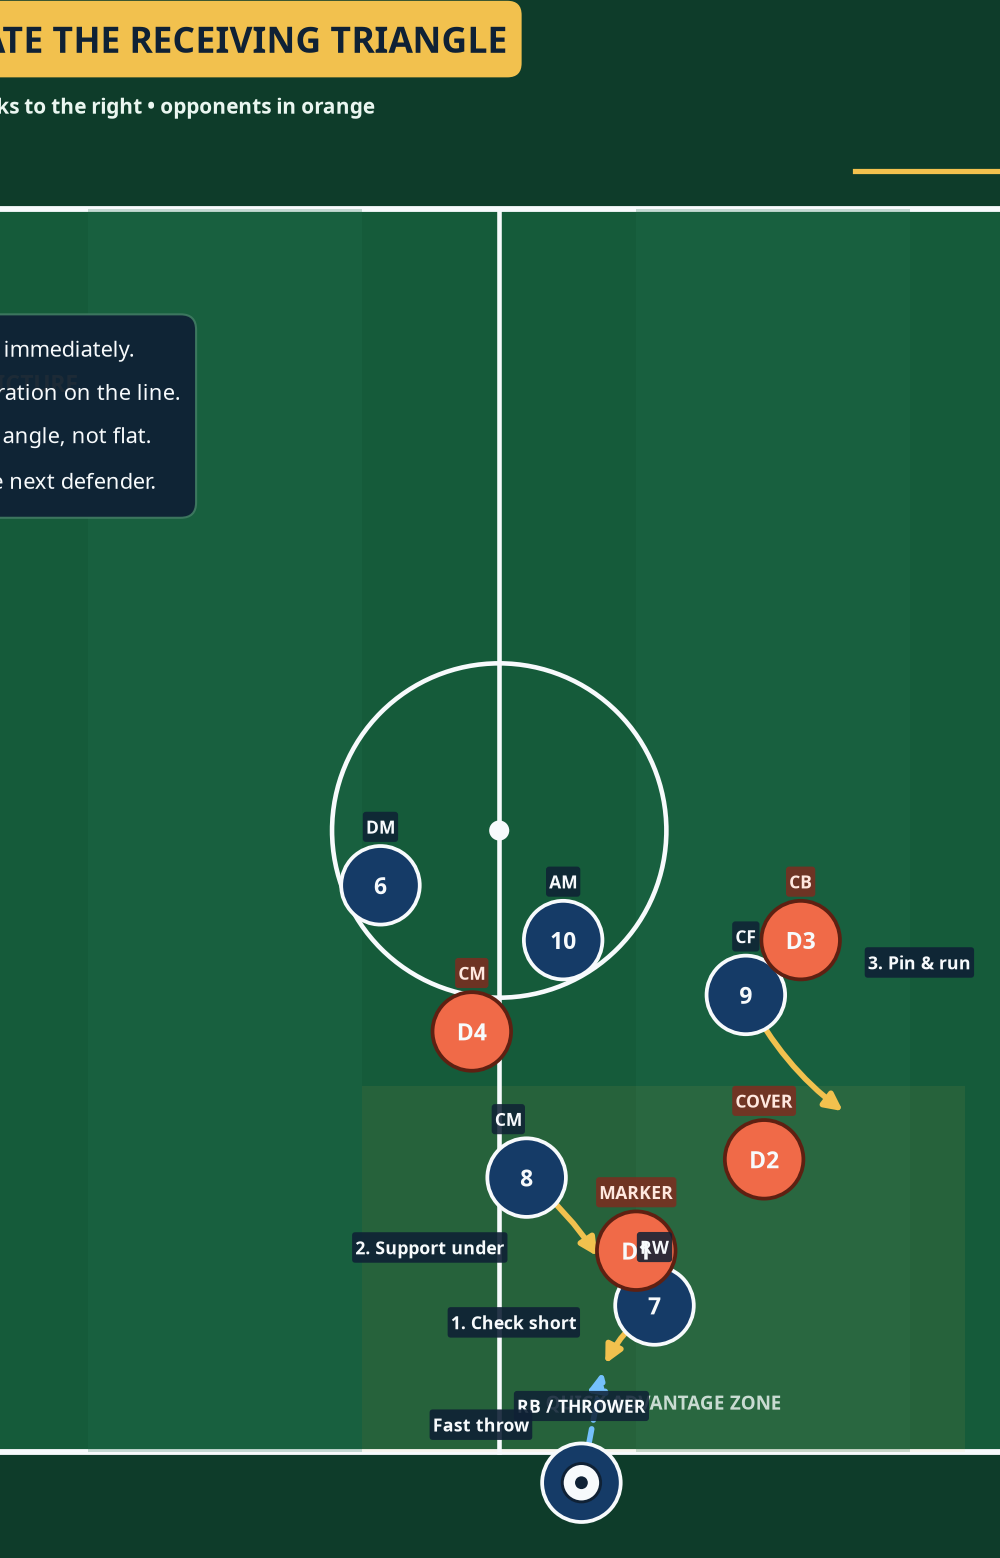
Diagram 1 — Initial picture and trigger

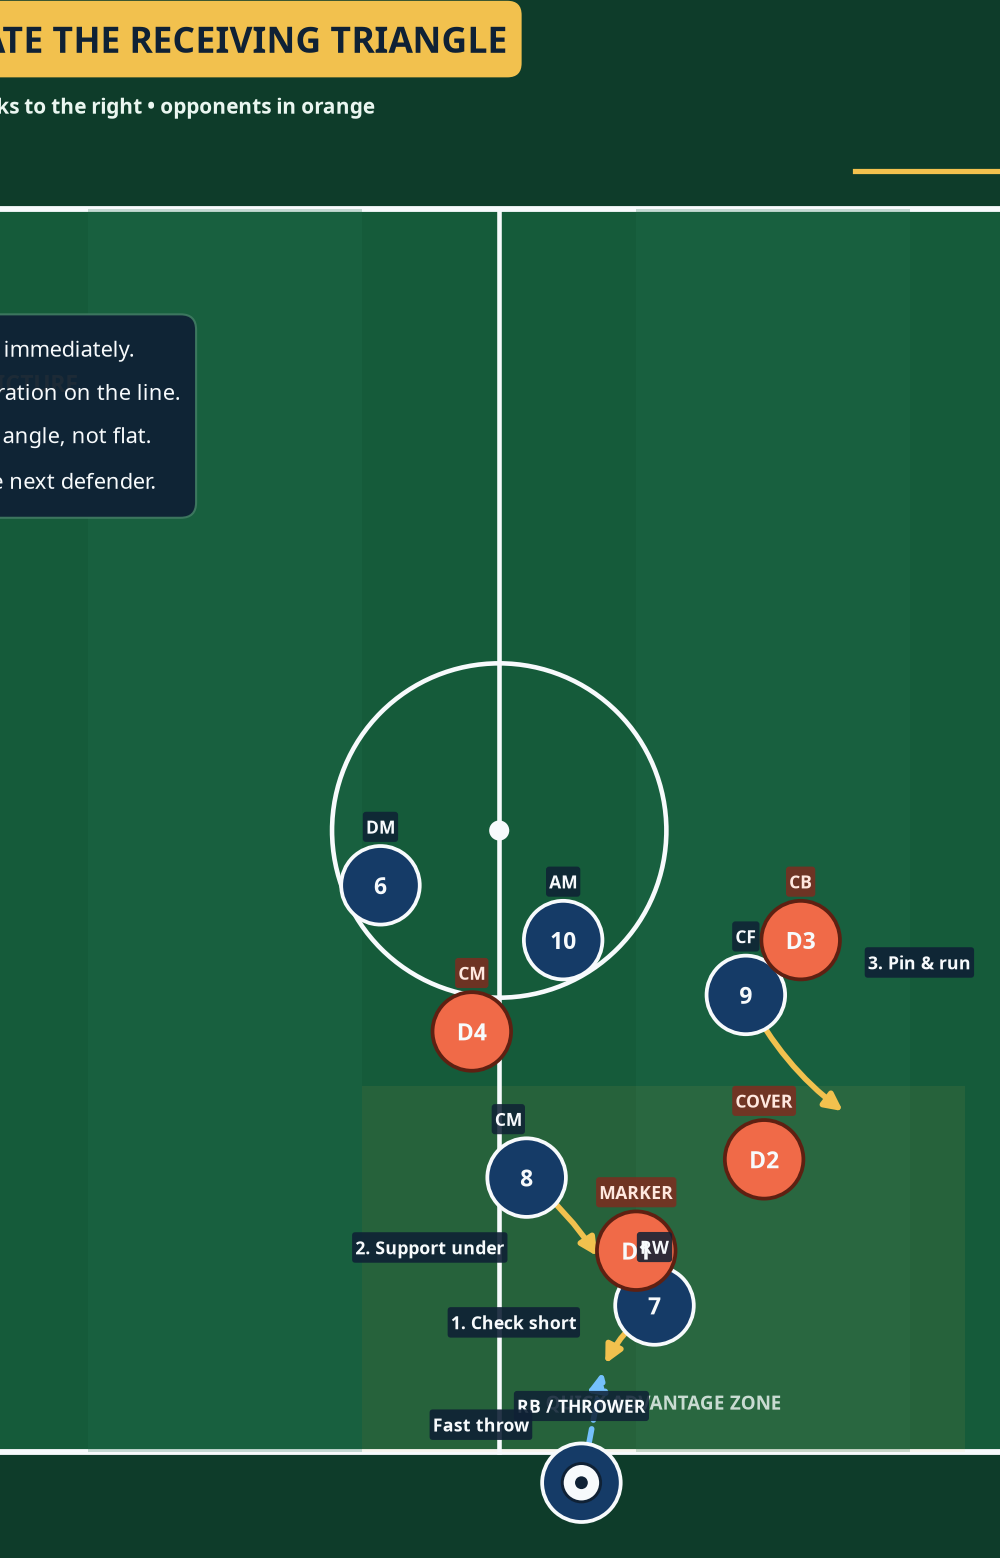
Call: The thrower calls “Flash” as the ball crosses the line. That is the cue for 7 to check, 8 to arrive underneath, and 9 to prepare the depth run. Players move on the call, not after the ball is in 2’s hands.
Step-by-Step Instructions
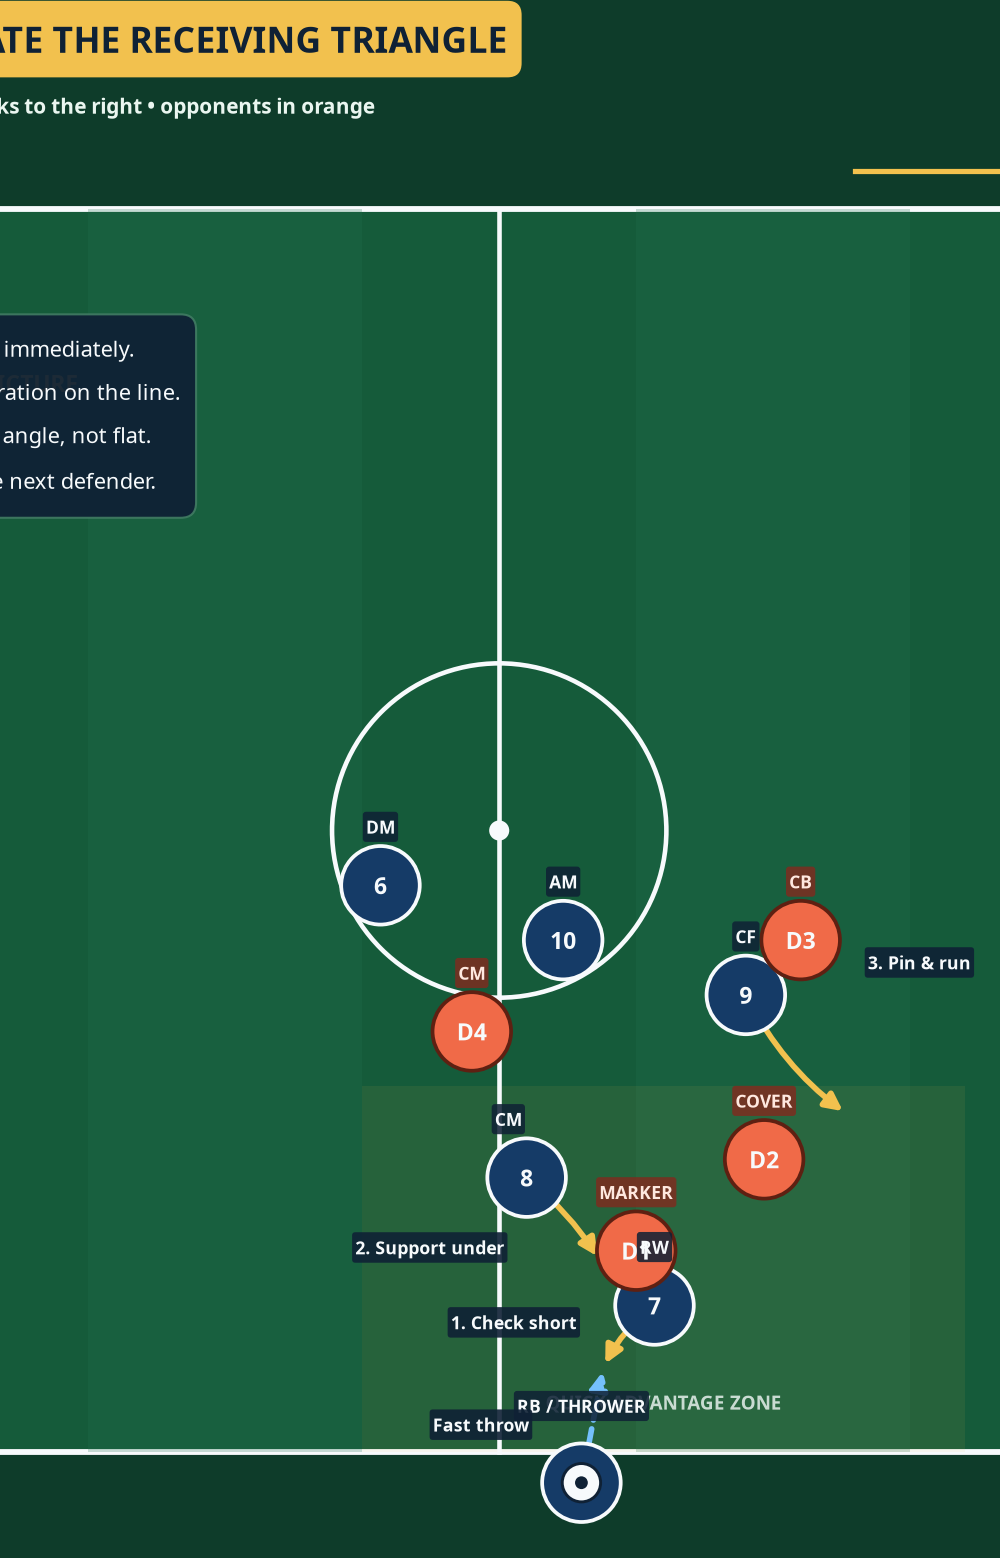
Trigger the restart. As soon as the ball is out, 2 gets to the line. 7 holds until 2 is set; 8 scans marker and cover; 9 pins the centre-back. The unit must reach its picture inside three seconds.
Create the first separation. When 2 arrives at the line, 7 checks towards the ball and slightly back, finishing 2–3 m inside the field. The movement must be sharp enough to step away from the marker, but not so deep that it crowds the thrower. At the same instant, 8 slides underneath on a diagonal to become the next pass, approximately 6 m away.
Throw quickly to the front foot. 2 delivers firmly to 7’s chest or safe front foot; avoid a floating ball. Under pressure, 7 uses a one-touch set; if free, 7 turns for two touches. 2 steps inside as emergency support.
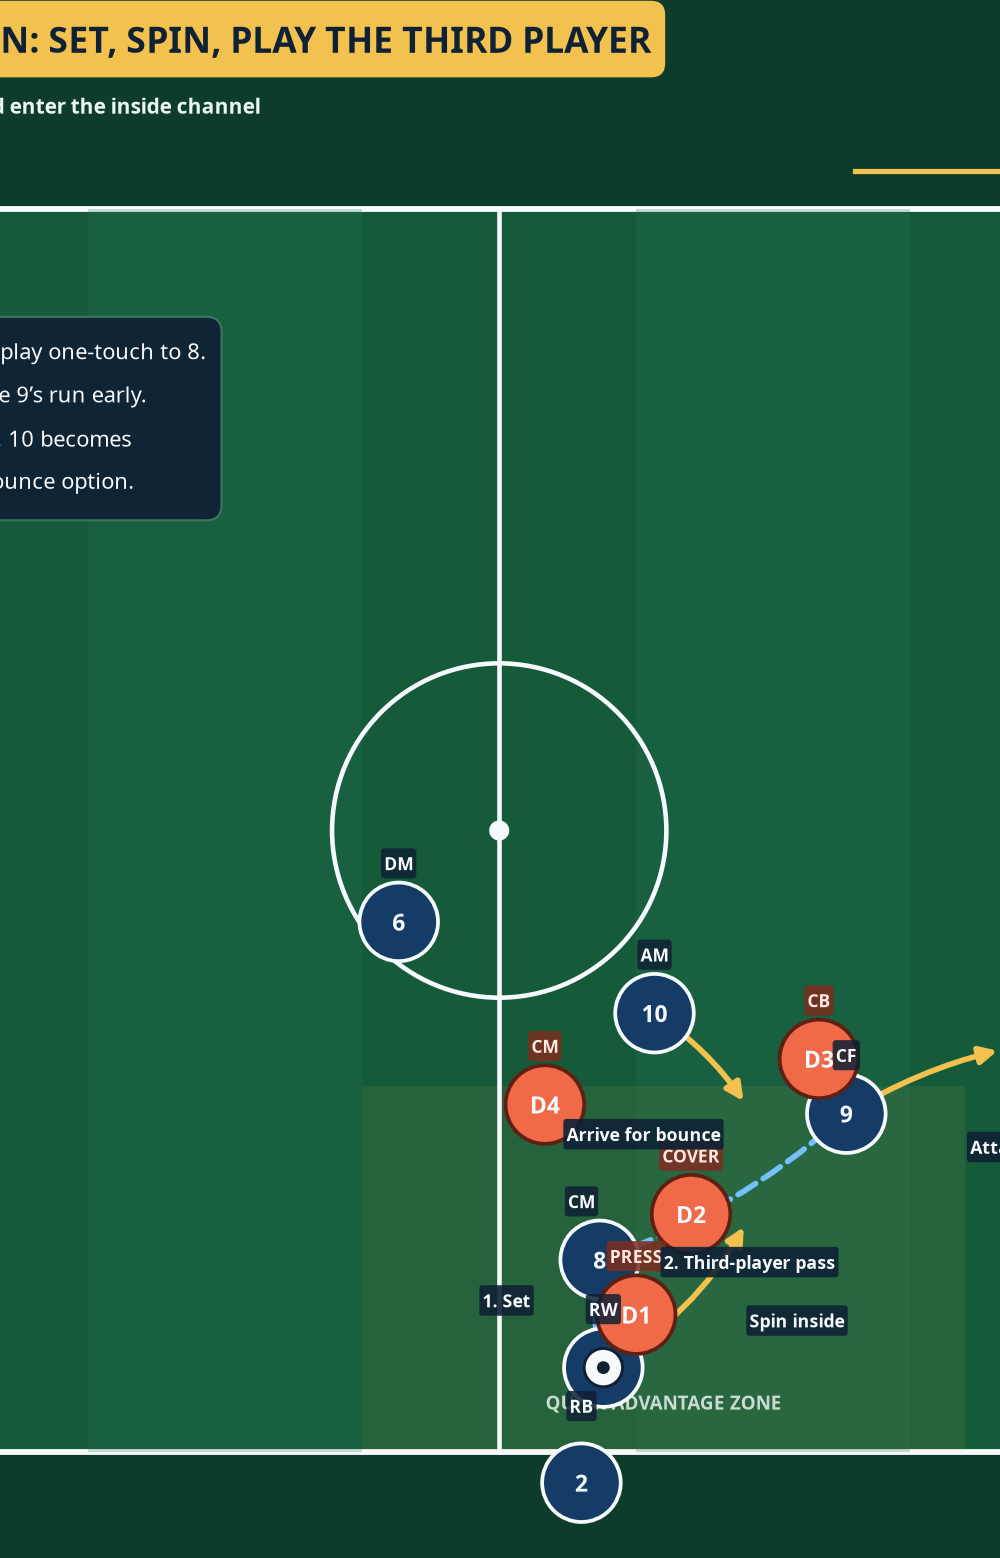
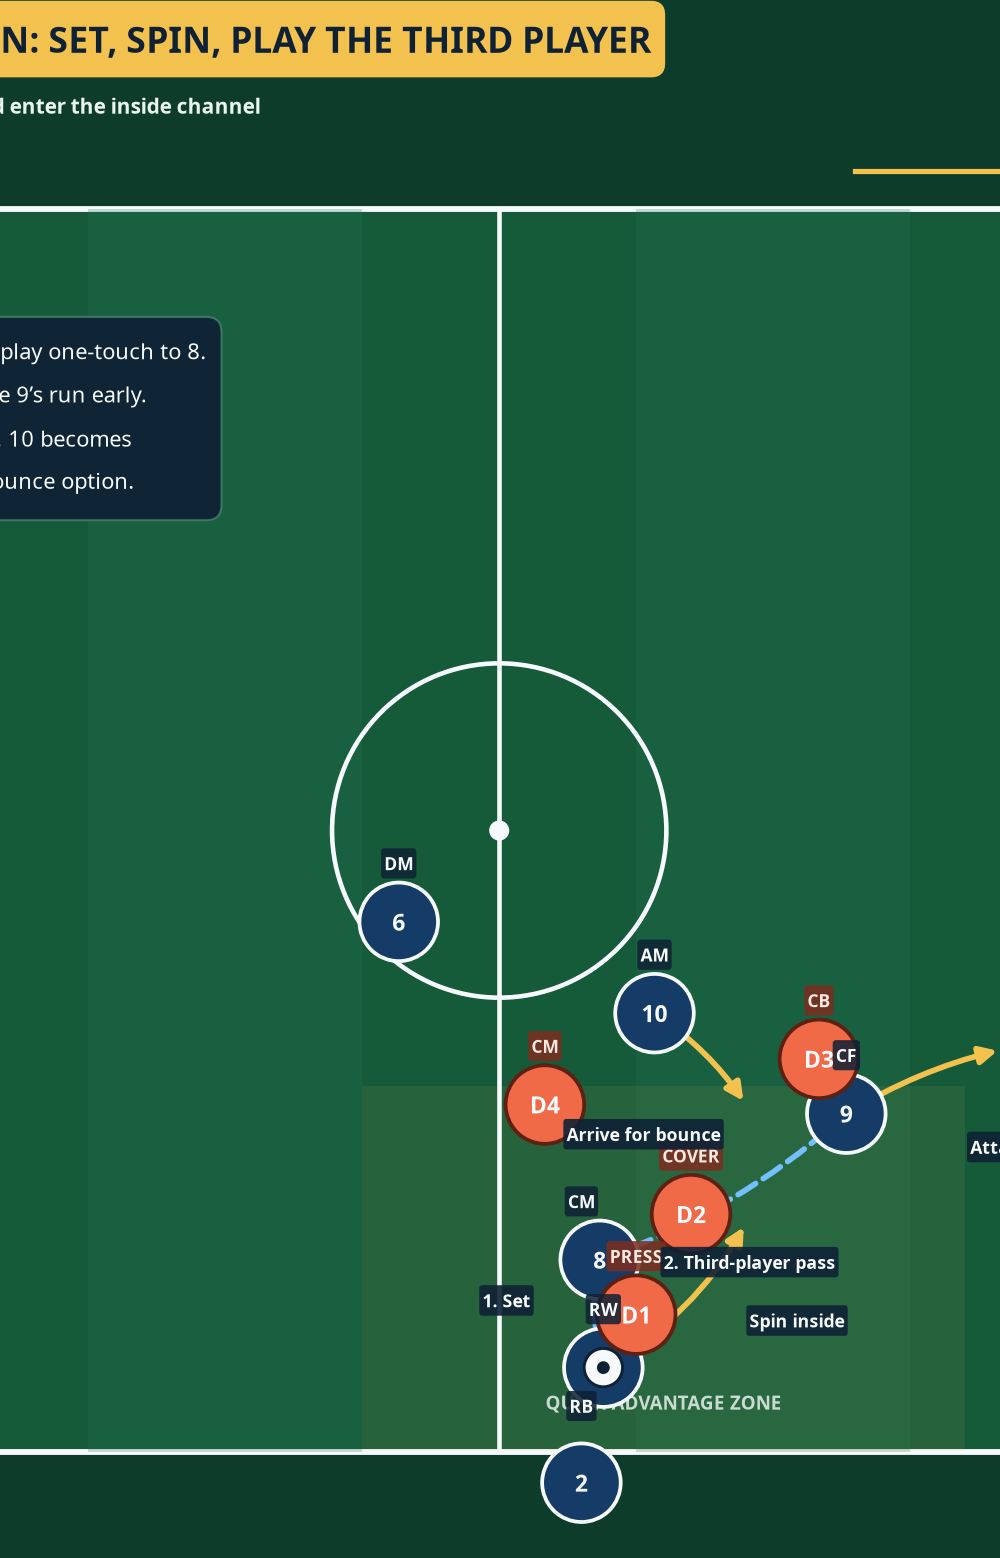
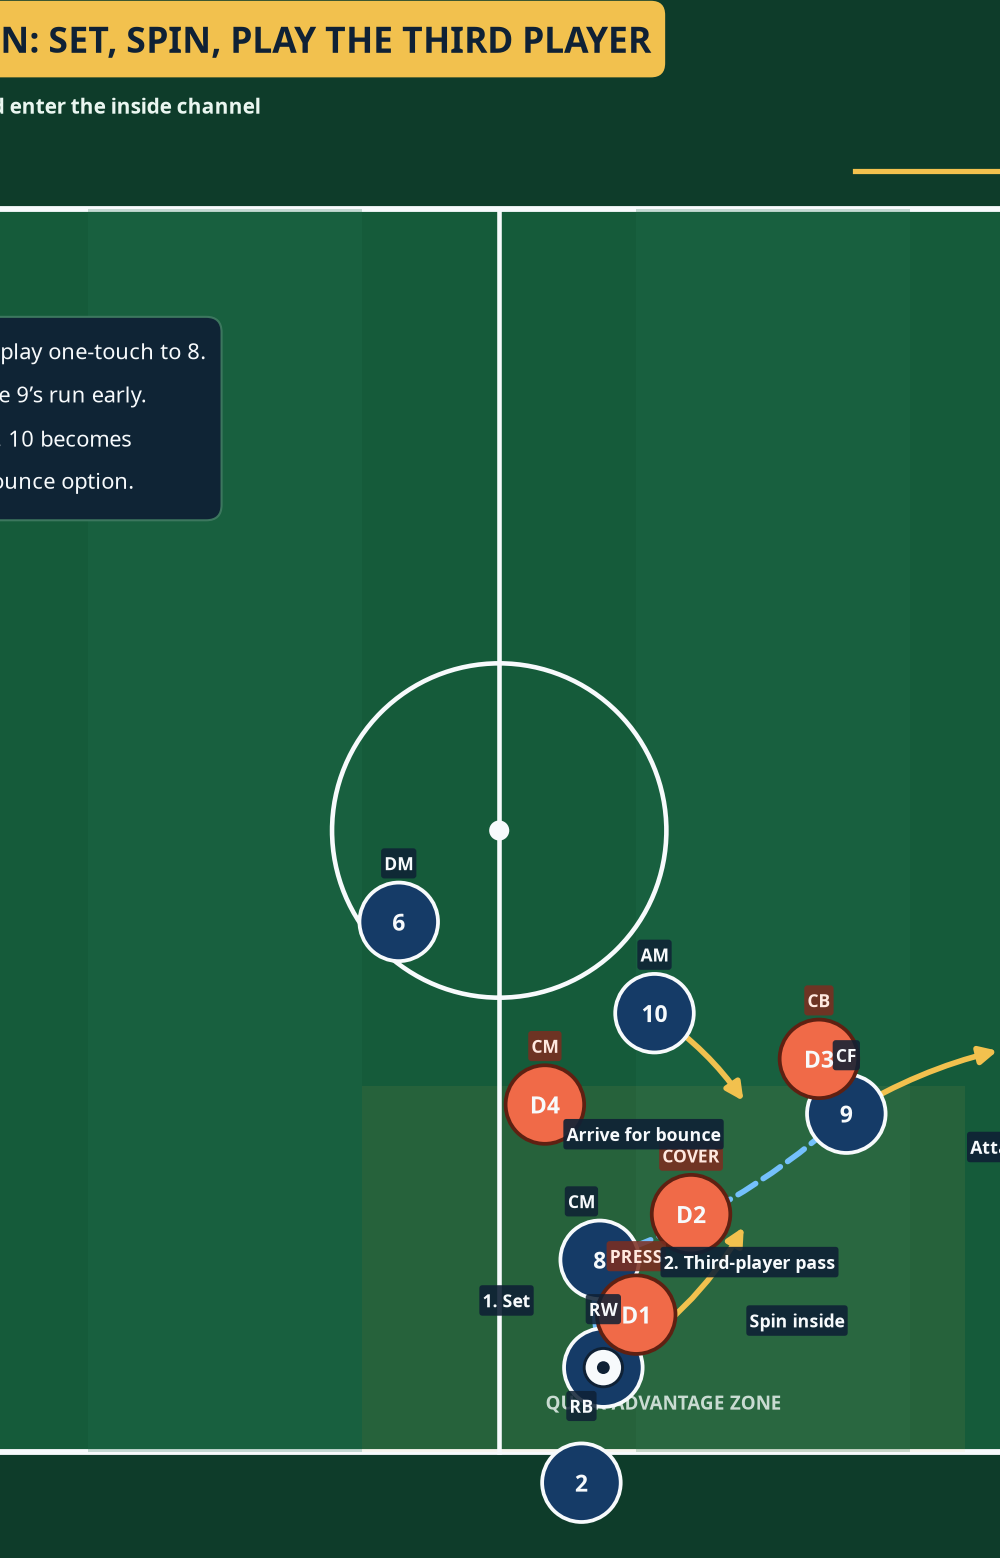
Set the ball and beat the first press. Against a jumping marker, 7 sets back or inside to 8 with one touch. 8 receives half-turned, first glance forward, and plays forward on the second touch at the latest. The crucial detail is that 8 arrives after 7 checks; arriving early makes the picture flat and easy to press.
Release the third player. As 7 sets, 9 explodes diagonally from the outside of the defender into the inside channel, a 7–10 m burst. 8 plays the pass into 9’s path, not into the defender’s feet. 10 then arrives for the bounce or cutback while 7 spins inside to support the next phase.
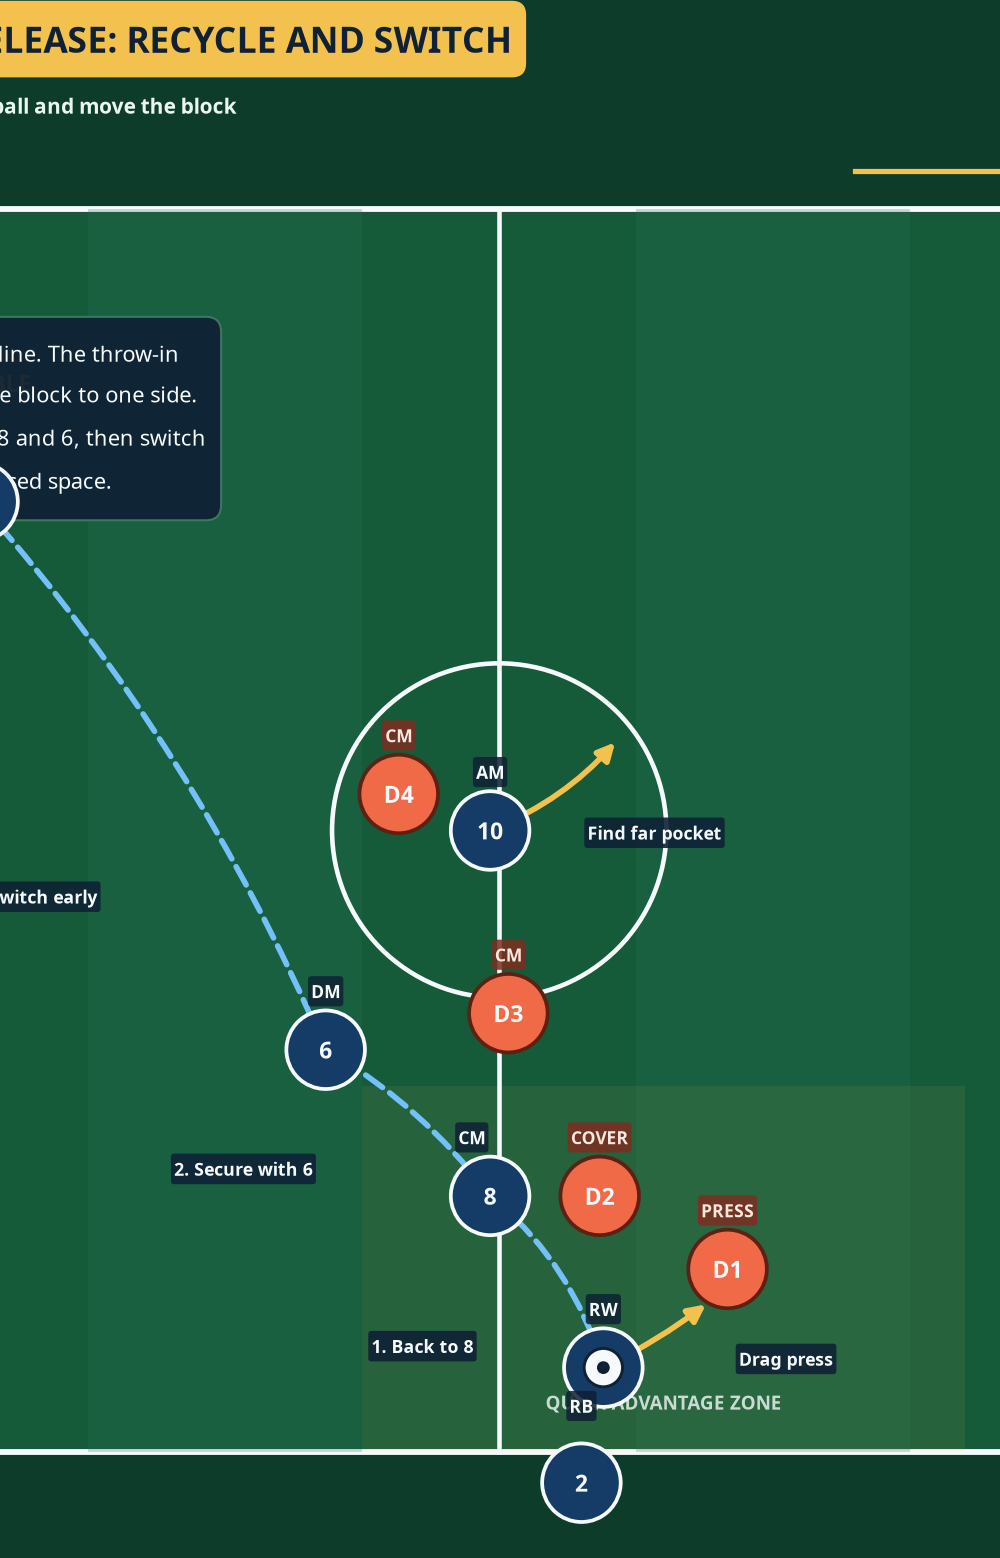
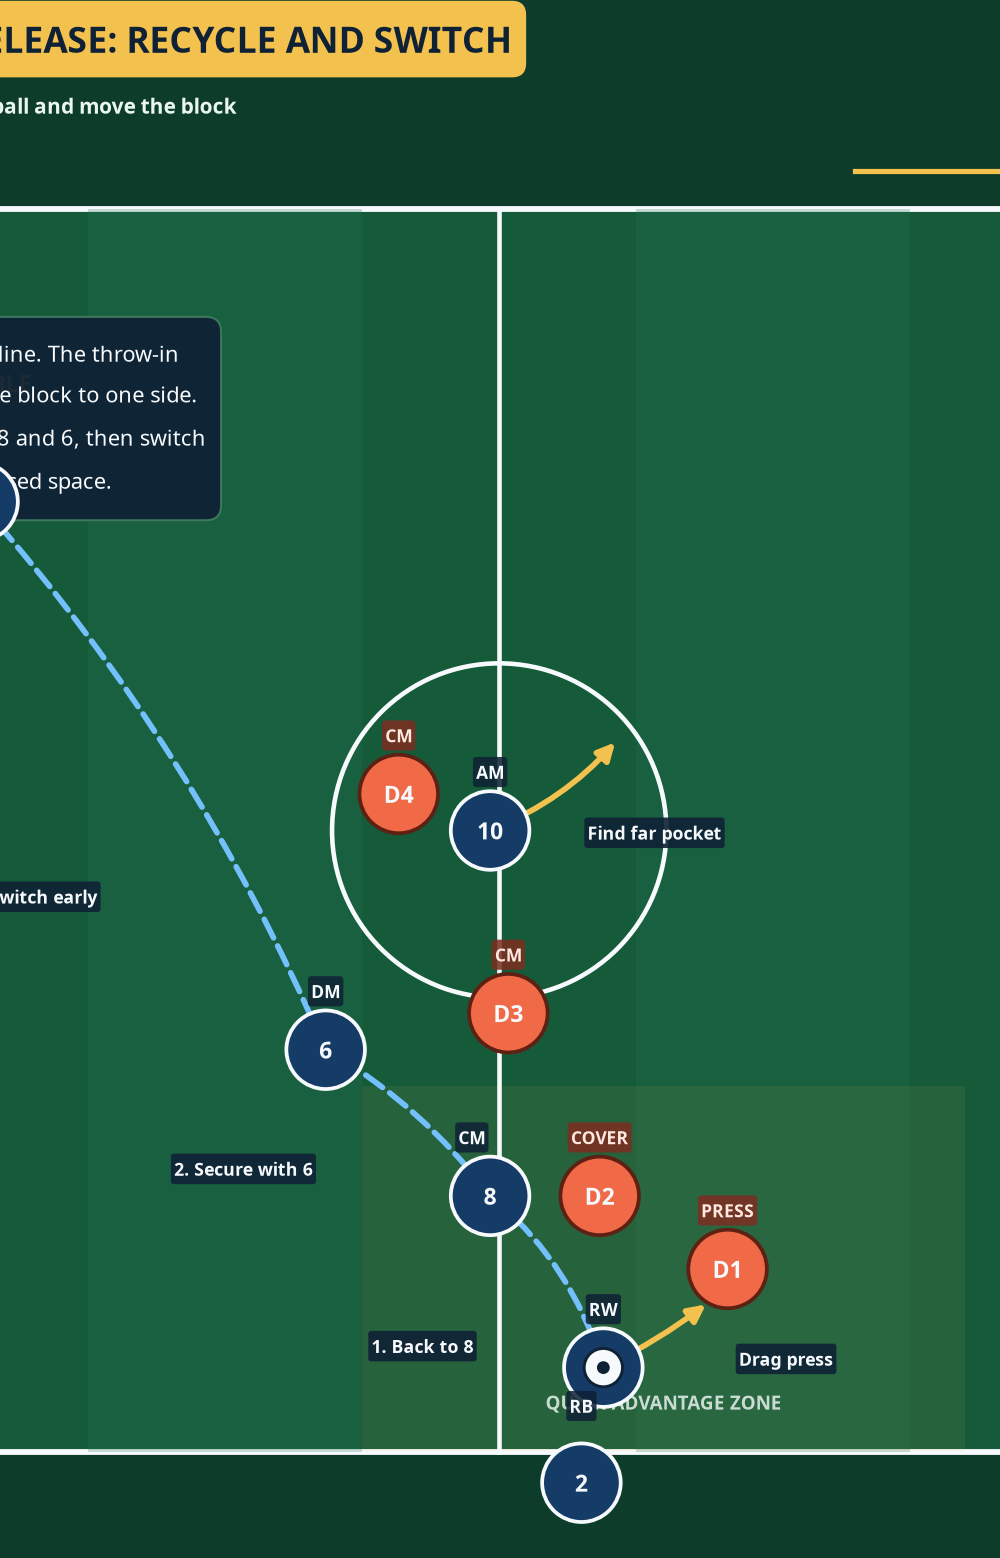
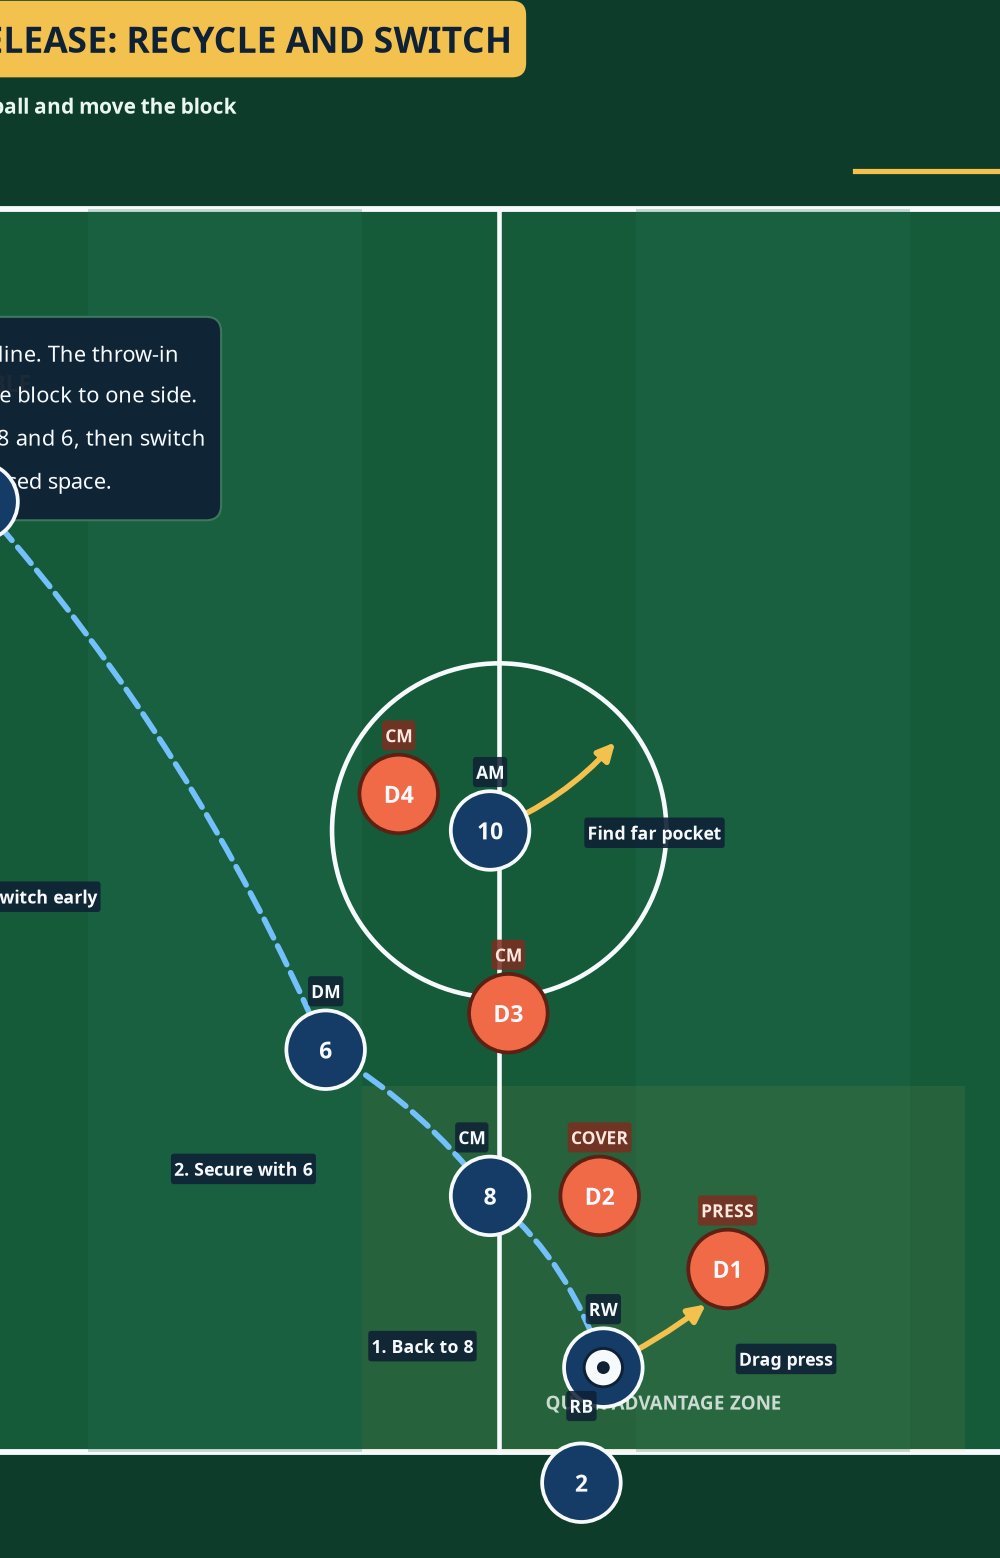
Finish or secure. If 9 receives facing forward, ask for a positive first touch towards the end zone or goal within two touches. If the central lane is shut, 8 uses 10 for a bounce and the team continues forward. If the press locks the near side, protect possession through 8 and 6 before switching early to 3.
Diagram 2 — Set, spin, and find the third player
Run each repetition for no more than 10 seconds. Score one point for a controlled pass into the end zone, two points for a finish after 9’s run, and one bonus point if the ball travels forward within three passes. On loss of possession, the attackers have three seconds to win it back; then the next ball is served immediately.
Key Coaching Points
| Coaching point | What the coach should demand |
|---|---|
| Restart speed | 2 does not wait for perfect positioning. The group learns its starting picture and arrives at speed. |
| Body orientation | 7 and 8 receive side-on. A closed stance turns the quick advantage into a dead end. |
| Passing detail | The throw and set must be firm, played to the receiving foot furthest from the defender. |
| Timing | 7 checks first, 8 arrives second, and 9 runs when 7’s set is travelling. Do not let all three move together. |
| Depth and width | 9 stretches the next line; 10 and 6 stay in separate support lanes. The triangle must retain usable distances. |
| Decision-making | The principle is forward if free, secure if blocked. Do not force a low-percentage pass down the line. |
Common Mistakes
| Error | Correction |
|---|---|
| 7 waits static on the touchline. | Rehearse a two-step check across the marker, finishing 2–3 m inside the field. |
| 8 stands level with 7. | Mark a cone 6 m underneath and insist that 8 arrives diagonally, not square. |
| 2 throws a slow, high ball. | Practise a firm chest-height or front-foot throw with a target window of 1 m. |
| 9 runs before the set. | Use the cue “set travels, 9 goes”; delay the run until the marker commits. |
| Players force the line under pressure. | Award a point for a calm 8–6 reset and an early switch, so security is valued as a win. |
Variations & Progressions
Variations
The first variation is a 10-bounce: if D1 blocks 8-to-9, 8 finds 10, who sets around the corner for 7’s inside spin. The second is the near-side decoy: 7 checks short but leaves the throw for 8’s curved-under run. Use it once the defence overcommits to 7.
Progressions
Start with a 4 v 0 walk-through, then use 4 attackers plus 2 supports against 3 passive defenders. Limit 7 to one touch, 8 to two, and set an eight-second end-zone target. For the advanced version, use 6 v 5 live; defenders counter into two mini-goals and 6 protects the counter. Players must choose the third-player pass, 10-bounce, or reset/switch.
Diagram 3 — Pressure release and switch
Age Adaptations
For Under-8, use 20 m × 15 m with 3 v 1. Hold the thrower still and coach readiness, angle, and passing away from pressure. At Under-10, use 24 m × 18 m and 4 v 2; introduce the check-and-set, but keep the third-player run coached.
For Under-12 to Under-14, use 30–36 m × 22–28 m and 5 v 3 or 6 v 4. Demand timing, use 6 as reset, and set a seven-second target. From Under-16 through open age, rehearse on the full 105 m × 68 m pitch with live counter-pressure. Ask which opponent jumps to 7 before the first forward action.
References