High-Velocity Counter-Attack: Mid-Block Trap to Final Third Transition
Master the art of winning the ball in the midfield trap and executing a lightning-fast counter-attack with this high-intensity transition drill.

Equipment Needed
1. Overview
The High-Velocity Counter-Attack drill is designed to train your team's ability to transition from a structured defensive mid-block into a lethal, fast-paced attack. In modern football, the moments immediately following a turnover are often the most dangerous. This session focuses on recognizing the pressing trigger, winning the ball aggressively, and exploiting the disorganized opposition defense within 5 to 8 seconds. It is ideal for teams looking to improve their verticality, decision-making under pressure, and clinical finishing on the break.
2. Setup
Pitch Dimensions: 60m length x 50m width (Half pitch + 10m).
Players Required: 11 (6 Red defending/countering, 4 Blue attacking, 1 Goalkeeper).
Equipment: 1 full-size goal, 12 cones (to mark 3 distinct zones), 6 bibs (2 colors), 8-10 balls.
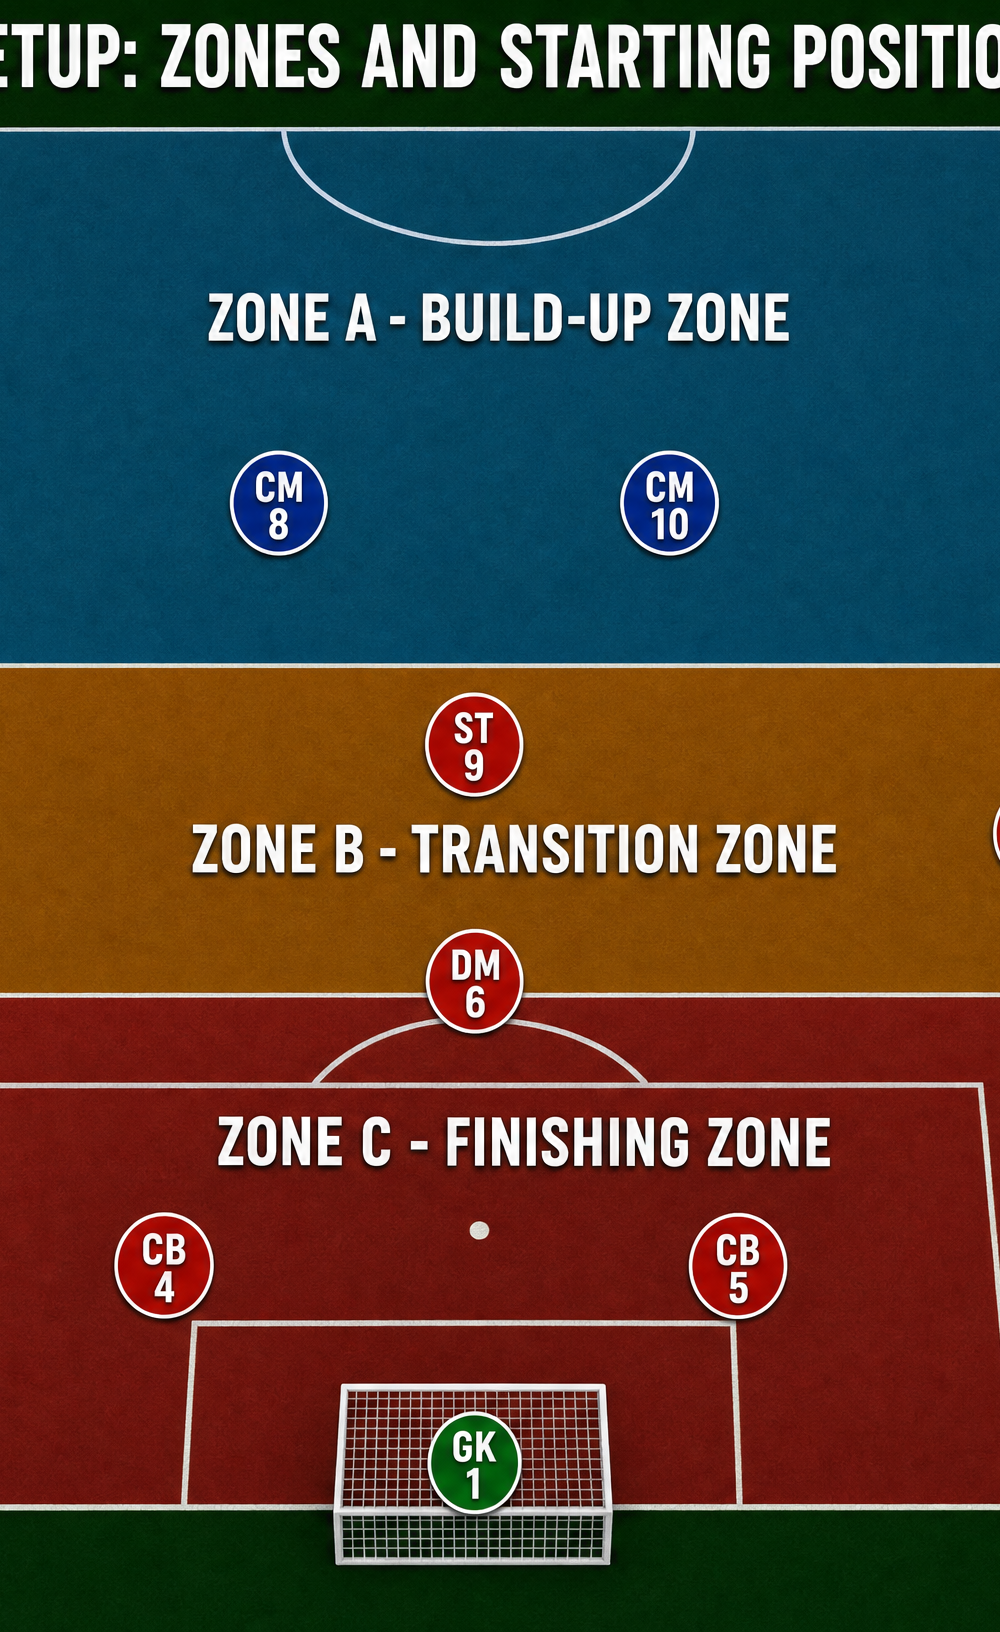
Zone Layout:
- Zone A (Build-up Zone): Halfway line down to 30m. (Blue team starts here).
- Zone B (Transition Zone): 30m to 18m from goal. (The trap zone where Red team engages).
- Zone C (Finishing Zone): Penalty area (18m) to the goal.
Starting Positions:
- Red Team (Defending/Countering): Set up in a 4-2 shape (simulating a 4-4-2 mid-block). Two Centre-Backs (CB 4, CB 5) hold the line in Zone C. A Defensive Midfielder (DM 6) sits just above them. A Striker (ST 9) and two wide midfielders (LM 11, RM 7) operate in Zone B.
- Blue Team (Attacking): Set up in a 2-2 shape in Zone A (e.g., CM 8, CM 10 centrally; LW 11, RW 7 wide). They look to possess the ball and penetrate Zone B.
- Goalkeeper: Starts in the full-size goal.
3. Step-by-Step Instructions
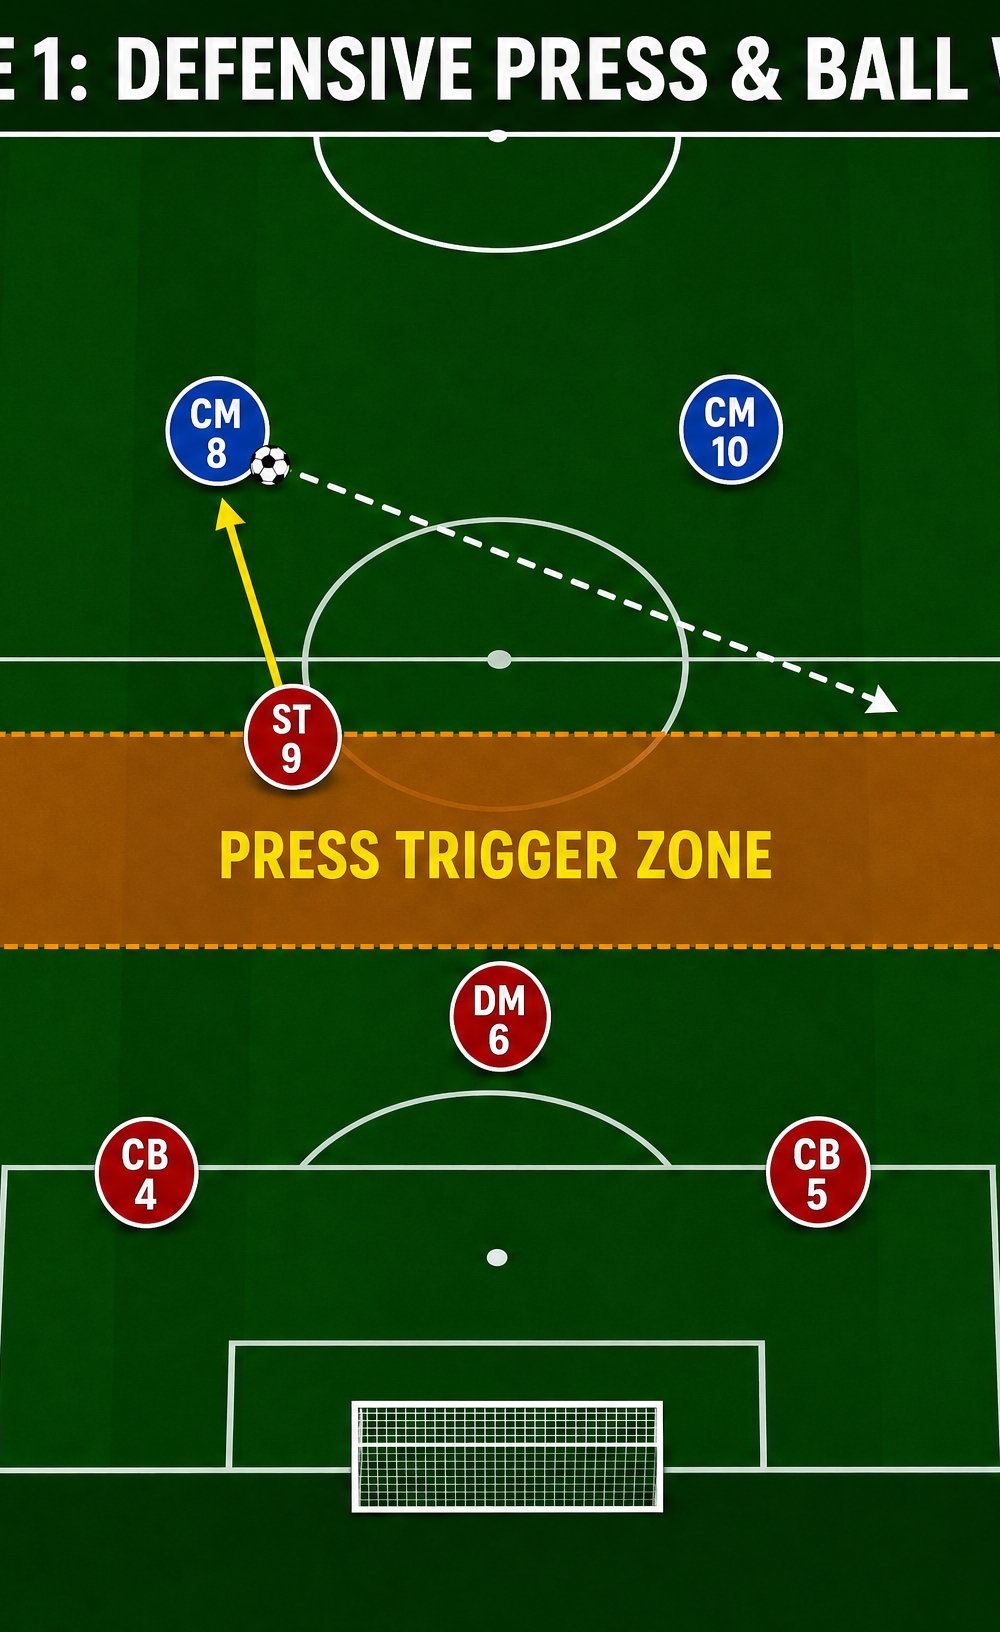
Phase 1: The Defensive Trap
- The coach feeds a ball to the Blue Team in Zone A.
- The Blue Team must complete at least 3 passes in Zone A before attempting to penetrate Zone B.
- The Red Team maintains a compact shape, allowing passes in front of them but blocking central passing lanes.
- The Trigger: When a Blue player takes a heavy touch or plays a square pass into Zone B, ST 9 initiates an aggressive press.
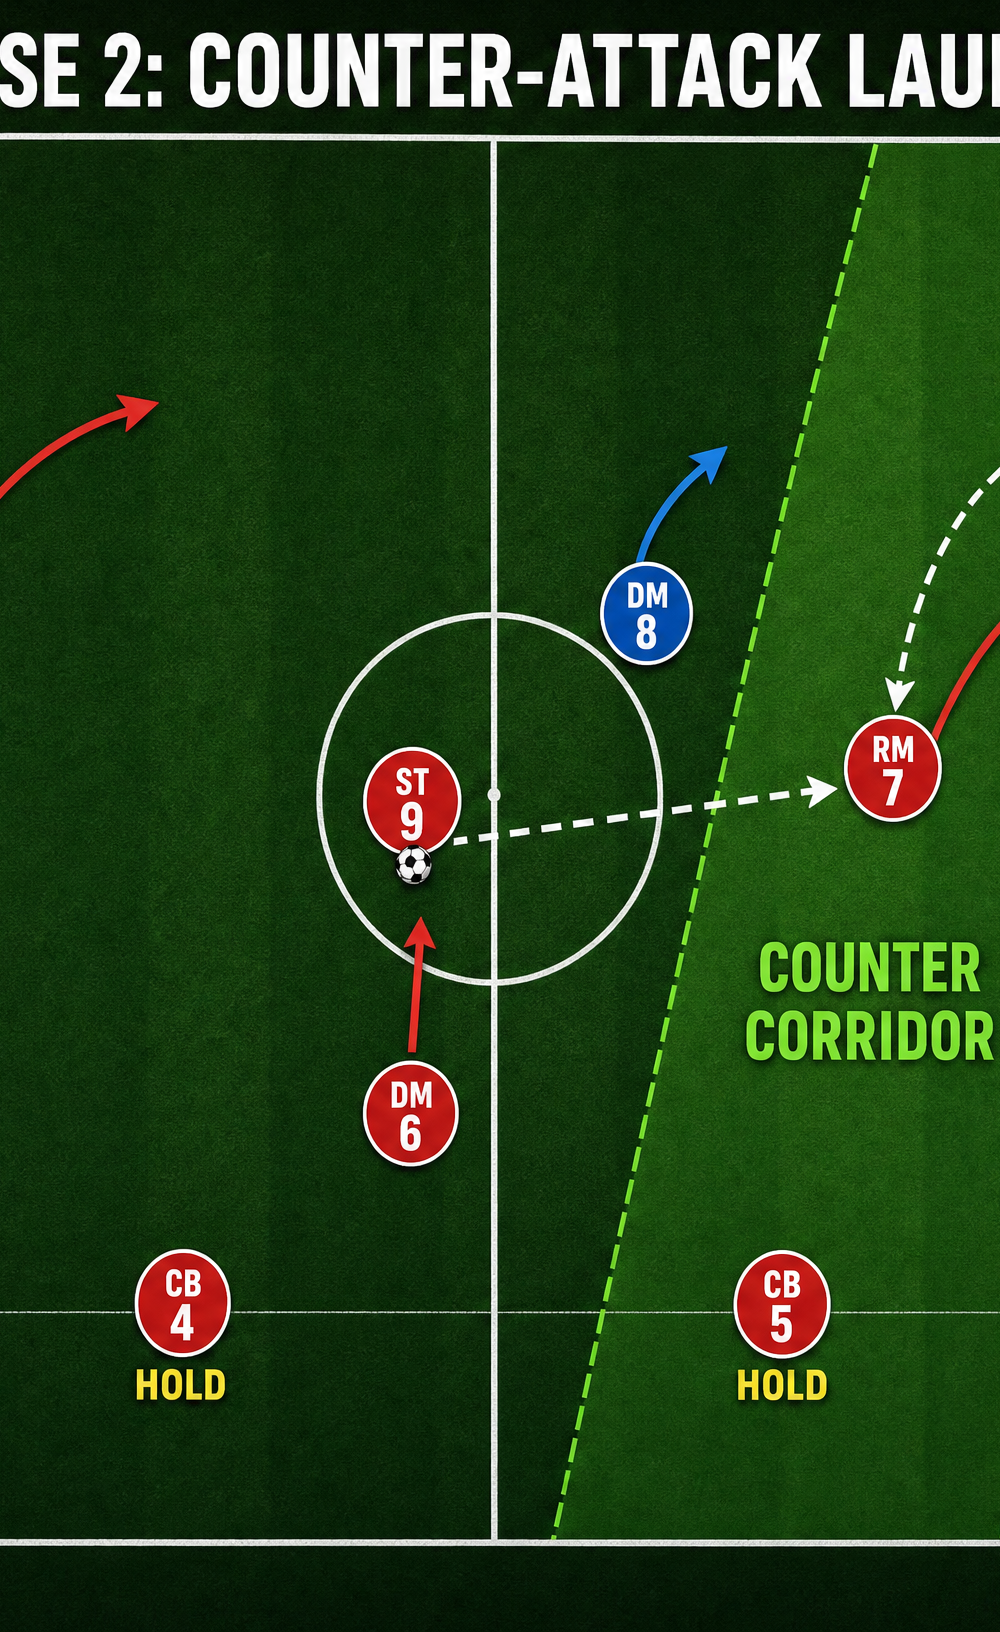
Phase 2: The Counter-Attack Launch
5. Upon ST 9 winning the ball or forcing a turnover to a teammate, the transition instantly begins.
6. First Action: The player who wins the ball must immediately look forward. If possible, play a first-time vertical pass into the space behind the recovering Blue defense.
7. Player Movement: LM 11 and RM 7 sprint diagonally into the wide channels (the 'Counter Corridors'). DM 6 pushes up to support the attack.
Phase 3: The Finish
8. The Red Team has a maximum of 8 seconds (or 3 passes) to get a shot on goal.
9. The Blue Team must immediately counter-press upon losing the ball, attempting to delay the Red Team or win it back.
10. CB 4 and CB 5 must push up to the edge of Zone B to compress the space and prevent a counter-counter-attack.
11. Reset the drill from the coach after a shot, a goal, or if the Blue Team regains possession for 5 seconds.
4. Key Coaching Points
- Recognize the Trigger: Defenders must act collectively. The press only works if everyone moves together when the trigger (poor touch, specific zone entry) occurs.
- First Pass Forward: The immediate instinct upon winning the ball must be vertical. A negative or square first pass allows the opposition to recover their defensive shape.
- Explosive Runs: Wide players (LM, RM) must break their necks to get forward into the channels, stretching the recovering defense and creating passing options.
- Rest Defense: Even while attacking, the CBs and DM must maintain a solid structure behind the ball to deal with potential turnovers.
- Clinical Execution: At high speeds, technique must remain sharp. Encourage taking shots early rather than over-passing in the penalty area.
5. Common Mistakes
- Passive Pressing: Waiting for the opponent to make a mistake rather than actively forcing it in the trap zone.
- Looking Backwards: Winning the ball and playing back to the CBs, completely killing the momentum of the counter-attack.
- Straight Runs: Attackers running in straight lines rather than diagonal runs, making them easier to track and narrowing the passing angles.
- Lack of Support: The ball carrier becoming isolated because teammates are slow to transition from defense to attack.
6. Variations & Progressions
- Progression 1 (Time Limit): Reduce the attacking time limit from 8 seconds to 5 seconds to force quicker decision-making and more direct play.
- Progression 2 (Overload): Add an extra recovering defender for the Blue Team to make the final third penetration more challenging.
- Variation 1 (Wide Trap): Adjust the starting positions to force the Blue Team wide, setting the pressing trap near the touchline rather than centrally.
7. Age Adaptations
- Under 10 - Under 12: Remove the time limit. Focus purely on the concept of 'win the ball and go forward immediately'. Use a smaller pitch (40m x 30m) and fewer players (e.g., 4v3).
- Under 14 - Under 16: Introduce the strict time limits (8 seconds). Emphasize the quality of the first pass and the specific diagonal runs of the wide players.
- Open/Senior: Run at full match intensity. Demand perfection in the pressing triggers and clinical finishing. Add complex constraints like requiring a one-touch finish.