

Netball
Goal Circle Shooting Accuracy: Four-Zone Finish Under Pressure
A 20-minute goal-circle progression that moves shooters from controlled accuracy work to decisive, legal finishes under live Goal Keeper pressure.
What you need
2 netballs, 4 flat markers or low-profile cones, 5 positional bibs: GS, GA, WA, C and GK, Goal post and ring, Timer or whistle, Optional scorecard and pen
Overview
Goal Circle Shooting Accuracy: Four-Zone Finish Under Pressure gives coaches a clear 20-minute progression for turning clean feeds into high-percentage shots. The drill starts with repeatable technique from four locations, adds a purposeful V-cut to create shooting space, and finishes with a legally controlled Goal Keeper contest. It is particularly useful after a footwork-and-feeding warm-up, or when a side is creating circle entries but not converting them.
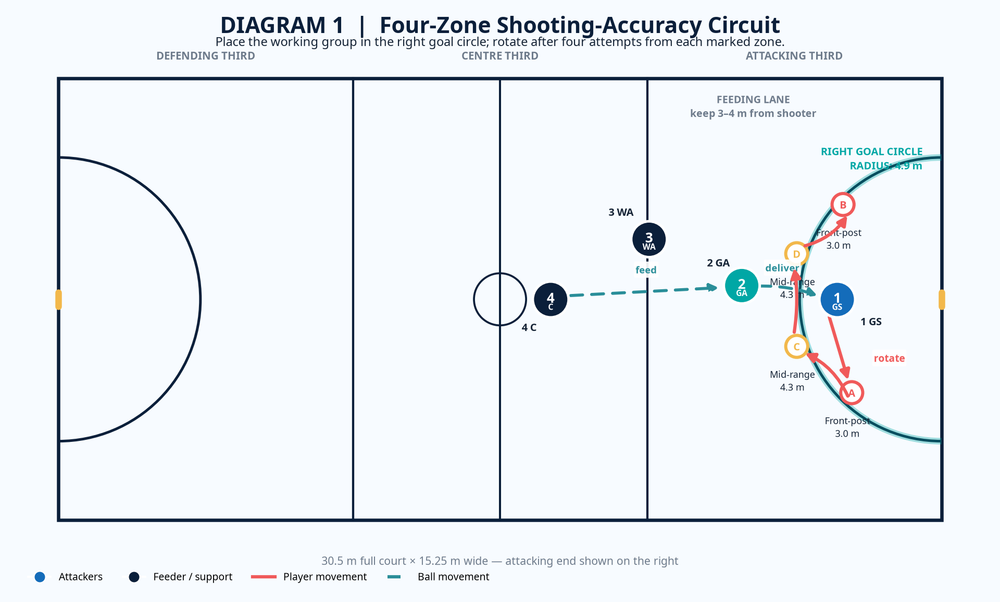
The court in the diagrams is regulation size—30.5 m long by 15.25 m wide—and the working area is the attacking goal circle, which has a 4.9 m radius from the midpoint of the goal line.1 The numbered roles used throughout are 1 GS, 2 GA, 3 WA, 4 C, and 5 GK. Rotate players through the shooting roles regularly; the best value comes when GA and GS both learn to finish from front-post and mid-range angles.
Setup
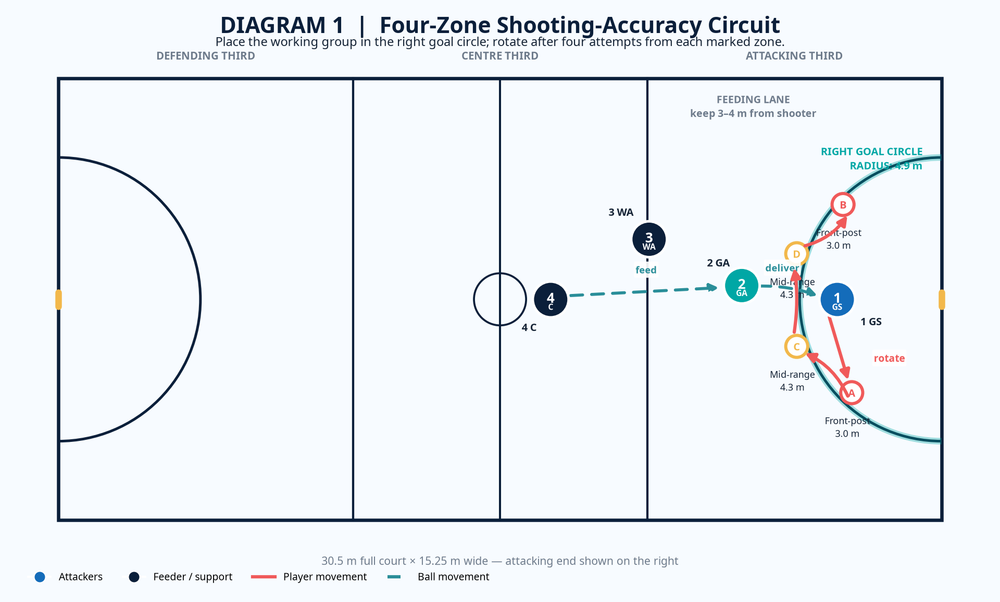
Use one end of a full court and establish four flat-marker shooting zones inside the right goal circle: front-post left and right at approximately 3.0 m from the post, plus mid-range left and right at approximately 4.3 m. Place WA 3–4 m outside the circle edge as the primary feeder, with C available in the attacking-third channel as a second feeder. Begin with 5 players; use a sixth player as a rebounder or ball returner if numbers allow.
| Item | Coaching specification |
|---|---|
| Duration | 20 minutes: 6-minute accuracy circuit, 7-minute V-cut phase, 7-minute pressure phase |
| Equipment | 2 netballs, 4 flat markers, 5 positional bibs, timer/whistle, optional scorecard |
| Court use | Right attacking third; keep non-working players outside the court surround |
| Scoring target | Track makes/attempts by zone; aim for a 70% clean-conversion standard before adding live pressure |
Before starting, brief the group on the outcome: catch high, land balanced, eyes to ring, release tall. Keep balls moving. The coach should stand just outside the goal line where they can see the shooter’s feet, the line of the ball, and the defender’s distance.
Step-by-Step Instructions
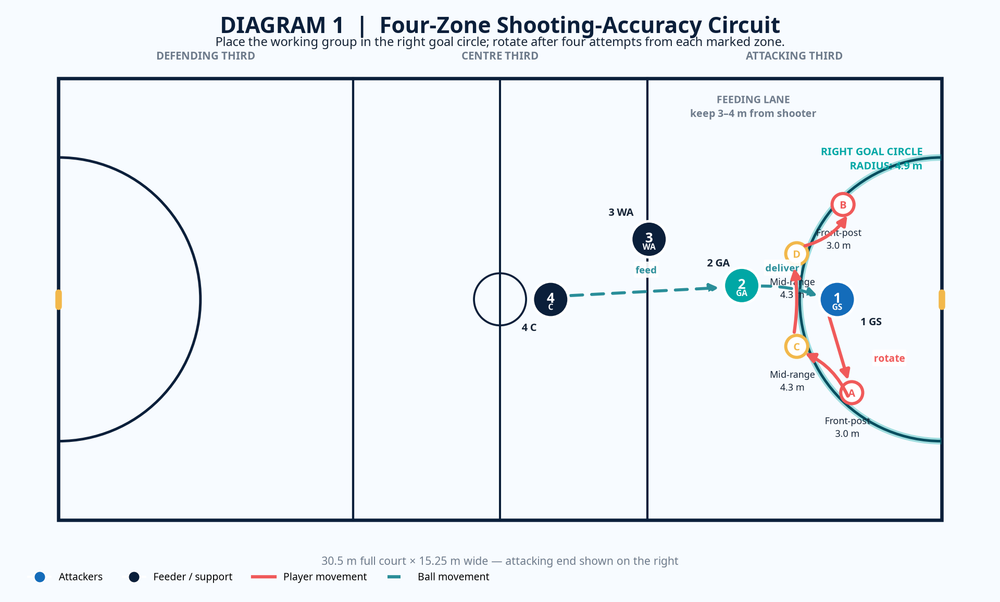
Set the four-zone circuit. Position 1 GS at Zone A, 2 GA at Zone B, 3 WA as the feeder, and 4 C as the reset option. WA begins with a ball; C holds the second ball only when coach wants a quicker turnover. GK is initially off court or collecting rebounds.
Run the baseline shot. WA feeds to GS at the nominated marker. GS catches the ball above chest height, lands under control, turns to the post, and shoots within three seconds. GA holds a separate zone to avoid crowding the landing space.
Score and rotate. Award one point for a goal and one technical point when the shooter meets the agreed cue—balanced landing, early eyes to ring, or high follow-through. After every shot, the shooter returns the ball to WA or C and moves clockwise to the next marker. Complete four attempts per zone, then swap GS and GA.
Coach the feed, not only the finish. WA must deliver the ball to the shooter’s outside shoulder, not behind the body. C works in the channel as a clear reset; insist that feeds arrive before the shooter becomes stationary and easy to mark.
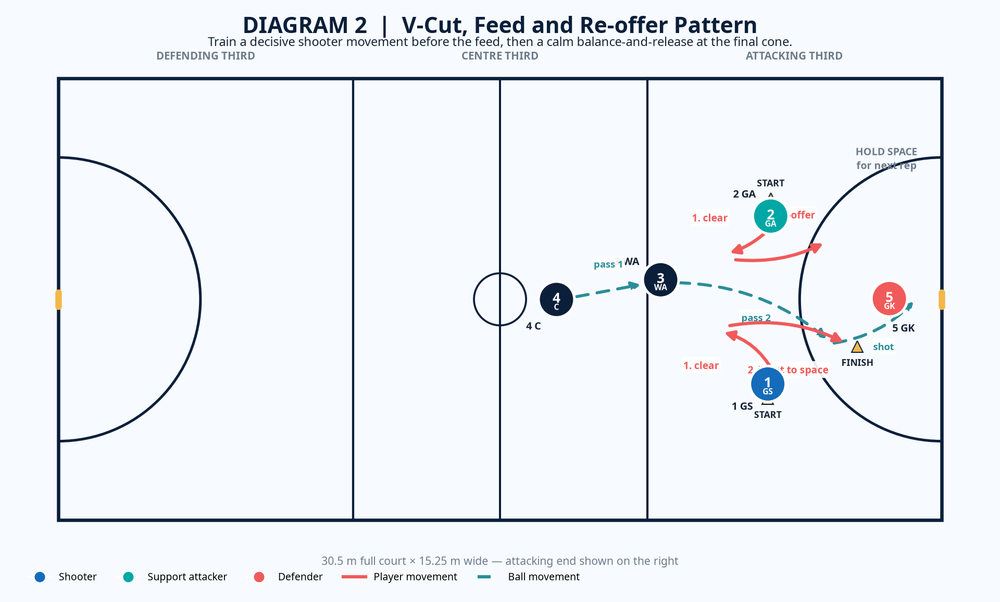
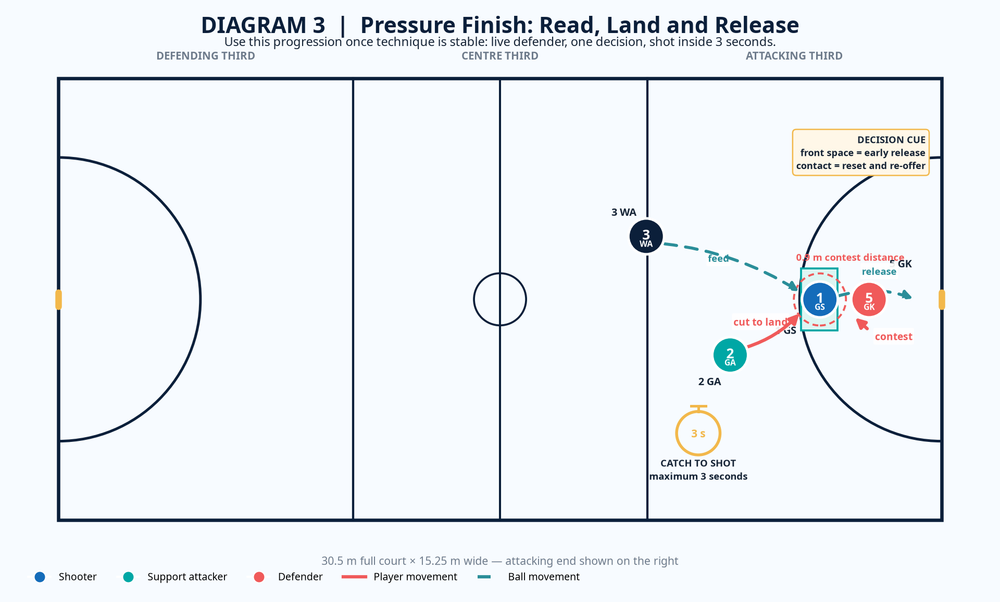
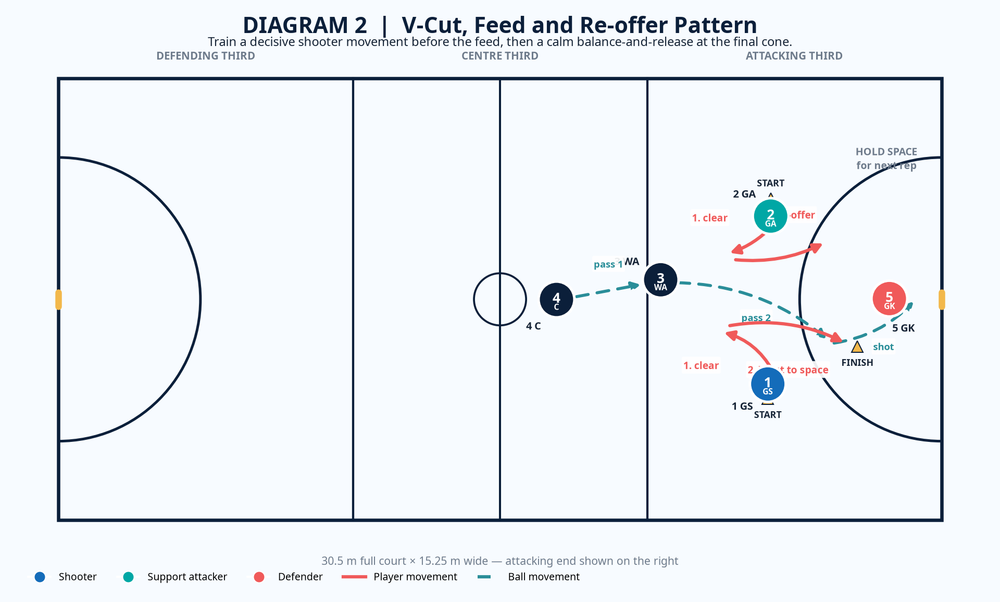
Add the V-cut. GS or GA begins 1.5–2.0 m deeper than their desired shooting spot. On the feeder’s call, the shooter drives away from the post for two sharp steps, plants, then cuts back into the free front-space lane. The feeder holds the ball until the cut has created separation.
Demand a shot-ready landing. Feed the ball slightly in front of the cutter. The shooter catches on the outside foot where possible, brings the second foot down to establish a stable base, and pivots smoothly to face the ring. Run 6 reps each, then swap shooter and feeder. If the cut is late, abort the feed and replay rather than rewarding a crowded catch.
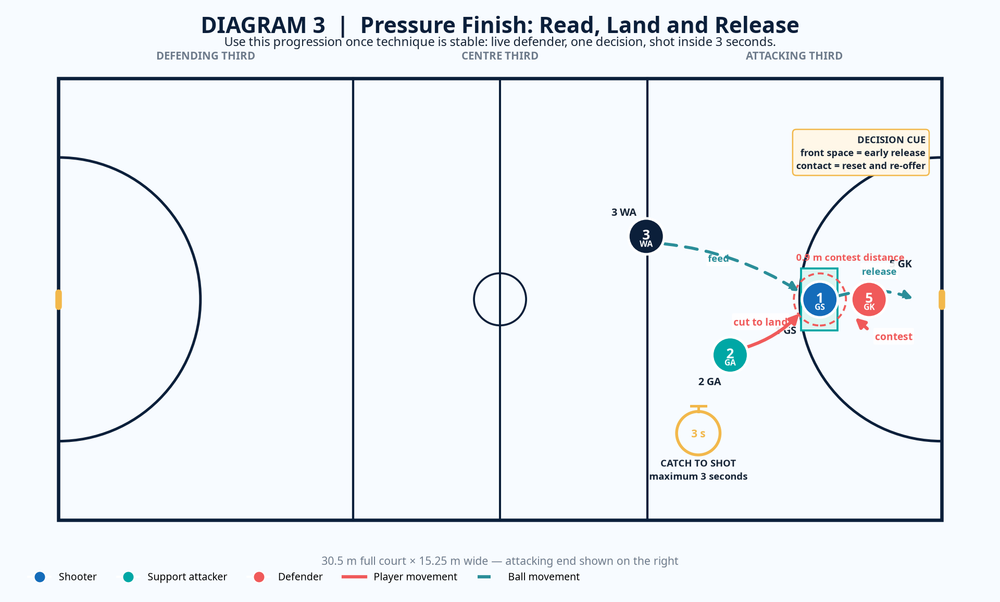
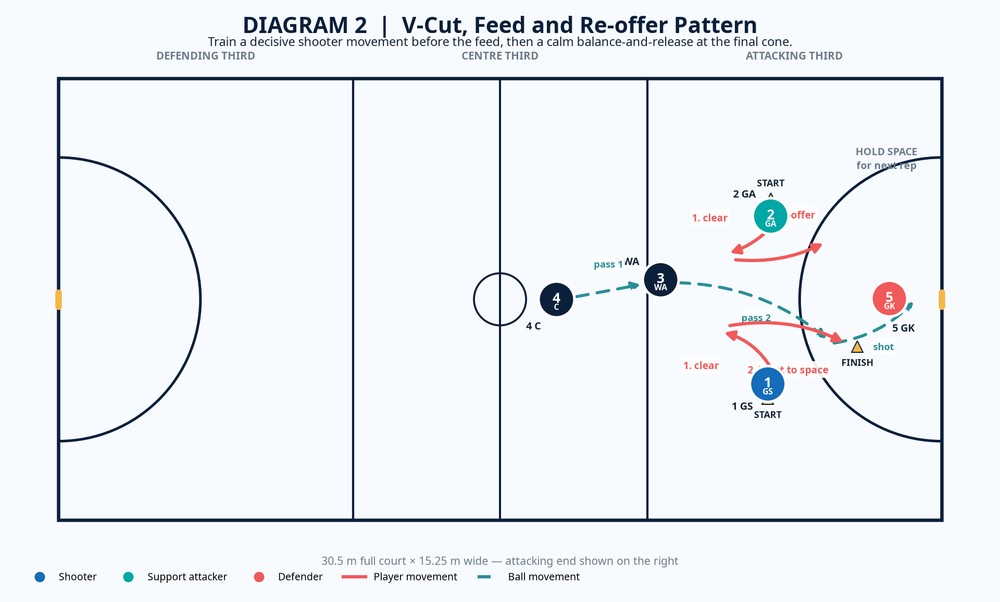
Introduce pressure progressively. Position 5 GK at the 0.9 m contest line once the shooter is grounded and stable. In official play, a defender contesting a player in possession must remain 0.9 m from the nearer foot; coach this phase with legal distance and no body contact.1 The shooter reads the arms: visible front space means shoot early; a blocked line means reset, re-offer, and take the next quality shot.
Finish with competition. Give each shooting pair 90 seconds. A goal under pressure is worth two points; a technical miss such as a rushed or off-balance release scores zero even if it goes in. The winning pair is the group with the best combined score and conversion percentage, not simply the most attempts.
Key Coaching Points
Land before you load. The shooter’s first task is to own a stable base. Look for knees softly flexed, hips square enough to transfer power, and feet set before the ball rises. A shooter who releases while still turning will be inconsistent even from close range.
Make the eyes beat the defender. The catch should trigger an immediate visual lock on the back of the ring. Do not let players watch their pass into the hands and then search for the post. The earlier the target is found, the calmer and higher the release becomes.
Keep the ball in a strong shooting channel. Absorb the pass high; avoid dropping it to the waist. The ball should travel in one continuous upward path from catch to set point to release. This protects it from the contest and preserves rhythm.
Generate power from the floor. Coach a coordinated knee-and-ankle drive, full arm extension, and relaxed wrist flick. When a ball falls short or is flat, correct the lower-body contribution before telling the player simply to throw harder.
Create and keep front space. In the V-cut phase, the drive away from the post must be convincing. The return cut is explosive into space, then controlled at the landing. Feeders must wait for the separation rather than passing to a shooter who is still moving toward pressure.
Common Mistakes
| Error to identify | Fast coaching correction |
|---|---|
| Shooter rushes on the catch and fires while rotating | Pause the rep; rehearse “catch, land tall, eyes, shoot” at half-speed, then return to live pace. |
| Ball drops to the waist before release | Ask the shooter to “catch high and keep the ball above the badge”; use a passive hand as a visual contest. |
| V-cut is rounded or too slow | Put a cone at the exit point and require two sharp acceleration steps away before the return cut. |
| Feeder delivers behind the shooter | Move WA one metre wider and demand an outside-shoulder lead pass into the free lane. |
| GK crowds or contacts the shooter | Reset the defender at the 0.9 m marker; emphasise legal hands-over pressure rather than collision. |
Variations & Progressions
For an easier version, move the four markers to 1.5 m and 2.5 m, remove GK, and allow the shooter one preparatory pivot after receiving. Keep the same scoring system so players learn that balanced technique matters before distance.
For a harder movement version, make WA and C complete a two-pass entry before the final feed. GS and GA must communicate which front-post lane is open, and the final receiver shoots within three seconds. This forces the group to maintain circle spacing while the ball is live.
For a competitive pressure version, use a trailing GK or GD who tracks the V-cut but must recover legally to contest. Award a bonus point only when the shooter chooses the correct response: early release to front space, or reset and re-offer when the contest is established.
Age Adaptations
For under-8, work only from 1.5–2.0 m with soft, accurate feeds. Use 30–45 second turns, no live defender, and celebrate a balanced landing and confident release rather than a score outcome. Keep instructions to one cue at a time.
For under-10 and under-12, use 2.0 m and 3.0 m zones and introduce the V-cut without a defender. Give each shooter a personal target such as 6 goals from 10 after first rehearsing the movement unopposed. Use a passive coach-held hand as the visual prompt for a higher release.
For under-14 and under-16, retain the 3.0 m and 4.3 m zones, enforce the three-second possession rule, and introduce GK pressure at legal distance. Track each player’s result by zone so the next session can target their weaker side.
For open players, compress the decision window with the live trailing-defender progression, randomise the feeder’s entry angle, and require the shooter to call either “front” or “reset” before the ball arrives. This makes the drill a tactical finishing exercise, not simply a shooting line.
