Netball
Circle Edge Rotation: A Timed GA–GS Finish for the Attacking Third
Teach a clean, timed circle-edge rotation that clears the Goal Attack, releases the Goal Shooter’s front cut, and creates a high-percentage shot before the defence can reset.
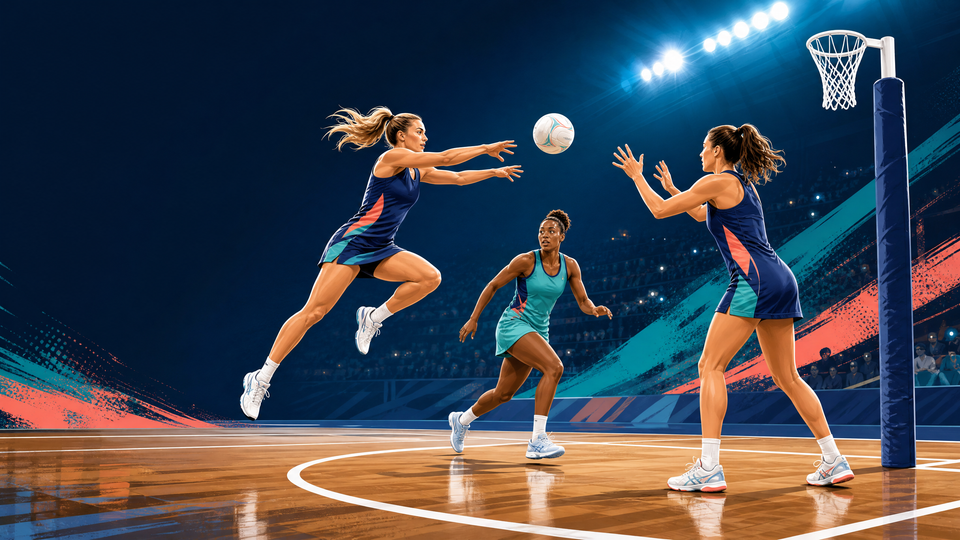
What you need
1–2 Netballs, 6 bibs: C, WA, GA, GS, GD and GK, 4 flat cones, full Netball court or accurately marked attacking third, whistle and timer
Overview
The Circle Edge Rotation is a four-attacker set play for a compact goal-circle defence. GA (3) clears first from the ball-side edge; GS (4) replaces that space on a delayed cue. The first movement shifts GD, then exposes the GA-to-GS channel.
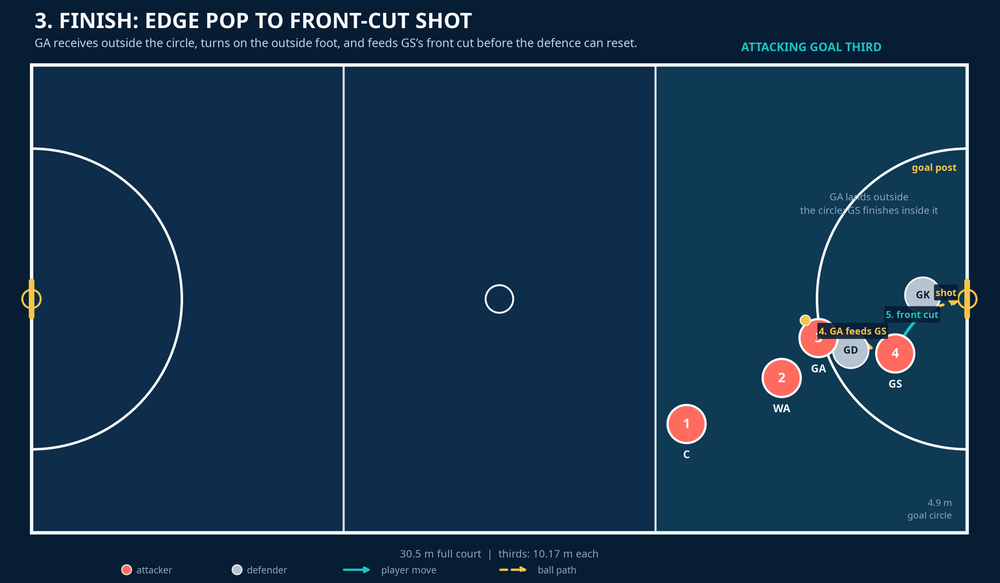
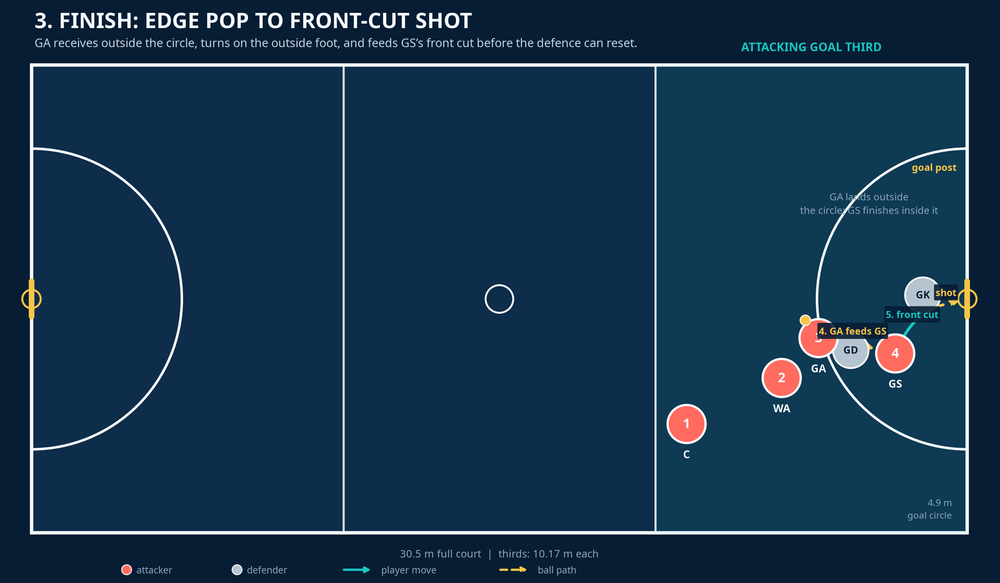
Use it after a settled centre-pass transition, a secure turnover, or a comfortable WA reception in the goal third. It is especially useful when GK sits under the post and GD denies GA’s first lead. The diagrams start on the right-hand edge; mirror the pattern to the left. The court is 30.5 m by 15.25 m, with equal thirds of about 10.17 m and 4.9 m-radius goal circles. GA catches outside the arc and GS finishes inside it.1
Play identity: clear the edge, replace it late, then feed the front cut. Do not coach this as three players moving at once; it is a timed sequence.
Setup
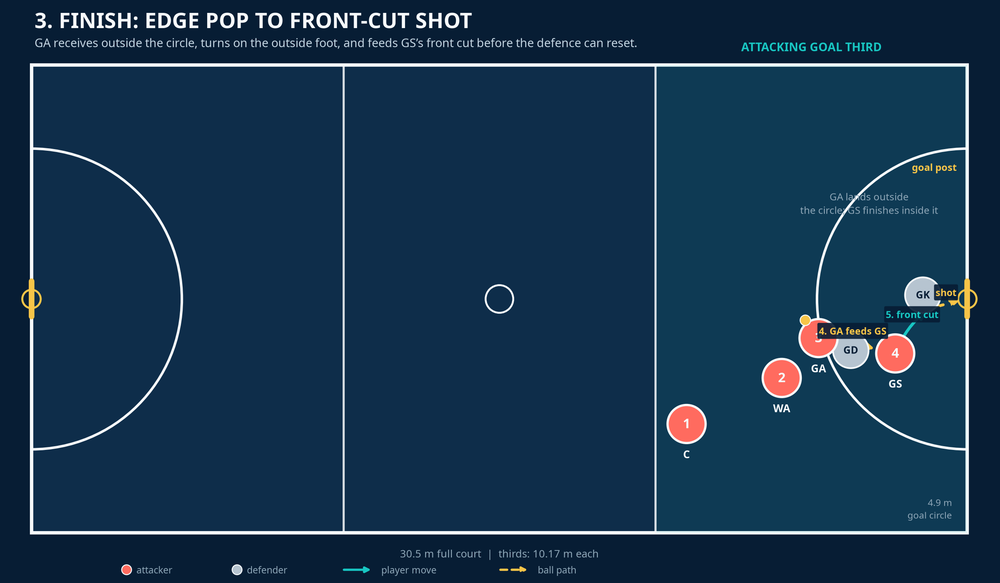
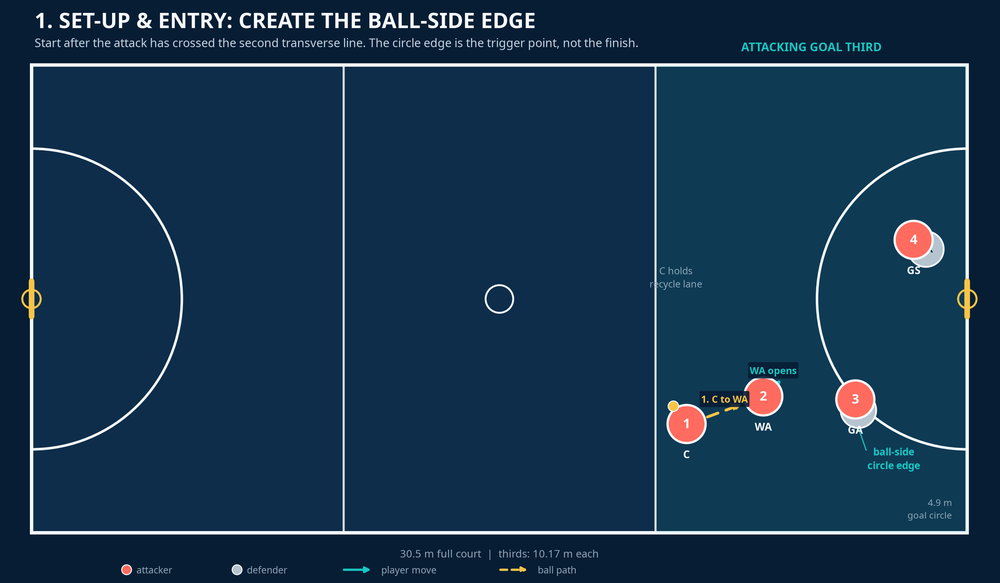
Set the play in one attacking third of a full court. Begin with C (1), WA (2), GA (3), GS (4), GD and GK, plus a feeder/coach if you are introducing it without pressure. Place a flat cone at the ball-side circle edge and a second cone 3 m up the arc to give GA a visible clearing target. One ball is enough for technical work; have two balls ready only when repetitions are moving quickly.
| Player | Starting point and job | Coaching distance/cue |
|---|---|---|
| C (1) | 1–2 m into the goal third and 1 m inside the ball-side sideline, holding the ball. | Maintain a recycle lane behind WA; do not drift into the first pass. |
| WA (2) | 2.5–3 m ahead of C, outside the circle and facing the sideline. | Present hands early, land balanced, and receive at chest height. |
| GA (3) | On the ball-side circle edge, with both feet clearly outside the arc. | Clear 3 m up the arc on WA’s catch, then show back to the ball. |
| GS (4) | 1.5–2 m from the post, slightly away from the ball-side shoulder of GK. | Stay still until GA has taken the second clearing step. |
| GD/GK | Start at realistic marking distance: GD on GA’s outside shoulder; GK goal-side of GS. | Begin passive, then move to live pressure once timing is reliable. |
Use the diagram legend and begin at approximately 50% defensive pressure so players can learn the picture before working at game speed.
Step-by-Step Instructions
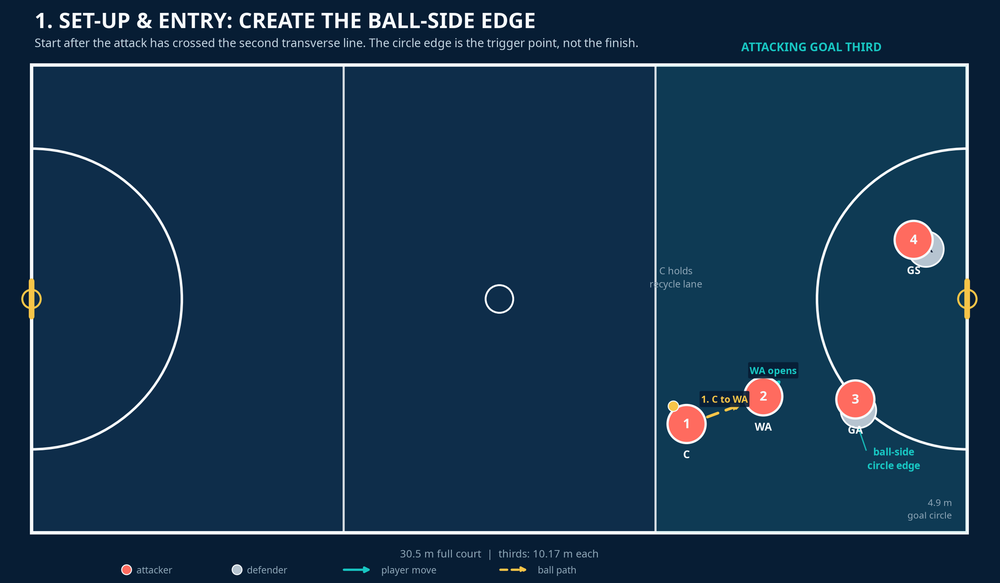
C (1) sets the entry. C shows briefly to GA, then chest-passes to WA’s outside shoulder in under one second. A floating pass gives GD time to front the next option.
WA (2) lands and stabilises. WA catches outside the circle with a low, balanced base, looks into the circle, and holds the defence for one count: “catch—see—go.”
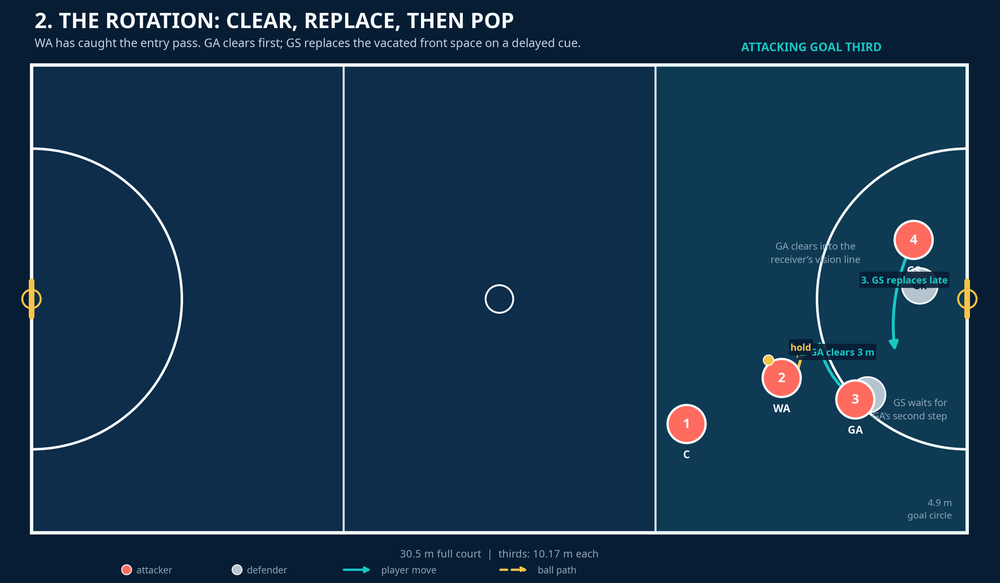
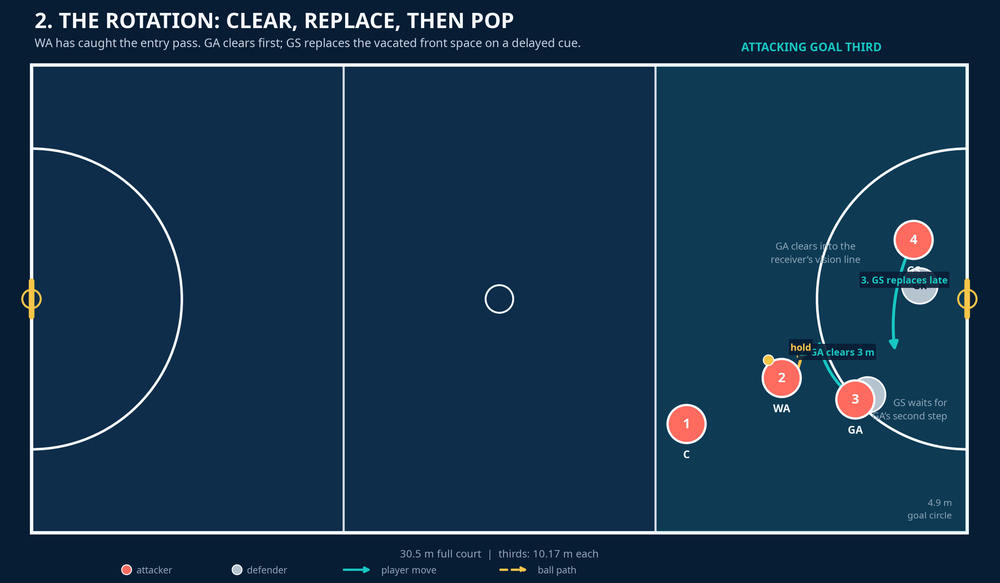
GA (3) starts the clear. On WA’s catch, GA drives 3 m up the circle edge. She sells the first two strides with purposeful hips and eyes away from the ball.
GS (4) waits, then replaces. GS does not leave on GA’s first step. On GA’s second step, GS pops 2–2.5 m towards the space GA has vacated, showing chest and hands to WA. This delay is the play’s trigger. If GS moves early, GK and GD can switch without being stretched.
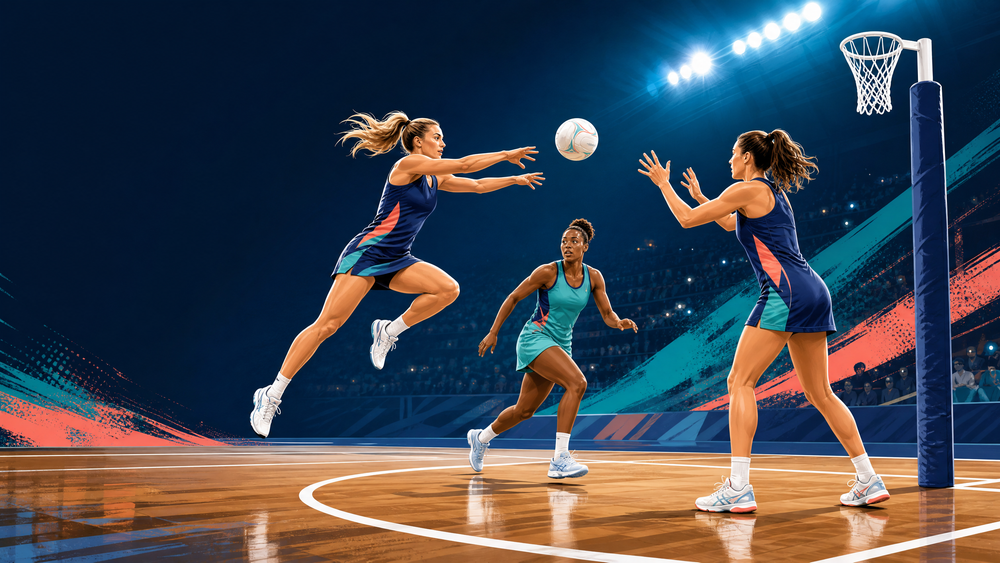
WA holds, then pops to GA. WA feeds GA as she turns back outside the circle. Feed GA’s outside hand so she can land on the outside foot and pivot. If the pop is denied, recycle immediately to C; do not force a contested lob.
GA (3) turns and feeds. GA catches outside the circle, pivots to the post, and reads GK. If GK has stepped up, GA releases a flat shoulder-height pass into GS’s front-cut space within one second.
GS (4) converts. As GA receives, GS cuts across GK’s front shoulder and drives 1.5–2 m to the post. GS takes the ball inside the circle, turns with balance, and shoots within two seconds of GA’s catch.
Build the second phase. C trails 3–4 m behind WA. If the front cut is covered, GA returns the ball to WA or C and GS re-establishes post position.
Key Coaching Points
- Coach the sequence, not just the routes. The audible cue is “GA clear—GS replace.” GA must own the first movement and GS must respond, not anticipate.
- Protect GA’s landing and pivot. GA catches outside the circle with the outside foot ready to turn. A square catch makes the final feed slow and exposes the ball to GD.
- Demand purposeful changes of pace. The initial GA clear and GS front cut should both be sharp accelerations after a controlled set-up, not a constant run.
- Pass to the receiver’s next action. WA feeds GA’s outside hand; GA feeds into the space where GS is cutting. The ball should make the next decision easier.
- Keep width around the circle. WA remains outside the arc and C stays behind the ball. Crowding the same 3 m lane is the quickest way to close your own passing window.
- Teach the reset as a win. A safe recycle after a denied pop is good decision-making. The group should never confuse “running the set” with forcing the final pass.
Common Mistakes
| Error to watch | What it causes | Immediate correction |
|---|---|---|
| GS leaves before GA clears. | GK and GD can switch or squeeze the same lane. | Freeze the group; make GS call “second step” before moving. |
| GA drifts instead of clearing hard. | GD stays square and the pop is still marked. | Add the 3 m cone and score each clear that reaches it at speed. |
| WA releases a high, slow pass. | GD intercepts or GA catches with no pivot option. | Use a shoulder-height, direct feed to GA’s outside hand. |
| GA catches inside the goal circle. | The GA cannot shoot and may be trapped with no clean feed. | Mark the circle edge with a cone and rehearse GA’s outside-foot landing. |
| GS runs straight at the post. | GK holds goal-side position and removes the front feed. | Rehearse the cross-body front cut across GK’s shoulder, then bend to the post. |
Variations & Progressions
| Version | How to run it | What it develops |
|---|---|---|
| No-defender learning phase | Use C, WA, GA and GS only. Pause at every catch and verbally check the next cue. | Shape, terminology, and correct starting distances. |
| Guided defender phase | Add GD and GK at 50% pressure. They may track but cannot intercept the first four repetitions. | Timing against moving bodies without fear of failure. |
| Live decision phase | GD and GK defend live. Allow C a reset pass; score one point for a shot within two seconds of GA’s catch and two points if it is a front-cut finish. | Scanning, decision-making, and execution under game pressure. |
For an advanced variation, have C call “hold” just before WA’s catch. GA clears as normal, but GS stays post-side and GA resets safely to C, countering an early defensive switch.
Age Adaptations
For Under 8–Under 10, remove live defenders, work on half a goal third, shorten GA’s clear to 2 m, and use “GA out, GS in.” Reward balance before goals.
For Under 12–Under 14, use the full goal third with one active defender. Teach the three-count rhythm—WA catches, GA clears, GS replaces—and allow an automatic recycle to C.
For Under 16 and open teams, demand live GD/GK pressure and time the GA-to-GS finish. If GK steps to the ball, go front cut; if GK stays under the post, reset and re-attack.
Coach’s 30-Minute Installation
Run 6 minutes without defenders, 8 minutes with guided defenders, 10 minutes live, and 6 minutes in a conditioned 4 v 2 circle game. Finish by asking each unit to state the trigger and the reset aloud. If players can name the cue—“GA second step, GS goes”—they are far more likely to reproduce the play under pressure.
References